Work Calendars
Overview
The system presents a practical feature that allows you to align your Timers with your organization's work calendar. This functionality
empowers you to set timers in accordance with specific workdays and holidays, breaks and operational hours, eliminating the need for generic
time settings. By defining working and non-working days, specifying daily active hours, and configuring unique work hours for different
days, you gain precise control over your work process.
One of the practical advantages of utilizing a work calendar is the ability to align timers with specific work scenarios. For instance, the system allows activating your timer to begin required action or event during operational hours. By configuring the work calendar, you can ensure that the timer starts on a designated workday and within the specified hours. This prevents any unnecessary timer activation during non-operational periods.
Therefore, setting up your work calendar is a strategic approach enhances efficiency, minimizes resource wastage, and optimizes your process execution, ultimately contributing to a more streamlined and productive operational environment.
Work Calendar Configuration
To set up a new work calendar, it is necessary to create a corresponding Calendar Class instance. Once created, it is required to configure this class and add it to Runtime in order to start working with the calendar.
Create and configure the Calendar Class as follows:
// December 31, 2022 will be a holiday
var holiday = MonthDay.Create(2022, Months.December, 31);

// On december 30, 2022, the workday will begin at 10 a.m. and last four hours
var workdaySettings = Workday.Create(
    MonthDay.Create(2023, Months.December, 30),
    TimeSpan.FromHours(10),
    TimeSpan.FromHours(4));

var year2023 = Year.Create(2023).SetHolidays(holiday)
    .SetWorkdays(workdaySettings);

// You can also use the shorthand notation
var year2024 = Year.Create(2024)
    .SetHoliday(Months.January, 1)
    .SetHoliday(Months.December, 31)
    .SetWorkday(Months.December, 30, TimeSpan.FromHours(10), TimeSpan.FromHours(4));

var calendar = Calendar.Create("MyCalendar")
    .SetWeekends(DayOfWeek.Saturday, DayOfWeek.Sunday)
    .SetWorkingHours(TimeSpan.FromHours(8))
    .SetStartOfWork(TimeSpan.FromHours(10))
    .SetYears(year2023, year2024);

runtime.WithCalendars(calendar);
runtime.SetDefaultCalendar(calendar.Name);
Using Calendars
Once a new calendar is created, you can start working with your calendar and configure it according to your required business needs. By default, it provides the following configuration:
- Saturday and Sunday are assigned as days off.
- Workdays commence at 10 AM and last for 8 hours.
- Holidays for 2023 and 2024 are specified
With the calendar in place, the system presents a convenient notation to enhance timer calculations. Namely, by appending the letter <w>
to your Timer Values, you can seamlessly calculate time in accordance with the established work calendar. For example, in case of
providing <2wd> date value (i.e., 2 workdays), the system will translate it to exactly 16 working hours, adeptly bypassing weekends,
holidays, and non-working hours.
Calendar Selection Priority
The system also provides the flexibility to deploy any number of calendars for various schemas and associated processes. These calendars can be designated at the process, schema, and Runtime stages. The hierarchy of priority begins with the process, then extends to the schema, and ultimately to Runtime.
During the timer execution, the process calendar will be undertaken by the system. If not specified, the system utilizes the schema calendar
and the default Runtime calendar. In case the default calendar is not assigned, the Timer proceeds as usual according to your provided
Values.
The following code is used to set up the calendar by default:
runtime.SetDefaultCalendar(calendarName1);
Consequently, you can pass the calendar to the constructor, thereby assigning a specific calendar to an individual process:
var createInstanceParameters = new CreateInstanceParams(schemeCode, processId) { CalendarName = "calendarName" }
await runtime.CreateInstanceAsync(createInstanceParameters);
Next, the calendar should be added to Runtime in order to use it within your schema:
var ITDepartmentCalendar = Calendar.Create("IT department calendar")
    .SetWeekends(DayOfWeek.Saturday, DayOfWeek.Sunday)
    .SetWorkingHours(TimeSpan.FromHours(8))
    .SetStartOfWork(TimeSpan.FromHours(10))
    .SetYears(Year.Create(2023)
        .SetHolidays(
            MonthDay.Create(2023, Months.January, 1),
            MonthDay.Create(2023, Months.January, 2))
        .SetWorkday(Months.December, 31,
            TimeSpan.FromHours(10), TimeSpan.FromHours(4)));

var SalesDepartmentCalendar = Calendar.Create("Sales department calendar")
    .SetWeekends(DayOfWeek.Saturday, DayOfWeek.Sunday)
    .SetWorkingHours(TimeSpan.FromHours(8))
    .SetStartOfWork(TimeSpan.FromHours(7))
    .SetYears(Year.Create(2023)
        .SetHoliday(Months.January, 1));

_runtime
    .WithBuilder(builder)
    .WithActionProvider(new ActionProvider(DataServiceProvider))
    .WithRuleProvider(new RuleProvider(DataServiceProvider))
    .WithDesignerAutocompleteProvider(new AutoCompleteProvider())
    .WithPersistenceProvider(provider)
    .SwitchAutoUpdateSchemeBeforeGetAvailableCommandsOn()
    .RegisterAssemblyForCodeActions(Assembly.GetExecutingAssembly())
    .WithPlugins(null, loopPlugin, filePlugin, approvalPlugin, basicPlugin)
    .WithExternalParametersProvider(externalParametersProvider)
    .CodeActionsDebugOn()
    .AsSingleServer()
    .WithCalendar(ITDepartmentCalendar, SalesDepartmentCalendar)
    .Start();
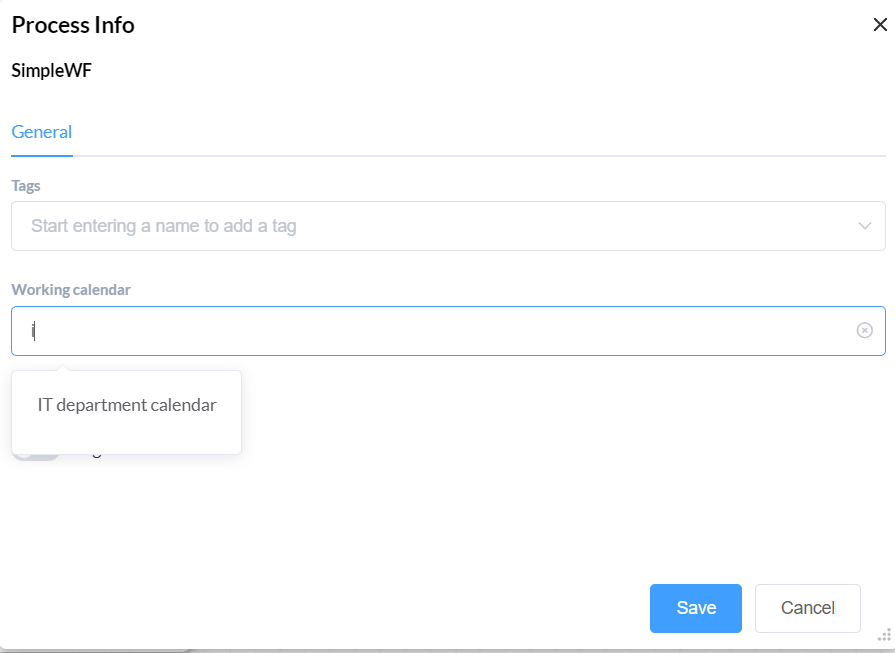
As a result, your required work calendar will be available within your Designer's schema. Click the Process Info button on the Toolbar
above your schema to access your calendar information.