Assignment Plugin
This plugin implements the basic functions for handling assignments. Assignments are an alternative way to interact with the process, by changing their statuses and other options. The assignments can be managed from both the designer and the document, regardless of the process state.
The AssignmentPlugin main actions, conditions, rules and API.
Installation and settings
Create a plugin object:
var assignmentPlugin = new AssignmentPlugin();
By default, the list of available statuses for each assignment contains the following four values: Created, In Progress, Completed and Declined, where Created is the default status. You can get these values using the AssignmentPlugin class:
// Created
string status1 = AssignmentPlugin.DefaultStatus;
// In Progress
string status2 = AssignmentPlugin.DefaultStartStatus;
// Completed
string status3 = AssignmentPlugin.DefaultFinishStatus;
// Declined
string status4 = AssignmentPlugin.DefaultDeclinedStatus;
// {"Created", "In Progress", "Completed", "Declined"}
List<string> statuses = AssignmentPlugin.GetStatuses();
To change the list of available statuses for each assignment, specify the list of statuses and the default values in the settings. In this case, the default status should be present in the list indicated by the first parameter.
assignmentPlugin.WithStatuses(
    new List<string>() { "Created", "Completed", "In Progress", "Expired" },
    "Created"
);
To inject custom logic, you can also specify other settings for handling assignments.
assignmentPlugin.OnDeadlineToCompleteAsync += CheckDeadlineToComplete;
assignmentPlugin.OnDeadlineToStartAsync += CheckDeadlineToStart;
Connect the plugin to WorkflowRuntime:
var runtime = new WorkflowRuntime();
...
runtime.WithPlugin(assignmentPlugin);
For the plugin to work correctly, you should add the following handlers:
runtime.GetUsersWithIdentitiesAsync += GetUsersWithIdentitiesAsync;
runtime.GetUserByIdentityAsync += GetUserById;
Read about Settings.
Assignment
Another name for assignments is a human tasks. Each assignment is uniquely identified by GUID Id. Each assigment must have AssignmentCode, Executor and a specified StatusState.
It should be noted that sometimes one process can have several assignments with the same AssignmentCode; it looks convenient for managing a group of assignments as a whole.
For details on the properties of an assignment, see the API.
Cases
AssignmentCreate
To create an assignment, use an action: AssignmentCreate from the Element panel.
When creating, you should specify Code, Name, and at least one Executor.
As an Executor, you can specify an actor; in this case, an independent assignment is created for each user belonging to the specified actor, and all of these assignments have the same AssignmentCode.
You can also specify a deadline for the start and the end of the assignment. The deadline is calculated when the process reaches the action itself. See below how deadlines are checked.
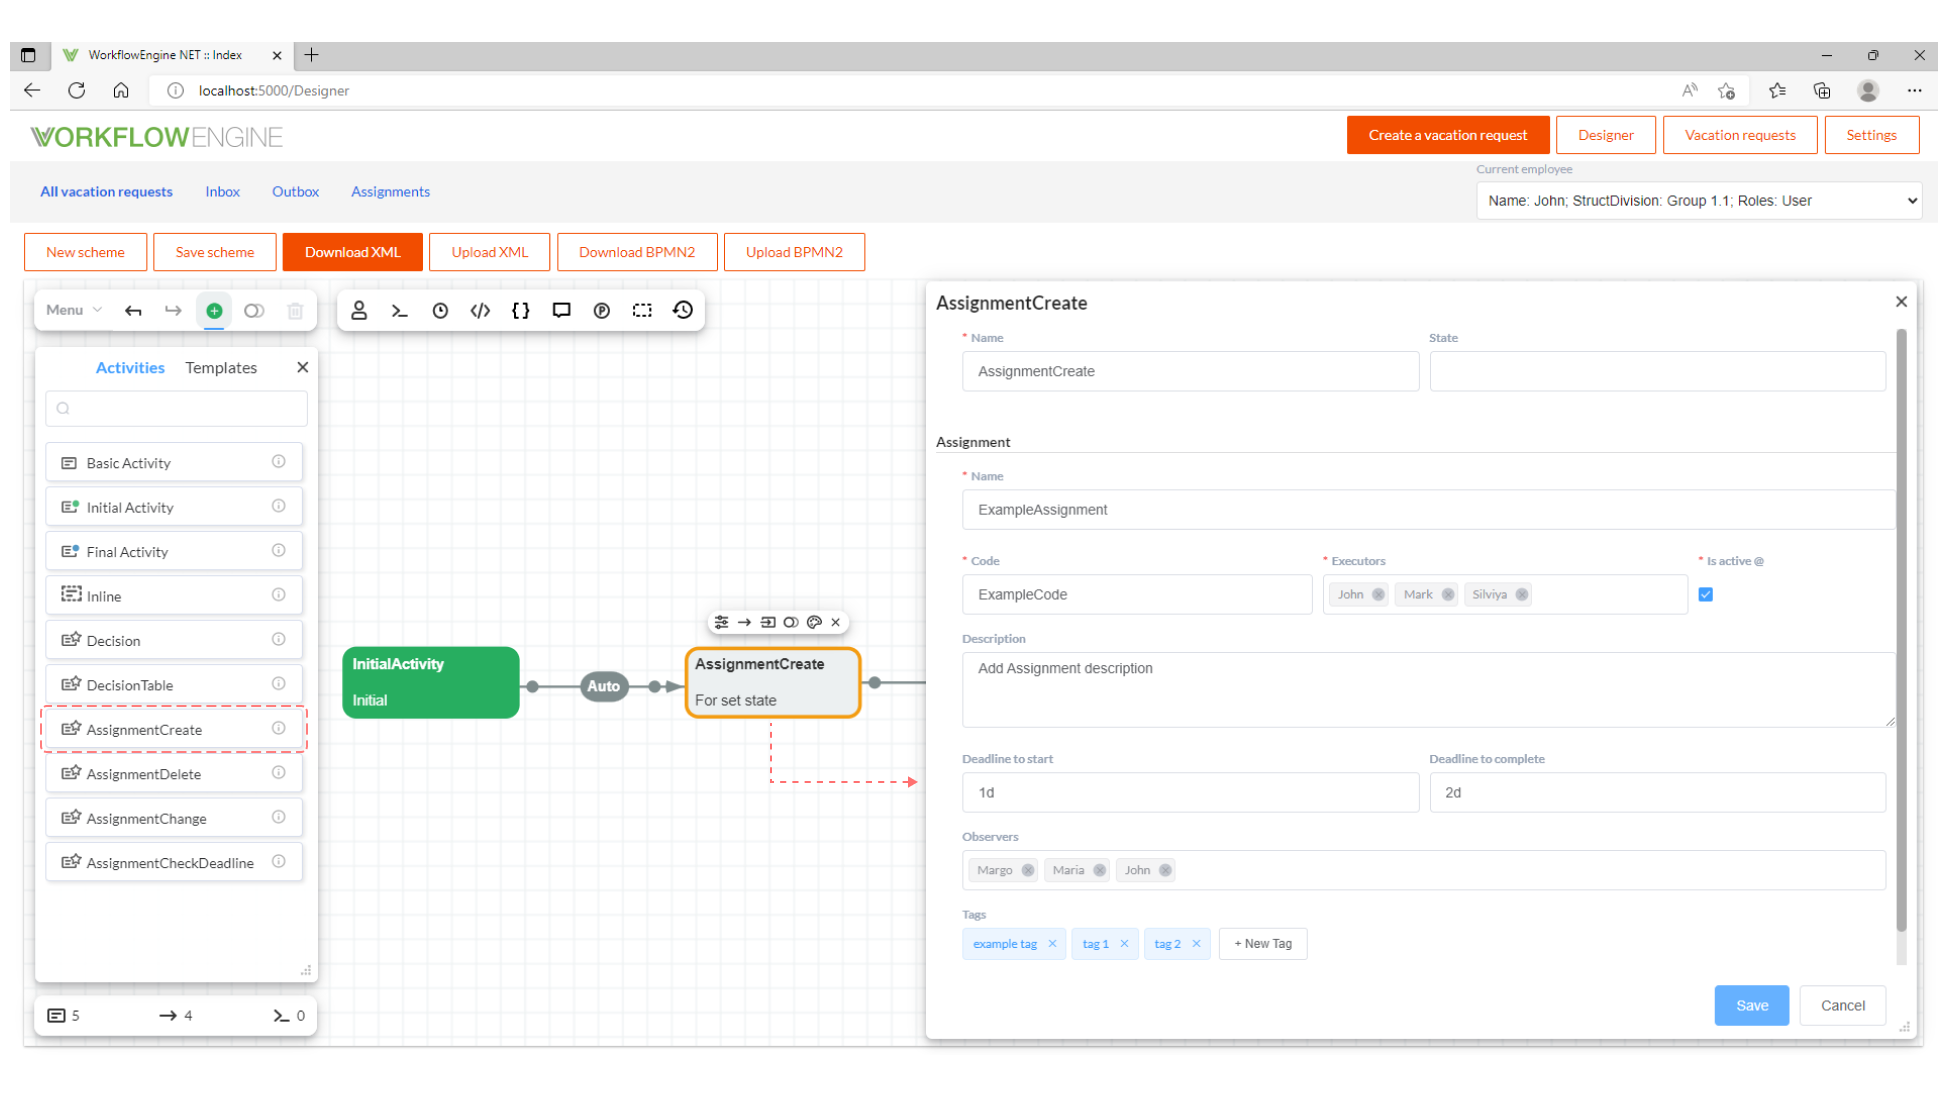
The Is active parameter is necessary when the process must fully control the assignment and check the external access to its changes. If not needed, this parameter can be ignored.
AssignmentChange
To change an assignment, use an action: AssignmentChange from Element panel.
When changing an assignment, you must specify the Code, the parameters to be changed, and their new values. Be careful: if the current process has several assignments with the same Code, all of them will be changed.
You might also change the executors of an assignment. For this purpose, you should select one of these values as the Old executor:
- All - all of the executors of the assignment with the Code specified.
- Specified actor, if several users belong to one actor, all of the executors who meet the condition will be changed.
- Specified user.
As a New executor, you should select a new user to replace the specified Old executor or a group of executors (if All or Specified actor are selected).
You can create several replacements, they will be executed in order, from top to bottom. If the specified old executor does not have a current assignment, then the replacement is skipped.

Each assignment, may also contain the data about the start date and the finish date of its execution. To change
the DateStart and DateFinish properties, you should implement the following event handler:
runtime.AssignmentApi.OnUpdateAssignment += OnUpdateAssignment;
This handler will be called on each update of the assignment; it is a convenient way to inject your own logic into management of assignments.
Handler syntax:
Assignment OnUpdateAssignment(Assignment newAssignment, Assignment oldAssignment)
{
    if (newAssignment.StatusState == AssignmentPlugin.DefaultStartStatus
        && oldAssignment.StatusState == AssignmentPlugin.DefaultStatus)
    {
        newAssignment.DateStart = DateTime.Now;
    }

    if (newAssignment.StatusState == AssignmentPlugin.DefaultCompletedStatus
        && oldAssignment.StatusState != AssignmentPlugin.DefaultCompletedStatus
        || newAssignment.StatusState == AssignmentPlugin.DefaultDeclinedStatus
        && oldAssignment.StatusState != AssignmentPlugin.DefaultDeclinedStatus)
    {
        newAssignment.DateFinish = DateTime.Now;
    }

    return newAssignment;
}
AssignmentDelete
To delete an assignment, use an action: AssignmentDelete from Element panel.
When deleting an assignment, you should specify the Assignment code and the method of deletion. If you select Is hard removal, then the assignment will be permanently deleted from the database, otherwise, the assignment will be marked as deleted (the property IsDeleted: true). After the secure deletion, the assignment becomes unavailable for changing from the process.
AssignmentCheckDeadlines
Use an action: AssignmentCheckDeadlines to compare the deadline with the current time.
You should fill out the following fields:
- Assignment code - if the field is left empty, then the deadlines will be checked for each assignment in each process.
- Check deadline condition - can take three values: Equal (accurate to the minute), Expired, and NotExpired.
- Deadline type - specifies, which deadline to check; can take three values: ToStart, ToComplete, and All (i.e., both deadlines).
When the plugin is connected, a system schema CheckDeadlines and a system process for checking all deadlines are created in the database. The schema is as follows:
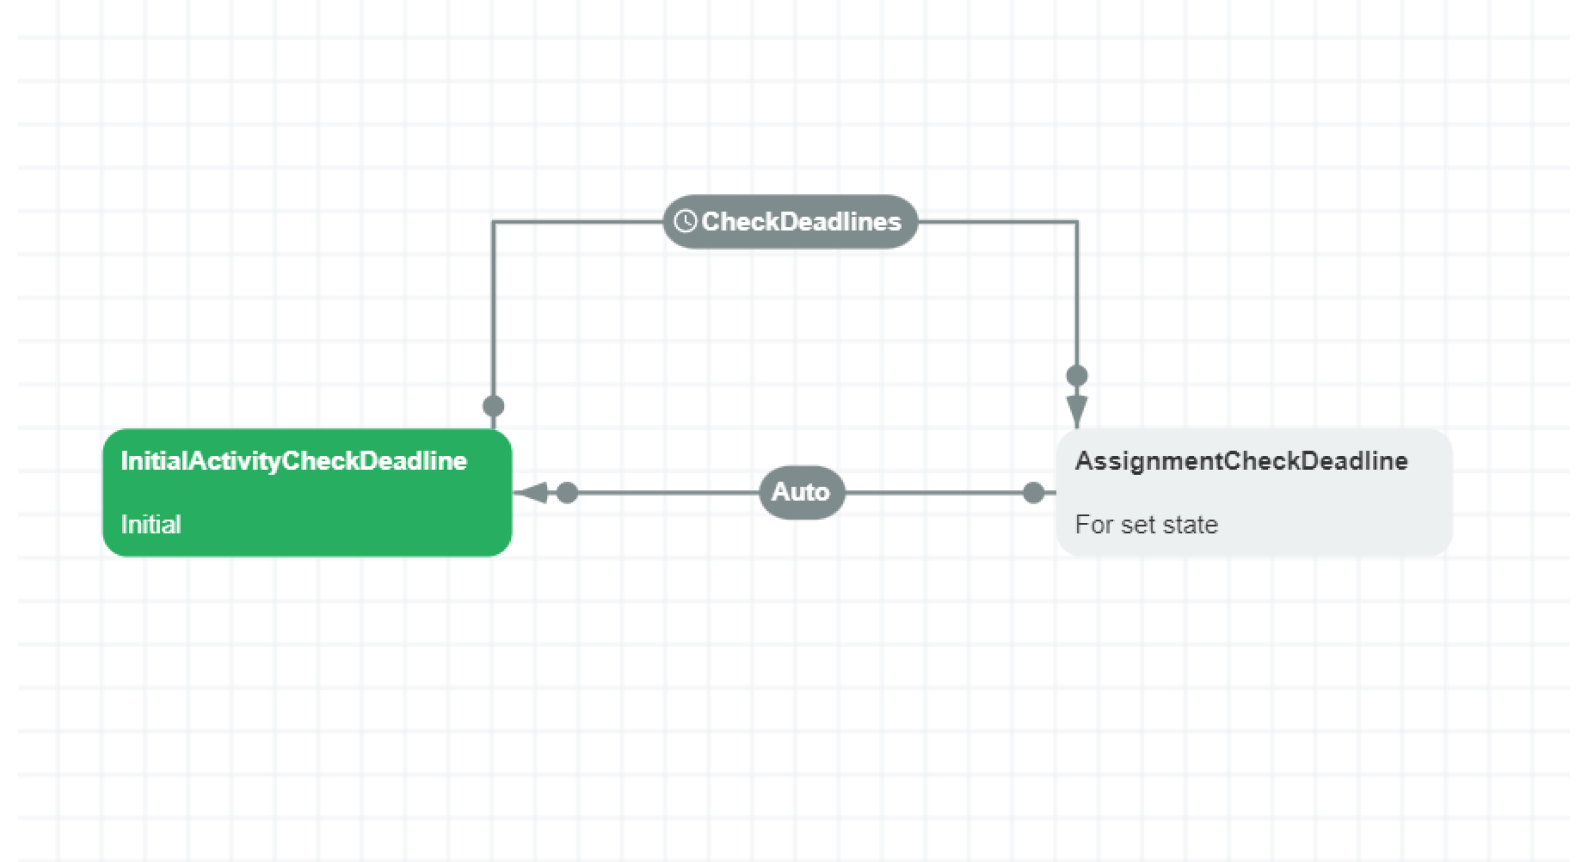
The schema contains the initial activity, transition with the timer at one-minute intervals, and the AssignmentCheckDeadline action with the following parameters:
- Assignment code: empty field
- Check deadline condition: Equal
- Deadline type: All
When the process reaches the current action, the OnDeadlineToStartAsync and * OnDeadlineToCompleteAsync* events are triggered, and you can handle them.
Handler syntax:
async Task CheckDeadlineToStart(Assignment assignment,
                                AssignmentCheckDeadlineCondition condition)
{
    if (condition == AssignmentCheckDeadlineCondition.Equal
        && assignment.StatusState == AssignmentPlugin.DefaultStatus)
    {
        assignment.Tags.Add("Overdue start deadline");
        await Runtime.UpdateAssignmentAsync(assignment);
    }
}

async Task CheckDeadlineToComplete(Assignment assignment,
                                   AssignmentCheckDeadlineCondition condition)
{
    if (condition == AssignmentCheckDeadlineCondition.Equal
        && (assignment.StatusState == AssignmentPlugin.DefaultStatus
            || assignment.StatusState == AssignmentPlugin.DefaultStartStatus))
    {
        assignment.Tags.Add("Overdue finish deadline");
        await Runtime.UpdateAssignmentAsync(assignment);
    }
}
The AssignmentCheckDeadlineCondition condition parameter matches the Check deadline condition value from the action form.
Assignment Conditions
AssignmentsAny
Checks, if at least one assignment exists in the current process. Assignments with IsDeleted: true are ignored.
AssignmentsAllHaveCertainStatus and AssignmentsAnyHaveCertainStatus
These conditions have the same form, the only difference is that the * AssignmentsAllHaveCertainStatus* demands the specified status from all of the assignments, while the AssignmentsAnyHaveCertainStatus is satisfied with at least one assignment with this status.
Due to the possibility of a process to have several assignments with the same AssignmentCode, you should specify the condition for each code (All or Any).

How to Manage Assignments from Document
Above, we consider actions that manage assignments using AssignmentManger. Here is an example of getting all the assignments of the process via AssignmentManger:
List<Assignment> assignments = await processInstance.AssignmentManager.GetListAsync();
The second method to interact with assignments uses PersistenceProvider. Here is an example of getting all the assignments with the StatusState: Completed and the executor id: identity:
AssignmentFilter filter = new AssignmentFilter().ExecutorEquals("identity")
    .StatusStateEquals("Completed");
List<Assignment> assignments = await runtime.PersistenceProvider
    .GetAssignmentsAsync(filter);
The third method uses WorkflowRuntime. The main difference between this method and the previous two is that at the
end of the method, Resume() is called for all the processes with the assignments to be changed.
Here is an example of creating a new assignment:
var form = new AssignmentCreationForm()
{
    AssignmentCode = "assignment1",
    Executor = "identity",
    Name = "assignment name"
};
await runtime.CreateAssignmentAsync(processInstance.ProcessId, form);
Example of Usage
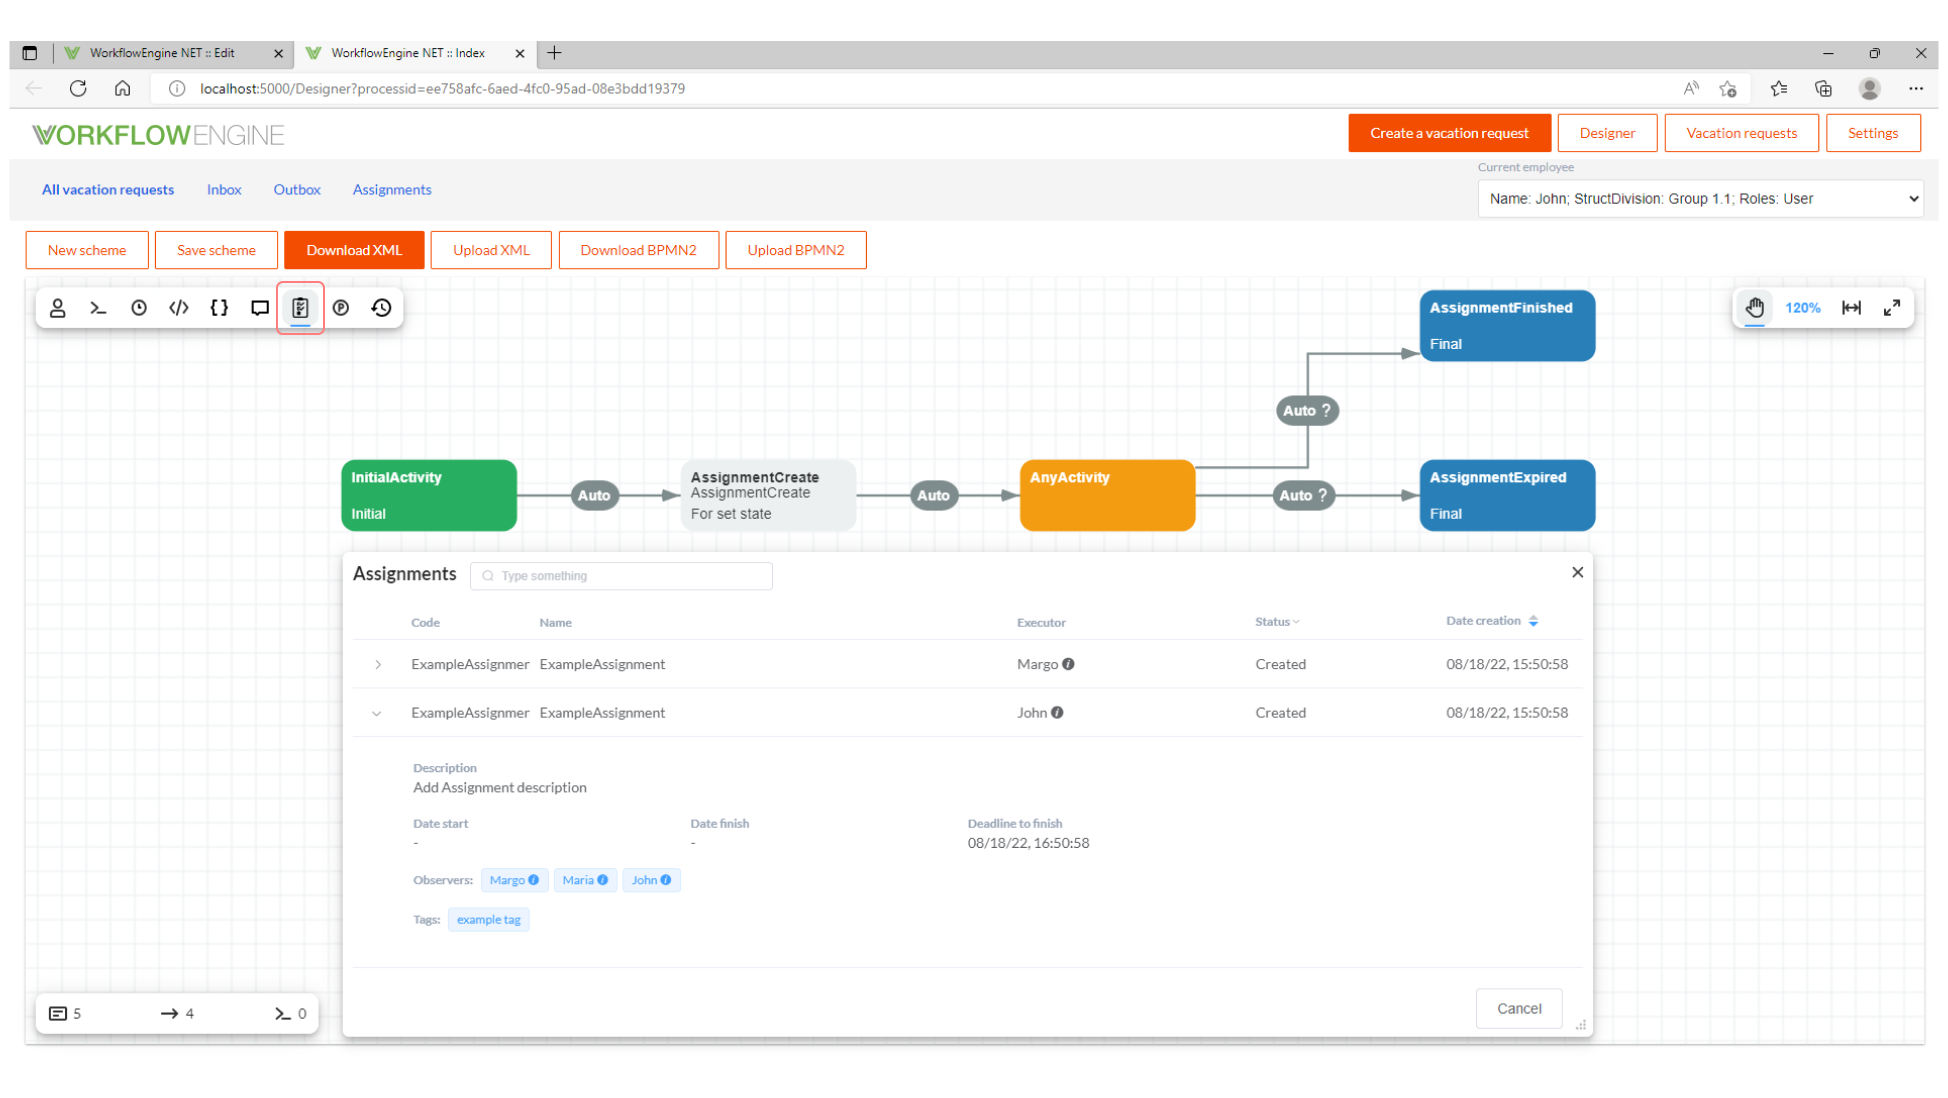
Let us create a simple schema in order to explain how to work with assignments. The schema is as follows:
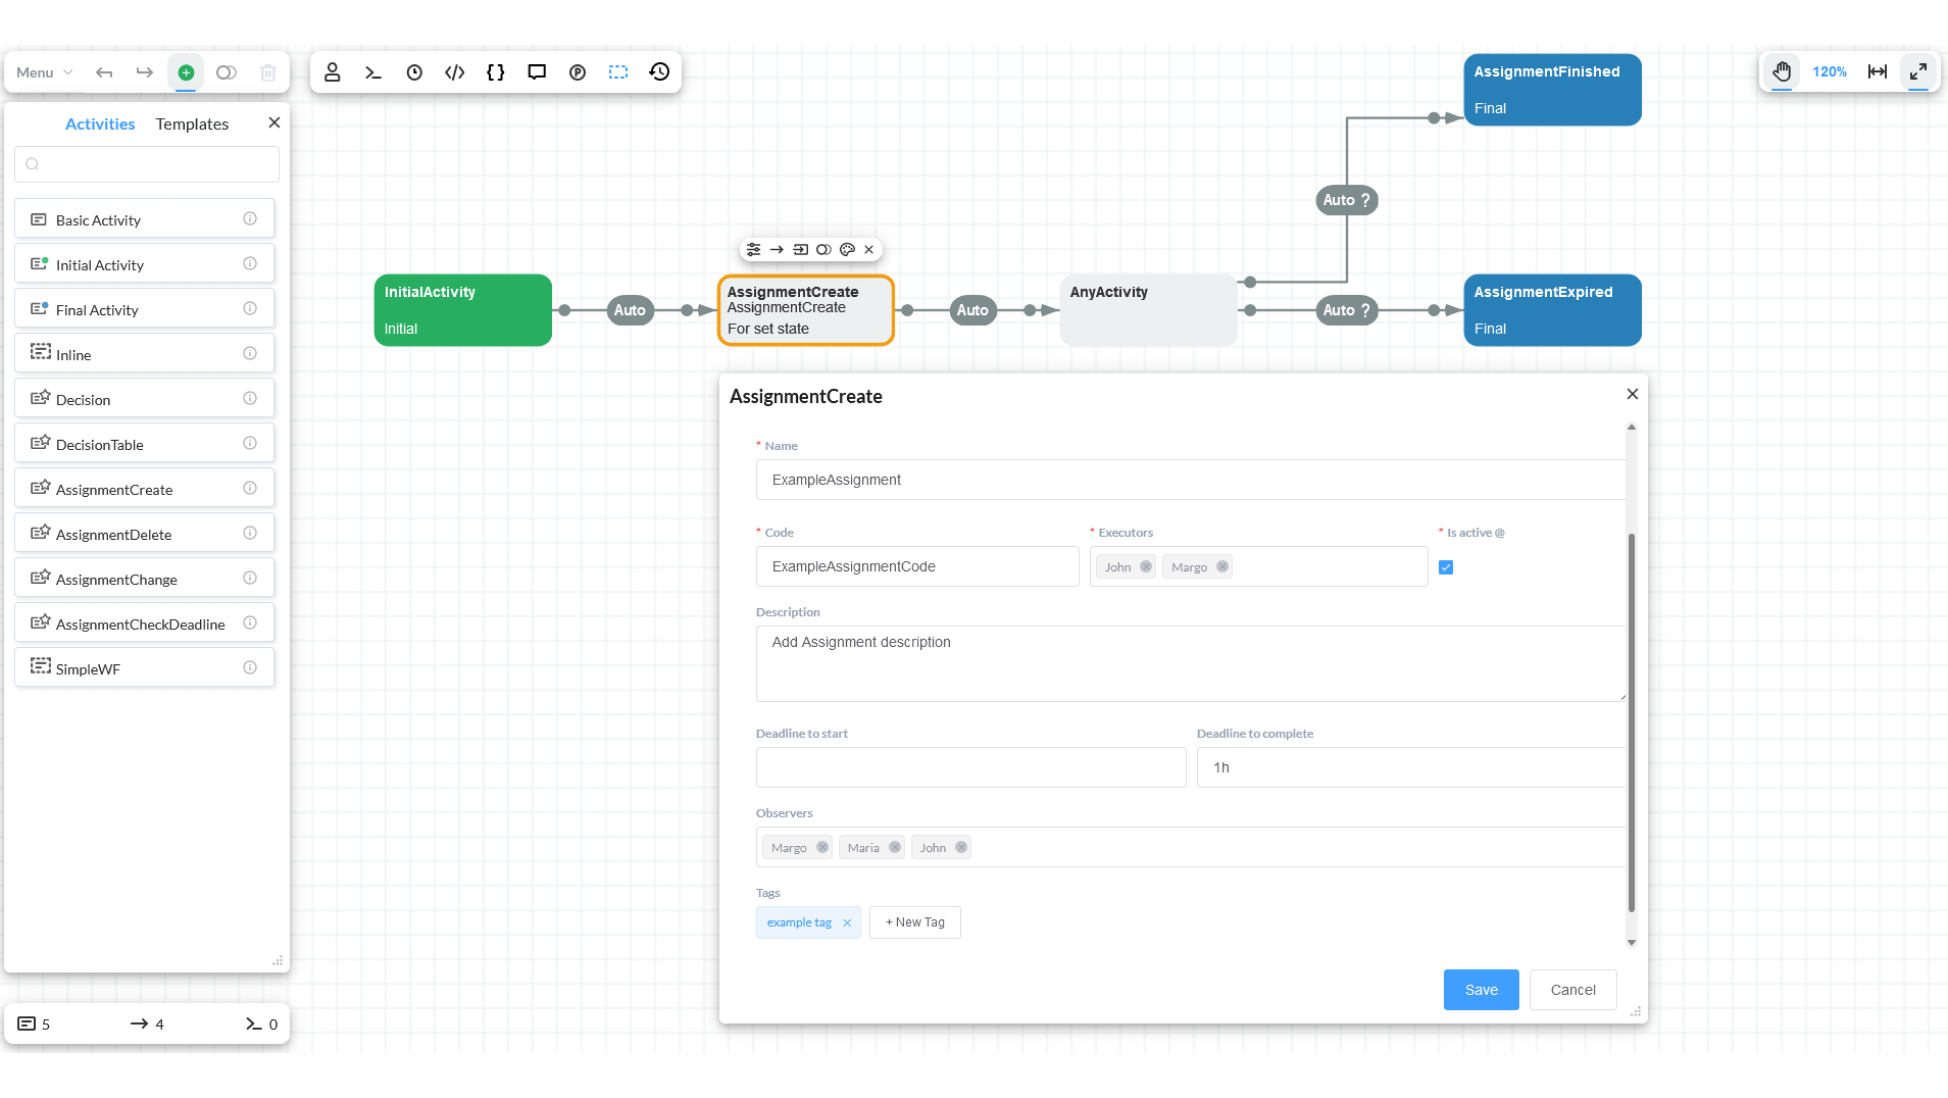
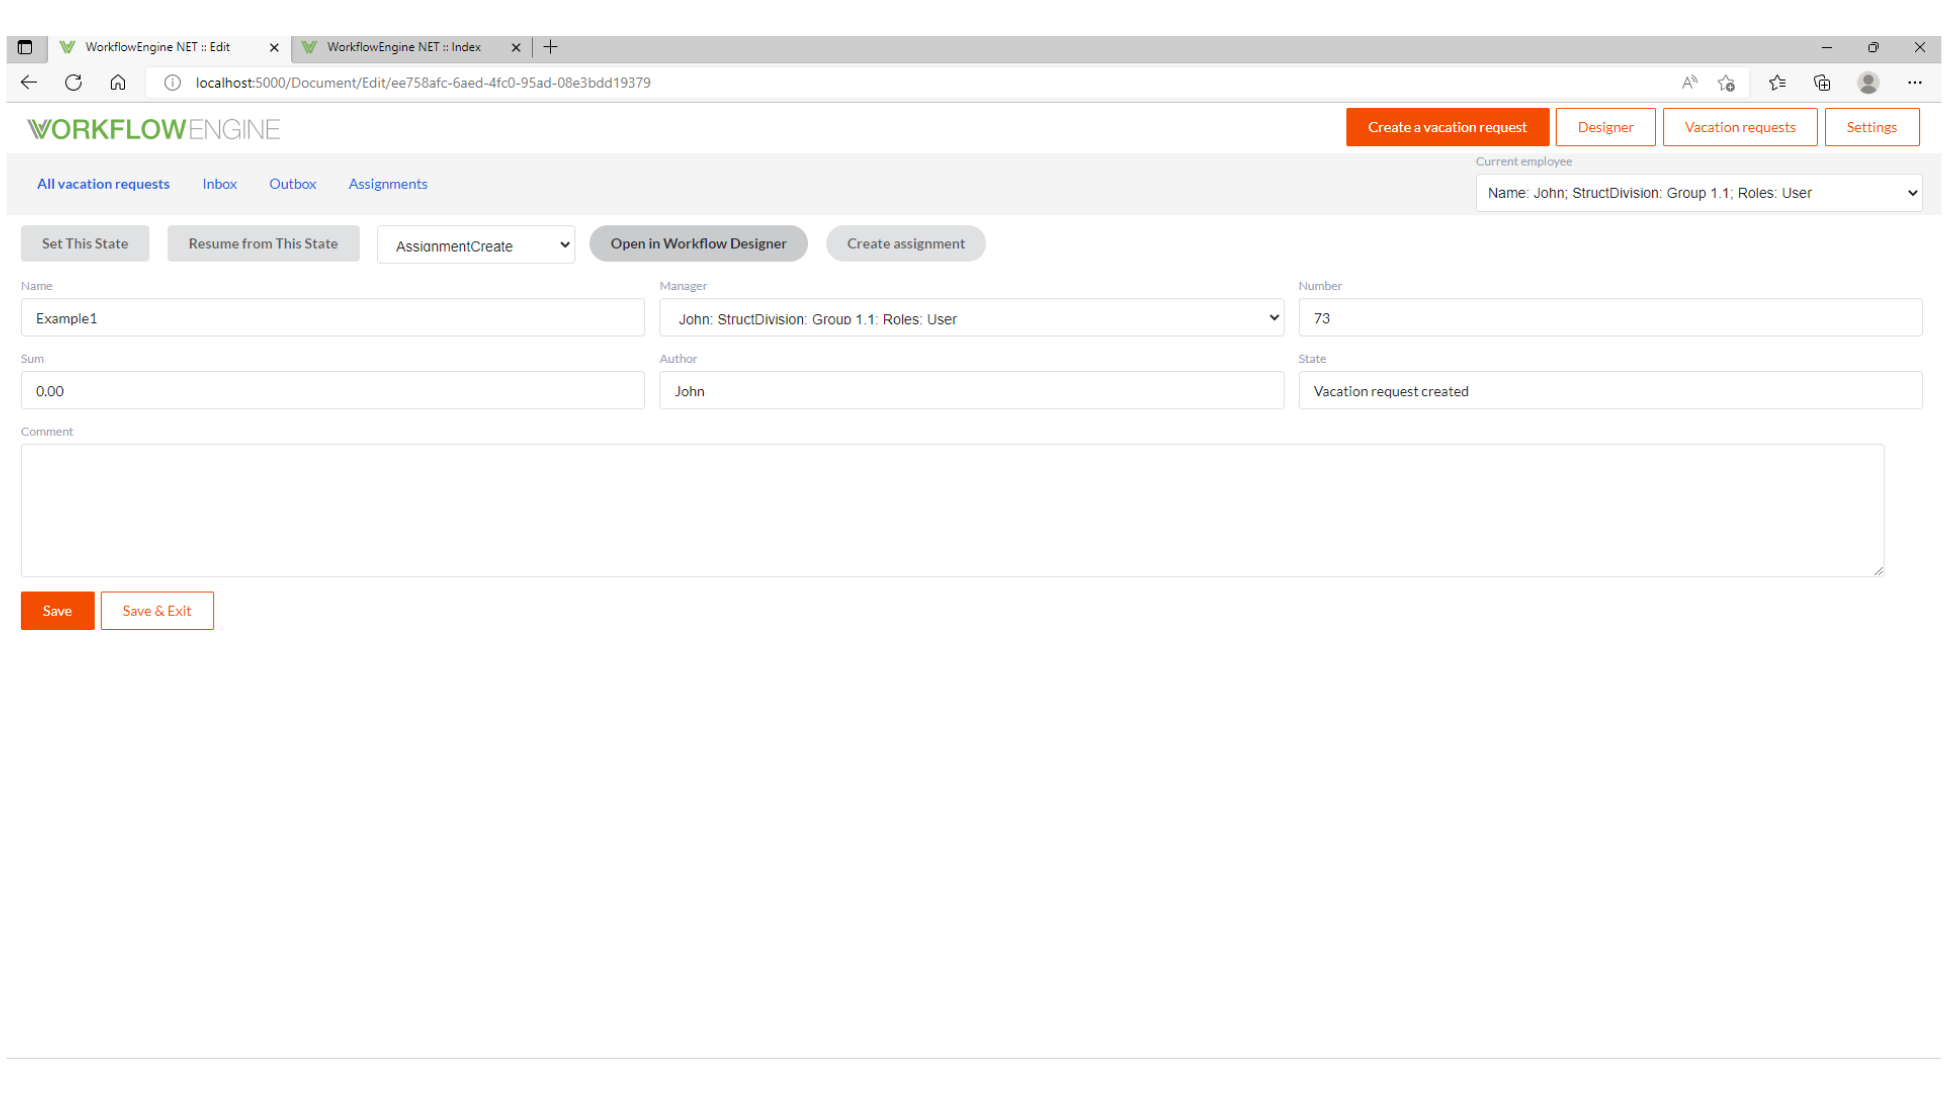
Let's create a process:
The current state of the process is AnyActivity. That is due two conditions: first, the assignment with the assignmentExample code has the Completed status; second, the Expired status.
At this stage, the executor is given one hour to execute the assignment; in case of delay, implementing the OnDeadlineToCompleteAsync handler, we assign the Expired status to the assignment, and the process will go further down.
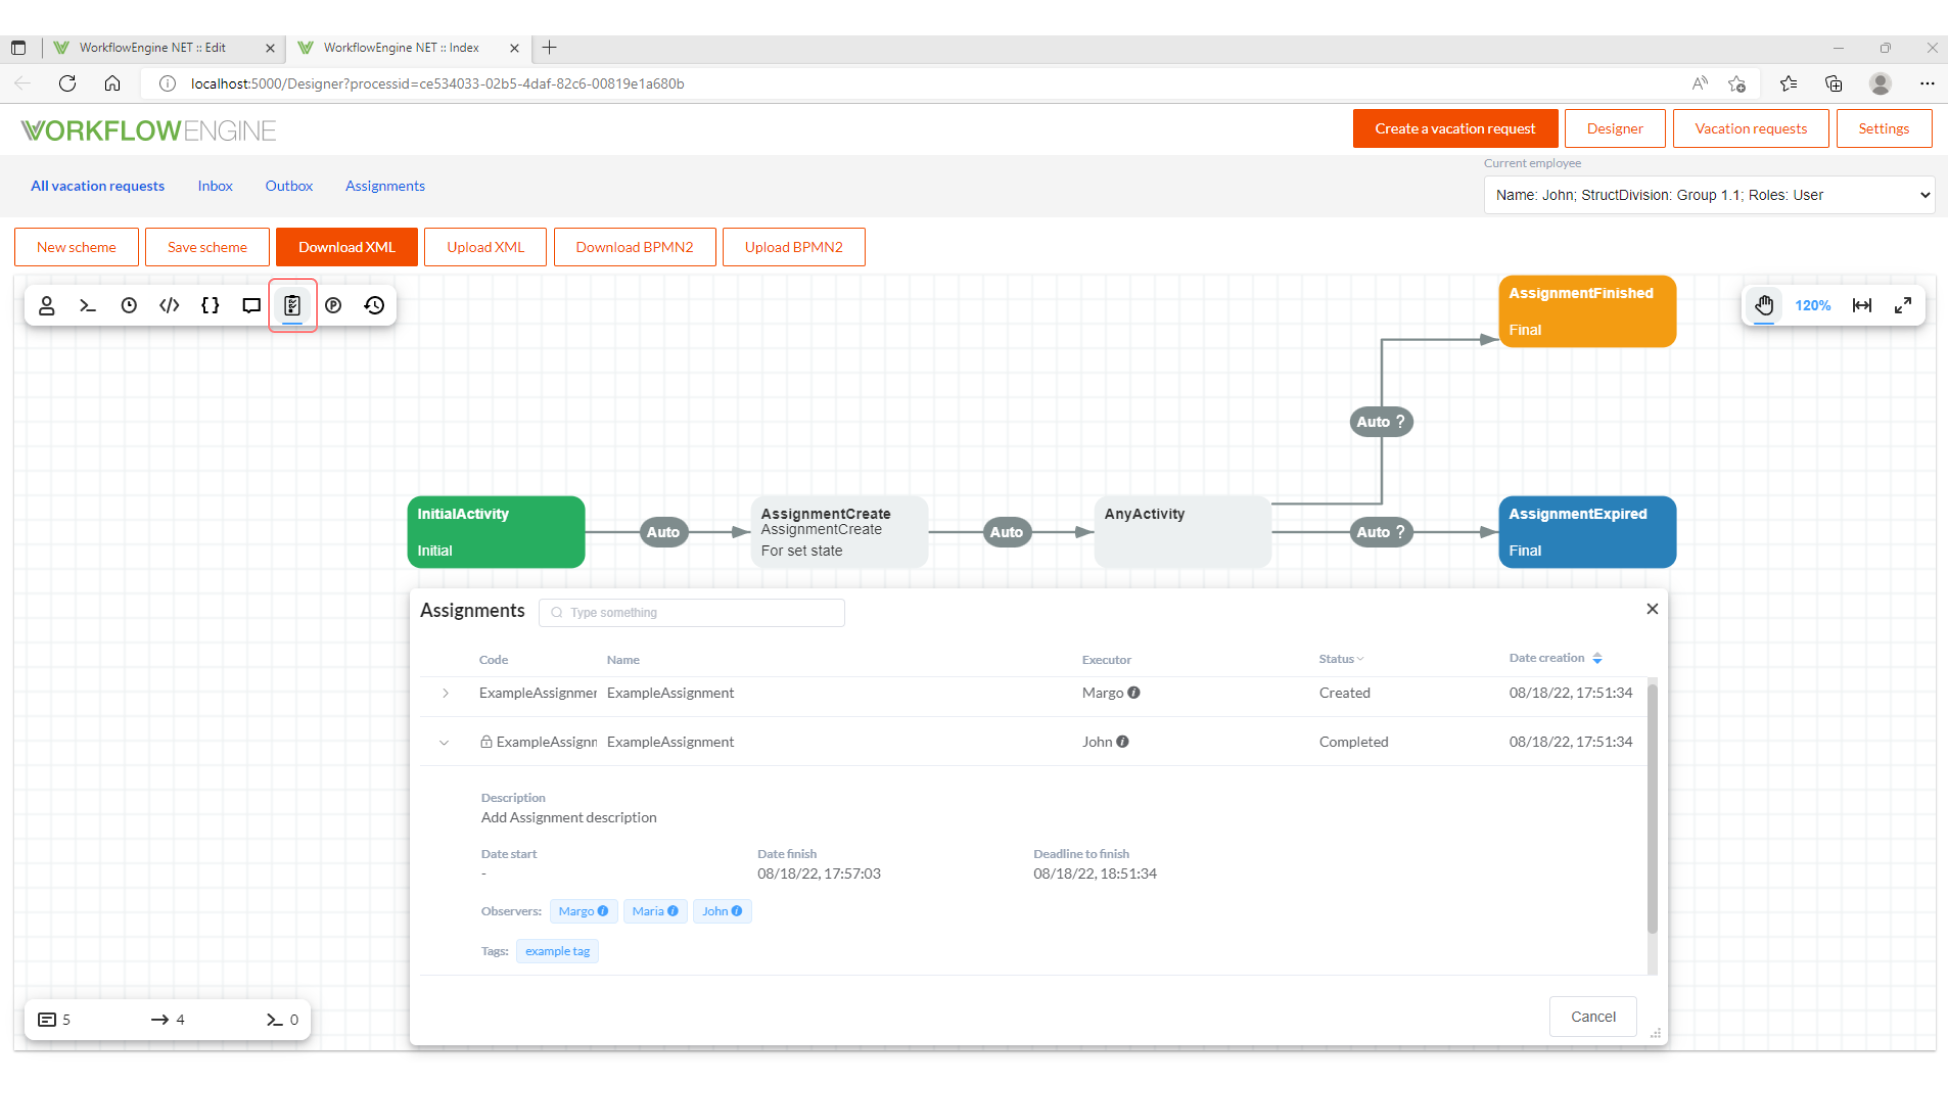
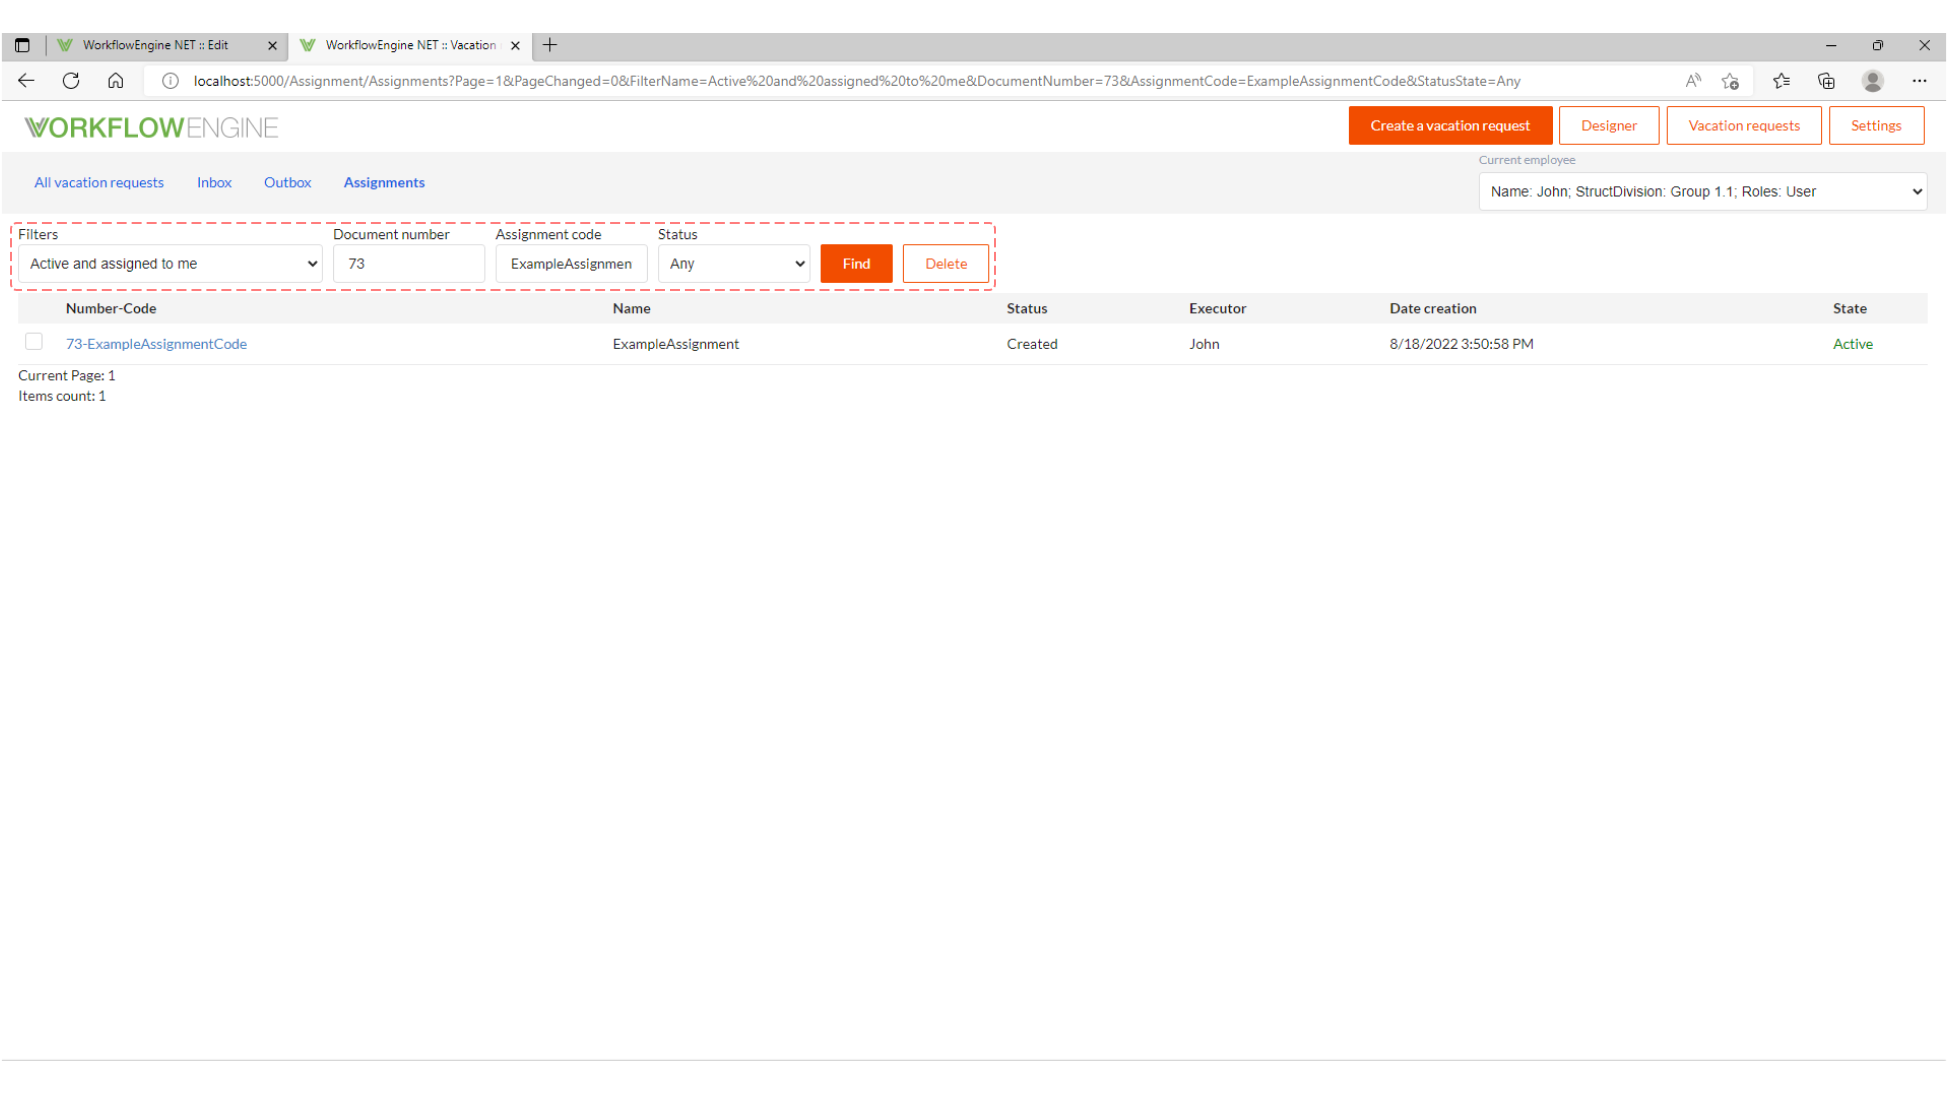
Using the filter, we will find the assignment that was created before:
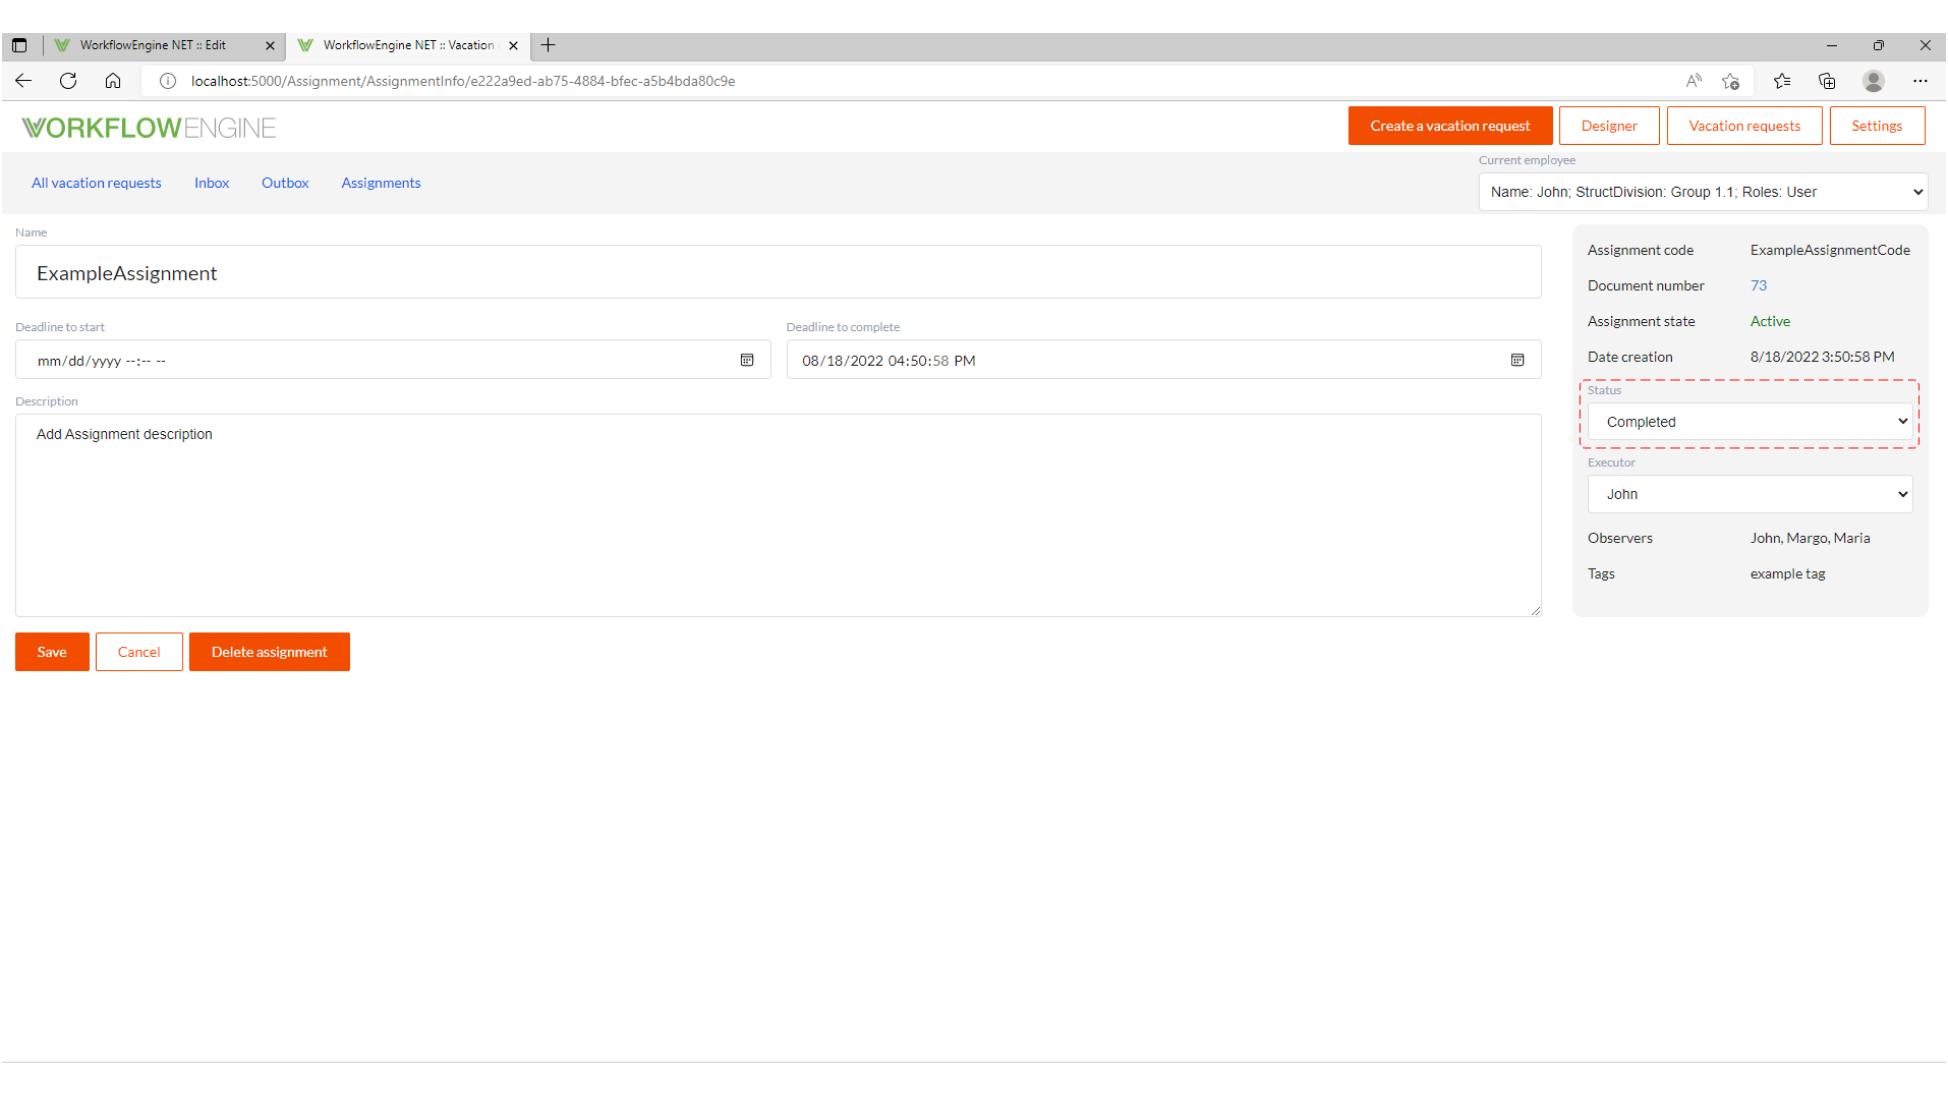
Let us change the assignment status to Completed:
Afterward, check the process status: