Action interaction with SignalR
Tutorial 4 📙
introducing-parameters - initial branch
actions-signalr - final branch
actions-signalr pull request - pull request with code changes
Overview
In this tutorial we describe how to implement ASP.NET SignalR library to interact with Actions in React sample. This open-source library simplifies adding real-time web functionality to apps, and it enables server-side code to push content to clients at once.

Overall, we will add an Action through the SignalR library that allows the server to send messages to the client application. The client is going to retrieve these messages from the workflow process.
The following stages are covered:
- Connect library SignalR.
- Call this library.
- Send messages to the client.
The Support process example described in Process Parameters implementation is used in this guide.
Prerequisites
- First, you should go through previous tutorials OR clone introducing-parameters branch.
- JetBrains Rider or Visual Studio.
- Command prompt or Terminal.
SignalR client installation
Execute the following commands in the frontend directory to install the NPM packages:
npm install @microsoft/signalr
npm install @rsuite/icons
npm install react-markdown
Backend
The code improvements required in the backend are described in this section.
WorkflowLib
Furthermore, the WorkflowLib.csproj must be modified.
We need to add a Microsoft.AspNetCore.App framework reference in order to be able to use the SignalR library on the backend.
<Project Sdk="Microsoft.NET.Sdk">

  <PropertyGroup>
    <TargetFramework>net7.0</TargetFramework>
    <ImplicitUsings>enable</ImplicitUsings>
    <Nullable>enable</Nullable>
  </PropertyGroup>

  <ItemGroup>
    <PackageReference Include="WorkflowEngine.NETCore-Core" Version="7.1.3" />
    <PackageReference Include="WorkflowEngine.NETCore-ProviderForMSSQL" Version="7.1.3" />
  </ItemGroup>

  <ItemGroup>
    <FrameworkReference Include="Microsoft.AspNetCore.App" />
  </ItemGroup>

</Project>
ProcessConsoleHub
First, the empty class ProcessConsoleHub must be added in WorkflowLib to work properly with SignalR. This class inherits Hub which
appears in the library.
using Microsoft.AspNetCore.SignalR;
using Newtonsoft.Json;

namespace WorkflowApi.Hubs;

public class ProcessConsoleHub : Hub
{
}
WorkflowInit
Furthermore, the class WorkflowInit must be modified. The implicit start runtime.Start is deleted and an explicit start is included.
The method StartAsync is added, it invokes WorkflowRuntime. Here, a new ActionProvider is created and Runtime.StartAsync is called.
Remember that this method StartAsync is explicit invoked in Program.cs.
using System.Xml.Linq;
using Microsoft.AspNetCore.SignalR;
using OptimaJet.Workflow.Core;
using OptimaJet.Workflow.Core.Builder;
using OptimaJet.Workflow.Core.Parser;
using OptimaJet.Workflow.Core.Runtime;
using OptimaJet.Workflow.DbPersistence;
using OptimaJet.Workflow.Plugins;
using WorkflowApi.Hubs;

namespace WorkflowLib;

...

        .WithCustomActivities(new List<ActivityBase> {new WeatherActivity()})
        // add custom rule provider
        .WithRuleProvider(new SimpleRuleProvider())
        .WithDesignerParameterFormatProvider(new DesignerParameterFormatProvider())
        .AsSingleServer();

        // events subscription
        runtime.OnProcessActivityChangedAsync += (sender, args, token) => Task.CompletedTask;
        runtime.OnProcessStatusChangedAsync += (sender, args, token) => Task.CompletedTask;

        runtime.Start();

        return runtime;
    }

    public static async Task StartAsync(IHubContext<ProcessConsoleHub> processConsoleHub)
    {
        Runtime.WithActionProvider(new ActionProvider(processConsoleHub));
        await Runtime.StartAsync();
    }

    public static void InjectServices()
    {
        throw new NotImplementedException();
    }
}
Program
Then, Program.cs must be modified. First, we should change the Cors settings to SignalR works properly, so policy.AllowCredentials is
included. Besides, MapHub<ProcessConsoleHub> is also added, the Hub will work by the
url api/workflow/processConsole. Next, we get processConsoleContext that is used by the library, and we call the
method WorkflowInit.StartAsync i.e. we pass it to WorkflowInit.cs.
using WorkflowApi;
using WorkflowLib;
using Microsoft.AspNetCore.SignalR;
using WorkflowApi.Hubs;

var builder = WebApplication.CreateBuilder(args);

// Add services to the container.
builder.Services.AddControllersWithViews();
builder.Services.AddSignalR();

const string rule = "MyCorsRule";
builder.Services.Configure<WorkflowApiConfiguration>(builder.Configuration);
var apiConfiguration = builder.Configuration.Get<WorkflowApiConfiguration>();

if (apiConfiguration?.Cors.Origins.Count > 0)
{
    builder.Services.AddCors(options =>
    {
        options.AddPolicy(rule, policy =>
        {
            policy.WithOrigins(apiConfiguration.Cors.Origins.ToArray());
            policy.AllowAnyHeader();
            policy.AllowCredentials();
        });
    });
}

...

    name: "default",
    pattern: "{controller=Home}/{action=Index}/{id?}");

app.MapHub<ProcessConsoleHub>("api/workflow/processConsole");

var processConsoleContext = app.Services.GetService<IHubContext<ProcessConsoleHub>>();

await WorkflowInit.StartAsync(processConsoleContext);

app.Run();
ActionProvider
Now, the new class ActionProvider is created. It is a standard provider with few modifications. First, in the constructor
the IHubContext<ProcessConsoleHub> was added which is used in SignalR for sending the messages. Besides, the field processConsoleHub is
invoked. It is required for interacting in WorkflowInit.cs and Program.cs.
The new ActionProvider and processConsoleHub which are called in the method StartAsync in WorkflowInit.cs, they are passed by
Program.cs. When the project is started, the link to processConsoleContext is gotten, and it is transferred to WorkflowInit.cs
in StartAsync where processConsoleHub is passed to ActionProvider which actually has the action being added.
The internal method SendMessageToProcessConsoleAsync where a certain message is sent through the browser is also included. Here,
ProcessId and actionParameter are passed on.
Detailed information regarding Actions, IWorkflowActionProvider and CodeActions can be read here.
using Microsoft.AspNetCore.SignalR;
using OptimaJet.Workflow.Core.Model;
using OptimaJet.Workflow.Core.Runtime;
using WorkflowApi.Hubs;

namespace WorkflowLib;

public class ActionProvider : IWorkflowActionProvider
{
    private readonly Dictionary<string, Func<ProcessInstance, WorkflowRuntime, string, CancellationToken, Task>>
        _asyncActions = new();

    private IHubContext<ProcessConsoleHub> _processConsoleHub;

    public ActionProvider(IHubContext<ProcessConsoleHub> processConsoleHub)
    {
        _processConsoleHub = processConsoleHub;
        _asyncActions.Add(nameof(SendMessageToProcessConsoleAsync), SendMessageToProcessConsoleAsync);
    }

    public void ExecuteAction(string name, ProcessInstance processInstance, WorkflowRuntime runtime,
        string actionParameter)
    {
        throw new NotImplementedException();
    }

    public async Task ExecuteActionAsync(string name, ProcessInstance processInstance, WorkflowRuntime runtime,
        string actionParameter,
        CancellationToken token)
    {
        if (!_asyncActions.ContainsKey(name))
        {
            throw new NotImplementedException($"Async Action with name {name} isn't implemented");
        }

        await _asyncActions[name].Invoke(processInstance, runtime, actionParameter, token);
    }

    public bool ExecuteCondition(string name, ProcessInstance processInstance, WorkflowRuntime runtime,
        string actionParameter)
    {
        throw new NotImplementedException();
    }

    public Task<bool> ExecuteConditionAsync(string name, ProcessInstance processInstance, WorkflowRuntime runtime,
        string actionParameter, CancellationToken token)
    {
        throw new NotImplementedException();
    }

    public bool IsActionAsync(string name, string schemeCode)
    {
        return _asyncActions.ContainsKey(name);
    }

    public bool IsConditionAsync(string name, string schemeCode)
    {
        throw new NotImplementedException();
    }

    public List<string> GetActions(string schemeCode, NamesSearchType namesSearchType)
    {
        return _asyncActions.Keys.ToList();
    }

    public List<string> GetConditions(string schemeCode, NamesSearchType namesSearchType)
    {
        return new List<string>();
    }

    //it is internal just to have possibility to use nameof()

    internal async Task SendMessageToProcessConsoleAsync(ProcessInstance processInstance, WorkflowRuntime runtime,
        string actionParameter, CancellationToken token)
    {
        await _processConsoleHub.Clients.All.SendAsync("ReceiveMessage", new
        {
            processId = processInstance.ProcessId,
            message = actionParameter
        }, cancellationToken: token);
    }
}
DesignerParameterFormatProvider
Finally, DesignerParameterFormatProvider.cs is also added to display the new form. Here, an action with the
name ActionProvider.SendMessageToProcessConsoleAsync, sets the parameters: Type as TextArea, IsRequired as True and Title as
"Console message" in CodeActionParameterDefinition. Moreover, DesignerParameterFormatProvider must be connected by WorkflowInit.cs in
the runtime.
Afterward, the created Action will be available to be used in the Designer. Besides, in the new form will be possible to set the data that
we want to send to the client, i.e. the process parameters with the syntax @ParameterName.
More information related to Parameter edit form can be read here.
using OptimaJet.Workflow.Core.Model;
using OptimaJet.Workflow.Core.Runtime;

namespace WorkflowLib;

public class DesignerParameterFormatProvider : IDesignerParameterFormatProvider
{
    public List<CodeActionParameterDefinition> GetFormat(CodeActionType type, string name, string schemeCode)
    {
        if (type == CodeActionType.Action && name == nameof(ActionProvider.SendMessageToProcessConsoleAsync))
        {
            return new List<CodeActionParameterDefinition>()
            {
                new CodeActionParameterDefinition()
                {
                    Type = ParameterType.TextArea,
                    IsRequired = true,
                    Title = "Console message"
                }
            };
        }

        return new List<CodeActionParameterDefinition>();
    }
}
Frontend
The code modifications required in the frontend are described in this section.
ProcessesConsoleContext
The new ProcessesConsoleContext React component is added. It creates the object consoleMessageCache which includes the
processId as key and the list of messages that come up by fields. This object is limited up to 100 processes and 100 messages maximum in
cache memory. When a message is accepted, it is sorted out, the cache is cleared, and then the message is addressed to ProcessConsole
SignalR is connected in HubConnectionBuilder. Here, the processConsole is configured.
import {HubConnectionBuilder, LogLevel} from '@microsoft/signalr'
import settings from './settings';
import {createContext, useContext, useEffect, useRef, useState} from 'react';

const ProcessesConsoleContext = createContext([]);
const maxProcessesInCache = 100;
const maxConsoleLinesInCache = 100;

const ProcessesConsoleProvider = ({children}) => {
    const [tryRefreshConnection, setTryRefreshConnection] = useState(true);
    const [consoleMessageCache, setConsoleMessageCache] = useState({});
    const consoleMessageCacheRef = useRef({});

    useEffect(() => {
        const connection = new HubConnectionBuilder()
            .withUrl(`${settings.workflowUrl}/processConsole/`)
            .withAutomaticReconnect()
            .configureLogging(LogLevel.Debug)
            .build();
        const connect = async () => {
            connection.on('ReceiveMessage', function (message) {
                const cache = Object.assign({}, consoleMessageCacheRef.current);
                let processCache = cache[message.processId];
                if (!processCache) {
                    const keys = Object.keys(cache);
                    if (keys.length >= maxProcessesInCache) {
                        delete cache[keys[0]];
                    }
                    processCache = cache[message.processId] = [];
                } else {
                    processCache = cache[message.processId] = [...processCache];
                }
                processCache.unshift({
                    date: new Date(),
                    message: message.message.replaceAll('\\n', '\n')
                });
                processCache = processCache.slice(0, maxConsoleLinesInCache);
                consoleMessageCacheRef.current = cache;
                setConsoleMessageCache(consoleMessageCacheRef.current);
            });
            await connection.start();
        }
        const disconnect = async () => {
            connection.off('ReceiveMessage');
            await connection.stop();
        }
        connect();
        return disconnect;
    }, [tryRefreshConnection])

    return <ProcessesConsoleContext.Provider value={consoleMessageCache}>{children}</ProcessesConsoleContext.Provider>
}

const useProcessesConsoleContext = () => useContext(ProcessesConsoleContext);

export {ProcessesConsoleProvider, useProcessesConsoleContext};
ProcessConsole
The ProcessConsole component is included in order to use ProcessesConsoleContext. When it is taken, the required message is
selected for the specific process according to the processId. Then, the message is displayed in timeLineItems. The ReactMarkdown
is required to render the messages.
import {Container, Timeline} from 'rsuite';
import {useProcessesConsoleContext} from "./ProcessesConsoleContext";
import CircleIcon from '@rsuite/icons/legacy/Circle';
import ReactMarkdown from 'react-markdown';

const ProcessConsoleTimeline = ({processId, align = 'left'}) => {
    const processesConsoleContext = useProcessesConsoleContext();
    const consoleLines = processesConsoleContext[processId] ?? [];
    const timeLineItems = consoleLines.map((ti, i) => <Timeline.Item key={i}
        dot={i === 0 ? <CircleIcon style={{color: '#15b215'}}/> : <CircleIcon/>}>
        <p>{`${ti.date.toLocaleDateString()} ${ti.date.toLocaleTimeString()}`}</p>
        {ti.message.split('\n').map((s, index) => {
            return <div key={index}><ReactMarkdown>{s}</ReactMarkdown></div>
        })}
    </Timeline.Item>)
    return <Timeline align={align}>{timeLineItems}</Timeline>
}

const ProcessConsole = ({processId}) => {
    return <Container style={{maxHeight: 900, overflowY: 'scroll'}}>
        <b>Process console</b>
        <ProcessConsoleTimeline processId={processId}/>
    </Container>
}
export default ProcessConsole;
AppView
Next, we have AppView component where the ProcessesConsoleProvider must be indicated explicitly in React <ontent, so all the referred
components will have access to it. In this way we can ensure that messages will be received when the application will connect to SignalR.
Besides, in case of switching the buttons.
import {Container, Content, Header, Nav, Navbar} from "rsuite";
import React, {useState} from "react";
import Schemes from "./Schemes";
import Processes from "./Processes";
import Designer from "./Designer";
import {ProcessesConsoleProvider} from "./ProcessesConsoleContext";

const navigationItems = [
    {name: 'Schemes', component: Schemes},
    {name: 'Processes', component: Processes},
    {name: 'Designer', component: Designer}
];

const AppView = () => {
    const [tab, setTab] = useState(navigationItems[0].name);
    const [schemeCode, setSchemeCode] = useState('Test1');
    const [processId, setProcessId] = useState();
...

    return <Container>
        <Header>
            <Navbar>
                <Nav>
                    {items}
                </Nav>
            </Navbar>
        </Header>
        <Content>
            <ProcessesConsoleProvider>
                <Child {...childProps}/>
            </ProcessesConsoleProvider>
        </Content>
    </Container>
}

export default AppView;
Designer
Finally, the ProcessConsole is added in Designer.js. When the specific process is opened, the ProcessConsole will be displayed in the
Designer.
import React, {useRef, useState} from "react";
import {Button, Container, Modal} from "rsuite";
import WorkflowDesigner from "@optimajet/workflow-designer-react";
import settings from "./settings";
import SchemeMenu from "./SchemeMenu";
import ProcessMenu from "./ProcessMenu";
import ProcessParameters from "./ProcessParameters";
import ProcessConsole from "./ProcessConsole";

const Designer = (props) => {
    const {schemeCode, ...otherProps} = {props}
    const [code, setCode] = useState(props.schemeCode)
    const [processId, setProcessId] = useState(props.processId)

    ...

    return <div style={{display: "flex"}}>
        <Container style={{maxWidth: '80%', overflow: 'hidden'}}>
            {!processId &&
                <SchemeMenu {...otherProps} schemeCode={code}
                            onNewScheme={createOrLoad} onCreateProcess={onOpenProcessWindow}/>
            }
            {!!processId && <ProcessMenu processId={processId} afterCommandExecuted={refreshDesigner}/>}
            ...

            <WorkflowDesigner
                schemeCode={code}
                processId={processId}
                designerConfig={designerConfig}
                ref={designerRef}
            />
        </Container>
        {processId && <ProcessConsole processId={processId}/>}
    </div>
}

export default Designer;
Starting the application
Once the code improvements are completed in the backend and frontend, the application can be compiled and run, so start it by executing the following commands:
cd docker-files
docker compose up --build --force-recreate
Then, open the application url http://localhost:3000/ in your preferred browser.
Upload the process scheme
In a previous tutorial the ParametersScheme.xml was presented to demonstrate how to work with process parameters. Now, just a single
change was included in this scheme. We invoke the method SendMessageToProcessConsoleAsync as an Action in each one of the Activities.
This method was added in ActionProvider.cs.
Download the ParametersScheme.xml.
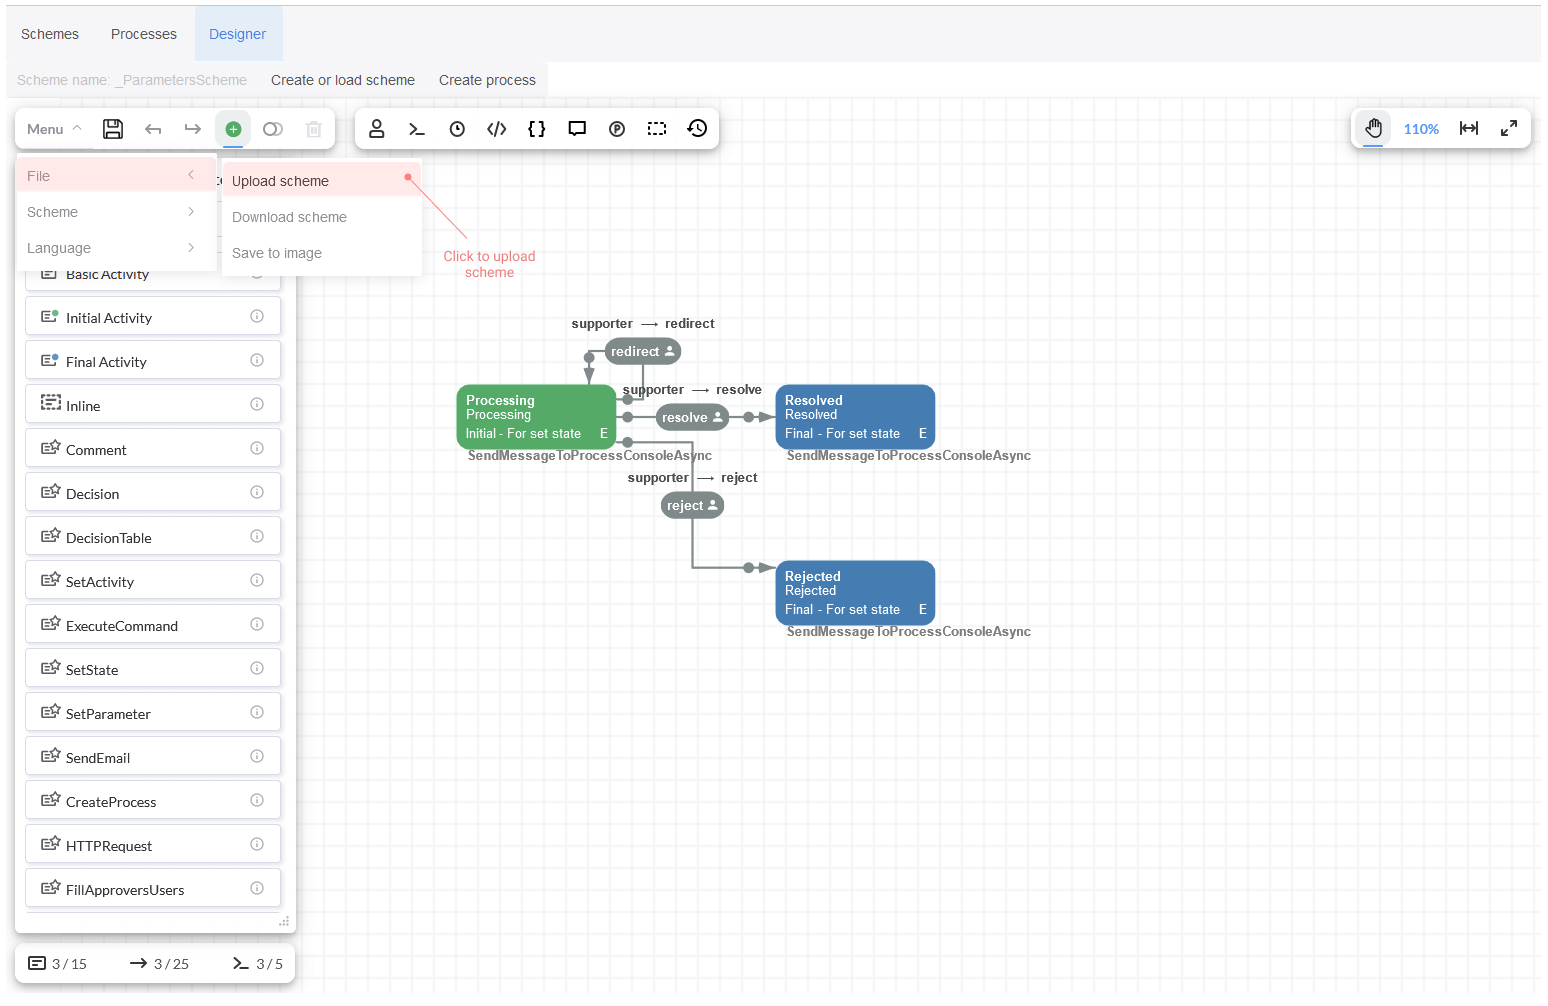
Click on tab Designer and upload the provided scheme as indicated below:
Then click Save.
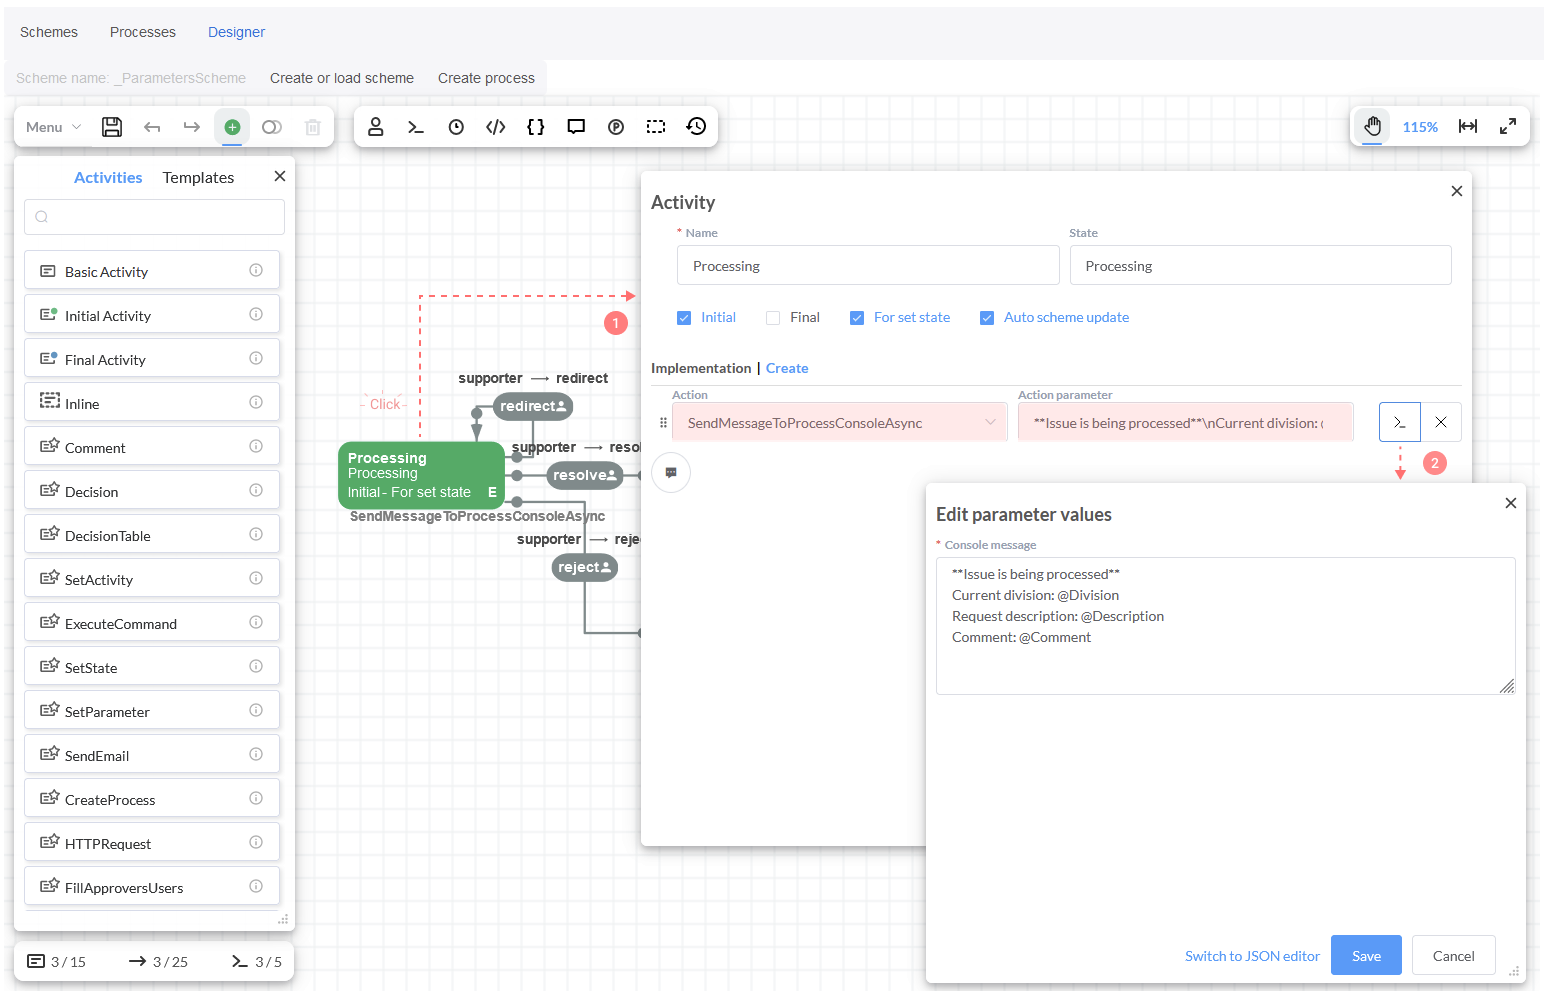
The message: "Issue is being processed" is inserted in the Processing state, and also the Process Parameters are included. The
request @Division - it means the current department where this request is being processed, the issue @Description and the @Comment.
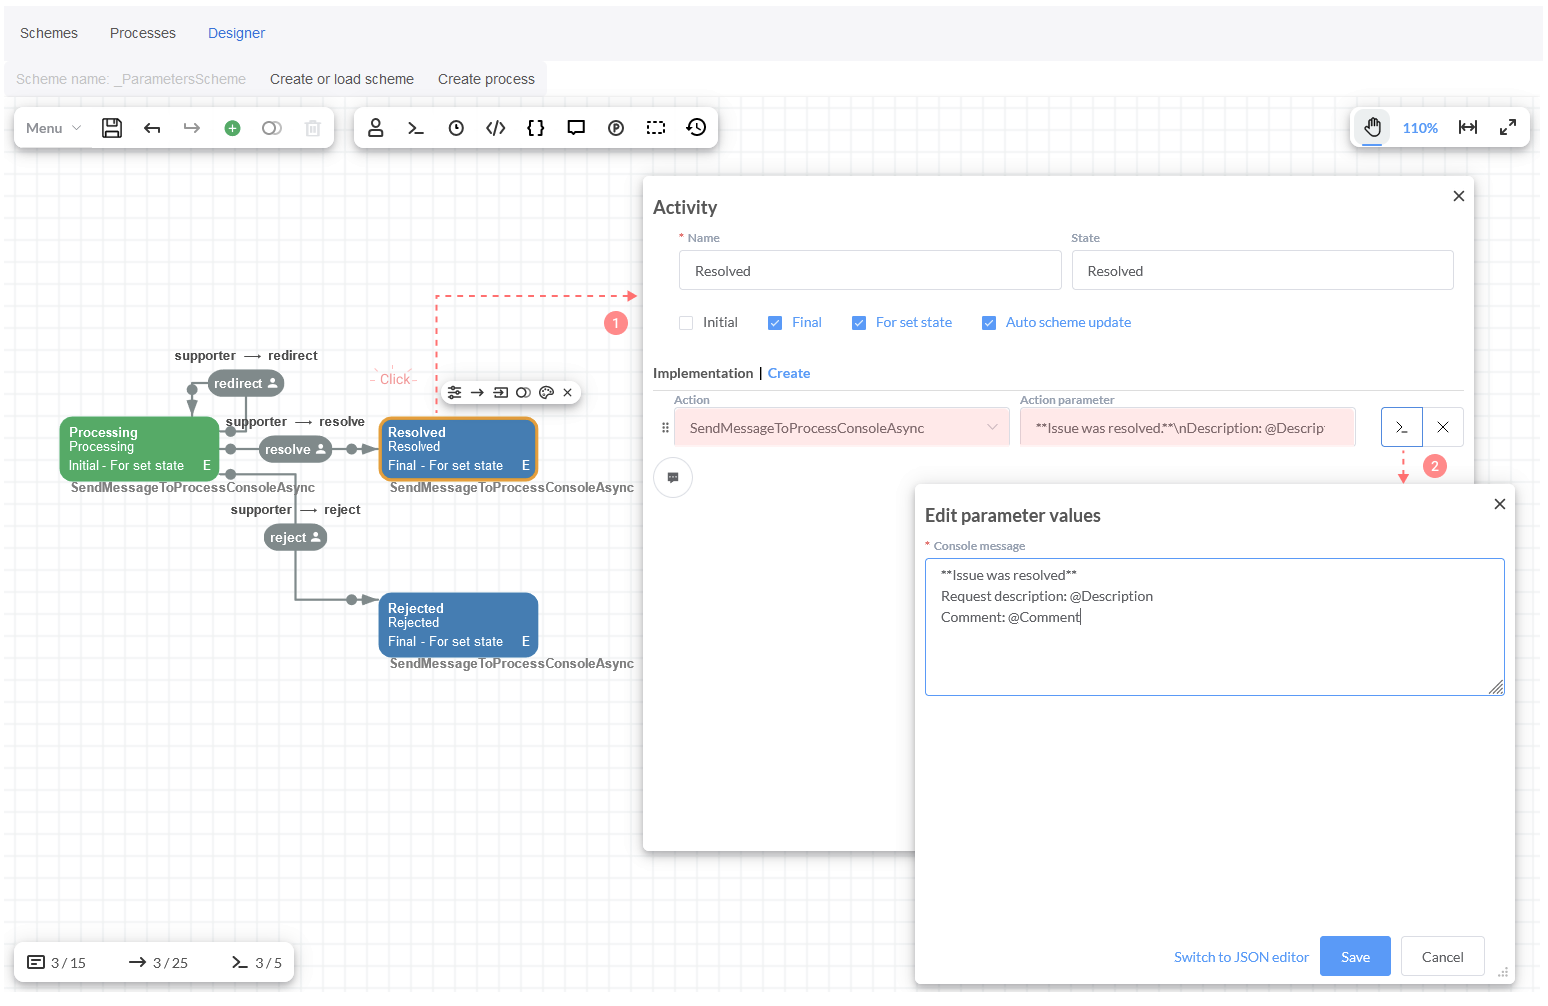
Next, in the Resolved state, the message: "Issue was resolved" is indicated, and also the parameters @Description and @Comment.
Likewise, the message: "Issue was rejected", and the same parameters were added in the state Rejected.
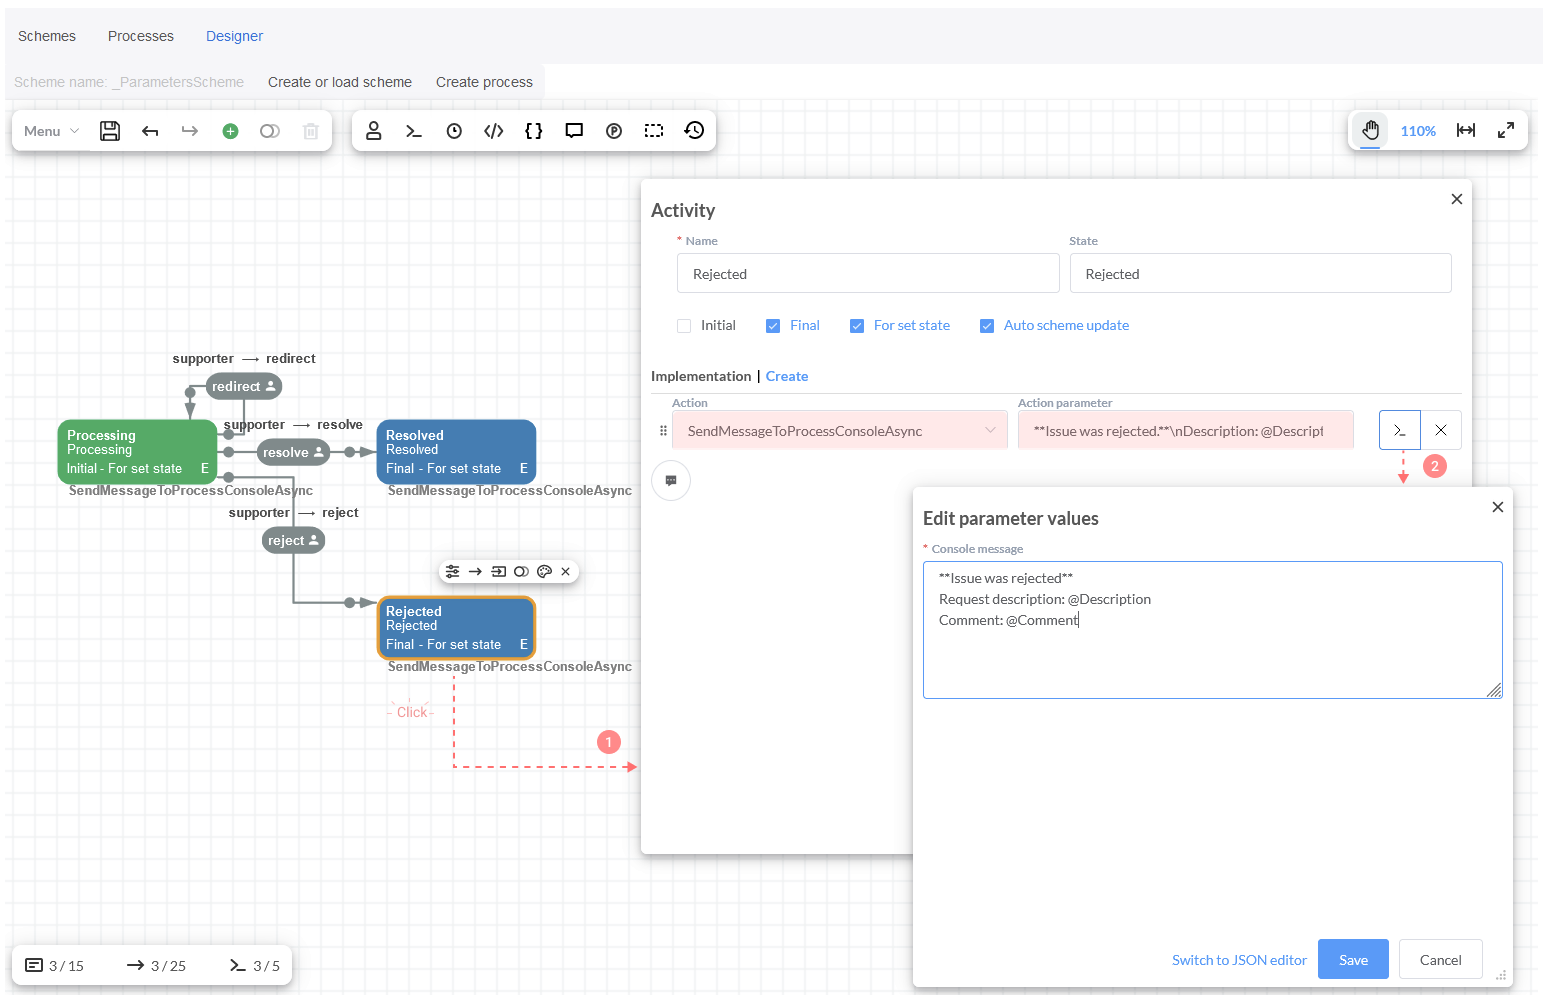
The expression @ParameterName, it takes the specific parameter and shows its value.
More information regarding parameters syntax can be found in this section.
Running the process
Once the Actions are set, we can save the scheme and run the process, so let's see how it works!
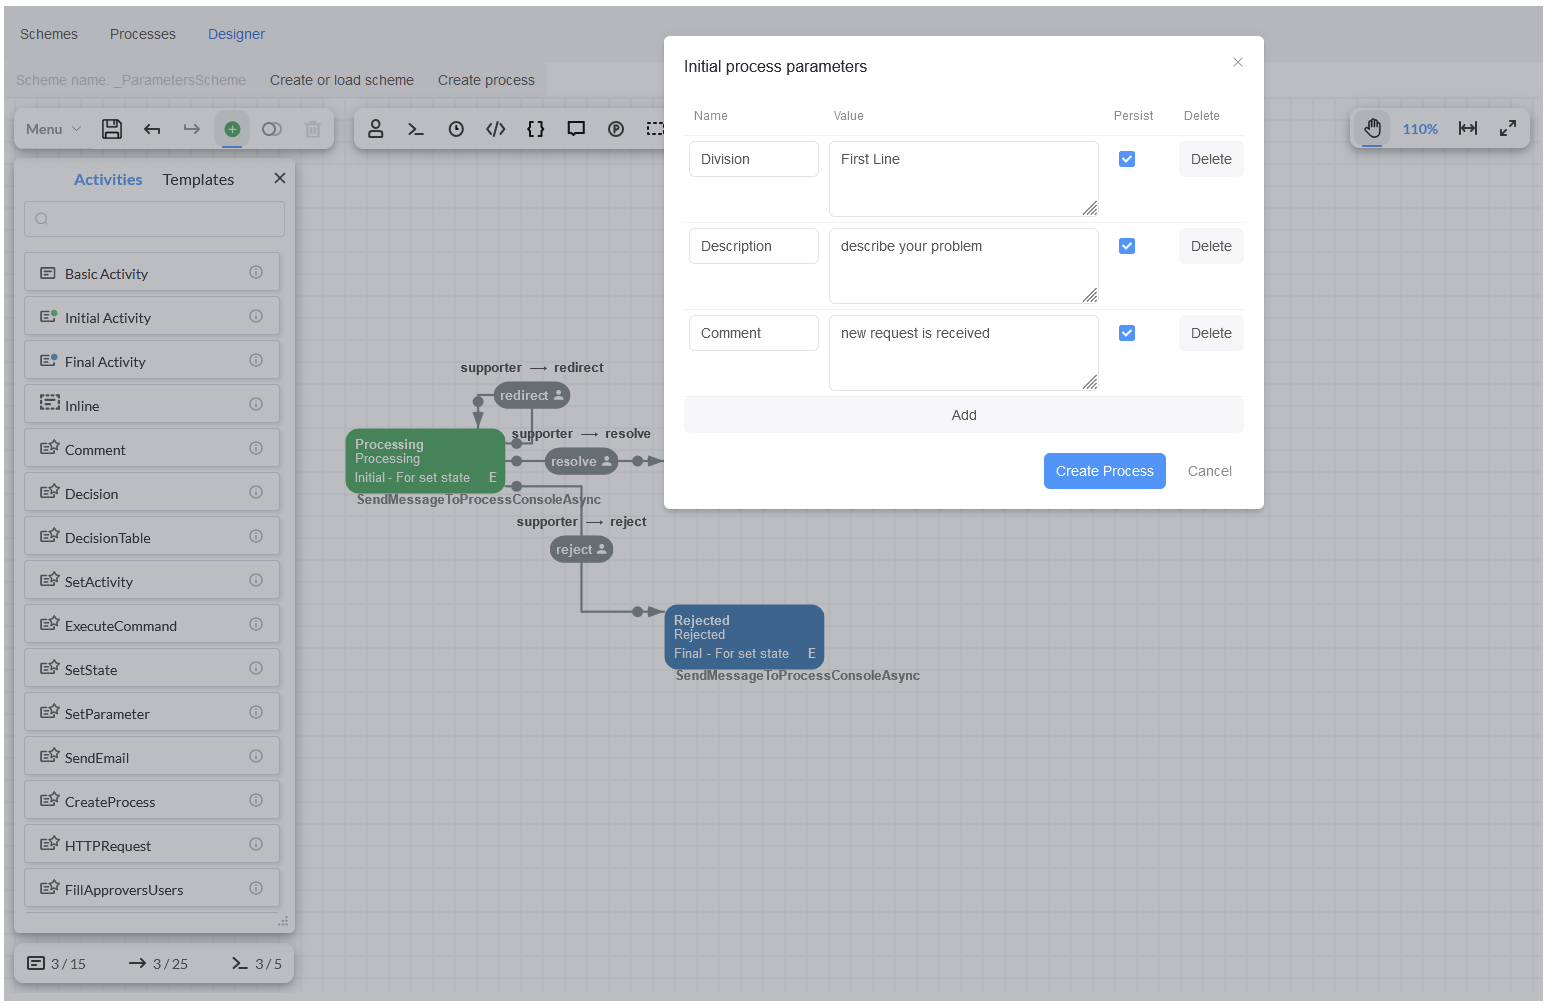
First, click on button Create process. You should indicate the issue Description, the Division, and the Comment in the modal
window 'Initial process parameters'. Then, click on blue button 'Create process'.
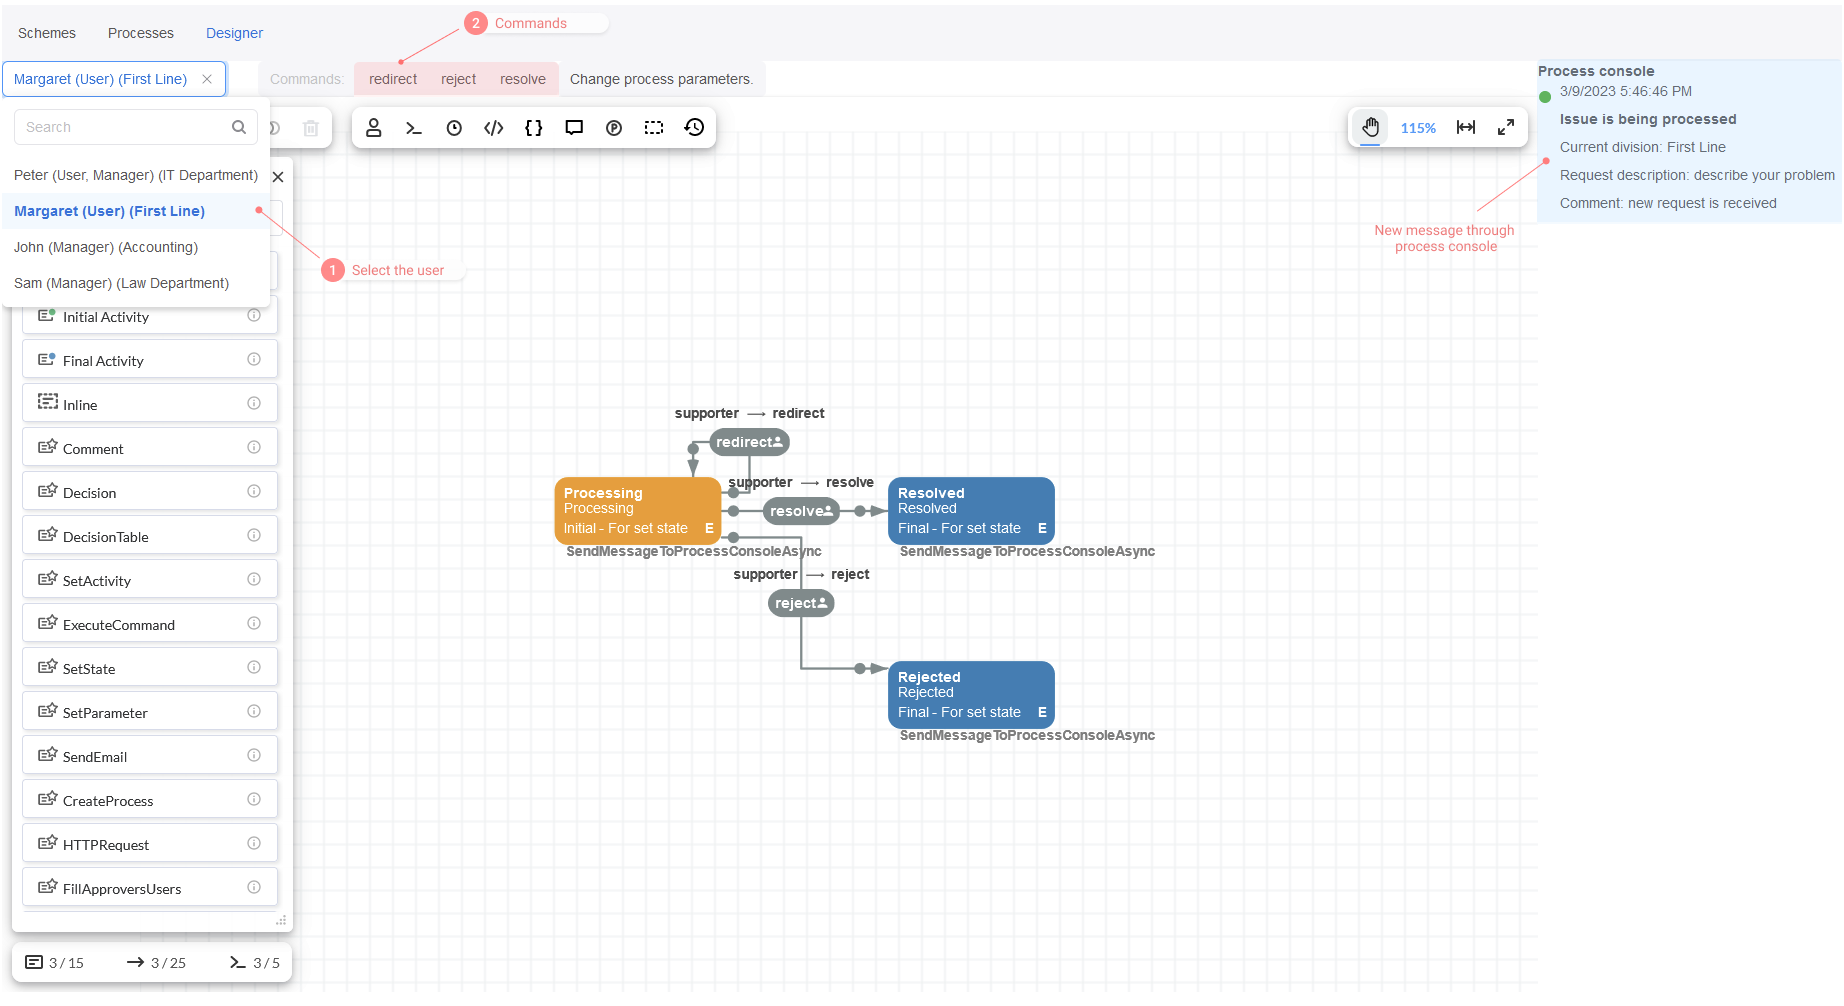
Afterward, the new message will be displayed through Process Console. Select the user from the current Division and click on command
Redirect to transfer the request.
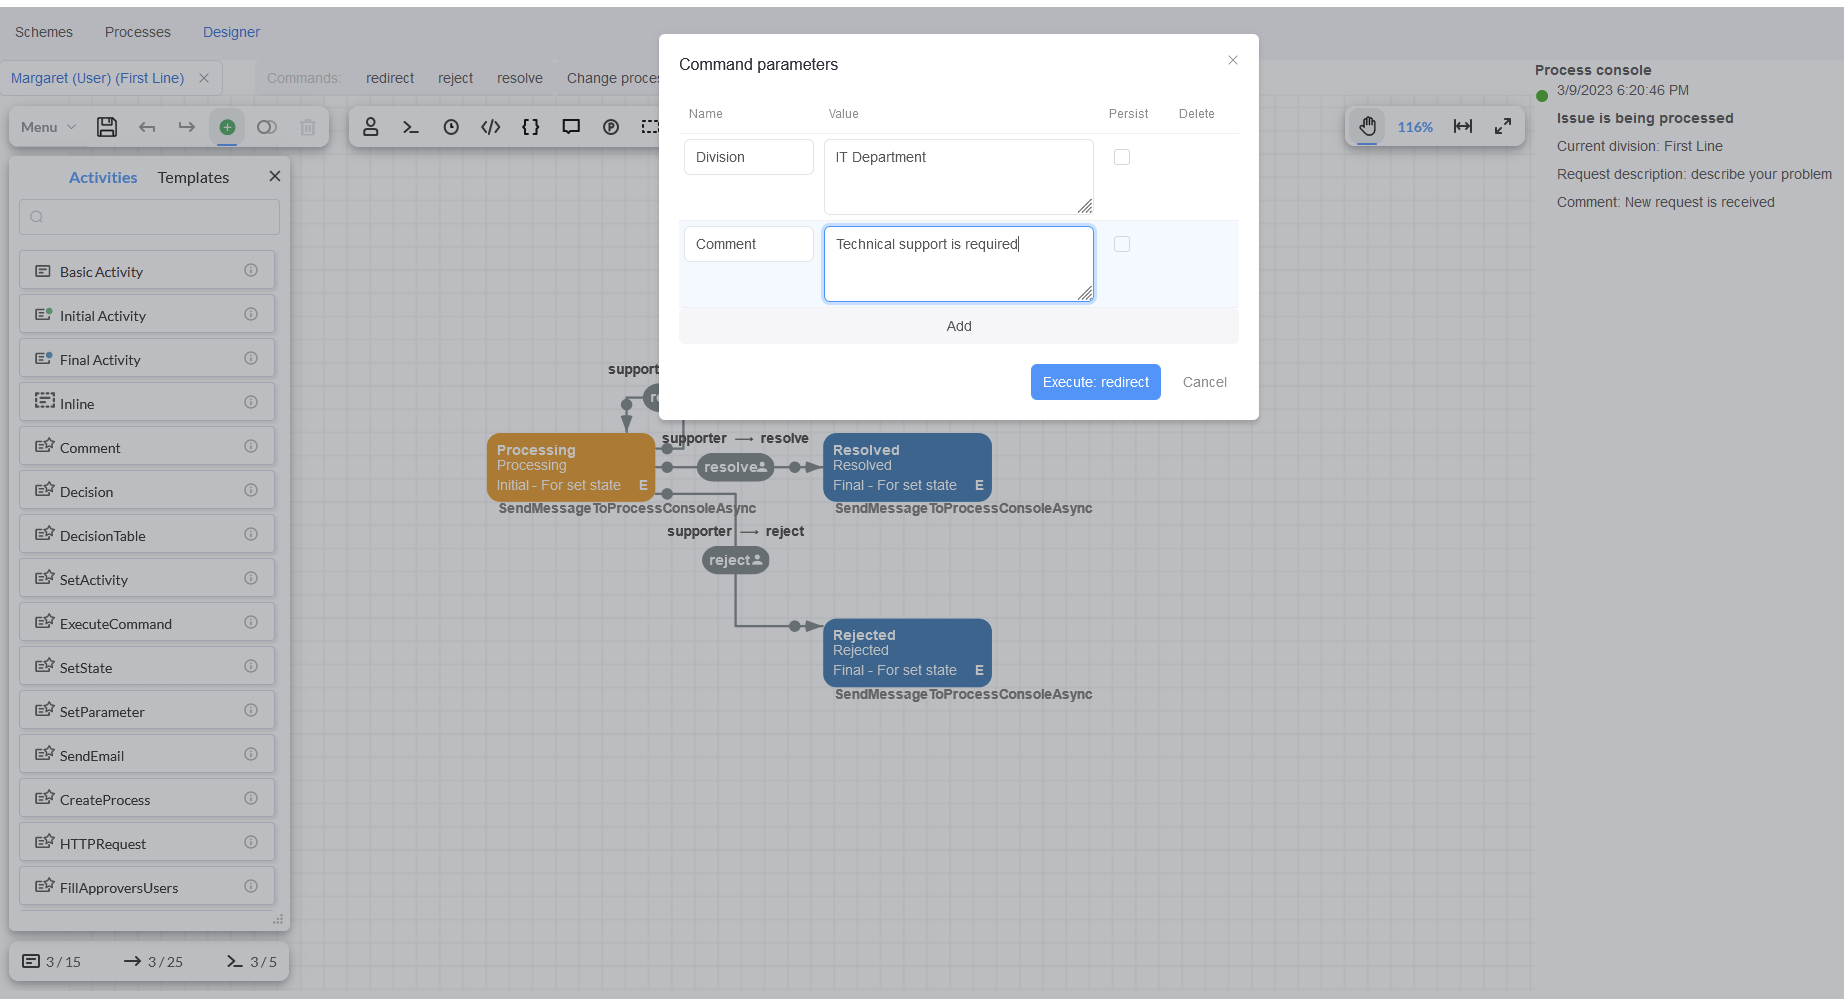
You should indicate the IT Department for redirecting and write the comment in the window 'Command Parameters'. After that, click on
button Execute redirect.
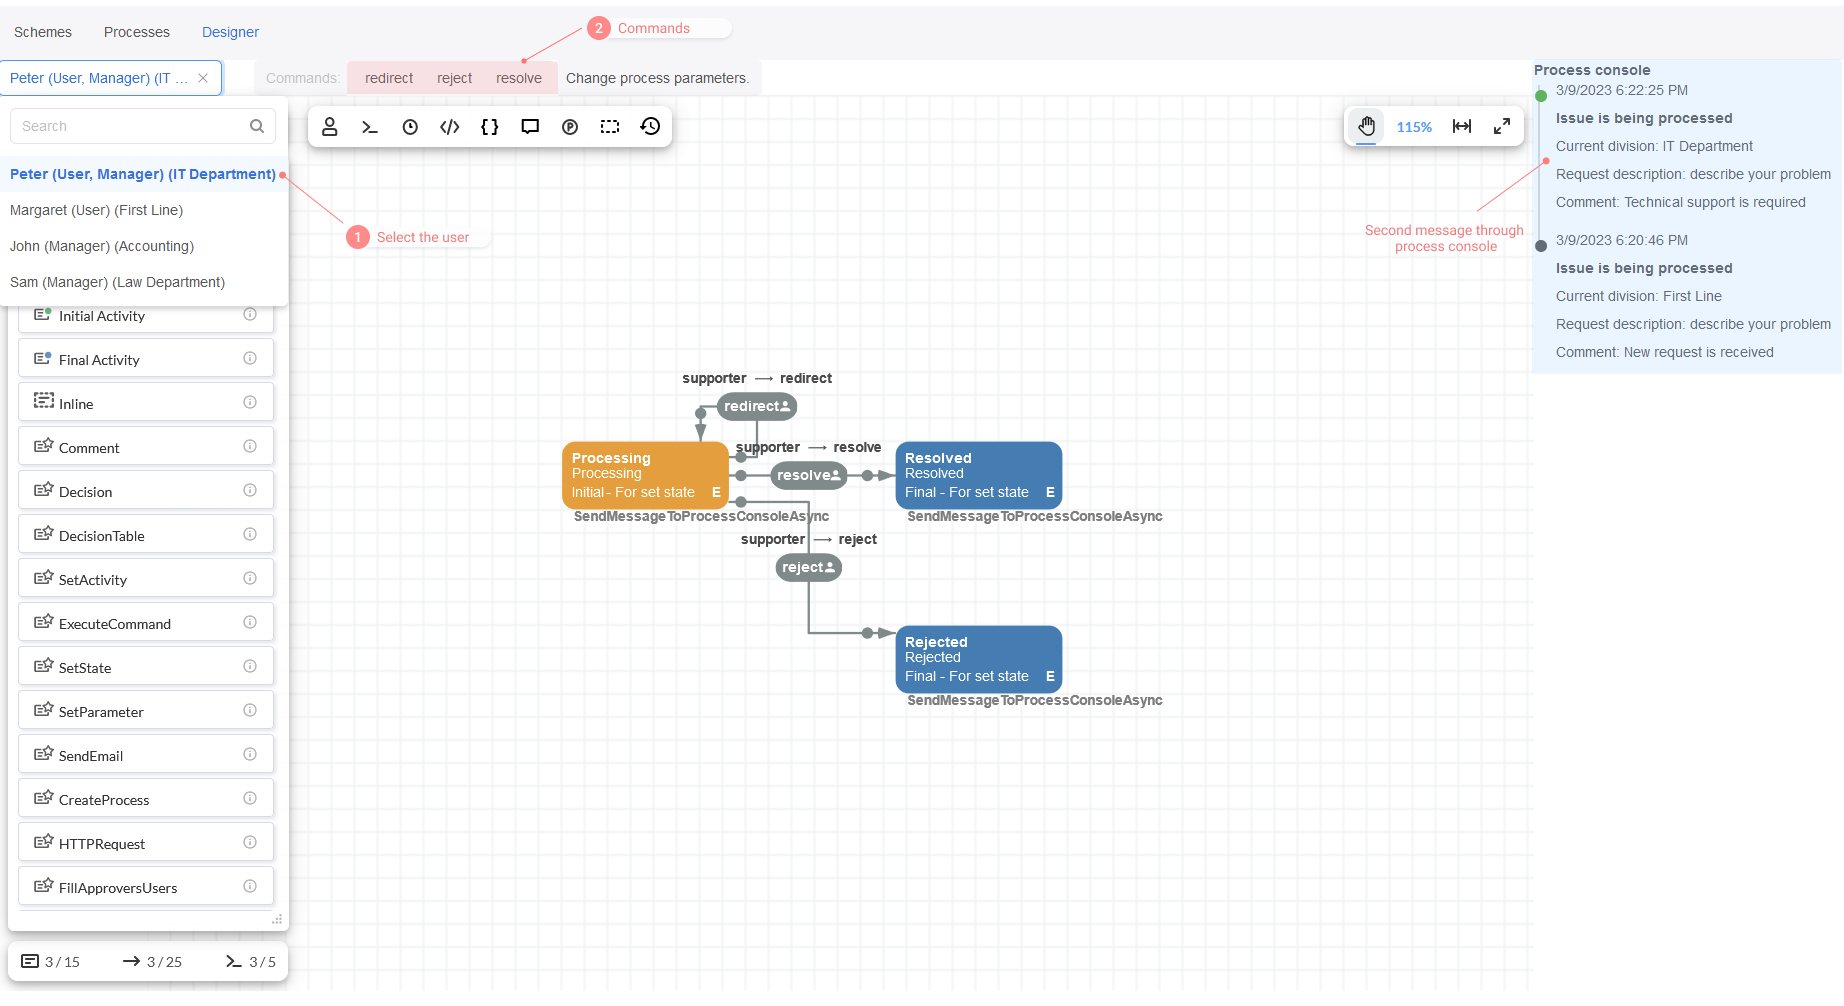
Now, you will see the second console message where the current state, Division, and the updated Comment are specified. The Description
was not changed, so it is kept. You can select the user from IT Department and click on command Resolve.
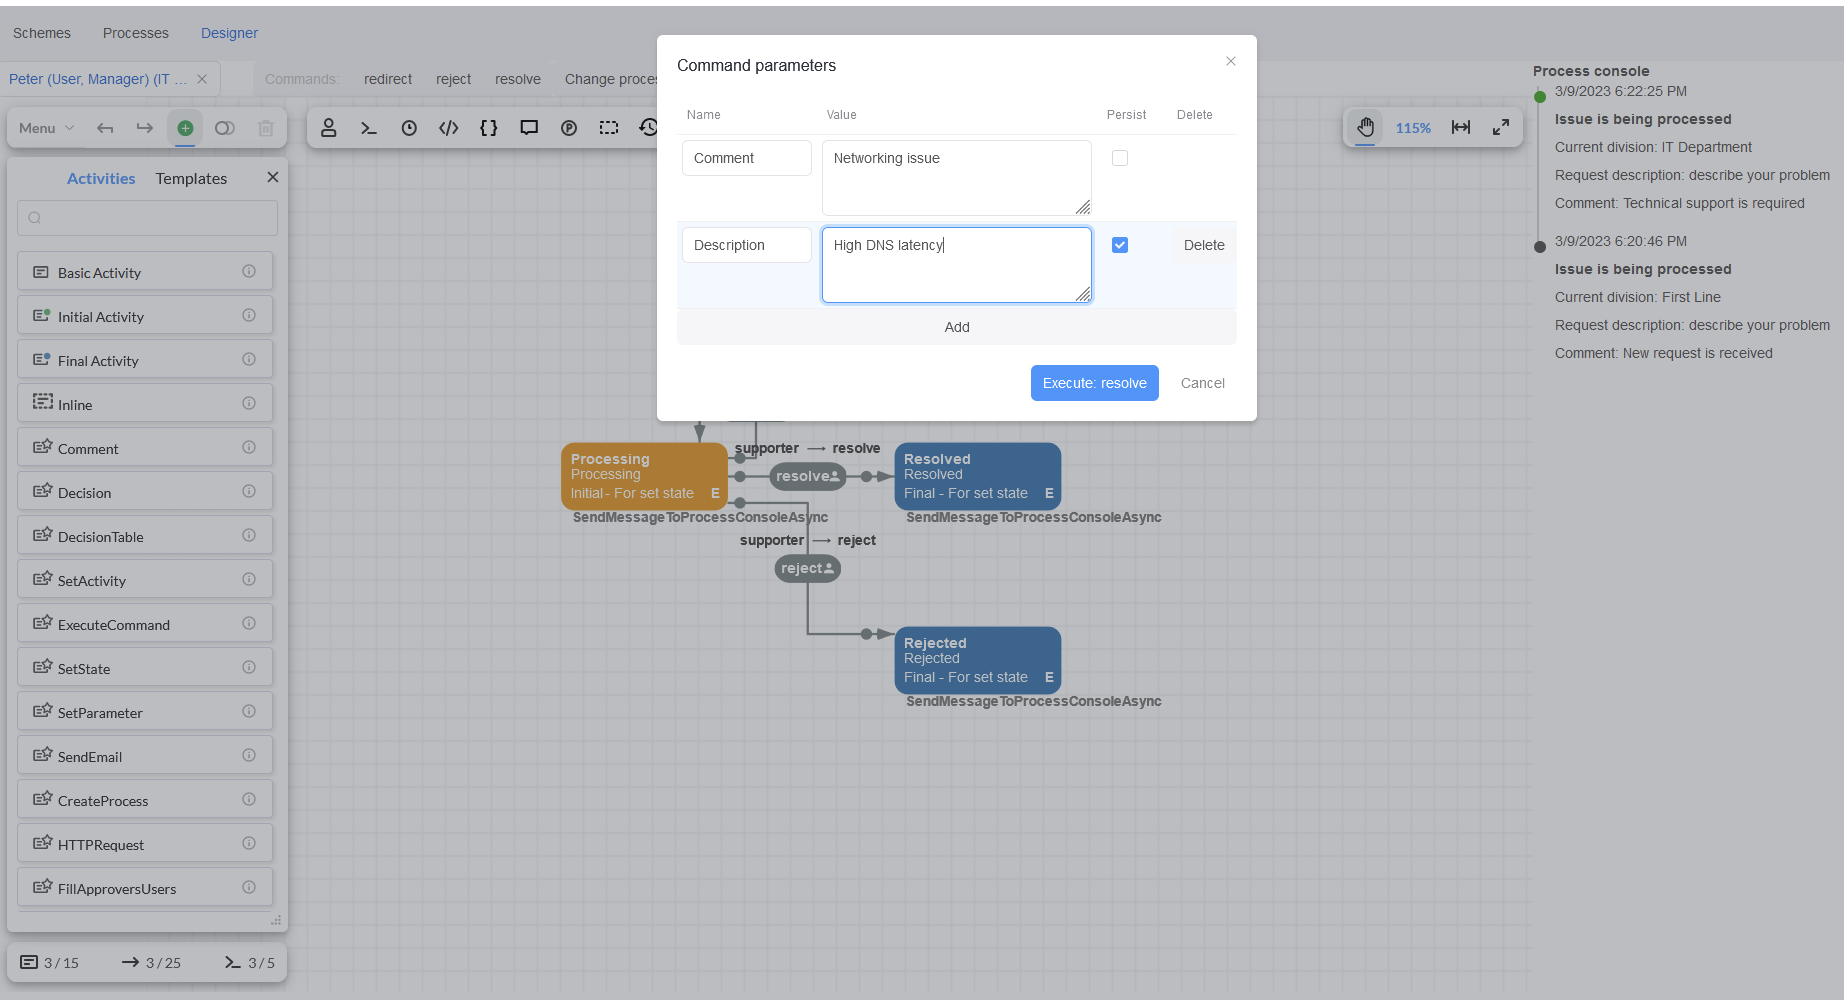
Next, add the issue Description and Comment to click on button Execute resolve in the 'Command parameters' window.
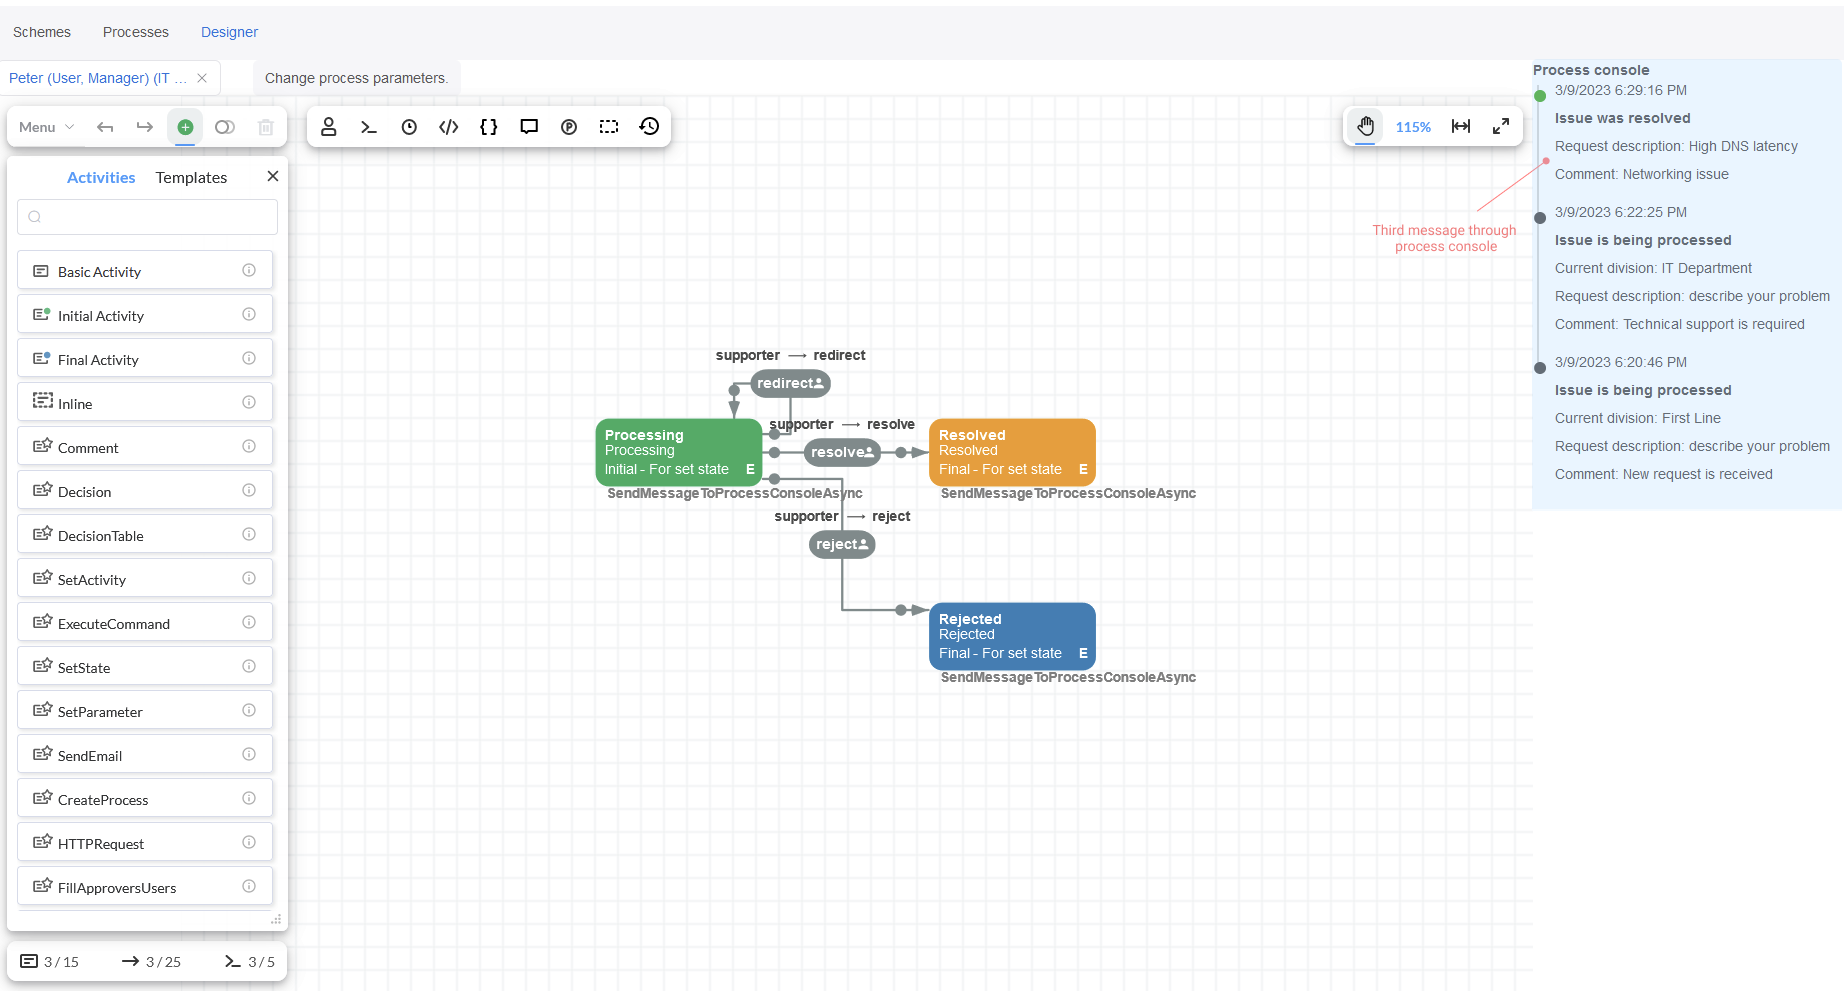
Finally, the third message "Issue was resolved", and the updated Comment and Description will be displayed in the Process console.
Conclusion
In this tutorial we demonstrated how quickly can be connected an external library like SignalR, and we have moved forward on several features and extended functionalities for interacting with the React sample application.