Framework-agnostic Setup
Also check out the integration tips section.
An integrated project is included at the end of this article. Furthermore, it is possible to download our samples and see how to manage workflows in web applications.
| # | Components | Description | Documentation |
|---|---|---|---|
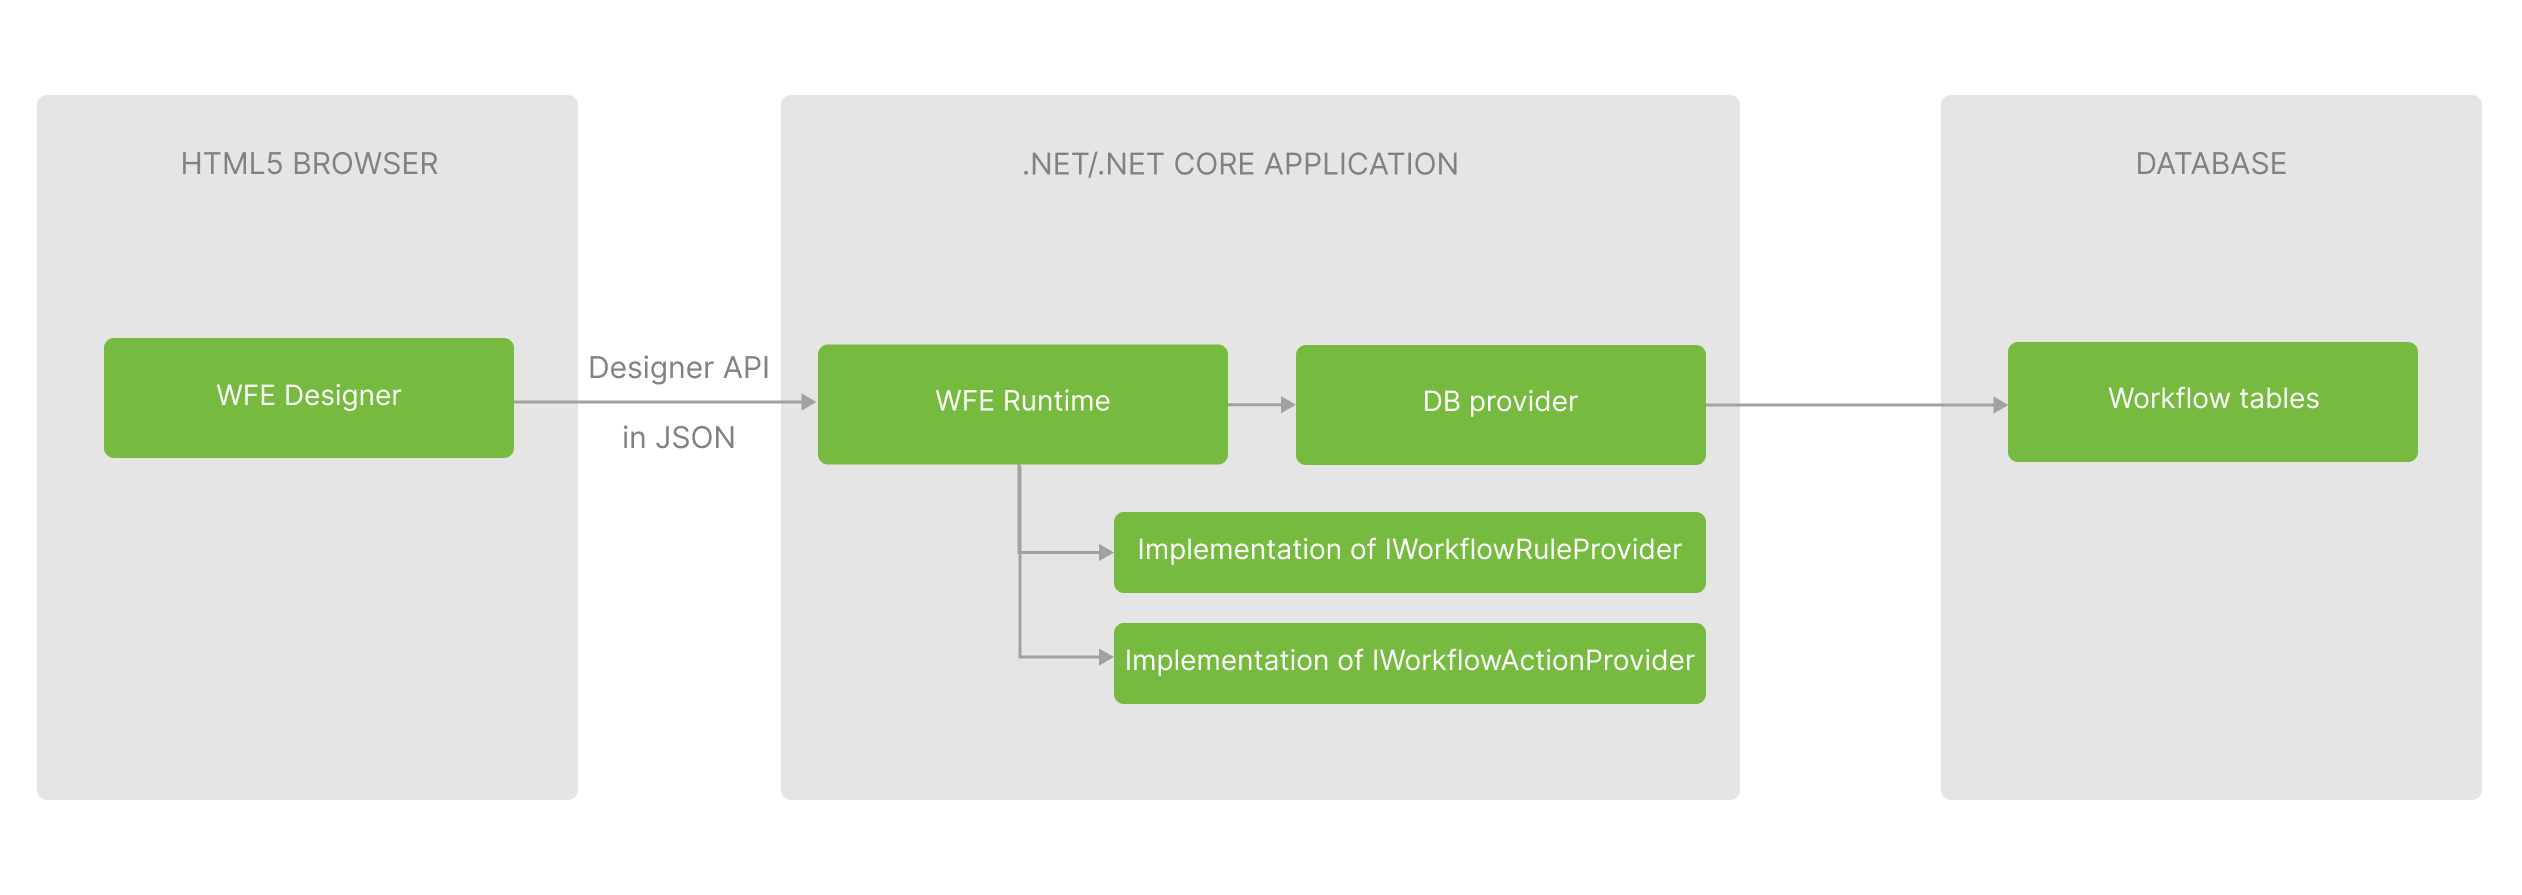
| 1 | WFE Designer | It is a javascript object on a web page where you want the designer to be displayed, and a function that will process requests from the designer and pass them to WorkflowRuntime. | Designer |
| 2 | WFE Runtime | This object allows to create a process, retrieve a list of commands, execute commands, set a process state, etc. It also provides an API for the designer, so you have to create one WorkflowRuntime object in your application or service and call its methods to enable document management functionality. | Runtime, Basic Operations |
| 3 | DB Provider | You have to use persistence providers to connect to the process database. Depending on your database type, you have to create an object and pass it to WorkflowRuntime. | Persistence |
| 4 | Workflow tables | A set of database tables. It's needed for workflow storage. | Persistence |
| 5 | IWorkflowRuleProvider | Provides for security integration. It allows you to call the available authorization methods, or write new ones. Rules represent the functions that are called at a certain moment in time. | Rules |
| 6 | IWorkflowActionProvider | Provides for business logic integration. It allows you to call your own business functions for each step of the workflow. | Actions |
This article describes an example for ASP.NET Core MVC web application and MS SQL database.
Integration with solutions based on other technologies (ASP.NET WebForms, .NET WinForms) or databases (MySQL, PostgreSQL, Oracle, MongoDB and others) is roughly the same and should not entail any difficulties.
Integrating Workflow Engine into an application takes about an hour and consists of 6 simple steps:
- Creating an empty solution in Visual Studio or JetBrains Rider.
- Setting up the database.
- Initializing WorkflowRuntime.
- Connecting the Designer.
- Creating a document workflow scheme.
- Creating a process and calling commands.
If you plan to integrate Workflow Designer into an Angular-based or React-based application, read the following guide.
0. Video tutorial
1. Creating an empty solution
Firstly, it will be required to create an empty solution where will be created a class library project (WorkflowLib) and an ASP.NET Core MVC web application (Model-View-Controller) i.e. the Workflow Designer project. In the preferred IDE, you should choose 'New Solution' -> ' EmptySolution'.
2. Setting up the database
Download our .NET Core persistence provider here. Moreover, you might download providers from GitHub repository.
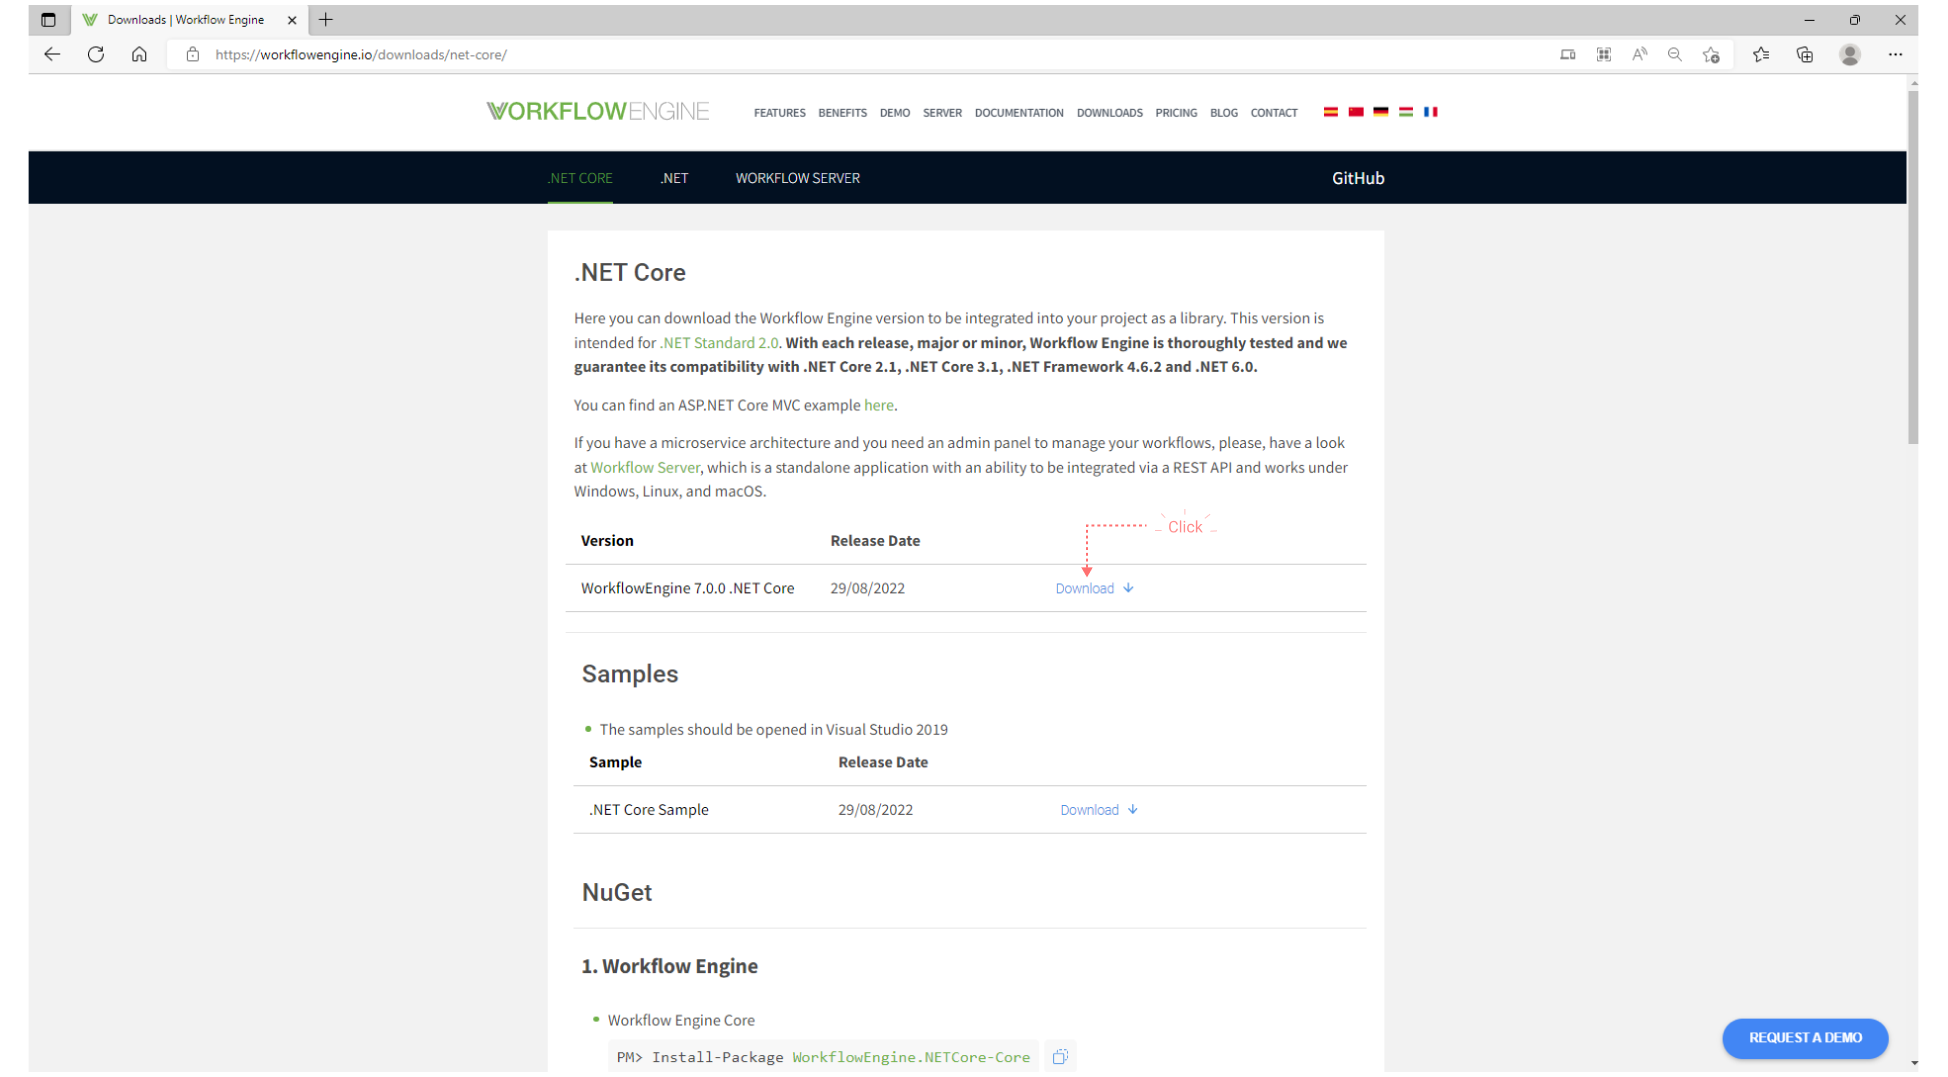
Learn more about persistence.
3. Initializing WorkflowRuntime
3.1. Create a Class Library project in Visual Studio or JetBrains Rider. It can be called: WorkflowLib.
Starting with WFE 7.0, the artifacts for the .NET Framework are no longer available. The .NET Framework 4.6.2 is now the minimum supported version (netstandard2.0), except for Oracle Provider, for which the minimum version is .NET Core 3.0 (netstandard2.1).
3.2. Add the following NuGet packages into your project (.NET Framework / .NET Core):
Once NuGet packets are installed, assemblies will be added to the project.
3.3. Add reference System.Configuration (for .NET Framework only).
3.4. Create a WorkflowInit.cs file. Add the following namespaces to the usings section:
using System;
using System.Xml.Linq;
using OptimaJet.Workflow.Core.Builder;
using OptimaJet.Workflow.Core.Bus;
using OptimaJet.Workflow.Core.Runtime;
using OptimaJet.Workflow.DbPersistence;
Add the initialization of the WorkflowRuntime object. It should look like this:
public static class WorkflowInit
{
    private static readonly Lazy<WorkflowRuntime> LazyRuntime = new Lazy<WorkflowRuntime>(InitWorkflowRuntime);

    public static WorkflowRuntime Runtime
    {
        get { return LazyRuntime.Value; }
    }

    public static string ConnectionString { get; set; }

    private static WorkflowRuntime InitWorkflowRuntime()
    {
        // TODO Uncomment for .NET Framework if you don't set ConnectionString externally.
        //ConnectionString = System.Configuration.ConfigurationManager.ConnectionStrings["ConnectionString"].ConnectionString;

        if (string.IsNullOrEmpty(ConnectionString))
        {
            throw new Exception("Please init ConnectionString before calling the Runtime!");
        }
        // TODO If you have a license key, you have to register it here
        //WorkflowRuntime.RegisterLicense("your license key text");

        // TODO If you are using database different from SQL Server you have to use different persistence provider here.
        var dbProvider = new MSSQLProvider(ConnectionString);

        var builder = new WorkflowBuilder<XElement>(
            dbProvider,
            new OptimaJet.Workflow.Core.Parser.XmlWorkflowParser(),
            dbProvider
        ).WithDefaultCache();

        var runtime = new WorkflowRuntime()
            .WithBuilder(builder)
            .WithPersistenceProvider(dbProvider)
            .RunMigrations()
            .EnableCodeActions()
            .SwitchAutoUpdateSchemeBeforeGetAvailableCommandsOn()
            .AsSingleServer();

        var plugin = new OptimaJet.Workflow.Plugins.BasicPlugin();
        // Settings for SendEmail actions
        // plugin.Setting_Mailserver = "smtp.yourserver.com";
        // plugin.Setting_MailserverPort = 25;
        // plugin.Setting_MailserverFrom = "from@yourserver.com";
        // plugin.Setting_MailserverLogin = "login@yourserver.com";
        // plugin.Setting_MailserverPassword = "pass";
        // plugin.Setting_MailserverSsl = true;
        runtime.WithPlugin(plugin);

        // events subscription
        runtime.OnProcessActivityChanged += (sender, args) => { };
        runtime.OnProcessStatusChanged += (sender, args) => { };
        // TODO If you have planned to use Code Actions functionality that required references to external assemblies
        // you have to register them here
        //runtime.RegisterAssemblyForCodeActions(Assembly.GetAssembly(typeof(SomeTypeFromMyAssembly)));

        // starts the WorkflowRuntime
        // TODO If you have planned use Timers the best way to start WorkflowRuntime is somewhere outside
        // of this function in Global.asax for example
        runtime.Start();

        return runtime;
    }
}
If you have a license key, add a call to the WorkflowRuntime.RegisterLicense method with the license key.
You can find more information in this documentation section.
4. Connecting the Designer
Starting with Workflow Engine 13.0, you can quickly launch the designer using the npx command. To do so, enter the following command in
your terminal:
npx @optimajet/workflow-designer http:localhost:5000/Designer/API Scheme
First parameter: The address of your backend server that hosts the workflow engine. By default, this is set tohttps://demo.workflowengine.io/Designer/API.Second parameter: The name of the schema to connect to. The default isSimpleWF.
Starting with WFE 7.0, the artifacts for the .NET Framework are no longer available. The .NET Framework 4.6.2 is now the minimum supported version (netstandard2.0), except for Oracle Provider, for which the minimum version is .NET Core 3.0 (netstandard2.1).
4.1. Create an ASP.NET Core MVC web application (choose Model-View-Controller). You just should create a project according to the dotnet
template. This project can be called WorkflowDesigner. The instructions from Microsoft are the following:
4.2. Add the following NuGet packages to the project (.NET Framework / .NET Core):
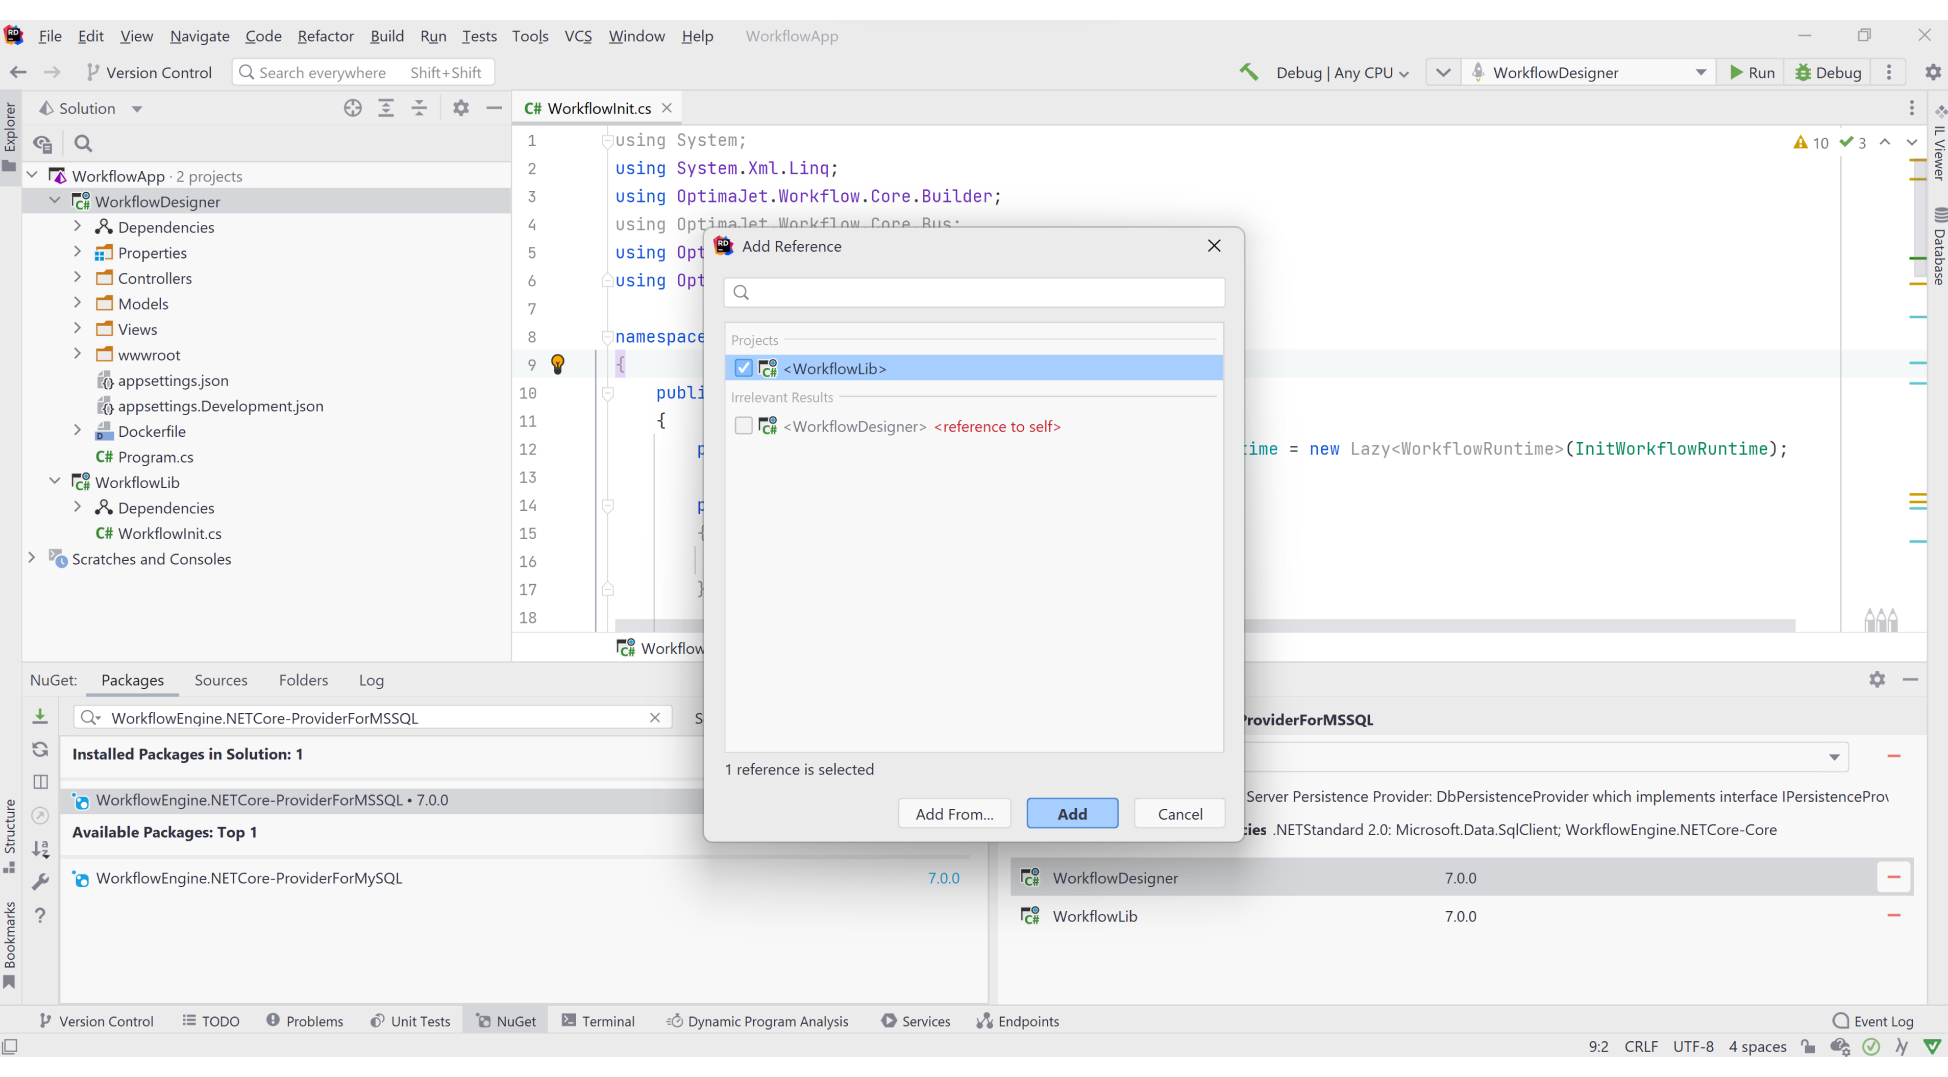
4.3. The reference to the class library project: WorkflowLib from step 3, must be added to have access to the
WorkflowRuntime object. You can connect the dependency as indicated below:
4.4 Then, create a new controller DesignerController which will handle the designer's requests to the backend.
using System.Collections.Specialized;
using System.Text;
using Microsoft.AspNetCore.Mvc;
using OptimaJet.Workflow;
using WorkflowLib;

namespace WorkflowDesigner.Controllers
{
    public class DesignerController : Controller
    {
        public async Task<IActionResult> Api()
        {
            Stream? filestream = null;
            var parameters = new NameValueCollection();

            //Defining the request method
            var isPost = Request.Method.Equals("POST", StringComparison.OrdinalIgnoreCase);

            //Parse the parameters in the query string
            foreach (var q in Request.Query)
            {
                parameters.Add(q.Key, q.Value.First());
            }

            if (isPost)
            {
                //Parsing the parameters passed in the form
                var keys = parameters.AllKeys;

                foreach (var key in Request.Form.Keys)
                {
                    if (!keys.Contains(key))
                    {
                        parameters.Add(key, Request.Form[key]);
                    }
                }

                //If a file is passed
                if (Request.Form.Files.Count > 0)
                {
                    //Save file
                    filestream = Request.Form.Files[0].OpenReadStream();
                }
            }

            //Calling the Designer Api and store answer
            var (result, hasError) = await WorkflowInit.Runtime.DesignerAPIAsync(parameters, filestream);

            //If it returns a file, send the response in a special way
            if (parameters["operation"]?.ToLower() == "downloadscheme" && !hasError)
                return File(Encoding.UTF8.GetBytes(result), "text/xml");

            //response
            return Content(result);
        }
    }
}
In addition, the following method must be appended to the created DesignerController:
public IActionResult Index()
{
    return View();
}
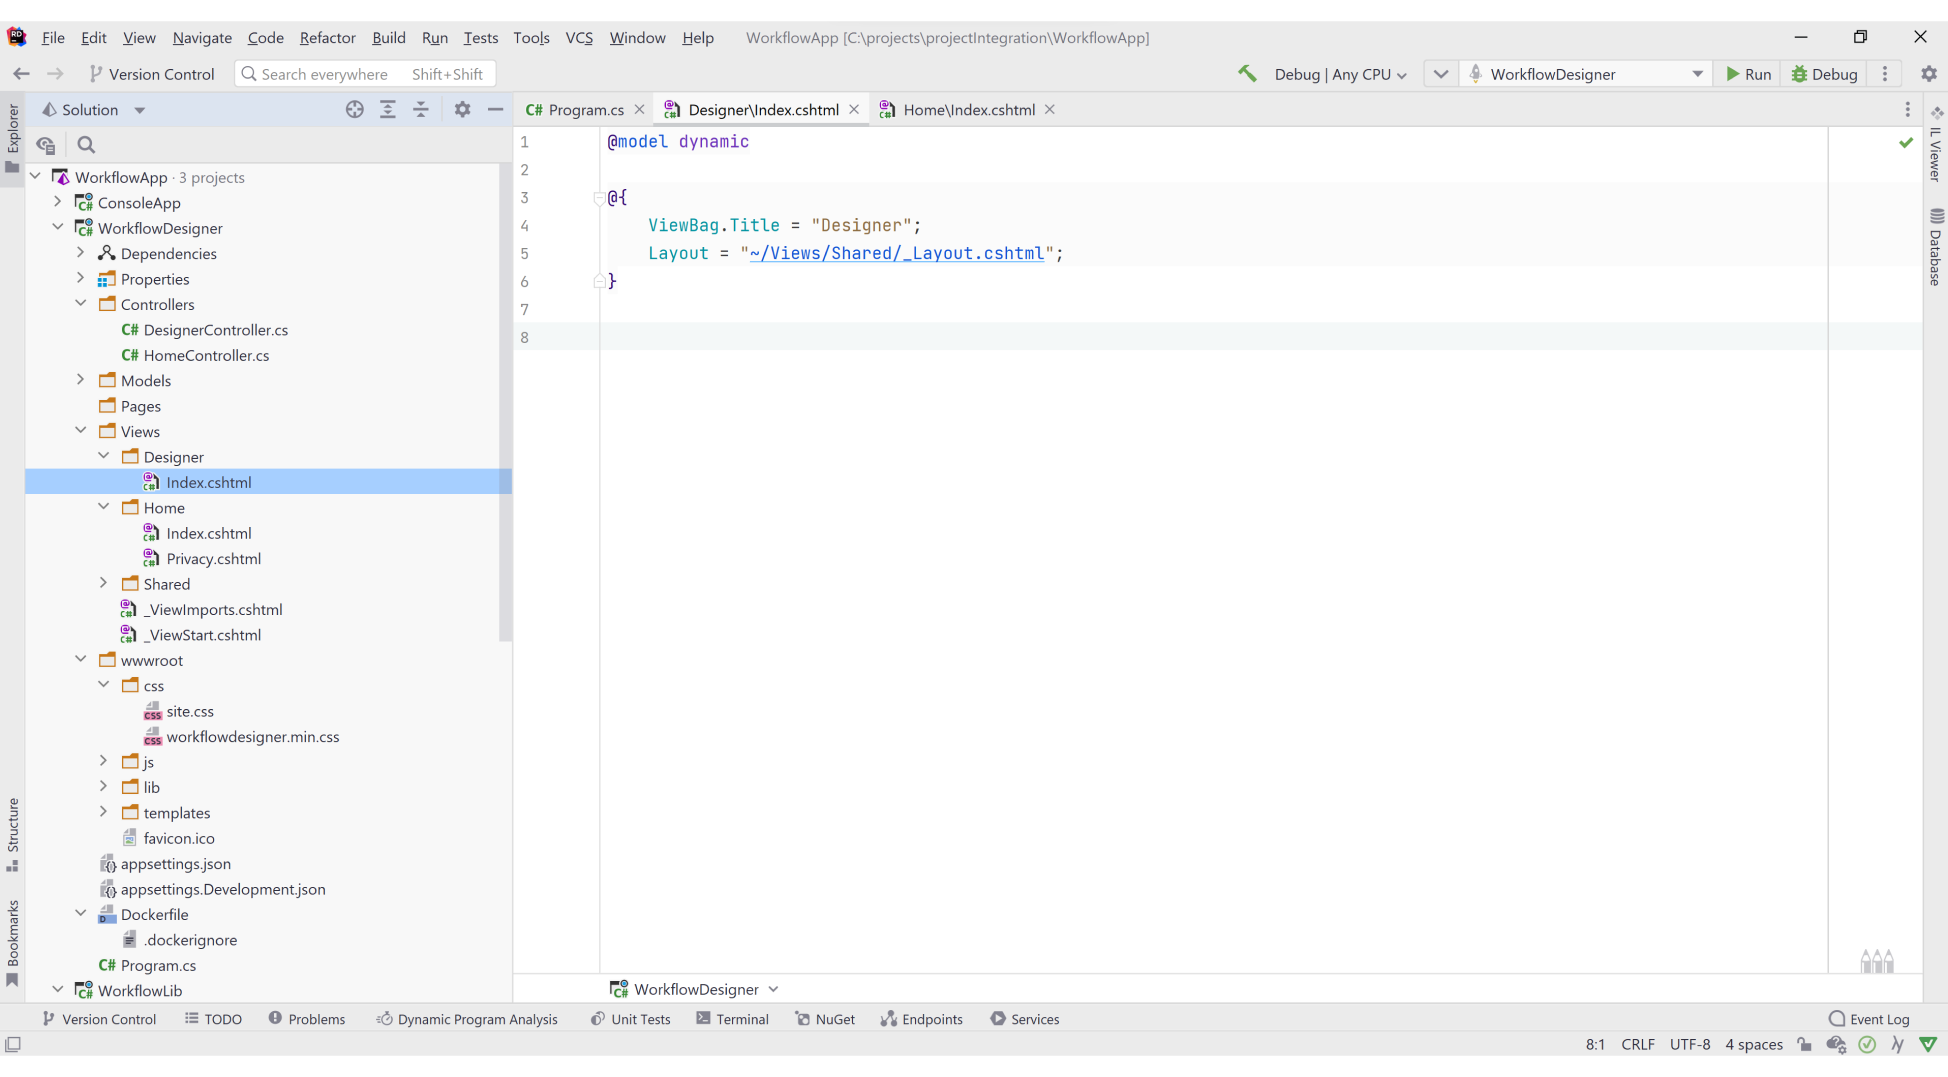
4.5 Next, the directory called 'Designer' and a html page: Index.cshtml, which the Designer will be opened, must be created. It should
be located in the folder 'Views' according the ASP NET Core architecture approach. Furthermore, the link on the main page to access the
Designer should be included in the page: Index.cshtml in 'Home' directory.
- In Designer directory the following code should be added in
Index.cshtml:
@{
    ViewBag.Title = "Designer";
    Layout = "~/Views/Shared/_Layout.cshtml";
}
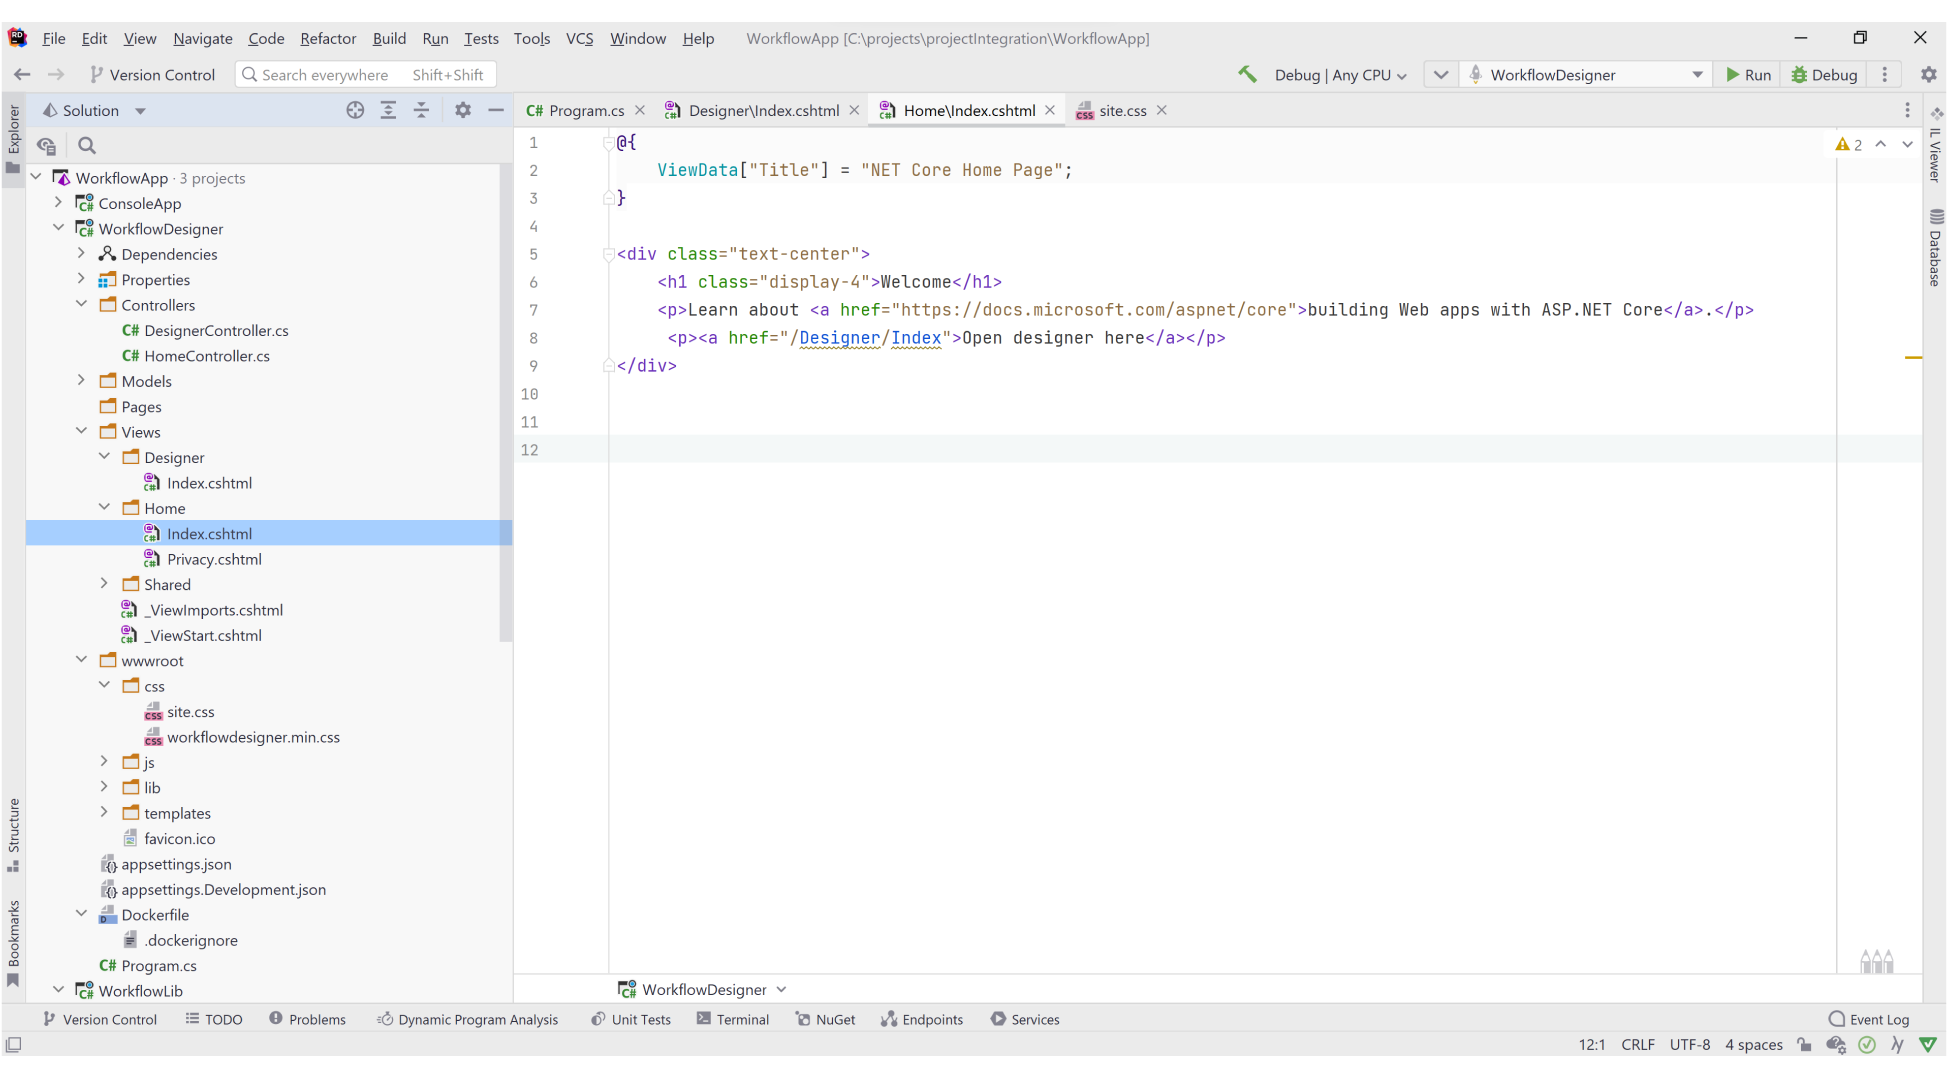
- Moreover, in
Index.cshtmlin Home directory this code:
<div class="text-center">
    <h1 class="display-4">Welcome</h1>
    <p><a href="/Designer/Index">Open designer here</a></p>
</div>
4.6 Download the frontend artifacts for the Designer to the directory with static content: /wwwroot. They can be found in the
WorkflowEngine.NET site. The folder 'templates' is required,
besides the file: workflowdesigner.min.css and workflowdesigner.min.js (save them in 'css' and 'js' directories respectively).
4.7. The ConnectionString should be annexed to the settings and use it at the start of the application. This is required for the
Designer API to work. Then, add a database connection string
in the ConnectionStrings section in web.config or appsettings.json configuration file.
- For .NET Framework:
<connectionStrings>
<add name="ConnectionString"
  connectionString="Data Source=(local);Initial Catalog=WFE;Integrated Security=False;User ID=sa;Password=1"
  providerName="System.Data.SqlClient" />
</connectionStrings>
- For .NET Core:
{
"ConnectionStrings": {
    "DefaultConnection": "Data Source=(local);Initial Catalog=wfe_sample;User ID=sa;Password=1"
    }
}
Make sure that server address, authentication type, login and password match your settings.
Furthermore, the ConnectionString initialization for WorkflowRuntime is needed.
- In case of .NET Framework: Check that the following code in
InitWorkflowRuntimemethod fromWorkflowLibproject inWorkflowInit.csis uncommented:
ConnectionString = System.Configuration.ConfigurationManager.ConnectionStrings["ConnectionString"].ConnectionString;
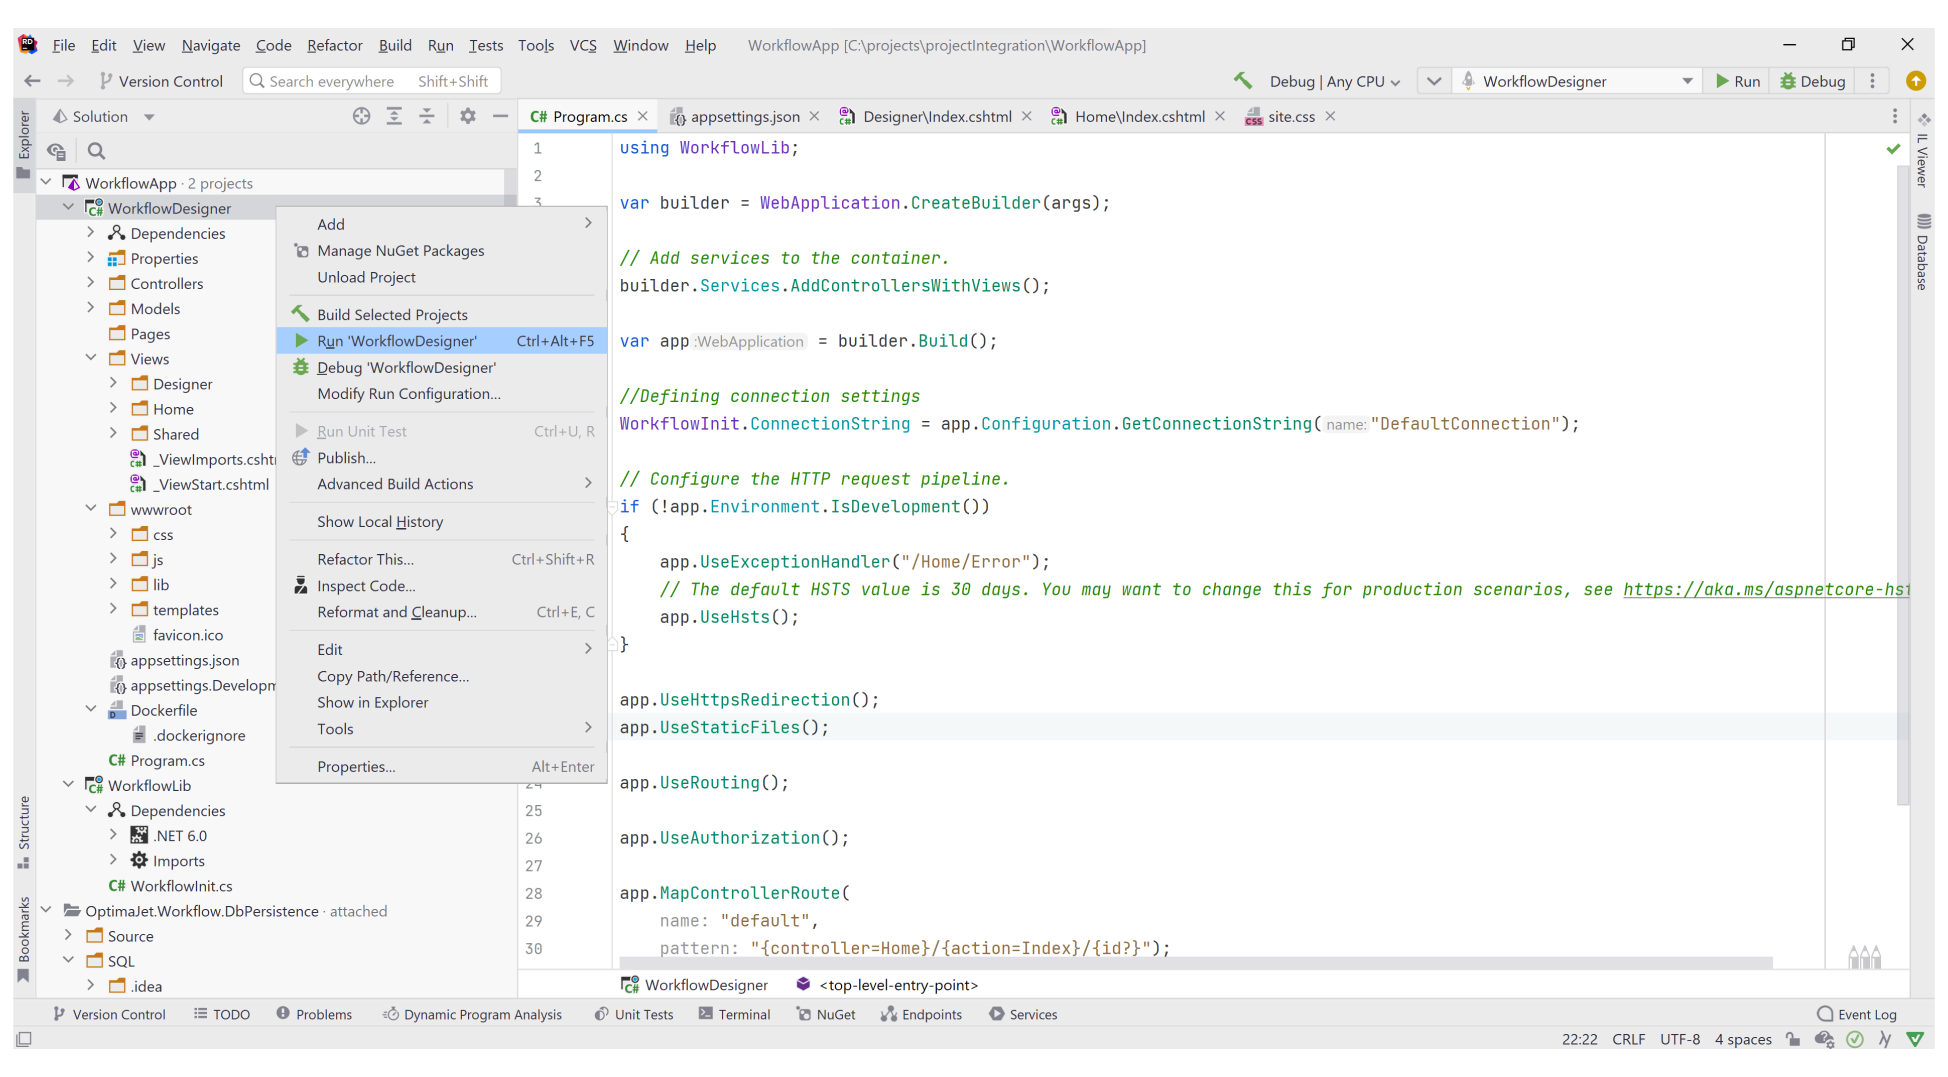
- For .NET Core:
Insert the following code in
Program.cs:
using WorkflowLib;
...

//Defining connection settings
WorkflowInit.ConnectionString = app.Configuration.GetConnectionString("DefaultConnection");
4.8 The main Designer frontend functions must be attached, so a render of the designer to the designer's view should be in
Index.cshtml in Designer directory. The following actions are required:
- Include the links to the files in the folder with static content (the Jquery library is already in the project folder 'template').
- Add the
<div>section where the designer will be placed. - Add also a
<script>section for rendering the designer. A designer object will be created in it, which will send requests to the API, receive data for rendering and display it.
<link href="~/css/workflowdesigner.min.css" rel="stylesheet" type="text/css" />
<script src="~/js/workflowdesigner.min.js" type="text/javascript"></script>
<script src="~/lib/jquery/dist/jquery.min.js" type="text/javascript"></script>

<div id="wfdesigner" style="min-height:600px; max-width: 1200px;"></div>

<script>
    var QueryString = function () {
        // This function is anonymous, is executed immediately and
        // the return value is assigned to QueryString!
        var query_string = {};
        var query = window.location.search.substring(1);
        var vars = query.split("&");
        for (var i = 0; i < vars.length; i++) {
            var pair = vars[i].split("=");
            // If first entry with this name
            if (typeof query_string[pair[0]] === "undefined") {
                query_string[pair[0]] = pair[1];
                // If second entry with this name
            } else if (typeof query_string[pair[0]] === "string") {
                var arr = [query_string[pair[0]], pair[1]];
                query_string[pair[0]] = arr;
                // If third or later entry with this name
            } else {
                query_string[pair[0]].push(pair[1]);
            }
        }
        return query_string;
    }();
    //Load settings
    var schemecode =  QueryString.code ?  QueryString.code : 'SimpleWF';
    var processid = QueryString.processid;
    var graphwidth = 1200;
    var graphminheight = 600;
    var graphheight = graphminheight;
    var wfdesigner = undefined;

    //Recreate designer object
    function wfdesignerRedraw() {
        var data;
        if (wfdesigner != undefined) {
            wfdesigner.destroy();
        }
        wfdesigner = new WorkflowDesigner({
            name: 'simpledesigner',
            apiurl: '/Designer/API',
            renderTo: 'wfdesigner',
            templatefolder: '/templates/',
            graphwidth: graphwidth,
            graphheight: graphheight
        });
        if (data == undefined) {
            var isreadonly = false;
            if (processid != undefined && processid != '')
                isreadonly = true;
            var p = { schemecode: schemecode, processid: processid, readonly: isreadonly };
            if (wfdesigner.exists(p))
                wfdesigner.load(p);
            else
                wfdesigner.create(schemecode);
        }
        else {
            wfdesigner.data = data;
            wfdesigner.render();
        }
    }
    wfdesignerRedraw();
    //Adjusts the size of the designer window
    $(window).resize(function () {
        if (window.wfResizeTimer) {
            clearTimeout(window.wfResizeTimer);
            window.wfResizeTimer = undefined;
        }
        window.wfResizeTimer = setTimeout(function () {
            var w = $(window).width();
            var h = $(window).height();
            if (w > 300)
                graphwidth = w - 40;
            if (h > 300)
                graphheight = h - 250;
            if (graphheight < graphminheight)
                graphheight = graphminheight;
            wfdesigner.resize(graphwidth, graphheight);
        }, 150);
    });
    $(window).resize();

</script>
4.9 The schema management functions or control functions should be inserted as well, so the next steps are recommended:
- Above the
<div>section which was placed the Designer object inIndex.cshtmlin the Designer directory, must be added a<form>section where buttons that are tied to functions, will be drawn inworkflowdesigner.min.js.
...
<form action="" id="uploadform" method="post" enctype="multipart/form-data" onsubmit="tmp()" style="padding-bottom: 8px;">
    <input type="file" name="uploadFile" id="uploadFile" style="display:none" onchange="javascript: UploadScheme(this);">
</form>

<div id="wfdesigner" style="min-height:600px; max-width: 1200px;"></div>
...
- Next, add a function to each button in
Index.cshtmlalso. The names of the functions must indicate what they do.
<script>
    ...

    $(window).resize();
    //Add Control functions

    function DownloadScheme() {
        wfdesigner.downloadscheme();
    }

    var selectSchemeType;
    function SelectScheme(type) {
        if (type)
            selectSchemeType = type;
        var file = $('#uploadFile');
        file.trigger('click');
    }
    function UploadScheme(form) {
        if (form.value=="")
            return;
        wfdesigner.uploadscheme($('#uploadform')[0], function () {
            alert('The file is uploaded!');
        });
    }
    function OnSave() {
        wfdesigner.schemecode = schemecode;
        var err = wfdesigner.validate();
        if (err != undefined && err.length > 0) {
            alert(err);
        }
        else {
            wfdesigner.save(function () {
                alert('The scheme is saved!');
            });
        }
    }

    function OnNew() {
        wfdesigner.create();
    }
</script>
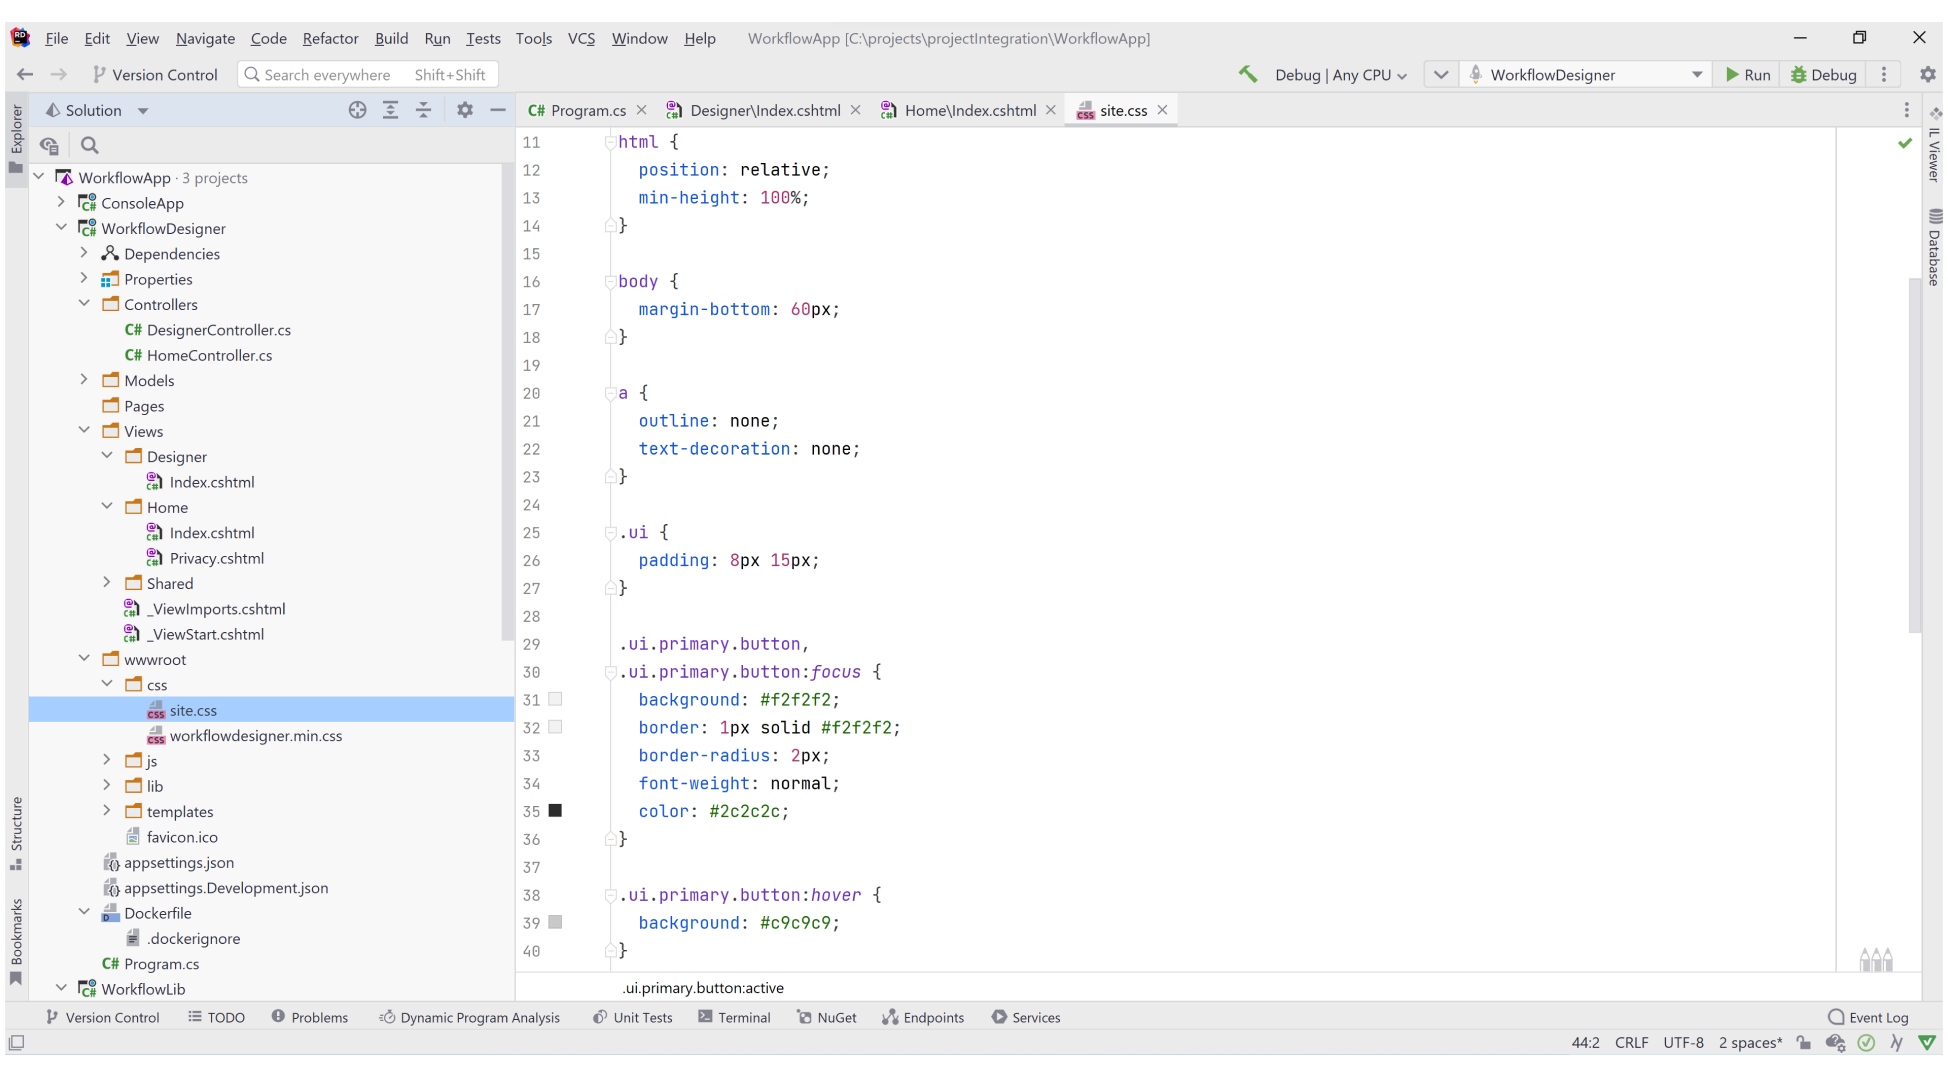
- Then, styles can be set to make the buttons look pretty in
site.cssin the directory where frontend artifacts are located in -> /wwwroot/css/. Probably, you will need to edit the styles of the application and the Designer size.
body {
  margin-bottom: 60px;
}

a {
  outline: none;
  text-decoration: none;
}

.ui {
  padding: 8px 15px;
}

.ui.primary.button,
.ui.primary.button:focus {
  background: #f2f2f2;
  border: 1px solid #f2f2f2;
  border-radius: 2px;
  font-weight: normal;
  color: #2c2c2c;
}

.ui.primary.button:hover {
  background: #c9c9c9;
}

.ui.primary.button:active {
  background: #b5b5b5;
}

.ui.secondary.button,
.ui.secondary.button:focus {
  background: #FFFFFF;
  border: 1px solid #f2f2f2;
  border-radius: 2px;
  font-weight: normal;
  color: #4d4d4d;
}

.ui.secondary.button:hover {
  background: #dbdbdb;
  color: #2c2c2c;
}

.ui.secondary.button:active {
  background: #dbdbdb;
  color: #2c2c2c;
}
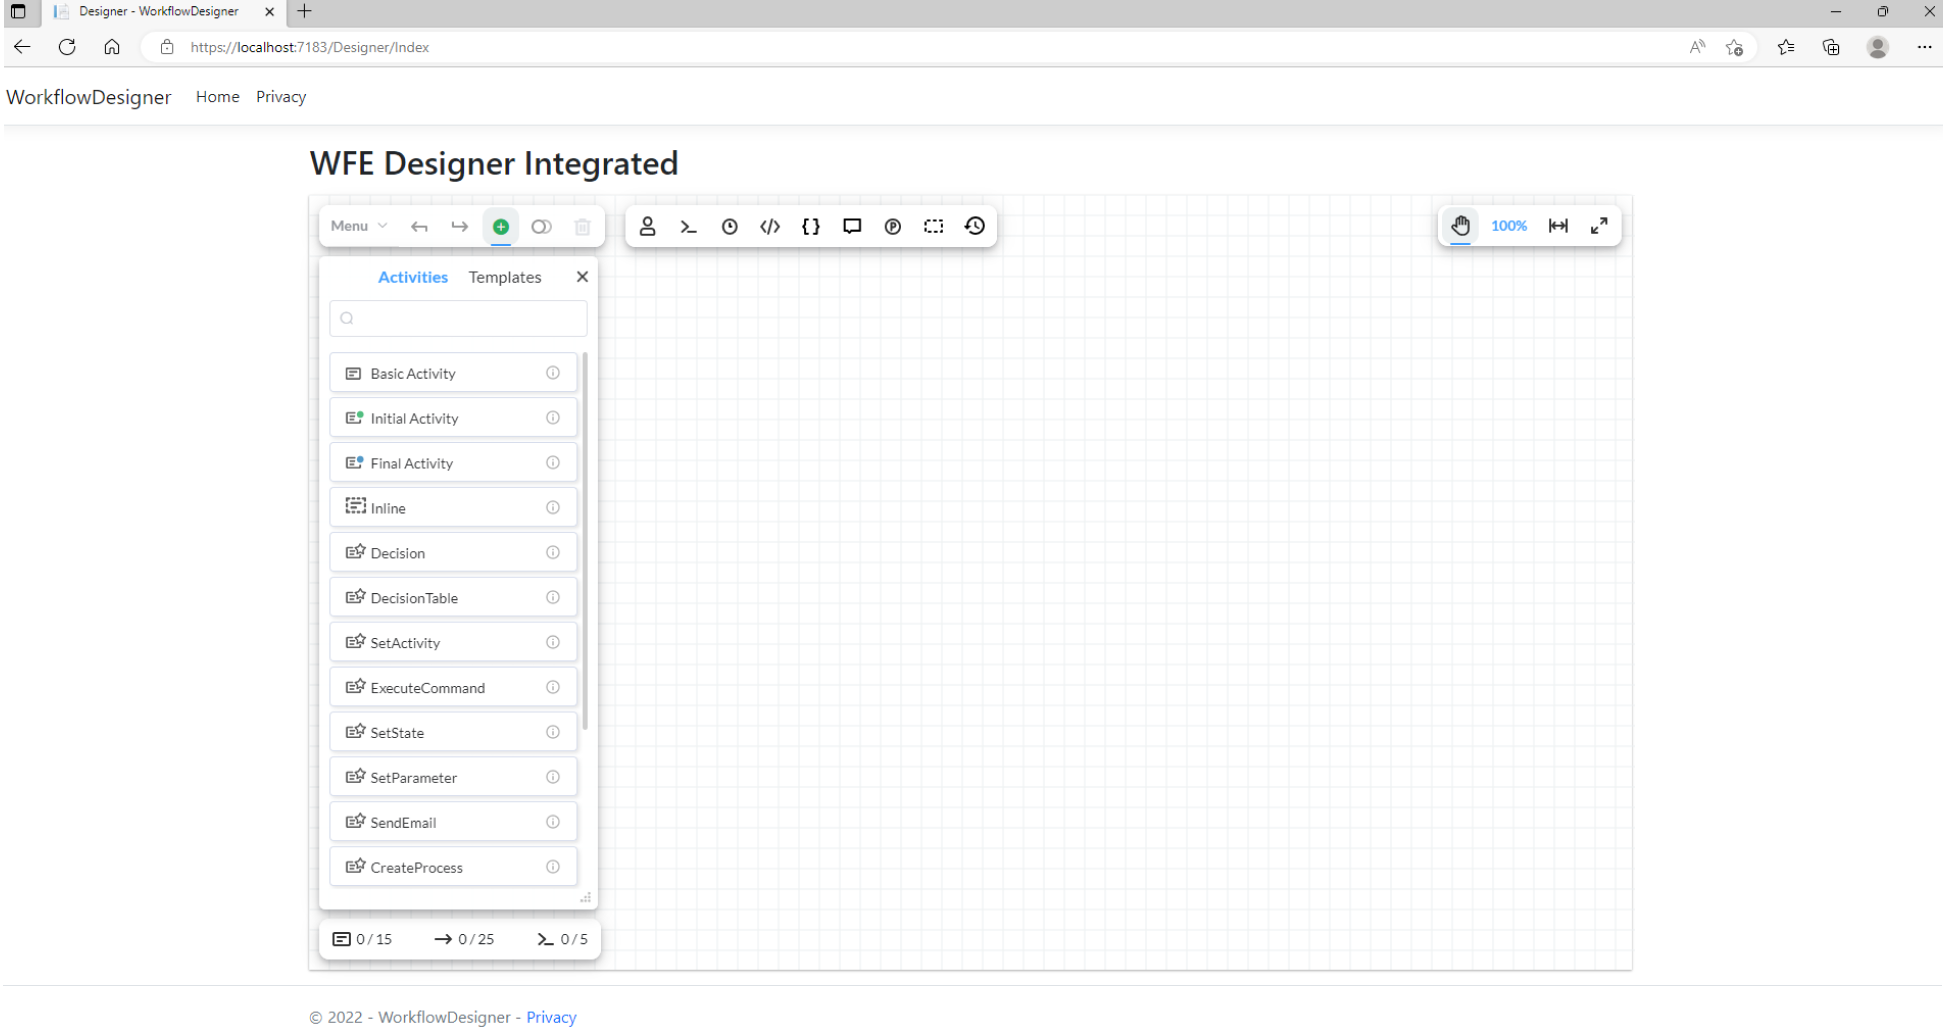
4.10. Finally, run the project. Click on the right-mouse-button in the created application and go to preferred browser.
Afterward, the Designer will be available.
More information related to how to build and connect Workflow Engine Designer can be read here. You can see also:
- WorkflowEngine Designer for JavaScript Sample
- WorkflowEngine Designer for React Sample
- WorkflowEngine Designer for Angular Sample
In case of any issue, check for errors on the page and refer to FAQ. You can learn more about Designer in documentation.
If you see some strange designer appearance, for example a modal windows or check boxes are looking strange, it probably means a 'css' conflict. Feel free to send us a message thought the contact form or at support@optimajet.com, we will do our best to help you.
5. Creating a workflow scheme
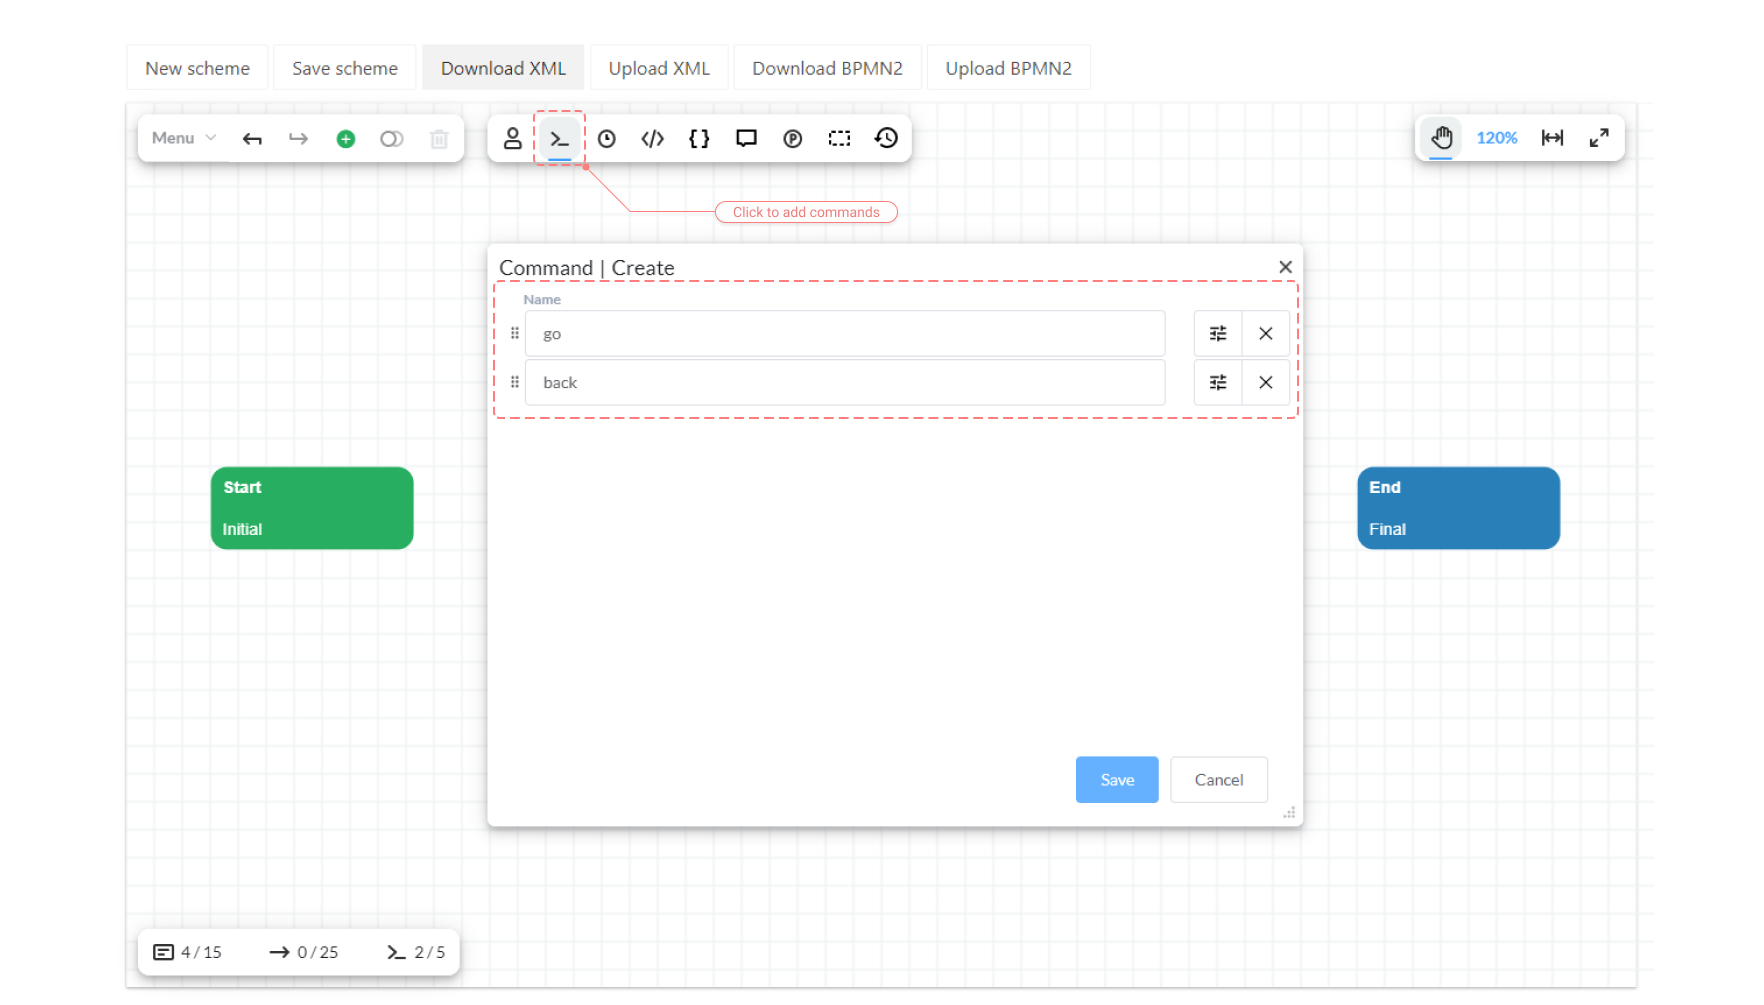
5.1. Create two commands: 'go' and 'back'.
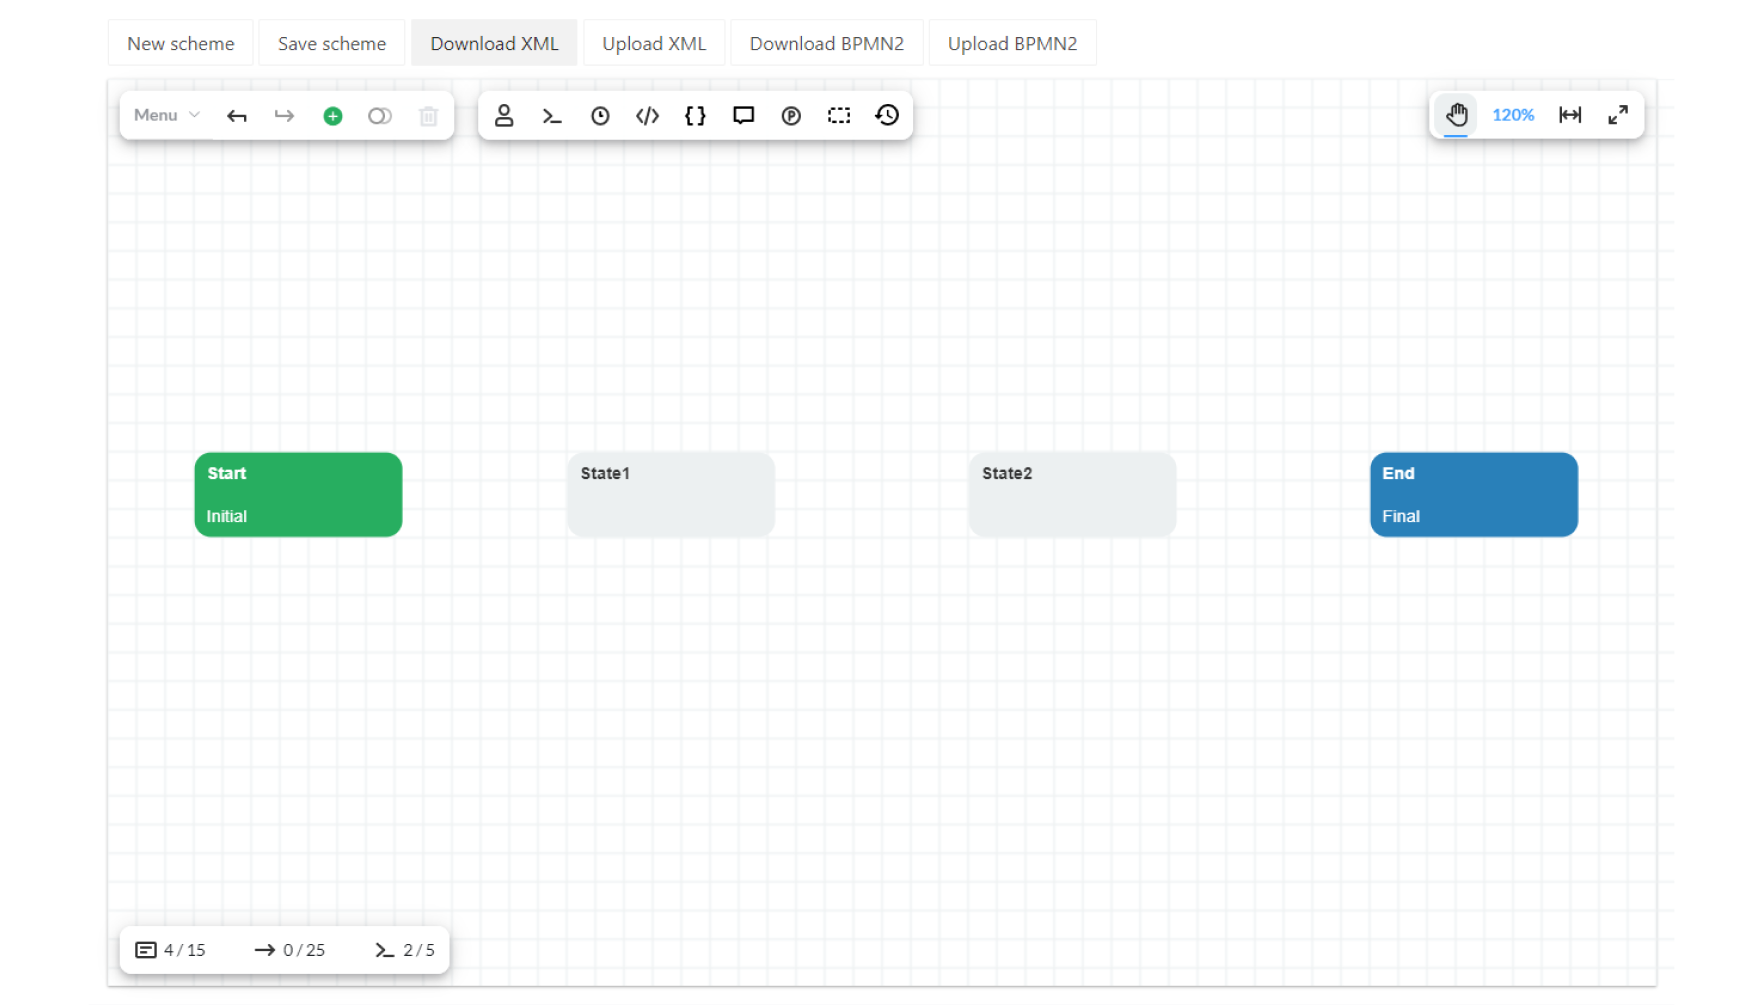
5.2. Create four activities: 'Start', 'State1', 'State2' and 'End'. Set the Initial flag for the Start activity and the Final flag for the End activity.
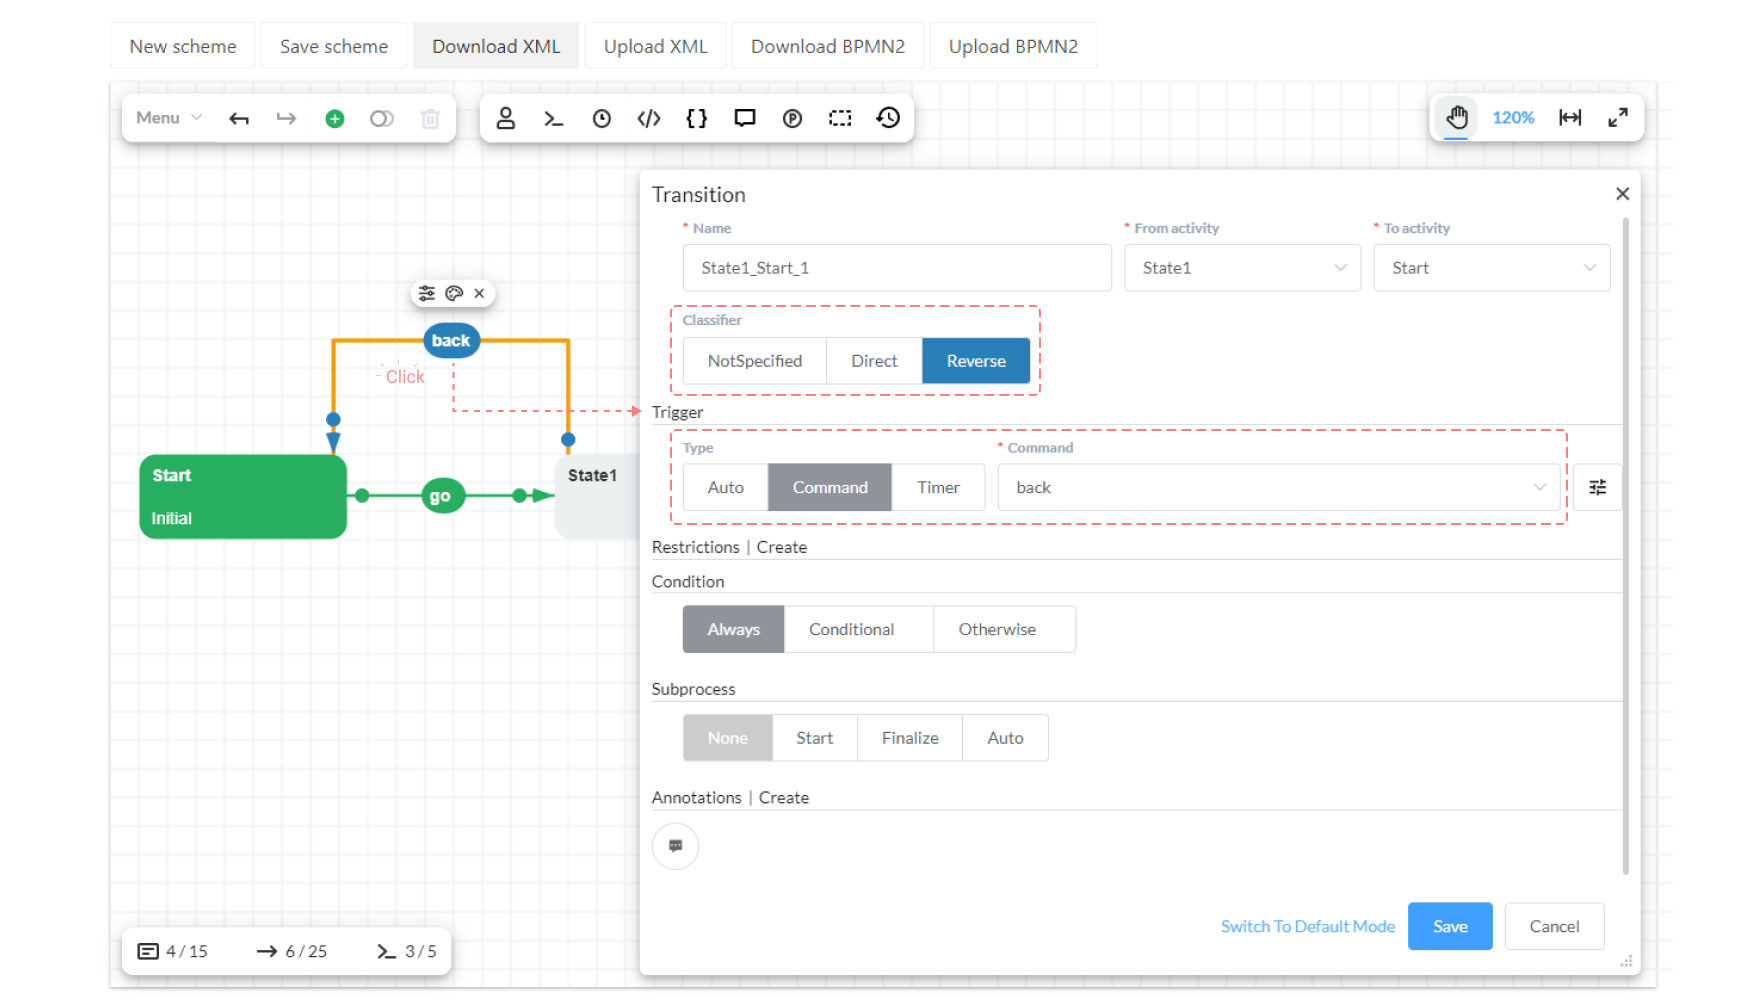
5.3. Create transitions between the activities. For each transition set the Trigger (in this example is set Command as trigger type) and Classifier parameter (it can be: Not Specified, Direct or Reverse).
5.4. Click on 'Save Scheme' button.
You can learn more about Schemes in documentation.
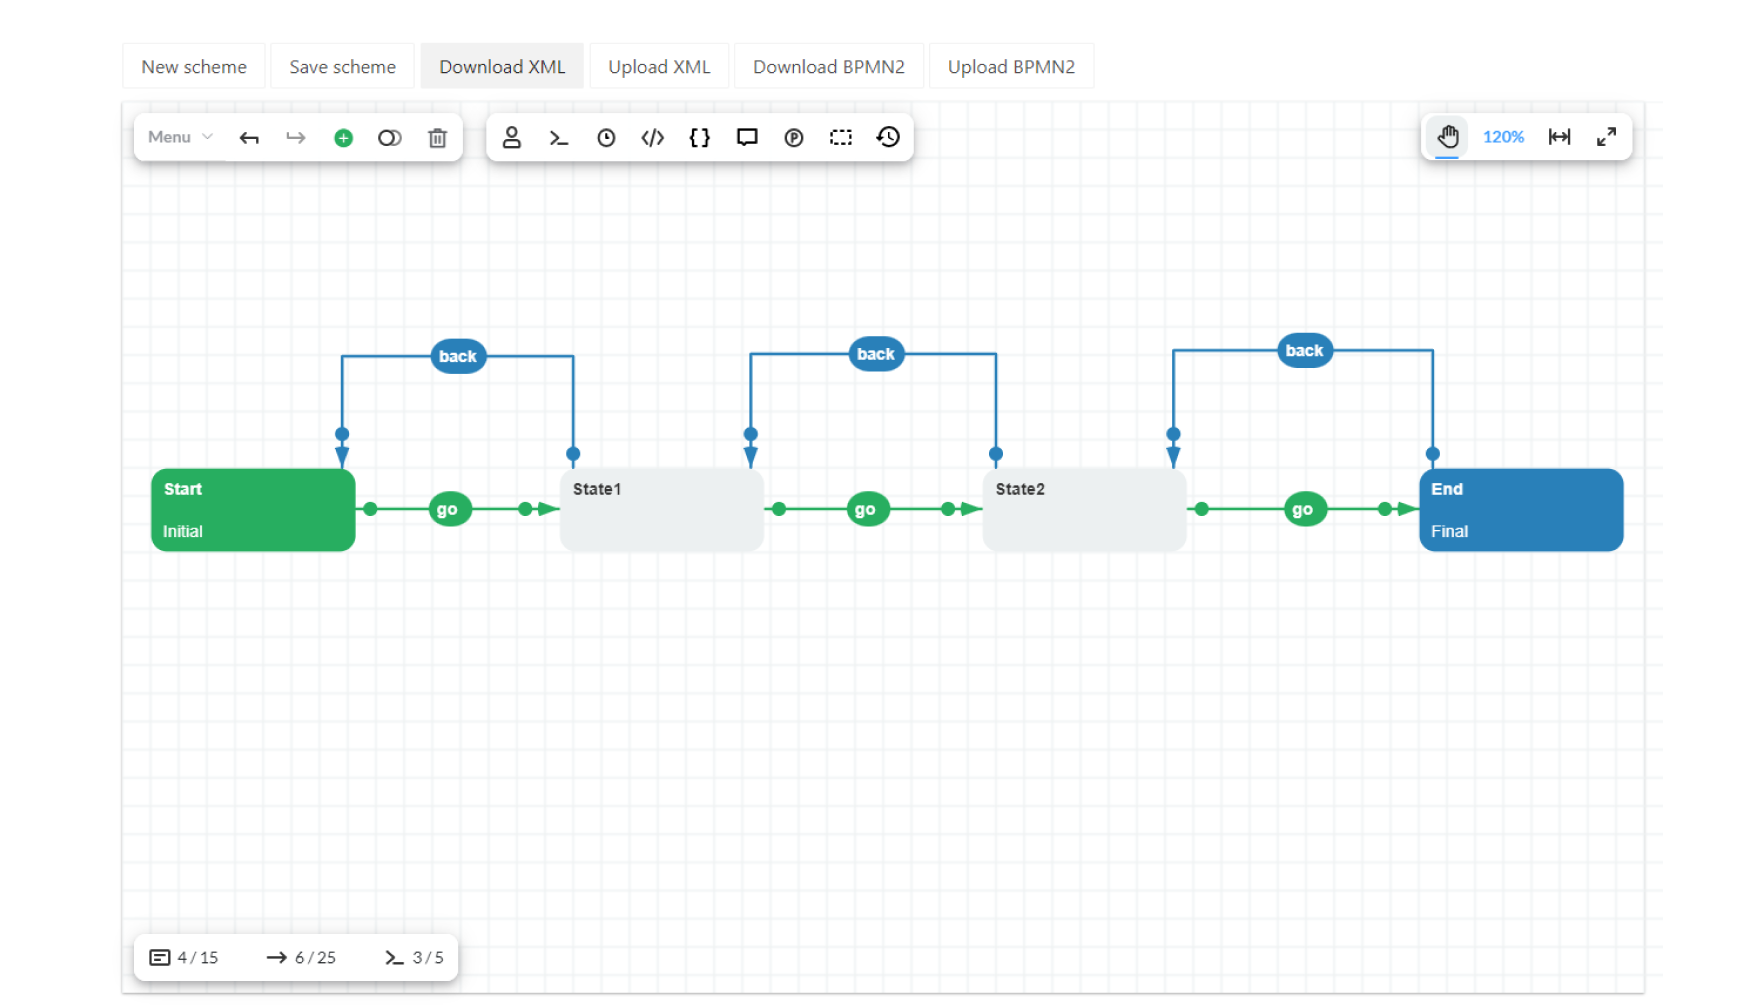
The final scheme can be downloaded here.
6. Creating a process and calling commands
Starting with WFE 7.0, the artifacts for the .NET Framework are no longer available. The .NET Framework 4.6.2 is now the minimum supported version (netstandard2.0), except for Oracle Provider, for which the minimum version is .NET Core 3.0 (netstandard2.1).
6.1. Create a Console Application project.
6.2. Add the following NuGet packages to the project (.NET Framework / .NET Core):
- WorkflowEngine.NETCore-Core
- WorkflowEngine.NETCore-ProviderForMSSQL
- Microsoft.Extensions.Configuration
- Microsoft.Extensions.Configuration.FileExtensions
- Microsoft.Extensions.Configuration.Json
6.3. Create and add a Reference to the project: WorkflowLib from step 3.
6.4. Add a database connection string.
- For .NET Framework:
Add a database connection string
to the connectionStrings section of the
app.configconfiguration file:
<connectionStrings>
<add name="ConnectionString"
  connectionString="Data Source=(local);Initial Catalog=WFE;Integrated Security=False;User ID=sa;Password=1"
  providerName="System.Data.SqlClient" />
</connectionStrings>
- For .NET Core:
Add a database connection string to the
ConnectionStrings section in the
appsettings.jsonconfiguration file:
{
  "ConnectionStrings": {
    "DefaultConnection": "Data Source=(local);Initial Catalog=wfe_sample;User ID=sa;Password=1"
  }
}
Make sure that server address, authentication type, login and password match your settings.
6.5. Read documentation in the section how to manage workflows.
6.6. Add the following namespaces to the Program.cs file:
The following lines of code can be different and usually depends on the class library name created in step 2. For example, you have to write "using ClassLibrary;" instead of "using WorkflowLib;" if you defined the library as ClassLibrary.
using OptimaJet.Workflow.Core.Runtime;
using System;
using System.Collections.Generic;
using System.Linq;
using System.Threading;
using WorkflowLib;
Add the following usings for .NET Core:
using System.IO;
using Microsoft.Extensions.Configuration;
Here's a sample code that shows you how to call basic operations: creating a process, getting a list of available commands, executing commands, setting a state and deleting a process:
class Program
{
    static string schemeCode = "SimpleWF";
    static Guid? processId = null;
    static async Task Main(string[] args)
    {
        // ------------------------------------------------------
        // TODO: This code for .NET Core only (!).
        // Comment it if you're working with .NET Framework
        // ------------------------------------------------------
        var builder = new ConfigurationBuilder()
            .SetBasePath(Directory.GetCurrentDirectory())
            .AddJsonFile("appsettings.json", optional: true, reloadOnChange: true);

        IConfigurationRoot configuration = builder.Build();
        WorkflowInit.ConnectionString = configuration[$"ConnectionStrings:DefaultConnection"];
        // ------------------------------------------------------

        Console.WriteLine("Operation:");
        Console.WriteLine("0 - CreateInstance");
        Console.WriteLine("1 - GetAvailableCommands");
        Console.WriteLine("2 - ExecuteCommand");
        Console.WriteLine("3 - GetAvailableState");
        Console.WriteLine("4 - SetState");
        Console.WriteLine("5 - DeleteProcess");
        Console.WriteLine("9 - Exit");
        Console.WriteLine("The process isn't created.");
        await CreateInstanceAsync();

        do
        {
            if (processId.HasValue)
            {
                Console.WriteLine("ProcessId = '{0}'. CurrentState: {1}, CurrentActivity: {2}",
                    processId,
                    await WorkflowInit.Runtime.GetCurrentStateNameAsync(processId.Value),
                    await WorkflowInit.Runtime.GetCurrentActivityNameAsync(processId.Value));
            }

            Console.Write("Enter code of operation:");
            char operation = Console.ReadLine().FirstOrDefault();

            switch (operation)
            {
                case '0':
                    await CreateInstanceAsync();
                    break;
                case '1':
                    await GetAvailableCommandsAsync();
                    break;
                case '2':
                    await ExecuteCommandAsync();
                    break;
                case '3':
                    await GetAvailableStateAsync();
                    break;
                case '4':
                    await SetStateAsync();
                    break;
                case '5':
                    await DeleteProcessAsync();
                    break;
                case '9':
                    return;
                default:
                    Console.WriteLine("Unknown code. Please, repeat.");
                    break;
            }
            Console.WriteLine();
        } while (true);
    }

    private static async Task CreateInstanceAsync()
    {
        processId = Guid.NewGuid();
        try
        {
            await WorkflowInit.Runtime.CreateInstanceAsync(schemeCode, processId.Value);
            Console.WriteLine("CreateInstance - OK.", processId);
        }
        catch (Exception ex)
        {
            Console.WriteLine("CreateInstance - Exception: {0}", ex.Message);
            processId = null;
        }
    }

    private static async Task GetAvailableCommandsAsync()
    {
        if (processId == null)
        {
            Console.WriteLine("The process isn't created. Please, create process instance.");
            return;
        }
        var commands = await WorkflowInit.Runtime.GetAvailableCommandsAsync(processId.Value, string.Empty);

        Console.WriteLine("Available commands:");
        if (commands.Count() == 0)
        {
            Console.WriteLine("Not found!");
        }
        else
        {
            foreach (var command in commands)
            {
                Console.WriteLine("- {0} (LocalizedName:{1}, Classifier:{2})",
                    command.CommandName, command.LocalizedName, command.Classifier);
            }
        }
    }

    private static async Task ExecuteCommandAsync()
    {
        if (processId == null)
        {
            Console.WriteLine("The process isn't created. Please, create process instance.");
            return;
        }
        WorkflowCommand command = null;
        do
        {
            await GetAvailableCommandsAsync();
            Console.Write("Enter command:");
            var commandName = Console.ReadLine().ToLower().Trim();
            if (commandName == string.Empty)
                return;
            command = (await WorkflowInit.Runtime
                .GetAvailableCommandsAsync(processId.Value, string.Empty))
                .Where(c => c.CommandName.Trim().ToLower() == commandName).FirstOrDefault();
            if (command == null)
                Console.WriteLine("The command isn't found.");
        } while (command == null);

        await WorkflowInit.Runtime.ExecuteCommandAsync(command, string.Empty, string.Empty);
        Console.WriteLine("ExecuteCommand - OK.", processId);
    }

    private static async Task GetAvailableStateAsync()
    {
        if (processId == null)
        {
            Console.WriteLine("The process isn't created. Please, create process instance.");
            return;
        }
        var states = await WorkflowInit.Runtime
            .GetAvailableStateToSetAsync(processId.Value, Thread.CurrentThread.CurrentCulture);
        Console.WriteLine("Available state to set:");
        if (states.Count() == 0)
        {
            Console.WriteLine("Not found!");
        }
        else
        {
            foreach (var state in states)
            {
                Console.WriteLine("- {0}", state.Name);
            }
        }
    }

    private static async Task SetStateAsync()
    {
        if (processId == null)
        {
            Console.WriteLine("The process isn't created. Please, create process instance.");
            return;
        }
        string stateName = string.Empty;
        WorkflowState state;
        do
        {
            await GetAvailableStateAsync();
            Console.Write("Enter state:");
            stateName = Console.ReadLine().ToLower().Trim();
            if (stateName == string.Empty)
                return;
            state = (await WorkflowInit.Runtime
                .GetAvailableStateToSetAsync(processId.Value, Thread.CurrentThread.CurrentCulture))
                .Where(c => c.Name.Trim().ToLower() == stateName).FirstOrDefault();
            if (state == null)
                Console.WriteLine("The state isn't found.");
            else
                break;
        } while (true);
        if (state != null)
        {
            var setStateParams = new SetStateParams(processId.Value, state.Name);
            await WorkflowInit.Runtime.SetStateAsync(setStateParams);
            Console.WriteLine("SetState - OK.", processId);
        }
    }

    private static async Task DeleteProcessAsync()
    {
        if (processId == null)
        {
            Console.WriteLine("The process isn't created. Please, create process instance.");
            return;
        }
        await WorkflowInit.Runtime.DeleteInstanceAsync(processId.Value);
        Console.WriteLine("DeleteProcess - OK.", processId);
        processId = null;
    }
}
6.7. Click on right-mouse-button to Run or Debug the Console Application project.
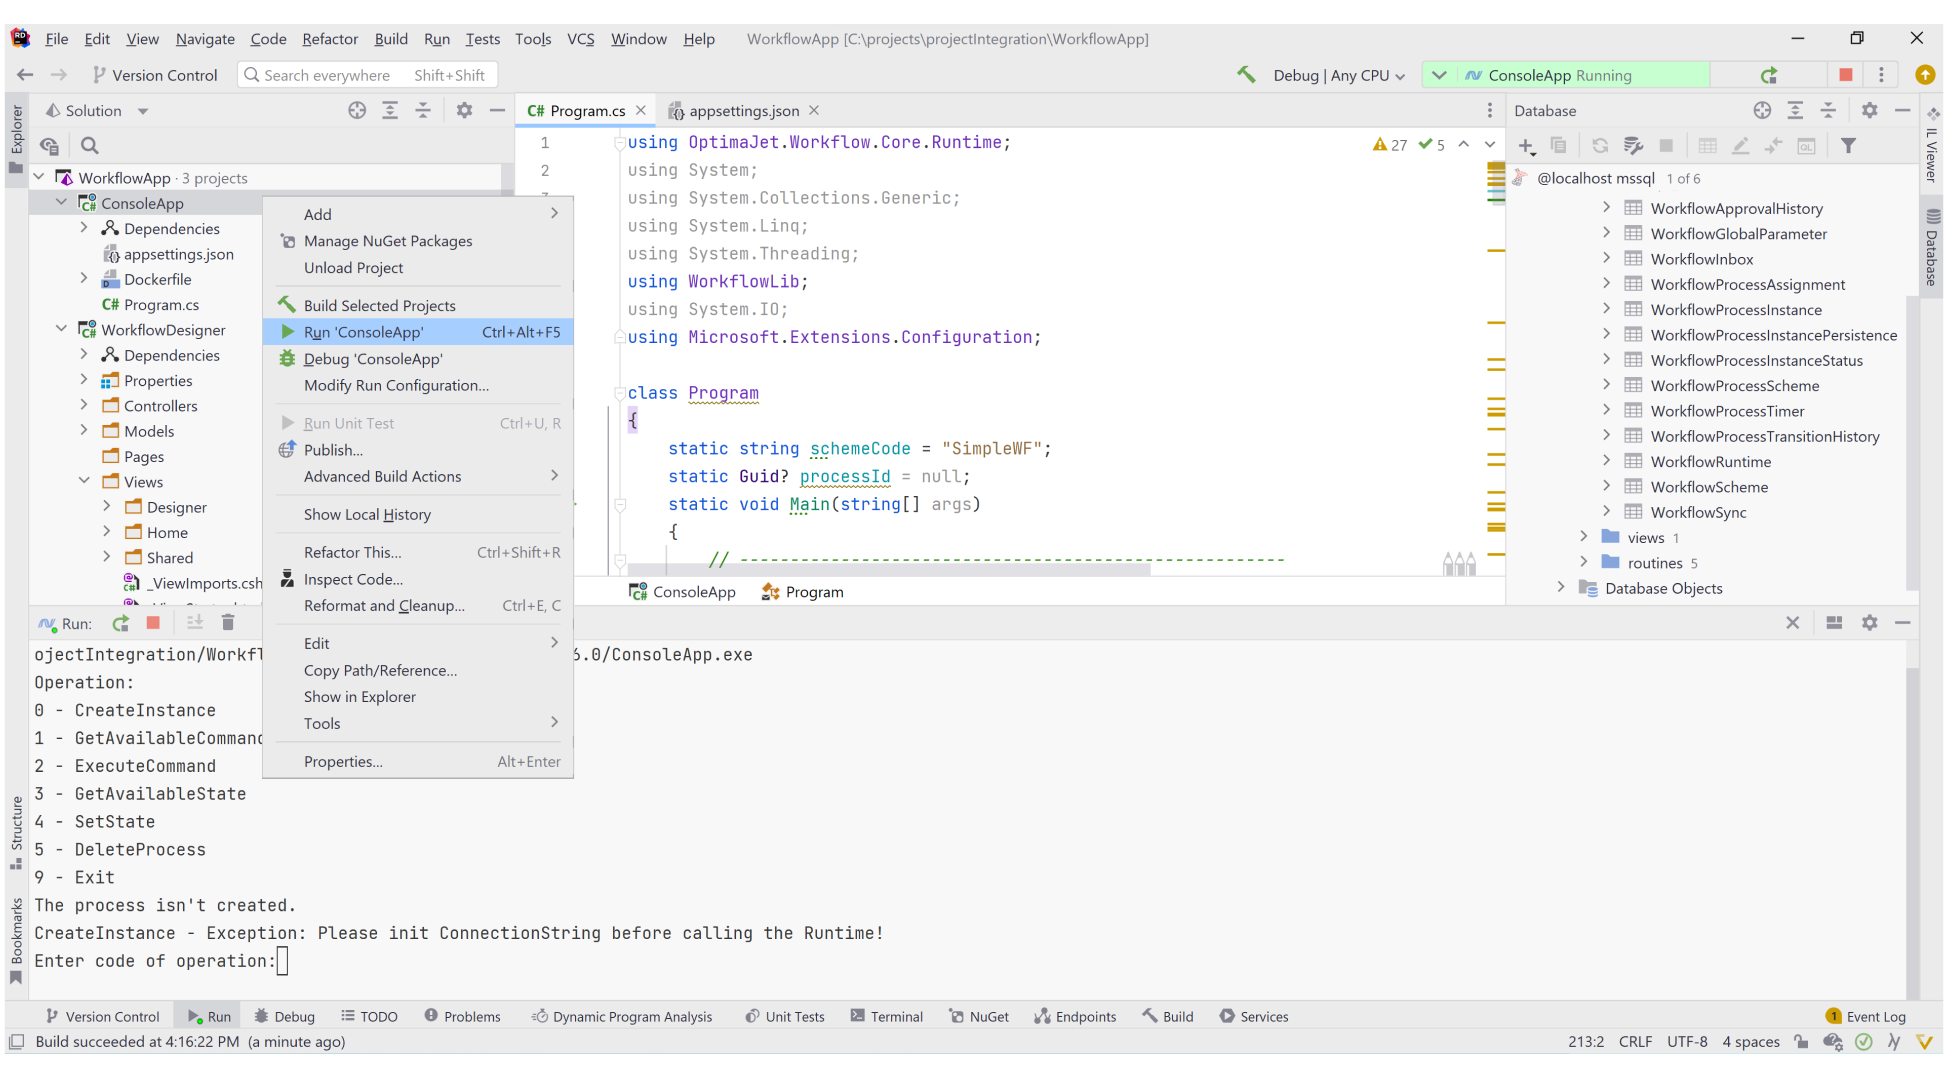
Then, the Console Application where you can create processes and execute commands should start.
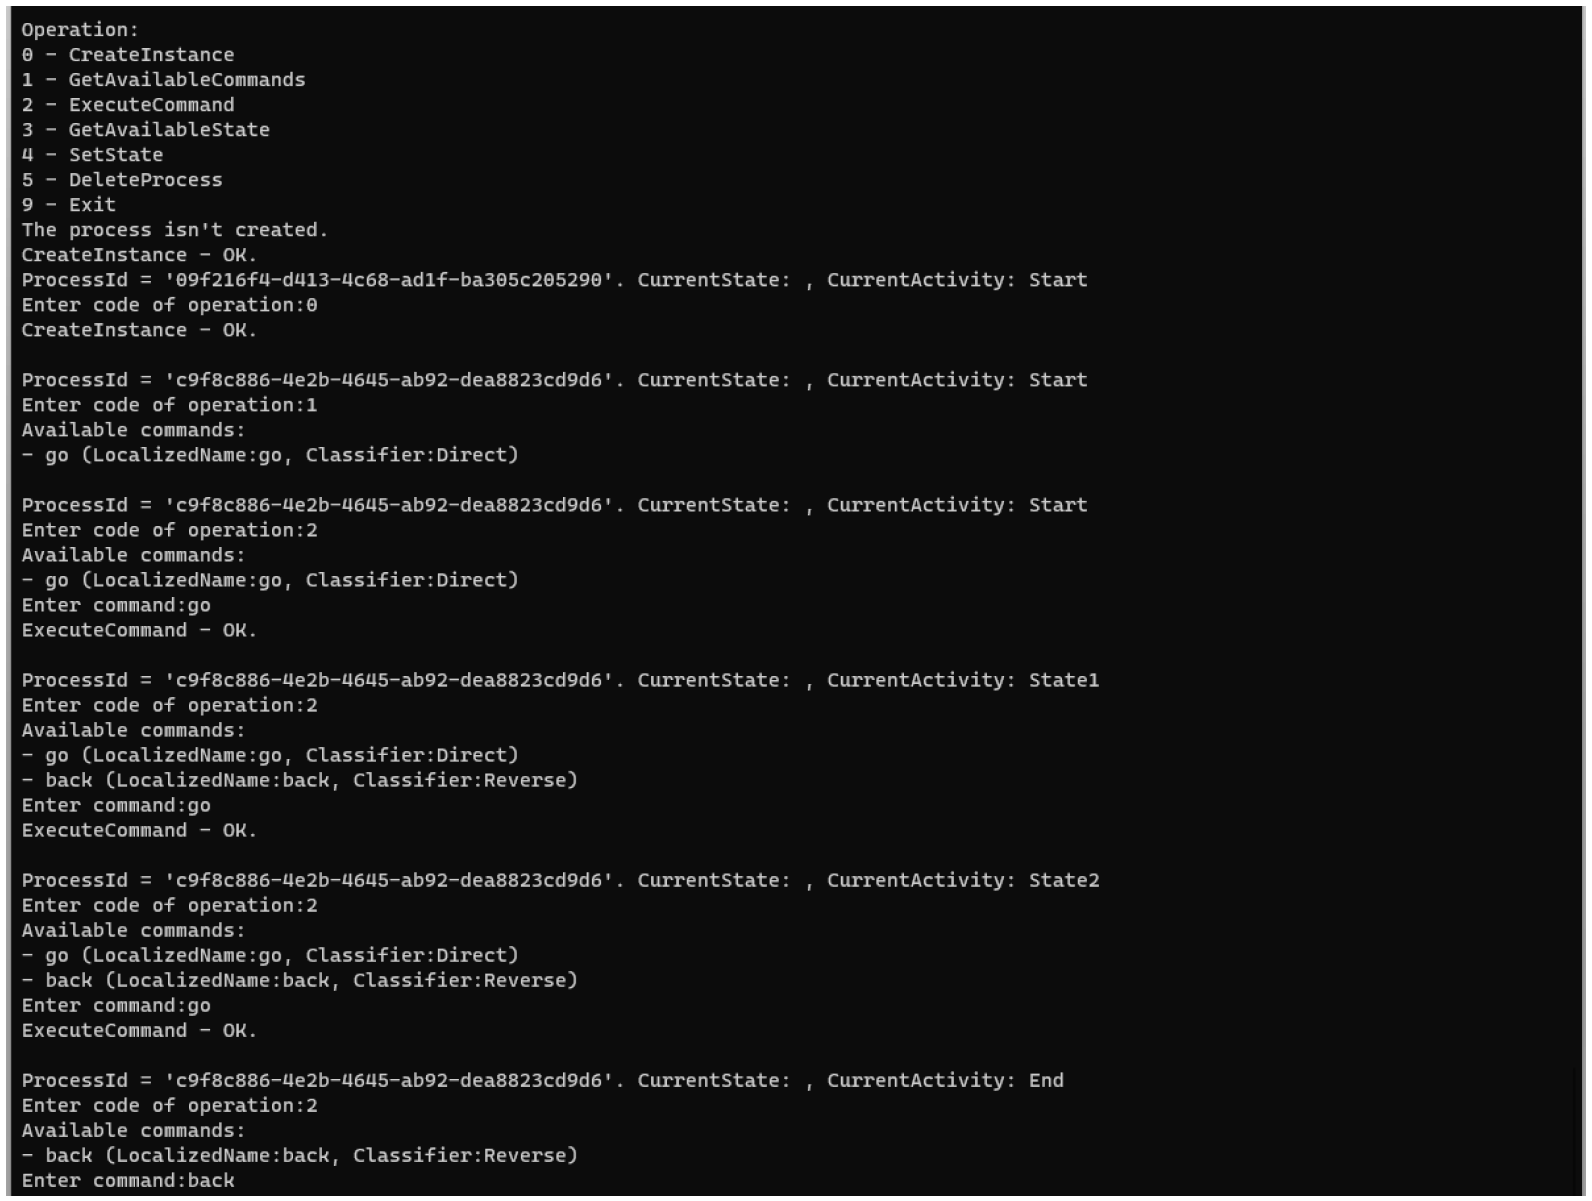
Learn more about basic operations here.
Conclusion
Workflow Engine is one of the easiest workflow engines for document approval when integrating is required. We recommend it to companies that develop information systems with workflow functionality.
In addition, you can download our samples here.
If you have any question, please, do not hesitate to contact us.