Demo application
In this section is introduced a simple example which describes a Vacation Approval Process in our Demo Application that is available here. Furthermore, a layered structured diagram is included which presents a general view of our architecture solution by implementing Workflow Engine components and the Designer considering the example presented.
In the public Demo this process example can not be changed.
1. Process automation in Workflow Engine
The workflow process is modeled easily in the Designer Canvas by creating a process scheme. The process main components are: Activities
and Transitions. The Activities define the sequence which actions are completed, and the Transitions allow passing from one state to
another, and they can be triggered by timers or commands with some conditions. Just it is needed to drag and drop these scheme components to
model any desired process. Then, the modeled process can be automated based on the workflow scheme through the Workflow Engine solution.
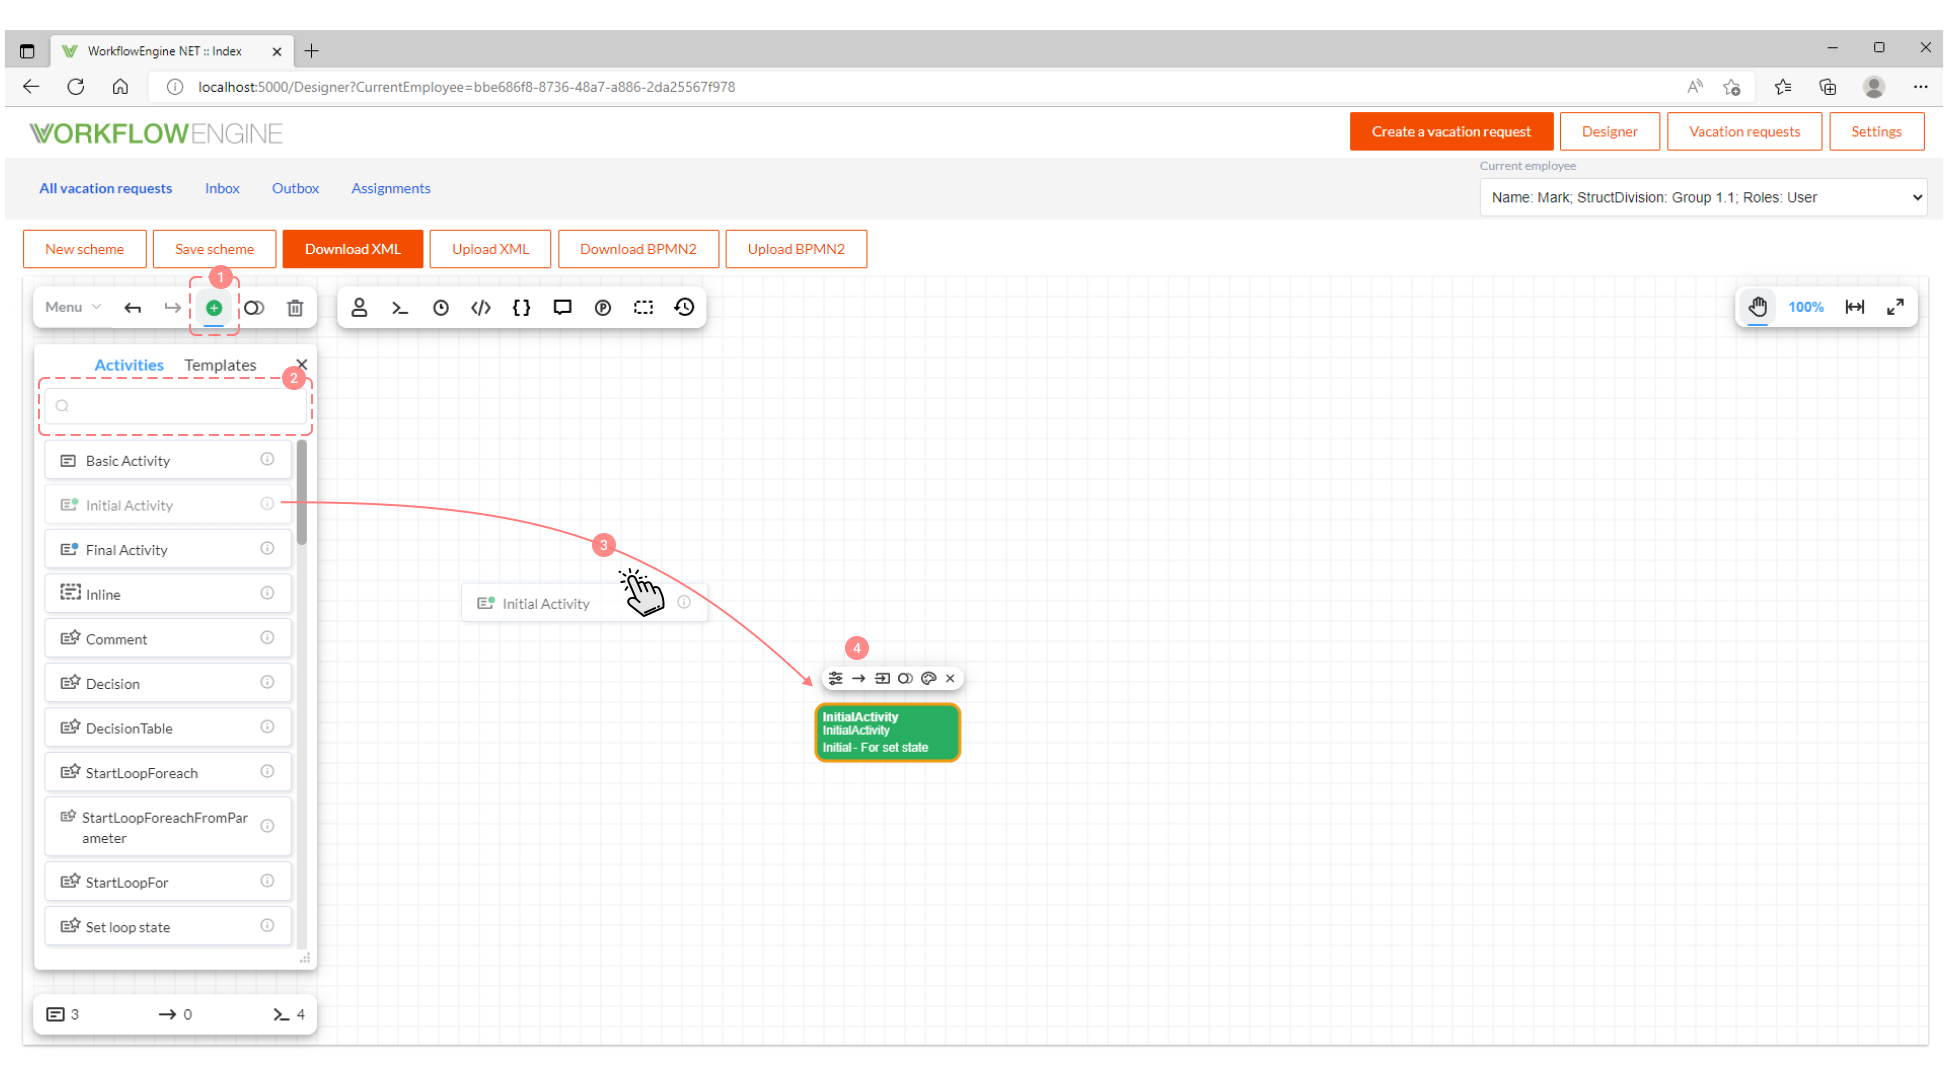
The following simple steps are needed to add an activity in the process scheme:
- Open the Elements panel.
- Find the type of activity in the elements list or use Search.
- Drag the element to the canvas.
- Click on the Activity element in 'Create Transition' arrow to include a
Transition.
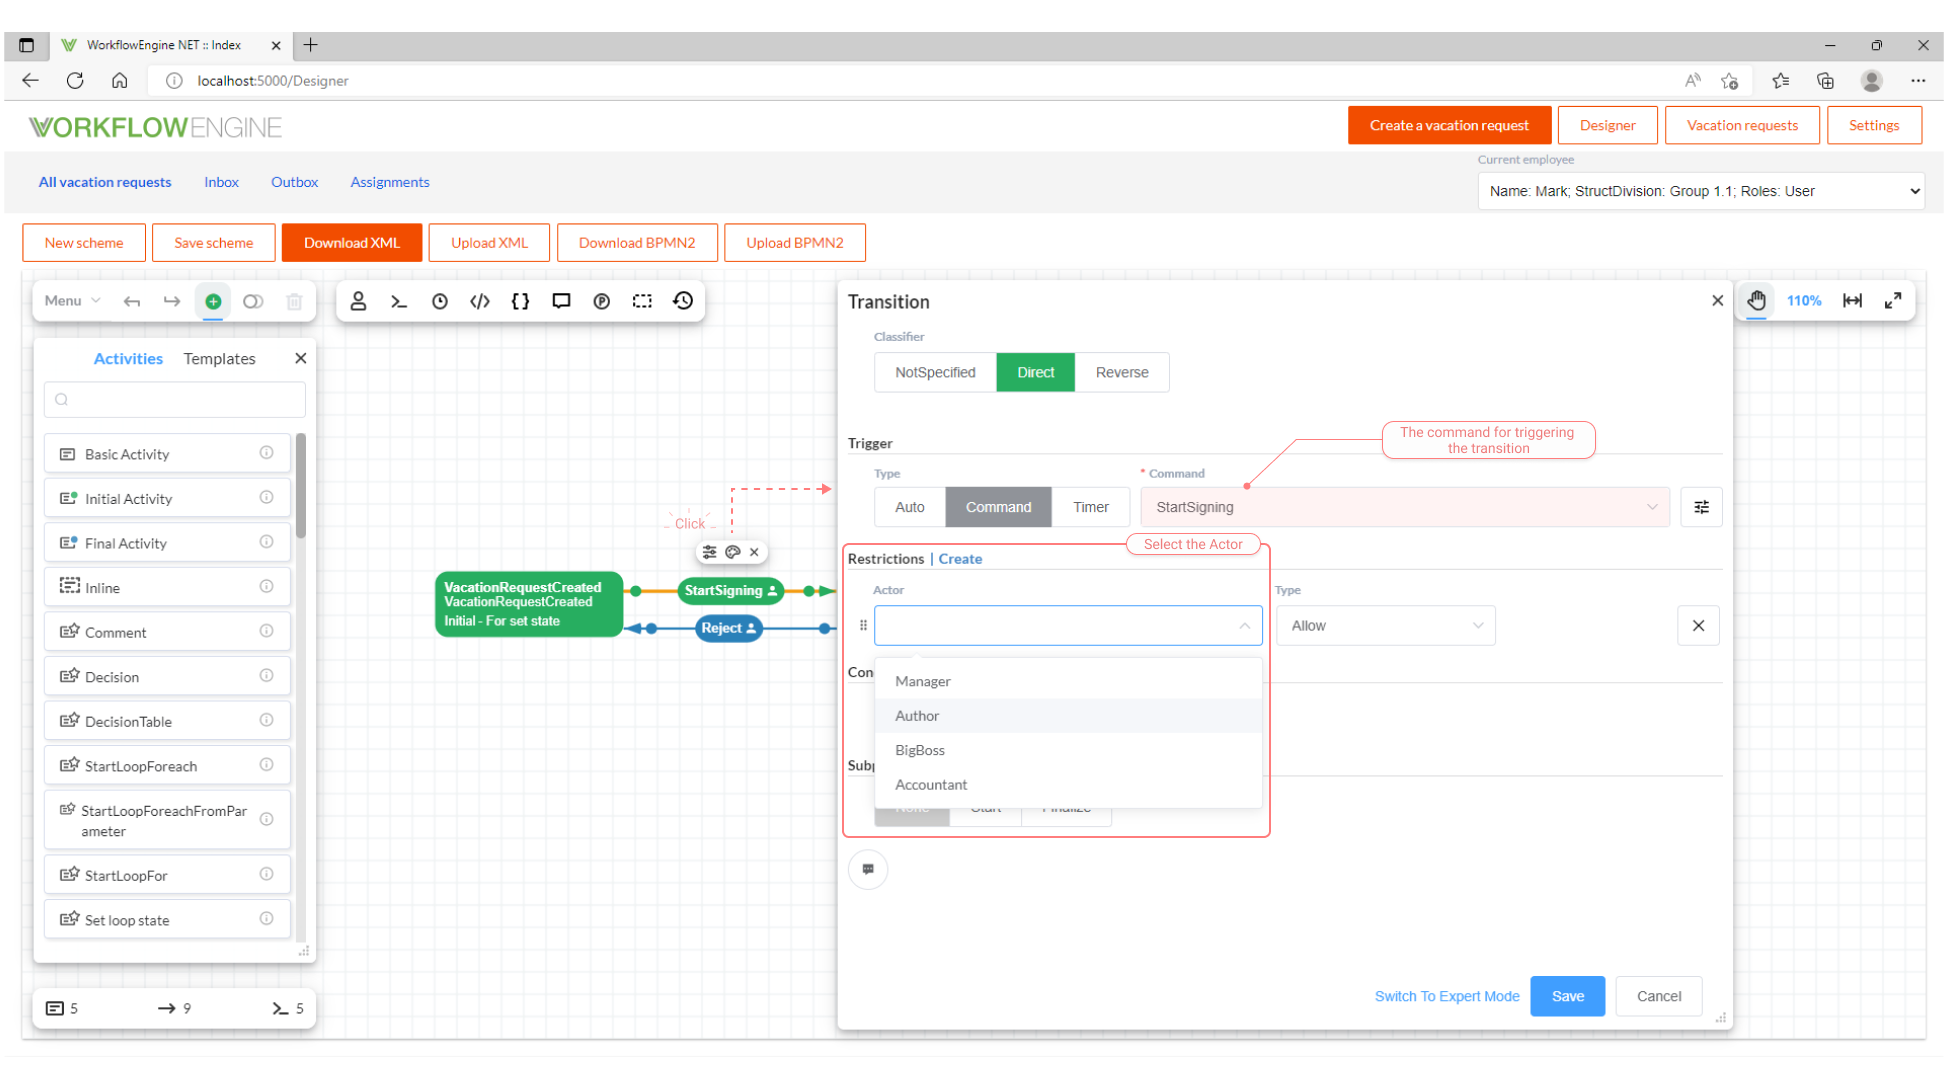
Once clicking on the Transition, in the sections: Trigger and Restriction, the Commands and Actors should be set as is
indicated in the picture:
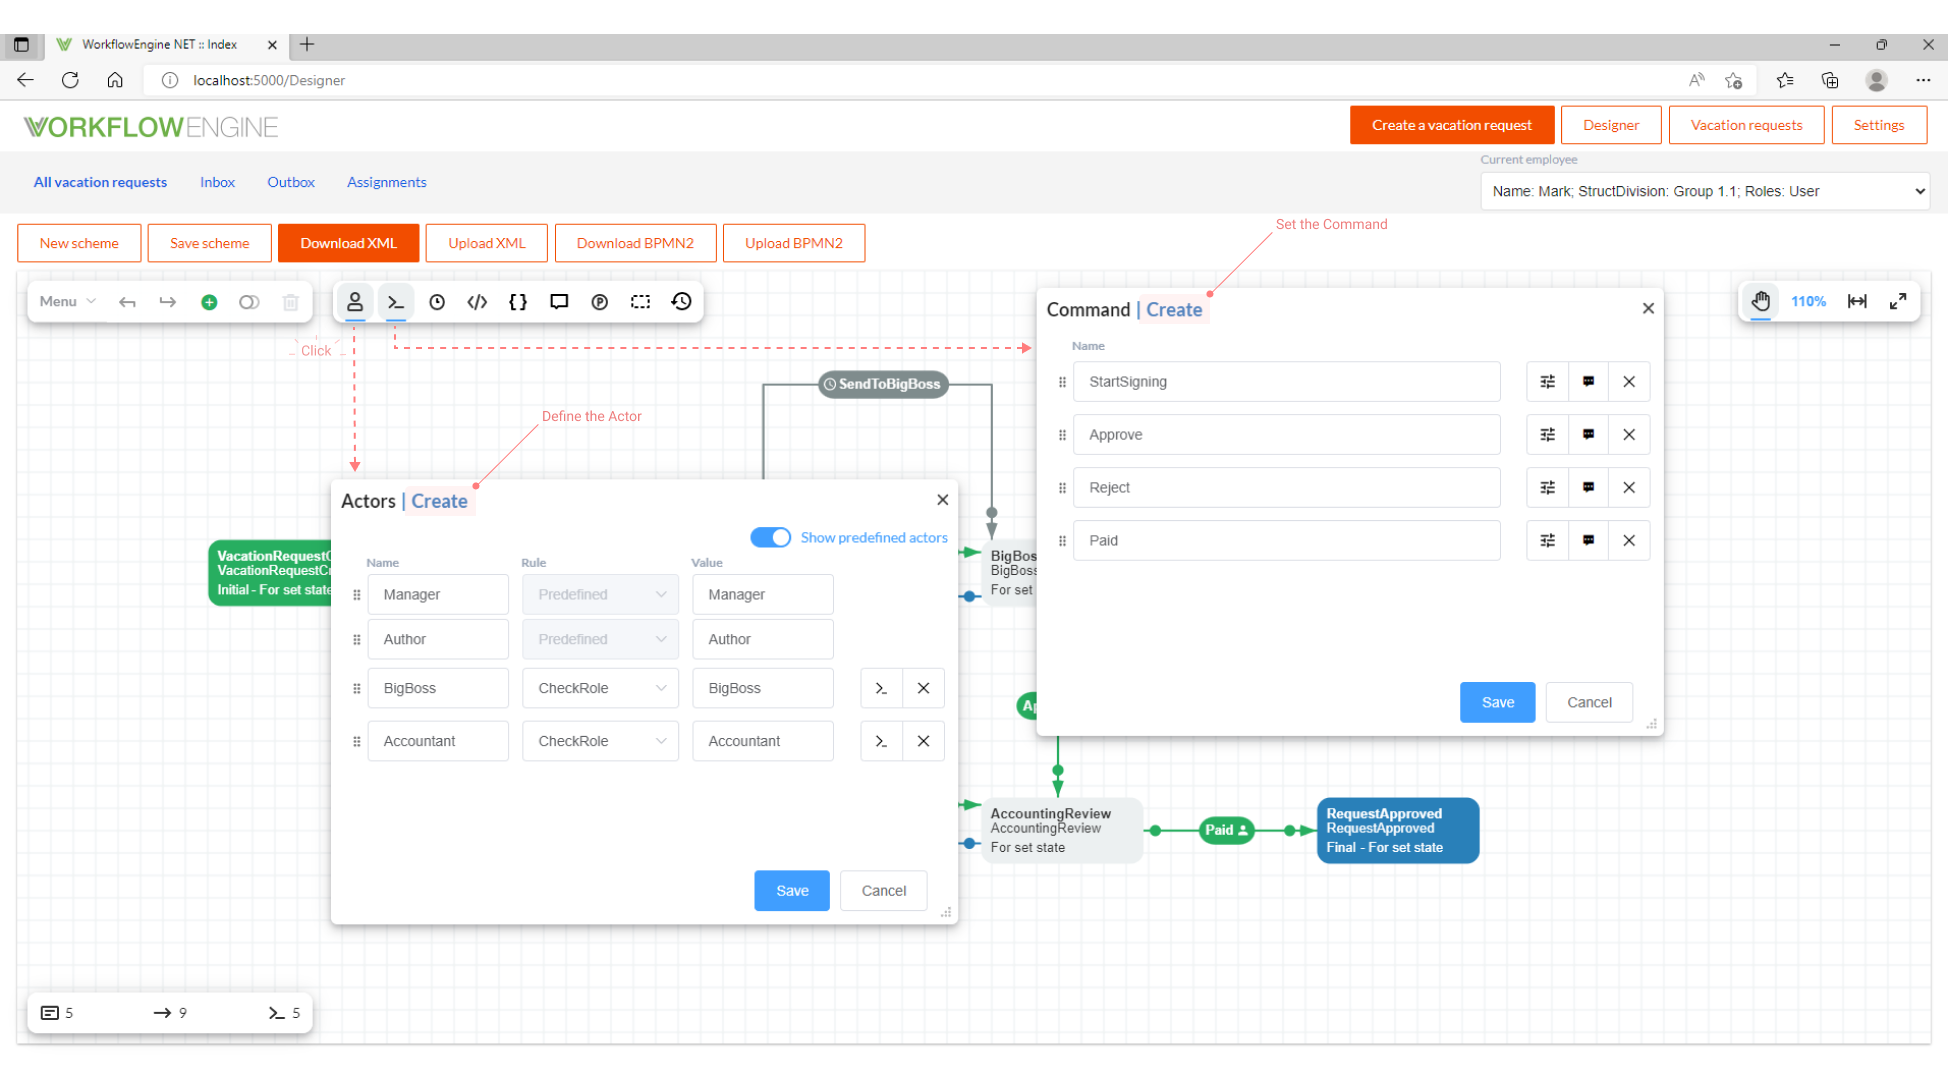
The Commands and Actors should be created through the Toolbar as follows:
2. Process description
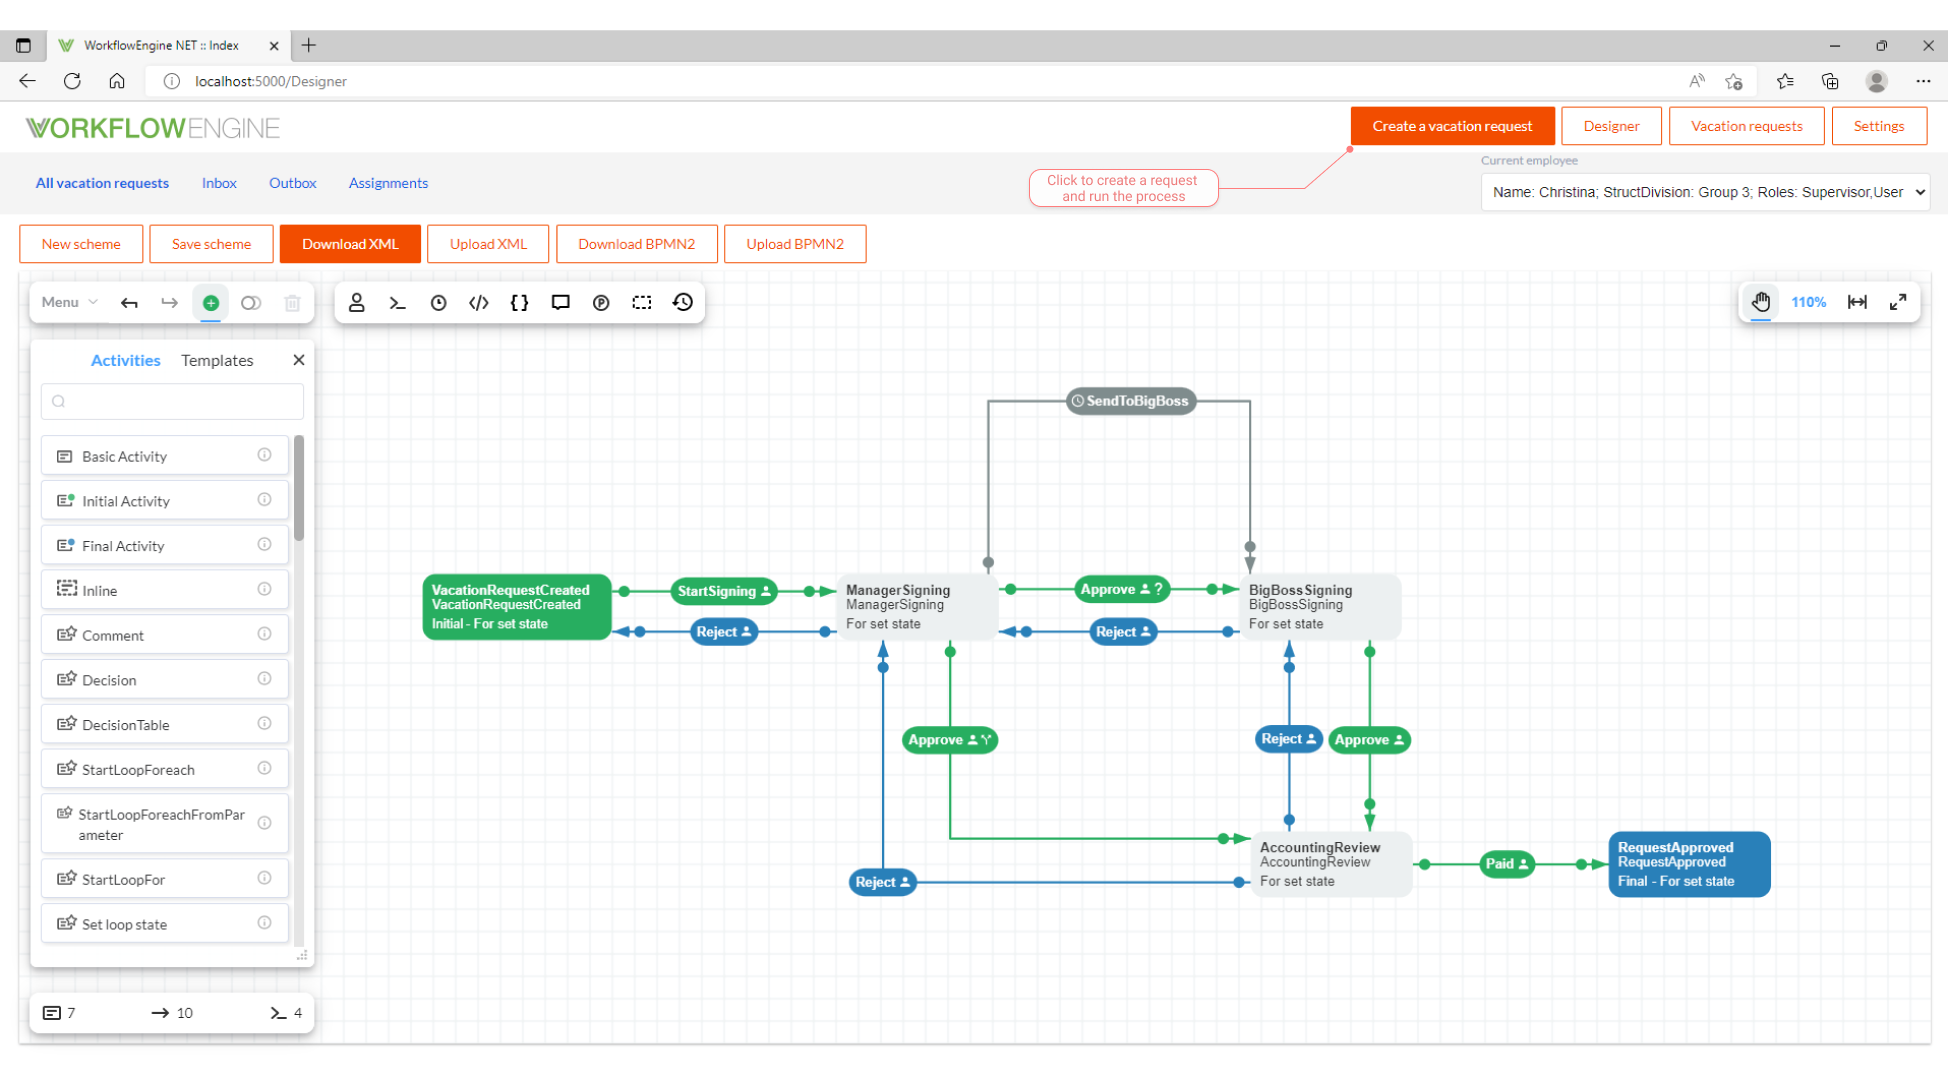
The Vacation Approval Process consist of five simple steps or stages: the request creation, the Manager signing and his approval, the Boss
signing and his approval when it might be required based on budget restrictions, the Accounting review and a final step which is the
approved request notification once it is paid. Each step can be represented by a single Activity. The actors who are involved in the
approval process are: the Requester or Author, the Manager, the Big Boss and the Accountant. The vacation approval request or requisition is
just a document that should be agreed. The process scheme that describes the sequence of operations is included below.
3. How to run a process
A vacation request form is created by using ASP.NET application and integrating Workflow Engine. In the documentation section: How to integrate, you can read the detailed procedure to integrate an ASP.NET Core web application.
Once clicking on the button: Create vacation request, the interface for creating a new requisition is displayed, you should complete the
following steps:
- Choose the current employee (who is set as Author initially).
- Select the Manager from the drop-down list field.
- Indicate a preferred denotation in the field 'Name'.
- Set the 'Sum' that is the required amount.
- Add an observation in the field 'Comment'.
- The 'Number' is defined automatically.
- The 'State' is set also by the system.
- Then, save the data.
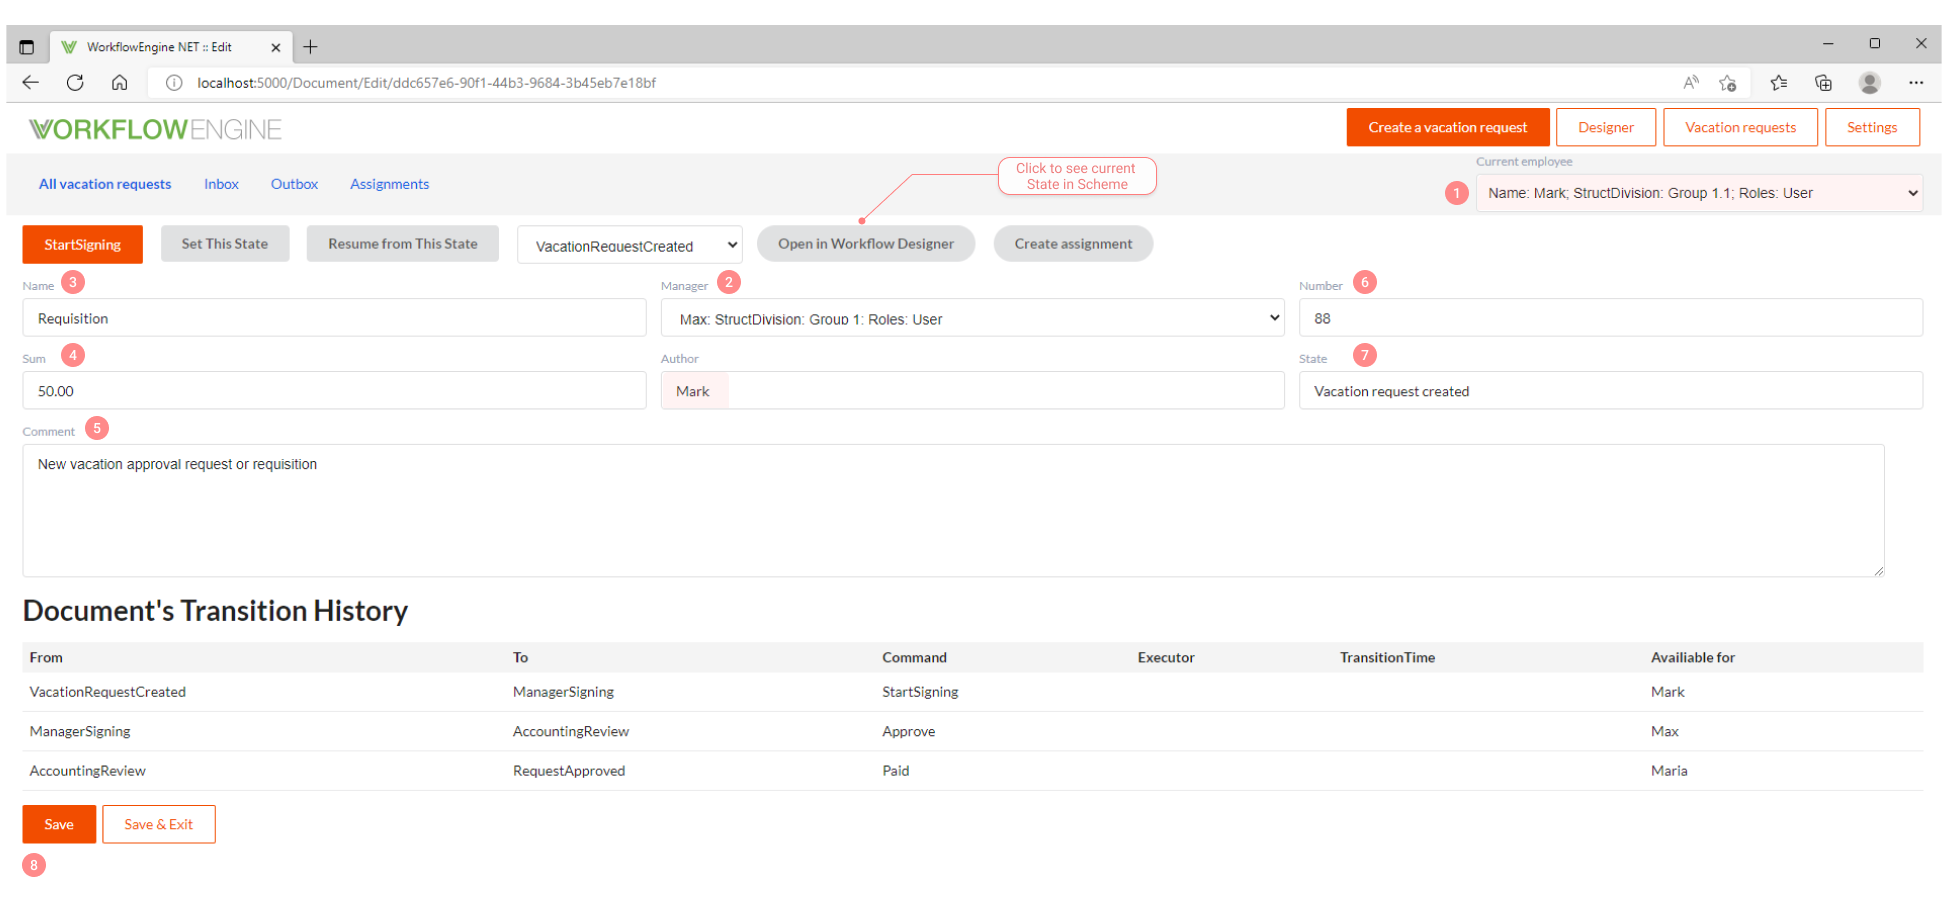
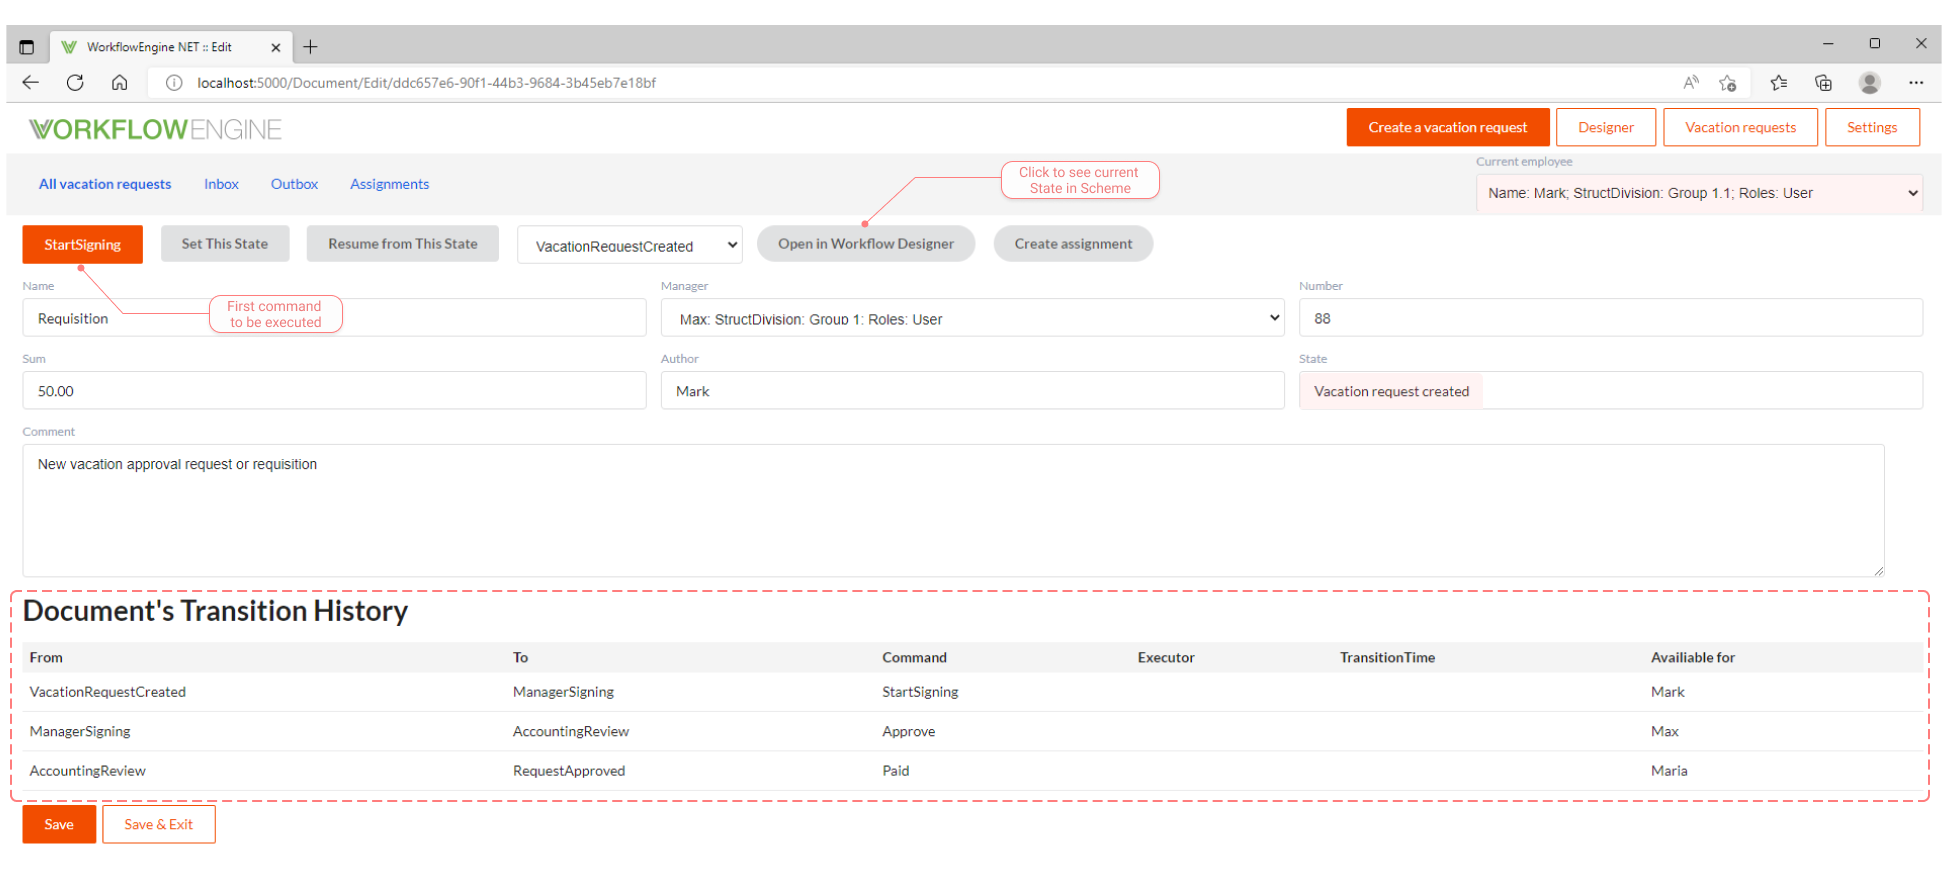
After saving the created requisition, will be available the Document's Transition History where is indicated the available employees who
might execute the Commands considering the defined Roles and the responsible Actors. The Commands and the Restrictions based on the
created Actors are defined in the Transitions. It is required for triggering the approval workflow. The first available command
is: StartSigning which enables to go forward to the Activity ManagerSigning.
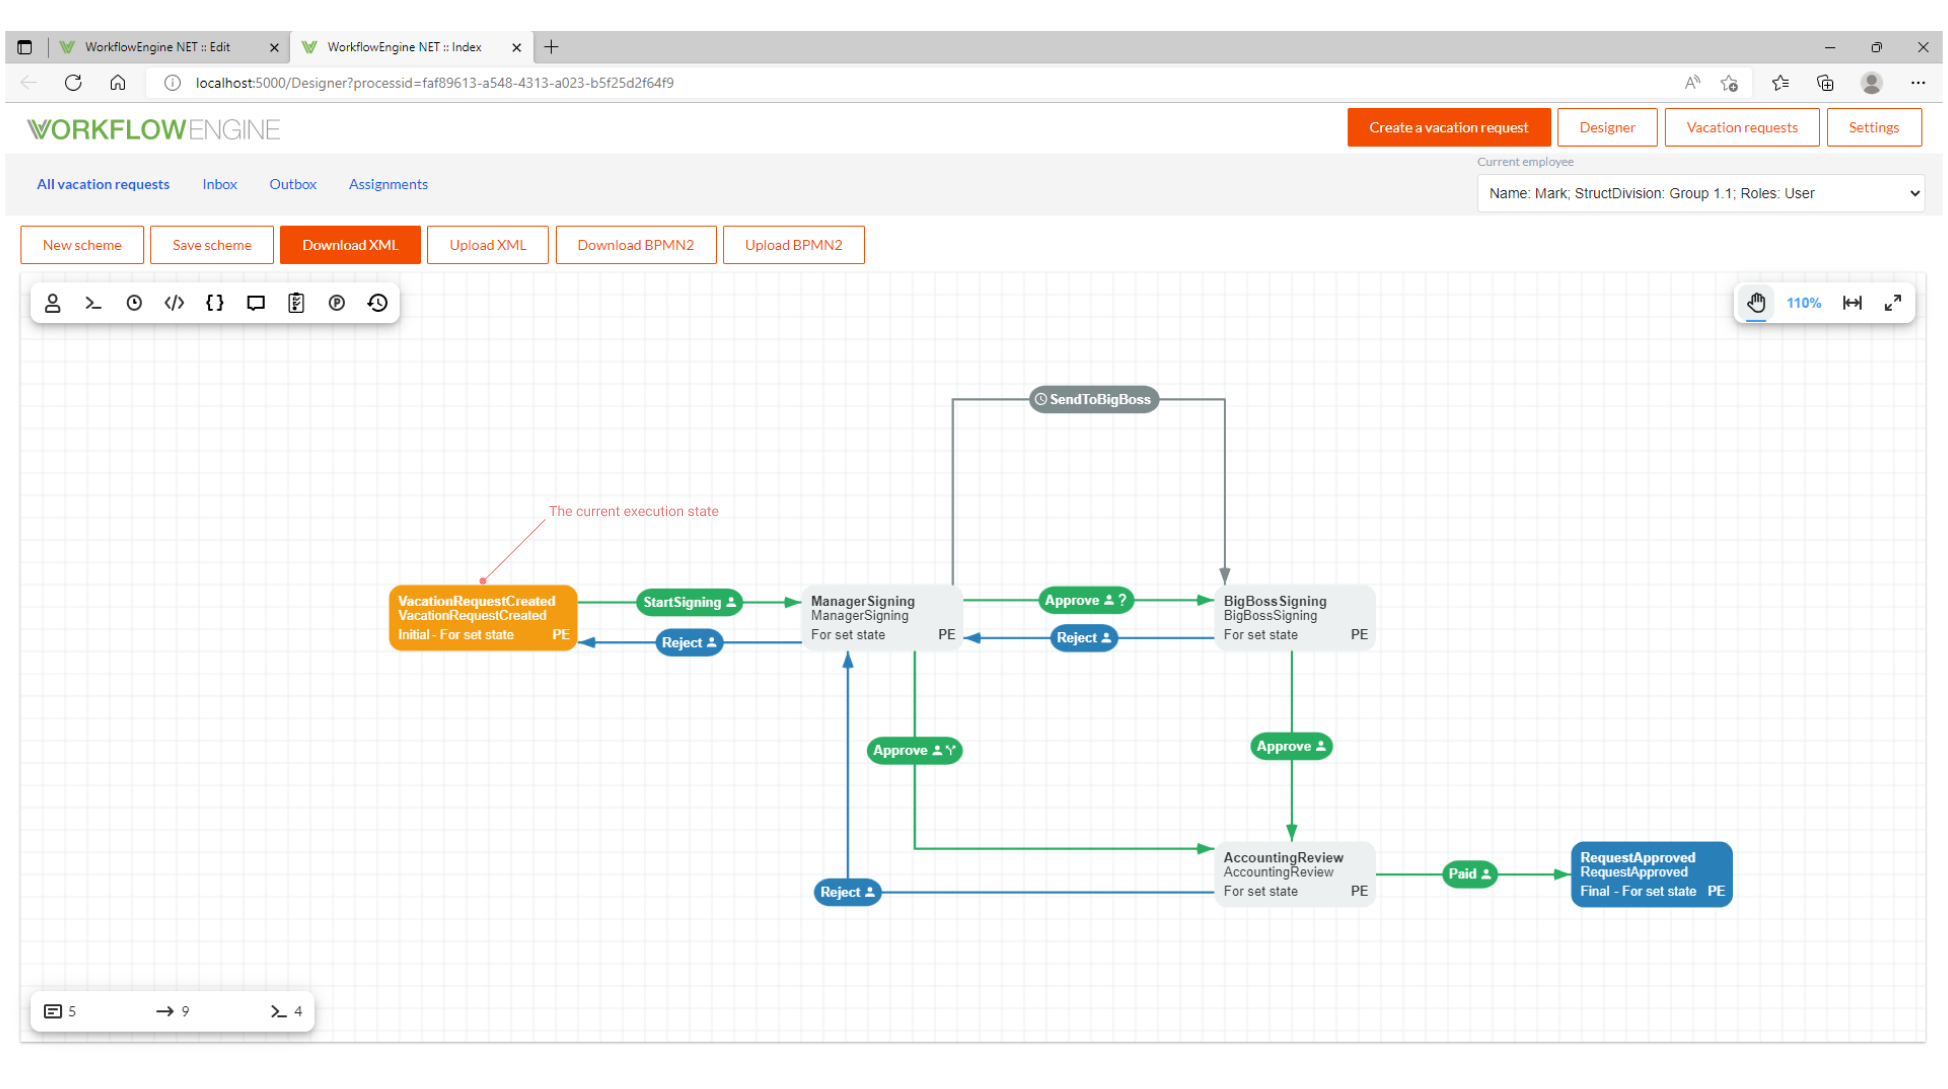
If you click on the button: Open in Workflow Designer, you can see the current execution state VacationRequestCreated in the created
workflow diagram instance.
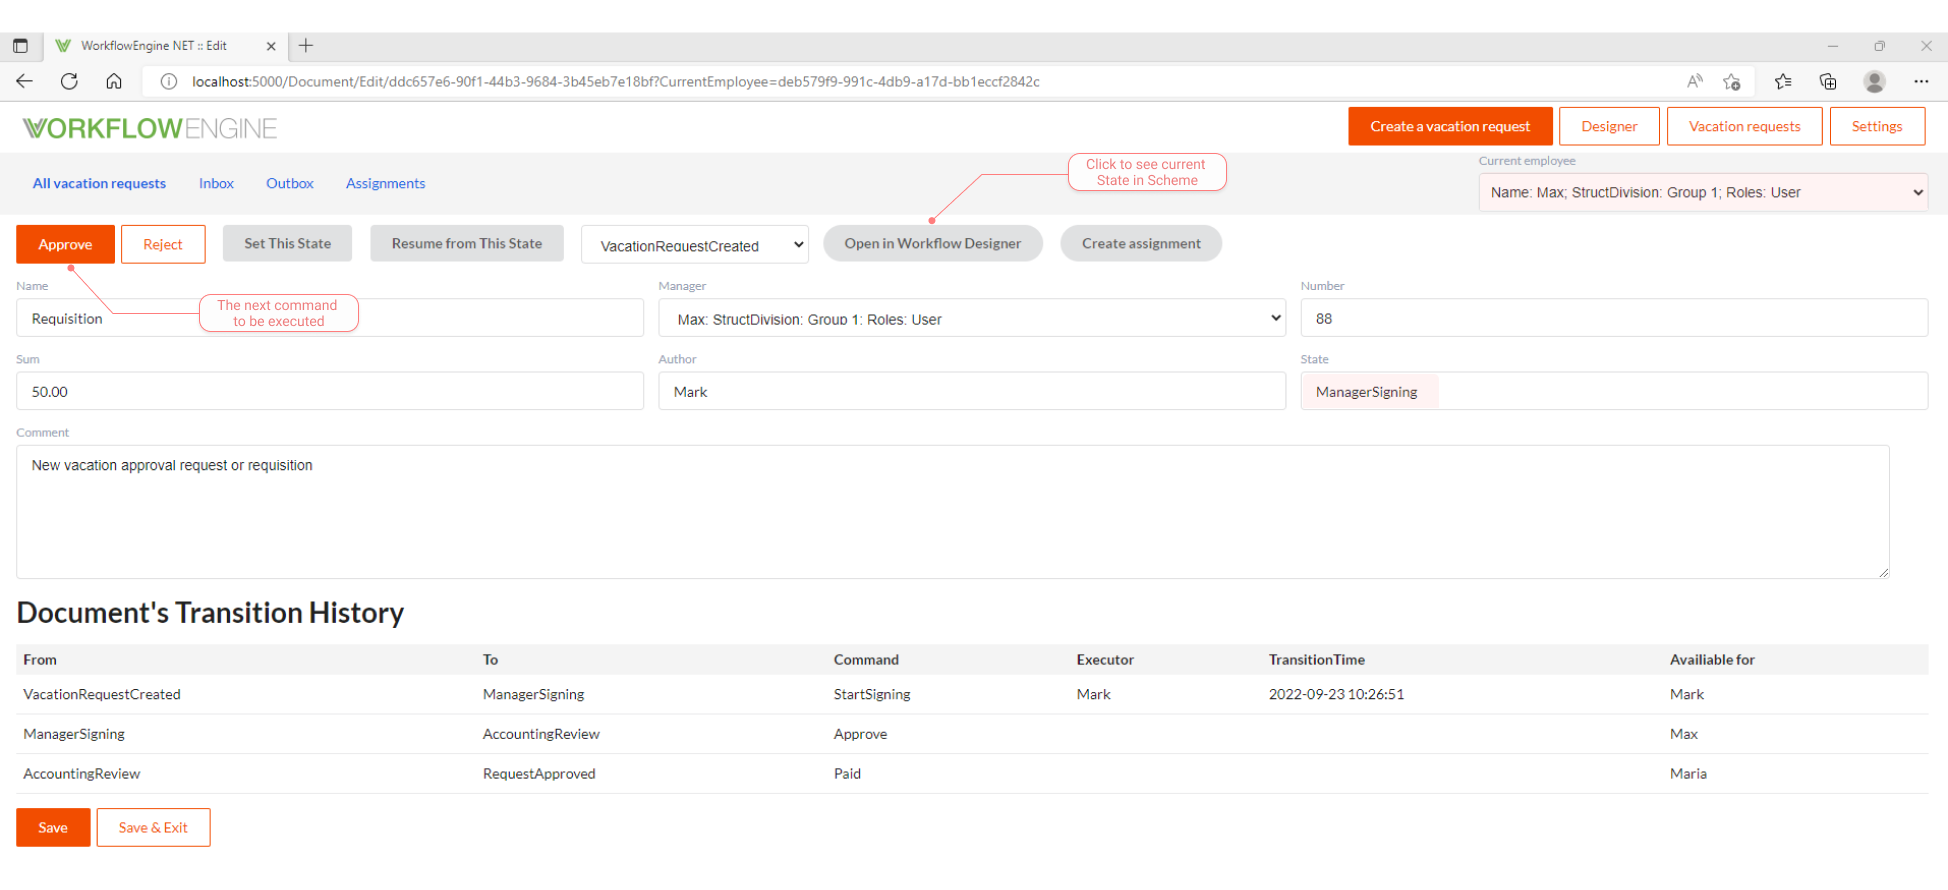
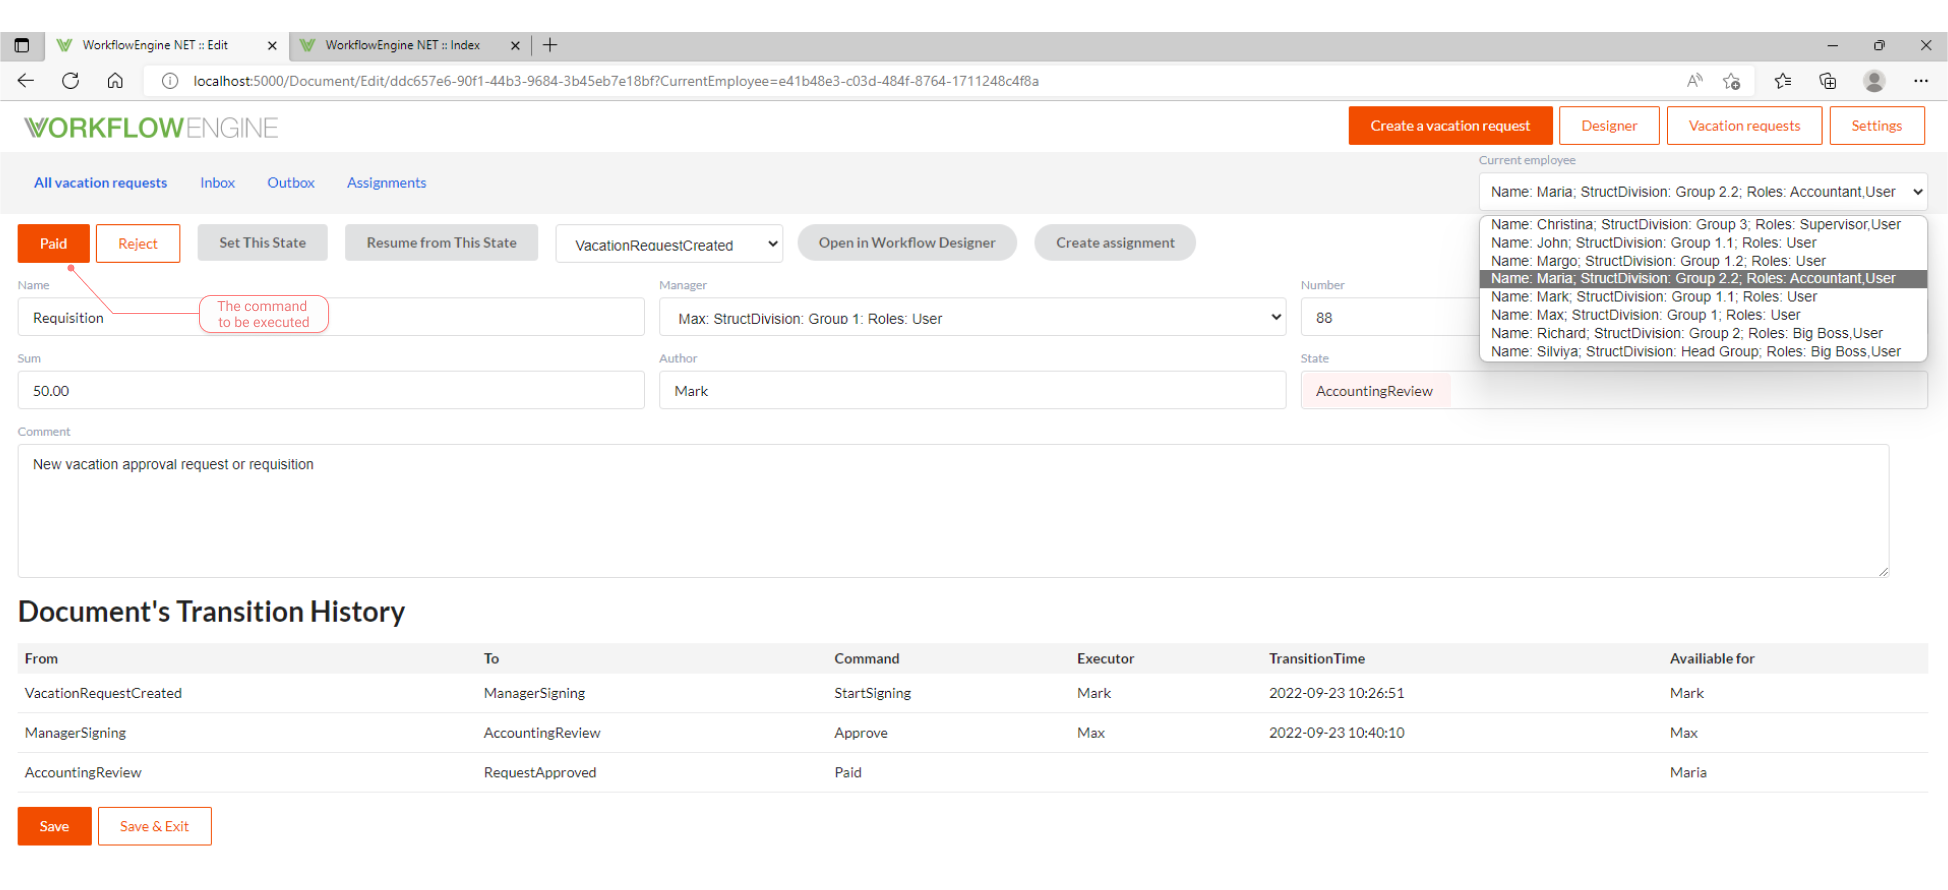
When the first command is fulfilled, the state ManagerSigning is set, so it is required to change the current employee and select the
actor whose can approve or reject the request and perform this activity. Then, the command Approve that can be executed by a Manager is
displayed.
Then, the current state ManagerSigning will appear in the workflow diagram instance.
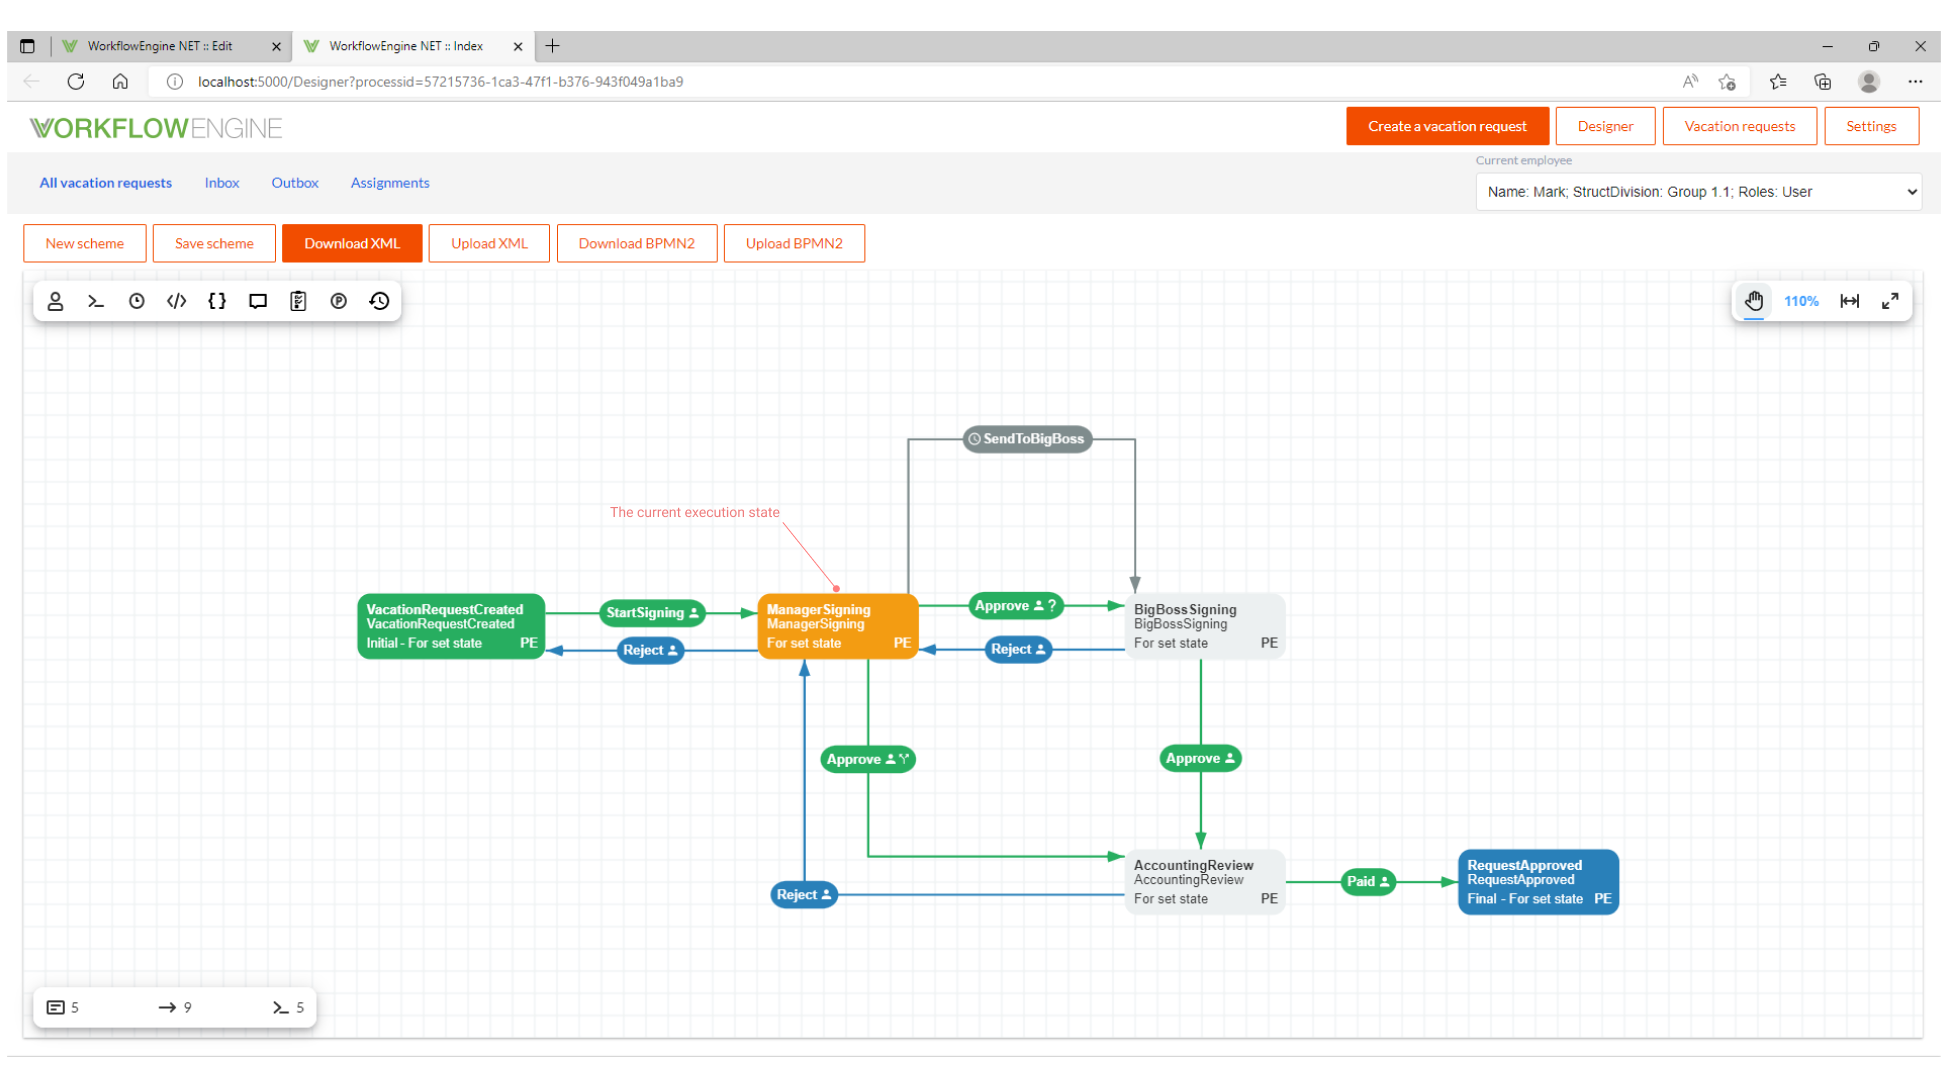
As soon as this command Approved is executed, is set the state AccountingReview, and then it is needed to choose the actor (select the
current employee) as well. The same procedure must be repeated until the end when the final activity is accomplished. The Document's
Transition History is updated as soon as the activity is completed. It is possible also to choose a specified State in order to resume or
restart the workflow process to this State.
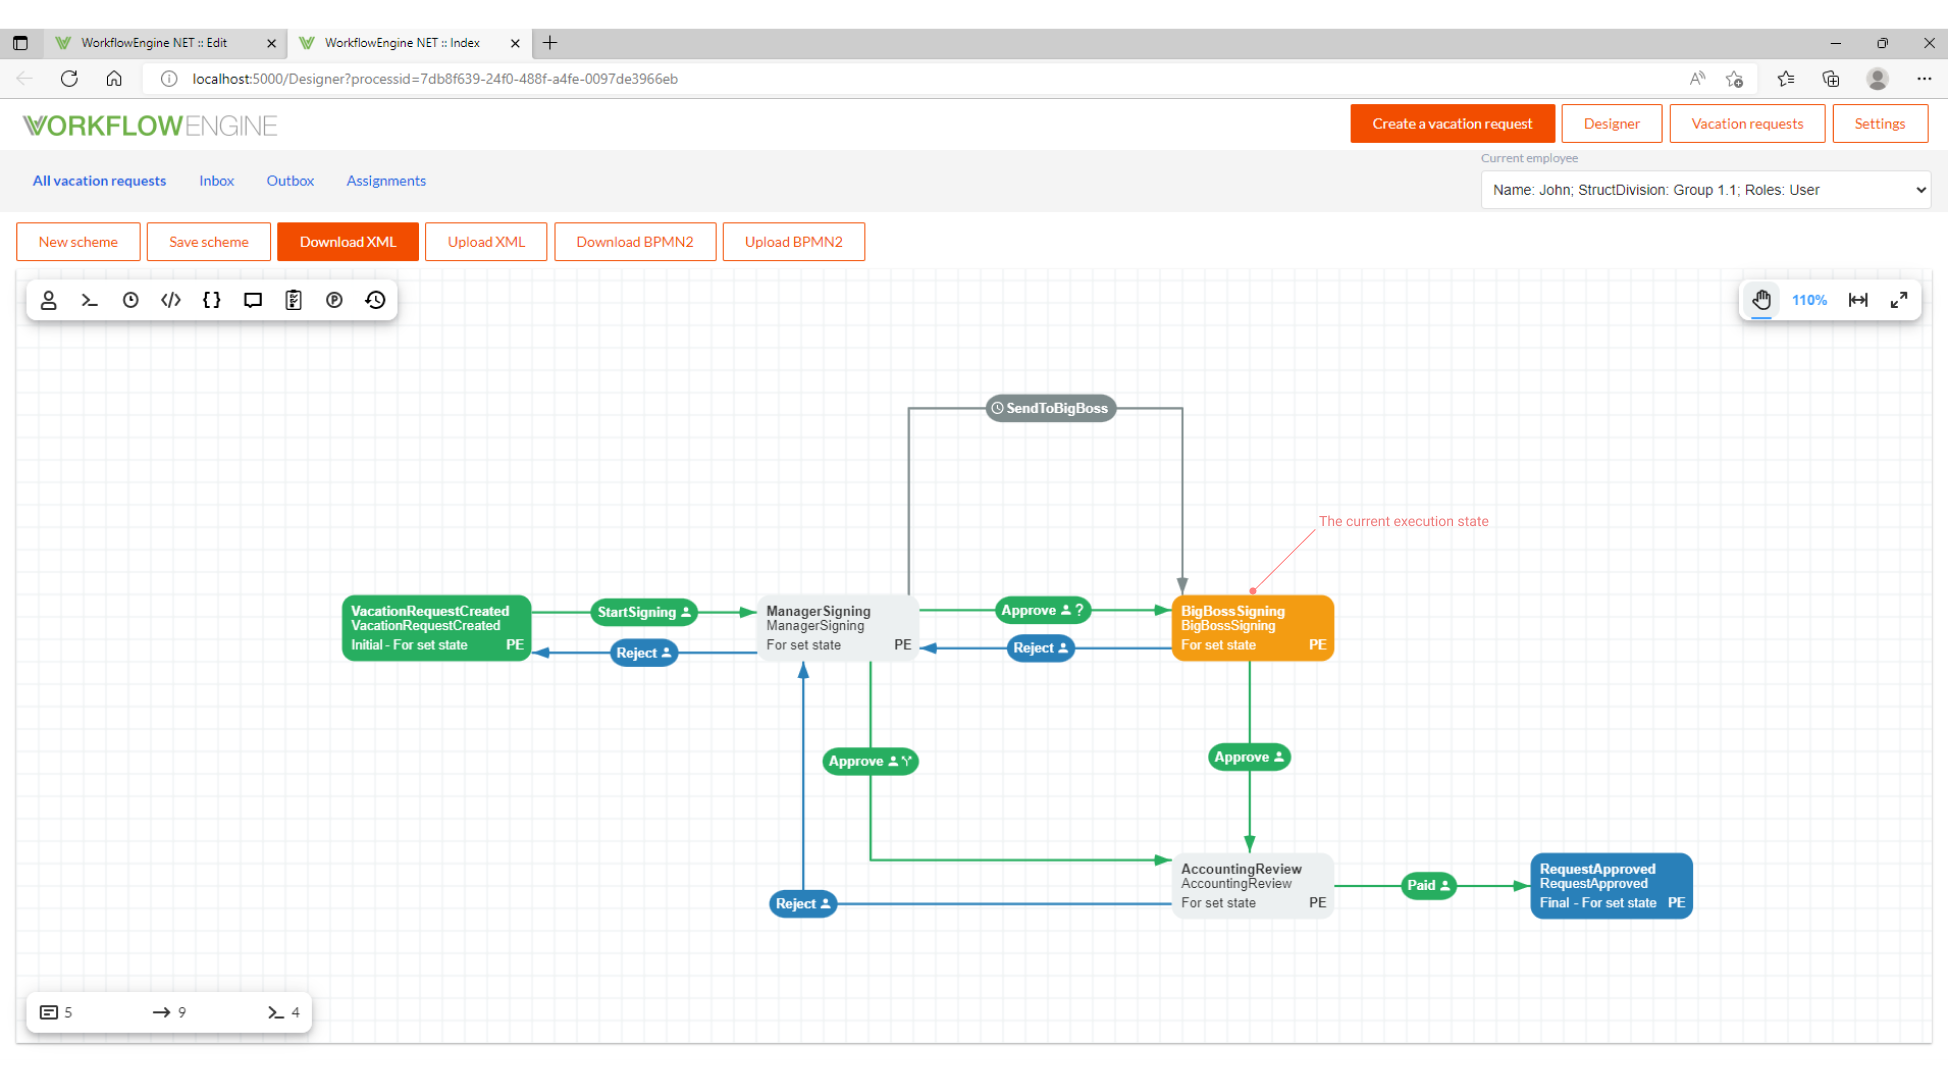
When the condition: @Sum > amount is verified, the command Approve permits the state to pass to BigBossSigning instead. Accordingly,
the current execution state in the workflow diagram instance will be available through Open in Workflow Designer.
Regarding the Inbox and Outbox pages - In the Inbox are listed the pending requests to be handled. On the other hand, in the Outbox
are listed the requests that have been already performed.
- Below, a pending request currently in Inbox:

- Here, the request already fulfilled in Outbox:

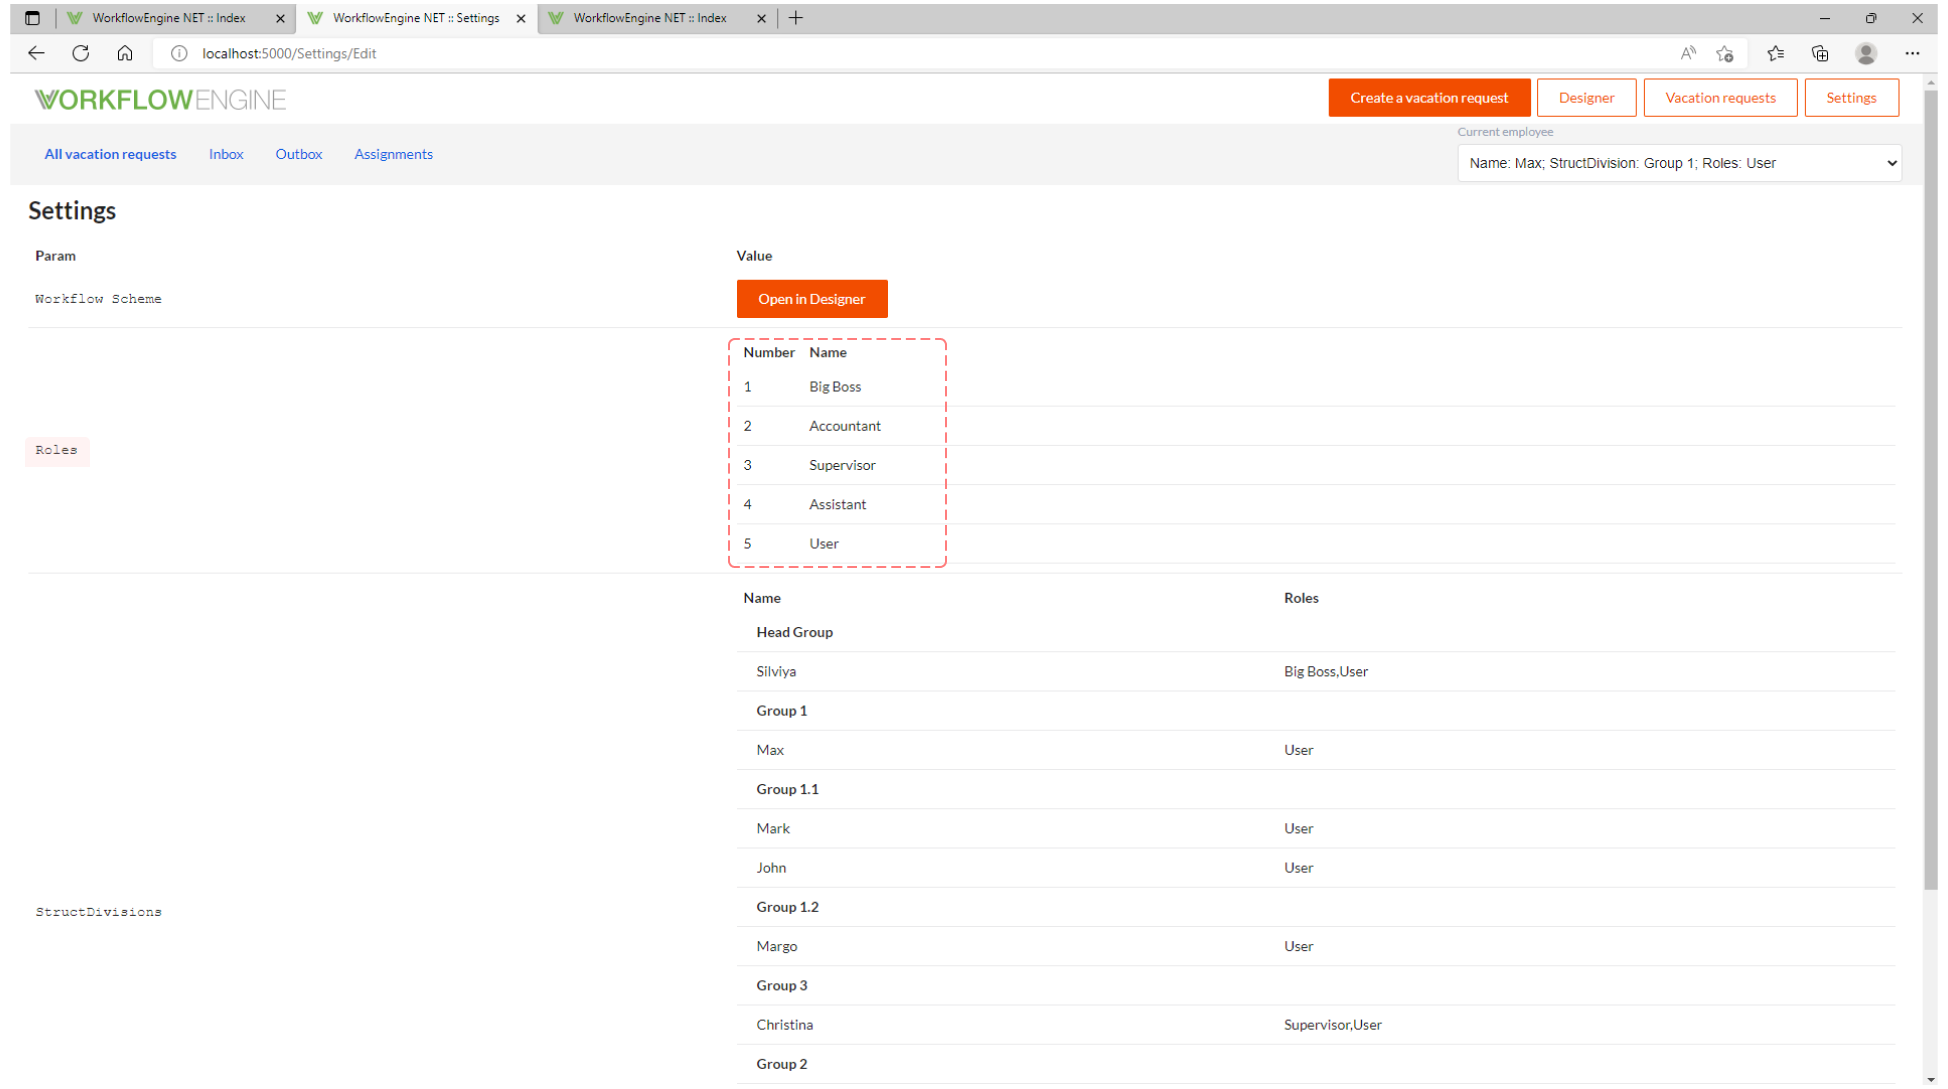
The Users or Employees and their Roles are created by implementing a Database model in Entity Framework
which is an Object-Relational Mapping (ORM) that provides developers with an automated mechanism to access and store data in the database.
Nevertheless, this kind of data might be available also in a client application or can be retrieved through an authentication server.
In case of modifying the current scheme, these conditions are met:
- An activity can be added to the scheme.
- The vacation request can be reopened.
- An update to the new scheme is completed when the list of commands is validated. Detailed information regarding this procedure can be read in the section Process scheme update.
- When the process is opened in the designer, you will see that the new scheme is used.
On the other hand, a new request may be created also as indicated below:
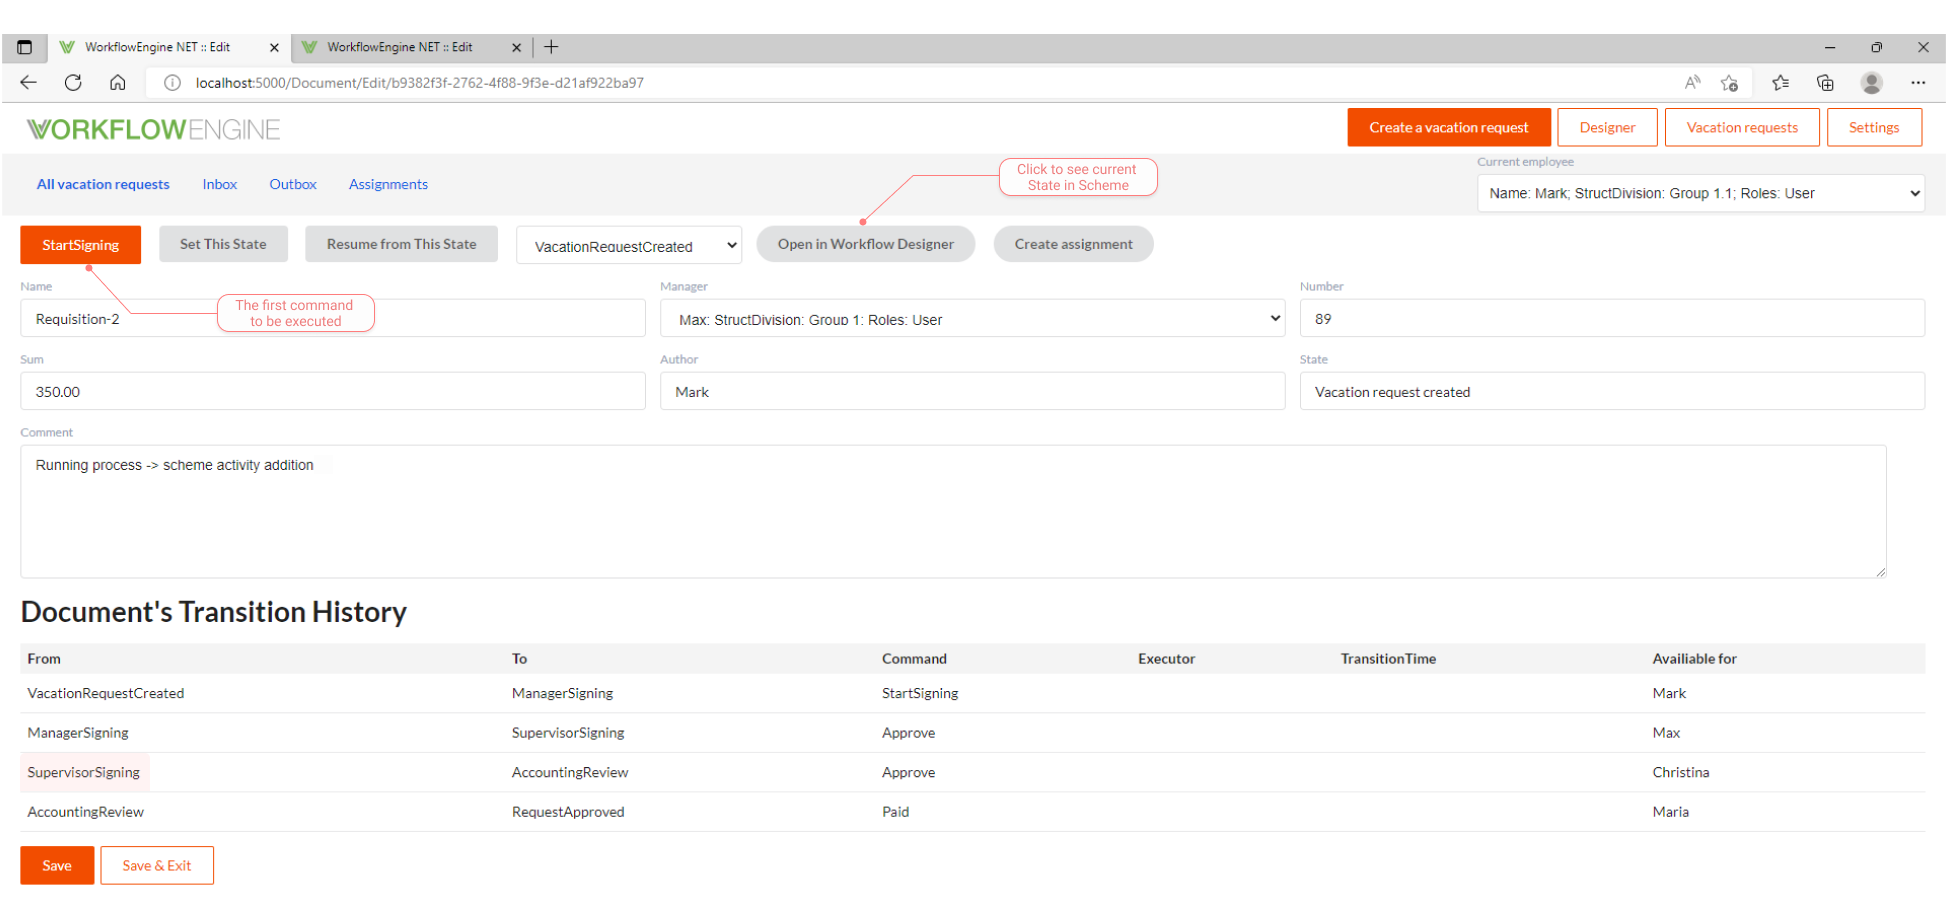
Afterward, open the scheme by clicking on: Open in Workflow Designer to see the current execution state.
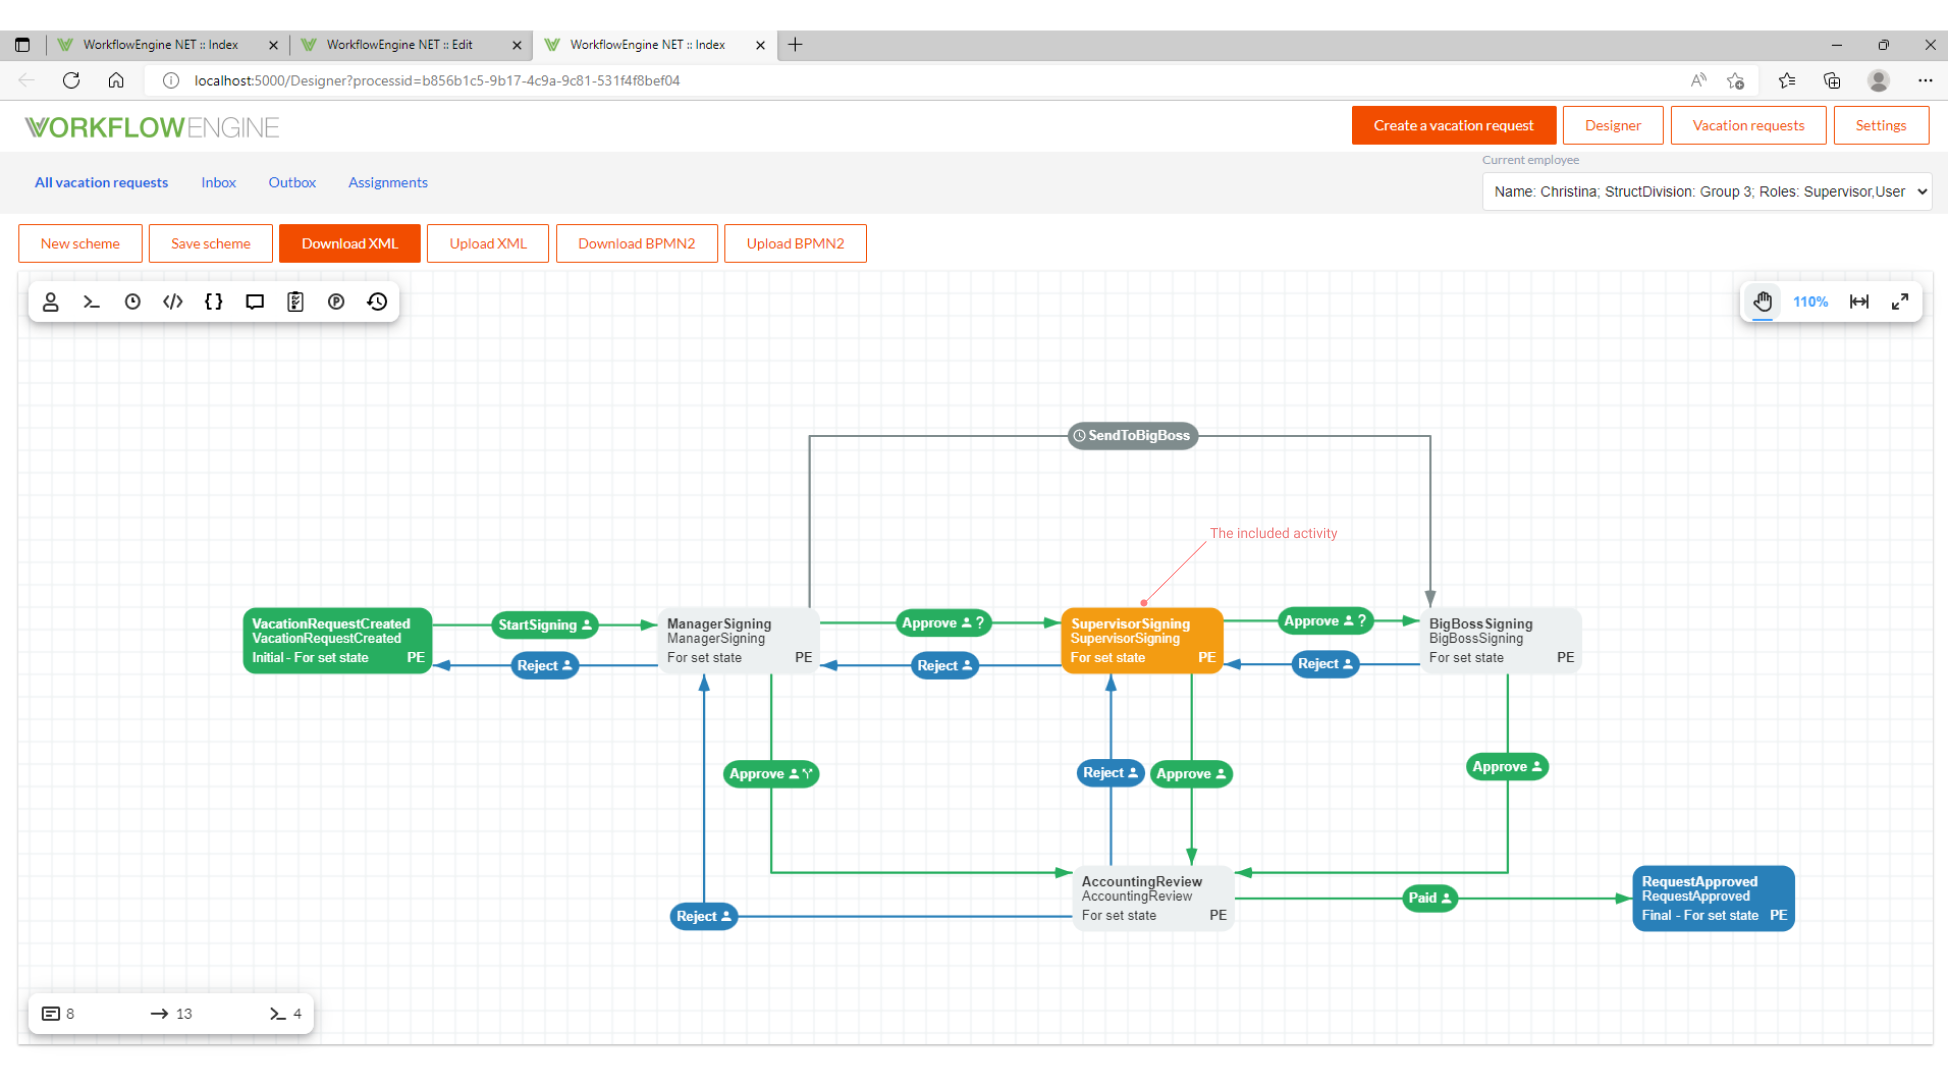
In our Github repository our Samples are available.
Detailed information related the Assignment's creation can be read in this documentation section.
Assignments
This is an alternative method to interact with the process by changing their statuses and other options. The assignments can be handled from both the designer and the document, according the process state.