Introducing parameters
Tutorial 3 📝
dockerizing - initial branch
introducing-parameters - final branch
introducing-parameters pull request - pull request with code changes
Overview
Process Parameters can be implemented in useful ways through coding improvement or customization. An implementation case in a React application is described in this tutorial. We will extend the functionalities in the React sample application described in the section React sample in Docker.
Support process description
We create a process scheme in order to demonstrate the Parameters Process operation. This scheme represents a simple IT support process
where tickets can be issued through different employees and departments. Overall, a particular support requests is received by the First
Line (L1). Then, the tickets are dispatched to the IT support department, the Law department or the Accounting department through the
command Redirect. The requests can be transferred between these departments or divisions, and they can be resolved or just rejected.
The following states are indicated:
- Processing - The request is being processed in this state.
- Resolved - Once the support request is resolved.
- Rejected - When support request is declined.
The Process Parameters are set in the scheme, and they are identified also in the support request as follows:
- Division - this parameter indicates the department where the request comes.
- Description - it is used to describe the issue. Initially, it displays the default value 'Describe your problem'.
- Comment - brief explanation related to the provided support.
All of these are persistence parameters. It means that they are saved along with the process and the interval of execution between commands.
In addition, the commands: Redirect, Resolve and Reject are set in the scheme as well as
the Rule Supporter which defines if the user has access to the commands depending on the
department where he works.
Prerequisites
- First, you should go through previous tutorials OR clone dockerizing branch.
- JetBrains Rider or Visual Studio.
- Command prompt or Terminal.
Backend application
First, in the backed application were added some new DTO classes and included some changes in the Application Data Model.
ProcessParameterDto
In this DTO the parameter's description is set, the Name and its serialized Value, besides the attributes Persist and
IsRequired.
namespace WorkflowApi.Models;

public class ProcessParameterDto
{
    public string Name { get; set; }

    public string Value { get; set; }

    public bool Persist { get; set; }

    public bool IsRequired { get; set; }
}
ProcessParametersDto
Moreover, the process parameters list was included:
namespace WorkflowApi.Models;

public class ProcessParametersDto
{
    public List<ProcessParameterDto> ProcessParameters { get; set; }
}
WorkflowProcessCommandDto
In this DTO model are defined the commands with parameters. The Name, LocalizedName and the CommandParameters list.
namespace WorkflowApi.Models;

public class WorkflowProcessCommandDto
{
    public string Name { get; set; }

    public string LocalizedName { get; set; }

    public List<ProcessParameterDto> CommandParameters { get; set; }
}
WorkflowProcessCommandsDto
Here, a modification was included. Command was set simply as string before, but now it is set as an object
WorkflowProcessCommandDto which has the command's name and process parameters list CommandParameters.
public class WorkflowProcessCommandsDto
{
    public string Id { get; set; }

    public List<WorkflowProcessCommandDto> Commands { get; set; }
}
Program
A minor change must be done to get the backend working properly with POST requests from the frontend.
const string rule = "MyCorsRule";
builder.Services.Configure<WorkflowApiConfiguration>(builder.Configuration);
var apiConfiguration = builder.Configuration.Get<WorkflowApiConfiguration>();

if (apiConfiguration?.Cors.Origins.Count > 0)
{
    builder.Services.AddCors(options =>
    {
        options.AddPolicy(rule, policy =>
        {
            policy.WithOrigins(apiConfiguration.Cors.Origins.ToArray());
            policy.AllowAnyHeader();
        });
    });
}
User
The Division was added in the user's model, the unit or department where user works. It is required for the sample process
described in this guide.
namespace WorkflowLib;

public class User
{
    public string Name { get; set; }
    public List<string> Roles { get; set; }
    public string Division { get; set; }
}
Users
Next, the division's names are also added in the user's list. In this case a user can work only in one department.
namespace WorkflowLib;

public static class Users
{
    public static readonly List<User> Data = new()
        {
            new User {Name = "Peter", Roles = new List<string> {"User", "Manager"}, Division = "IT Department"},
            new User {Name = "Margaret", Roles = new List<string> {"User"},  Division = "First Line"},
            new User {Name = "John", Roles = new List<string> {"Manager"},  Division = "Accounting"},
            new User {Name = "Sam", Roles = new List<string> {"Manager"}, Division = "Law Department"},
        };

    public static readonly Dictionary<string, User> UserDict = Data.ToDictionary(u => u.Name);
}
WorkflowController
In this class several methods were modified and a new ones have been created.
Initially, we need to import two new namespaces, the classes from which will be used later.
using System.Globalization;
using Microsoft.AspNetCore.Mvc;
using OptimaJet.Workflow.Core.Entities;
using OptimaJet.Workflow.Core.Persistence;
using WorkflowApi.Models;
using WorkflowLib;
using OptimaJet.Workflow.Core.Model;
using OptimaJet.Workflow.Core.Runtime;
The first method to mention is CreateInstance. The code that was added allows to pass parameters when the process is created. This method
also was changed from GET to POST request in the backend. The process parameters are taken from the Form, and they are parsed
in GetParameterNameAndValue where they can be added actually as Persistent Parameter or Temporary Parameter. Then, the parameters are
passed in CreateInstanceAsync.
More information related to Persistent and Temporary parameters can be found here.
/// </summary>
/// <param name="schemeCode">Process scheme code</param>
/// <returns>Process instance</returns>
[HttpPost]
[Route("createInstance/{schemeCode}")]
public async Task<IActionResult> CreateInstance(string schemeCode, [FromBody] ProcessParametersDto dto)
{
// generating a new processId
var processId = Guid.NewGuid();
// creating a new process instance
await WorkflowInit.Runtime.CreateInstanceAsync(schemeCode, processId);
var createInstanceParams = new CreateInstanceParams(schemeCode, processId);

if (dto.ProcessParameters.Count > 0)
{
  var processScheme = await WorkflowInit.Runtime.Builder.GetProcessSchemeAsync(schemeCode);

  foreach (var processParameter in dto.ProcessParameters)
  {
      var (name, value) =
          GetParameterNameAndValue(processParameter.Name, processParameter.Value, processScheme);
      if (processParameter.Persist)
      {
          createInstanceParams.AddPersistentParameter(name, value);
      }
      else
      {
          createInstanceParams.AddTemporaryParameter(name, value);
      }
  }
}

await WorkflowInit.Runtime.CreateInstanceAsync(createInstanceParams);
Next, the Commands method was also modified. Now, each command returns to the client its Name, LocalizedName and the
parameter's list CommandParameters in WorkflowProcessCommandDto. Moreover, the Value is set as the DefaultValue which is registered
in the scheme. The value is serialized in JSON to be displayed to the client.
/// <summary>
/// Returns process instance commands
/// </summary>
// getting available commands for a process instance
...
var commands = await WorkflowInit.Runtime.GetAvailableCommandsAsync(processId, identityId);
// convert process instance commands to a list of strings
var commandNames = commands?.Select(c => c.CommandName).ToList() ?? new List<string>();
// creating the resulting DTO
var dto = new WorkflowProcessCommandsDto
{
    Id = process.ProcessId.ToString(),
    Commands = commands?.Select(c =>
    {
        return new WorkflowProcessCommandDto()
        {
            Name = c.CommandName,
            LocalizedName = c.LocalizedName,
            CommandParameters = c.Parameters.Select(p => new ProcessParameterDto
            {
                Name = p.ParameterName,
                IsRequired = p.IsRequired,
                Persist = p.IsPersistent,
                Value = p.DefaultValue as string
                    ?? (p.DefaultValue == null
                        ? String.Empty
                        : ParametersSerializer.Serialize(p.DefaultValue))
            }).ToList()
        };
    }).ToList() ?? new List<WorkflowProcessCommandDto>()
};

return Ok(dto);
Furthermore ExecuteCommand was modified. Here, the method was changed to POST and process parameters are passed to ProcessParametersDto. Then, the parameters can be passed along with commands in ExecuteCommandAsync, so it is possible to give the
process parameters with commands when a process is created.
/// <param name="processId">Unique process identifier</param>
/// <param name="command">Command</param>
/// <param name="identityId">Command executor identifier</param>
/// <param name="dto">Command parameters</param>
/// <returns>true if the command was executed, false otherwise</returns>
[HttpPost]
[Route("executeCommand/{processId:guid}/{command}/{identityId}")]
public async Task<IActionResult> ExecuteCommand(Guid processId, string command, string identityId,
    [FromBody] ProcessParametersDto dto)
{
    // getting available commands for a process instance
    var commands = await WorkflowInit.Runtime.GetAvailableCommandsAsync(processId, identityId);
    // search for the necessary command
    var workflowCommand = commands?.First(c => c.CommandName == command)
                          ?? throw new ArgumentException($"Command {command} not found");

    if (dto.ProcessParameters.Count > 0)
    {
        var processScheme = await WorkflowInit.Runtime.GetProcessSchemeAsync(processId);

        foreach (var processParameter in dto.ProcessParameters)
        {
            var (name, value) =
                GetParameterNameAndValue(processParameter.Name, processParameter.Value, processScheme);

            workflowCommand.SetParameter(name, value, processParameter.Persist);
        }
    }
    // executing the command
    var result = await WorkflowInit.Runtime.ExecuteCommandAsync(workflowCommand, identityId, null);
    return Ok(result.WasExecuted);
}
Now, we are going to describe the new methods that were added.
First, SetProcessParameters method which modifies all process parameters. In this method are gotten processId and the parameter that
should be changed ProcessParametersDto. It takes them and writes down, then they are saved in processInstance.SaveAsync. This approach
might be used when process command execution is not required.
/// <summary>
/// Changes process parameters without changing a process state
/// </summary>
/// <param name="processId">Unique process identifier</param>
/// <param name="dto">Process parameters</param>
/// <returns>true if the process parameters has been changed, false otherwise</returns>
[HttpPost]
[Route("setProcessParameters/{processId:guid}")]
public async Task<IActionResult> SetProcessParameters(Guid processId, [FromBody] ProcessParametersDto dto)
{
    var result = dto.ProcessParameters.Count > 0;

    var processInstance = await WorkflowInit.Runtime.GetProcessInstanceAndFillProcessParametersAsync(processId);

    foreach (var processParameter in dto.ProcessParameters)
    {
        var (name, value) =
            GetParameterNameAndValue(processParameter.Name, processParameter.Value,
                processInstance.ProcessScheme);

        await processInstance.SetParameterAsync(name, value,
            processParameter.Persist ? ParameterPurpose.Persistence : ParameterPurpose.Temporary);
    }

    foreach (var processParameter in processInstance.ProcessParameters.Where(p =>
                 p.Purpose != ParameterPurpose.System && !dto.ProcessParameters.Any(d => d.Name.Equals(p.Name))))
    {
        processInstance.RemoveParameter(processParameter.Name);
    }

    await processInstance.SaveAsync(WorkflowInit.Runtime);
    return Ok(result);
}
Next, we have SchemeParameters method. It returns parameters which are described in the process scheme. These parameters are set in the
scheme as default values.
/// <summary>
/// Returns list of scheme parameters and theirs default values
/// </summary>
/// <param name="schemeCode">Process scheme code</param>
/// <returns></returns>
[HttpGet]
[Route("schemeParameters/{schemeCode}")]
public async Task<IActionResult> SchemeParameters(string schemeCode)
{
    var processScheme = await WorkflowInit.Runtime.Builder.GetProcessSchemeAsync(schemeCode);

    var processParameterDtos = processScheme.Parameters
        .Where(p => p.Purpose != ParameterPurpose.System)
        .Select(p => new ProcessParameterDto()
        {
           Name = p.Name, Value = p.InitialValue ?? string.Empty, Persist = p.Purpose == ParameterPurpose.Persistence
        }).ToList();

    return Ok(processParameterDtos);
}
Then, ProcessParameters method was also added. It receives the processId and recovers the parameters of a running process. The launched
instance returns all parameters and their current values.
/// <summary>
/// Returns list of process parameters and theirs values
/// </summary>
/// <param name="processId">Unique process identifier</param>
/// <returns></returns>
[HttpGet]
[Route("schemeParameters/{processId:guid}")]
public async Task<IActionResult> ProcessParameters(Guid processId)
{
    var processInstance = await WorkflowInit.Runtime.GetProcessInstanceAndFillProcessParametersAsync(processId);

    var processParameterDtos = processInstance.ProcessParameters
        .Where(p => p.Purpose != ParameterPurpose.System)
        .Select(p => new ProcessParameterDto()
        {
            Name = p.Name,
            Value = SerializeProcessParameter(p),
            Persist = p.Purpose == ParameterPurpose.Persistence
        }).ToList();

    return Ok(processParameterDtos);
}
Afterward, a private method SerializeProcessParameter which serializes the process parameters by considering Implicit or
Explicit parameters was added. In case of Implicit parameters they are serialized in JSON format
or as string, and the Explicit ones are already deserialized.
Detailed information regarding process parameters can be read in this section.
/// <summary>
/// Serializes process parameters in unified way
/// </summary>
/// <param name="processParameter">Process parameter with value</param>
/// <returns></returns>
private static string SerializeProcessParameter(ParameterDefinitionWithValue processParameter)
{
    //Implicit parameters are saved as strings
    //Explicit parameters are already deserialized
    var parameterValue = processParameter.IsImplicit
        ? ParametersSerializer.Deserialize<object>(processParameter.Value.ToString())
        : processParameter.Value;

    return parameterValue as string ?? ParametersSerializer.Serialize(parameterValue);
}
Finally, another private method GetParameterNameAndValue where are received parameterName, the serialized parameterValue and
scheme from the client. If the parameter is written down in the process scheme, it is validated, then it is deserialized based on the
types that are available in the parameter's GUI through the Designer toolbar. When the parameter is not described in the scheme (an explicit
parameter), then it is deserialized through the dynamic method DynamicParameter.ParseJson. This object can work with a derived type.
 private static (string Name, object Value) GetParameterNameAndValue(string parameterName, string parameterValue,
        ProcessDefinition scheme)
{
    var parameter =
        scheme.Parameters.FirstOrDefault(p => p.Name.Equals(parameterName, StringComparison.Ordinal)) ??
        scheme.Parameters.FirstOrDefault(p => p.Name.Equals(parameterName, StringComparison.OrdinalIgnoreCase));

    switch (parameter)
    {
        case null:
        {
            var value = DynamicParameter.ParseJson(parameterValue);
            return (parameterName, value);
        }
        case {} when parameter.Type == typeof (string):
        {
            return (parameterName, parameterValue);
        }
        case { Type: { } }:
        {
            return (parameter.Name, ParametersSerializer.Deserialize(parameterValue, parameter.Type));
        }
        default:
        {
            throw new InvalidOperationException();
        }
    }
}
These are all changes in WorkflowController.
Frontend application
Now, all the improvements in the Frontend application are described in this section.
ProcessParameters
First, a complete new React component ProcessParameters has been included. It is a table element in 'Initial Process Parameters' where
a process parameter can be edited or added when you create a new process. Considering that this a complex component, validation was not
included, but you may add it and use this code in your application.
import {useEffect, useState} from "react";
import {Table, Input, Checkbox, Container, Button} from 'rsuite';

const {Column, HeaderCell, Cell} = Table;

const EditableInputCell = ({rowData, dataKey, onChange, idKey, readOnlyFn, ...props}) => {
    return <Cell {...props} style={{padding: '5px'}}>
        <Input readOnly={readOnlyFn(rowData)} value={rowData[dataKey]} onChange={value => {
            onChange && onChange(rowData[idKey], dataKey, value)
        }}/>
    </Cell>;
}

const EditableTextAreaCell = ({rowData, dataKey, onChange, idKey, ...props}) => {
    return <Cell {...props} style={{padding: '5px'}}>
        <Input as="textarea" rows={3} value={rowData[dataKey]} onChange={value => {
            onChange && onChange(rowData[idKey], dataKey, value)
        }}/>
    </Cell>;
}

const EditableCheckboxCell = ({rowData, dataKey, onChange, idKey, ...props}) => {
    return <Cell {...props} style={{padding: '5px'}}>
        <Checkbox checked={rowData[dataKey]} onChange={(_, checked) => {
            onChange && onChange(rowData[idKey], dataKey, checked)
        }}/>
    </Cell>;
}

const ButtonCell = ({rowData, idKey, onClick, text, hideFn, ...props}) => {
    return <Cell {...props} style={{padding: '5px'}}>
        {!hideFn(rowData) &&
            <Button onClick={() => {
                onClick && onClick(rowData[idKey])
            }}>{text}</Button>}
    </Cell>;
}

const defaultParameter = {
    name: "parameter", value: "", persist: true, isRequired: false
}

const ProcessParameters = ({onParametersChanged, defaultParameters, ...props}) => {
    const idKey = "name";
    const [data, setData] = useState(defaultParameters ?? []);
    const [autoHeight, setAutoHeight] = useState(false);

    useEffect(() => {
        onParametersChanged(data);
    }, [data]);

    useEffect(() => {
        setAutoHeight(true);
    }, [])

    const onChange = (id, key, value) => {
        const nextData = Object.assign([], data);
        let updated = nextData.find(item => item[idKey] === id);
        if (key === idKey) {
            const updatedClone = {...updated};
            updatedClone[key] = value;
            updated[key] = rewriteDuplicatedKey(nextData, updatedClone)[key];
        } else {
            updated[key] = value;
        }
        setData(nextData);
    };

    const onAdd = () => {
        const nextData = Object.assign([], data);
        const dataCount = nextData.length;
        const newParameter = {...defaultParameter};
        newParameter.name = `${newParameter.name}_${dataCount + 1}`;
        nextData.push(rewriteDuplicatedKey(nextData, newParameter));
        setData(nextData);
    }

    const onDelete = (id) => {
        let nextData = Object.assign([], data);
        const index = nextData.findIndex(item => item[idKey] === id);
        nextData = nextData.slice(0, index).concat(nextData.slice(index + 1));
        setData(nextData);
    }

    const rewriteDuplicatedKey = (data, newItem) => {
        if (data.find(item => item[idKey] === newItem[idKey])) {
            const split = newItem[idKey].split("_");
            const last = parseInt(split[split.length - 1]);

            if (!isNaN(last)) {
                if (split.length > 1) {
                    newItem[idKey] = `${split.slice(0, split.length - 1).join("_")}_${last + 1}`;
                } else {
                    newItem[idKey] = `${last + 1}`;
                }
            } else {
                newItem[idKey] = `${newItem[idKey]}_1`;
            }

            return rewriteDuplicatedKey(data, newItem);
        }

        return newItem;
    }

    return <Container style={{overflow: 'hidden'}}>
        <Table data={data} rowHeight={87} height={(87 * 3 + 40)} autoHeight={autoHeight}>
            <Column flexGrow={2}>
                <HeaderCell>Name</HeaderCell>
                <EditableInputCell dataKey={"name"} idKey={idKey} onChange={onChange}
                                   readOnlyFn={(rowData) => rowData["isRequired"]}></EditableInputCell>
            </Column>
            <Column flexGrow={4}>
                <HeaderCell>Value</HeaderCell>
                <EditableTextAreaCell dataKey={"value"} idKey={idKey} onChange={onChange}></EditableTextAreaCell>
            </Column>
            <Column flexGrow={1}>
                <HeaderCell>Persist</HeaderCell>
                <EditableCheckboxCell dataKey={"persist"} idKey={idKey} onChange={onChange}></EditableCheckboxCell>
            </Column>
            <Column flexGrow={1}>
                <HeaderCell>Delete</HeaderCell>
                <ButtonCell idKey={idKey} text={"Delete"} onClick={onDelete} hideFn={(rowData) => rowData["isRequired"]}/>
            </Column>
        </Table>
        <Button onClick={onAdd}>Add</Button>
    </Container>;
}

export default ProcessParameters;
ProcessMenu
The ProcessMenu component was also modified. When a process instance is running, now appears the button Change Process Parameters,
where the process parameters can be edited and the changes saved. Command execution has also been modified. When a process instance is
running, the commands that can be executed become available. Then, if you click on command, in the modal window Command Parameters, you
can create or add a parameter for this command.
import React, {useEffect, useState} from "react";
import {Button, ButtonGroup, FlexboxGrid, Modal} from "rsuite";
import FlexboxGridItem from "rsuite/cjs/FlexboxGrid/FlexboxGridItem";
import settings from "./settings";
import Users from "./Users";
import ProcessParameters from "./ProcessParameters";

const ProcessMenu = (props) => {
    const [commands, setCommands] = useState([]);
    const [currentUser, setCurrentUser] = useState();

    const [commandParametersState, setCommandParametersState] = useState({
        open: false,
        name: "",
        localizedName: "",
        defaultParameters: []
    })
    const [commandParameters, setCommandParameters] = useState([])
    const [processParametersState, setProcessParametersState] = useState({
        open: false,
        processParameters: []
    })
    const [newProcessParameters, setNewProcessParameters] = useState([])

    const loadCommands = (processId, user) => {
        fetch(`${settings.workflowUrl}/commands/${processId}/${user}`)
            .then(result => result.json())
            .then(result => {
                setCommands(result.commands)
            })
    }

    const executeCommand = () => {
        fetch(`${settings.workflowUrl}/executeCommand/${props.processId}/${commandParametersState.name}/${currentUser}`,
            {
                method: "post",
                headers: {
                    'Accept': 'application/json',
                    'Content-Type': 'application/json'
                },
                body: JSON.stringify({
                    processParameters: commandParameters
                })
            })
            .then(result => result.json())
            .then(() => {
                onCloseCommandWindow();
                loadCommands(props.processId, currentUser);
                props.afterCommandExecuted?.();
            });
    }

    const onOpenCommandWindow = (command) => {
        setCommandParametersState({
            ...commandParametersState,
            name: command.name,
            localizedName: command.localizedName,
            defaultParameters: command.commandParameters,
            open: true
        });
    };

    const onCloseCommandWindow = () => setCommandParametersState({...commandParametersState, open: false});
    const onCloseProcessParametersWindow = () => setProcessParametersState({...processParametersState, open: false});
    const onOpenProcessParametersWindow = () => {
        fetch(`${settings.workflowUrl}/schemeParameters/${props.processId}/`)
            .then(result => result.json())
            .then(result => {
                setProcessParametersState({...processParametersState, processParameters: result, open: true});
            })
    }

    const onSetProcessParameters = () => {
        fetch(`${settings.workflowUrl}/setProcessParameters/${props.processId}`,
            {
                method: "post",
                headers: {
                    'Accept': 'application/json',
                    'Content-Type': 'application/json'
                },
                body: JSON.stringify({
                    processParameters: newProcessParameters
                })
            })
            .then(result => result.json())
            .then(() => {
                onCloseProcessParametersWindow();
                loadCommands(props.processId, currentUser);
                props.afterCommandExecuted?.();
            });
    }

    useEffect(() => {
        loadCommands(props.processId, currentUser);
    }, [props.processId, currentUser]);

    const buttons = commands.map(c => <Button key={c.name} onClick={() => onOpenCommandWindow(c)}>{c.localizedName}</Button>)
    return <>
        <FlexboxGrid>
            <FlexboxGridItem colspan={4}>
                <Users onChangeUser={setCurrentUser} currentUser={currentUser}/>
            </FlexboxGridItem>
            <FlexboxGridItem colspan={12}>
                {commands.length > 0 && <ButtonGroup>
                    <Button disabled={true}>Commands:</Button>
                    {buttons}
                </ButtonGroup>
                }
                <Button onClick={onOpenProcessParametersWindow}>Change process parameters.</Button>
            </FlexboxGridItem>
        </FlexboxGrid>
        <Modal open={commandParametersState.open} onClose={onCloseCommandWindow} overflow={true}>
            <Modal.Header>
                <Modal.Title>Command parameters</Modal.Title>
            </Modal.Header>
            <Modal.Body>
                <ProcessParameters onParametersChanged={(processParameters) => setCommandParameters(processParameters)}
                                   defaultParameters={commandParametersState.defaultParameters}/>
            </Modal.Body>
            <Modal.Footer>
                <Button onClick={executeCommand} appearance="primary">
                    Execute: {commandParametersState.localizedName}
                </Button>
                <Button onClick={onCloseCommandWindow} appearance="subtle">
                    Cancel
                </Button>
            </Modal.Footer>
        </Modal>
        <Modal open={processParametersState.open} onClose={onCloseProcessParametersWindow} overflow={true}>
            <Modal.Header>
                <Modal.Title>Change process parameters</Modal.Title>
            </Modal.Header>
            <Modal.Body>
                <ProcessParameters onParametersChanged={(processParameters) => setNewProcessParameters(processParameters)}
                                   defaultParameters={processParametersState.processParameters}/>
            </Modal.Body>
            <Modal.Footer>
                <Button onClick={onSetProcessParameters} appearance="primary">
                    Save
                </Button>
                <Button onClick={onCloseProcessParametersWindow} appearance="subtle">
                    Cancel
                </Button>
            </Modal.Footer>
        </Modal>
    </>
}
export default ProcessMenu;
Designer
Next, we have some changes in Designer component. Here, the code was modified to transfer the process parameters. When you create a new
process by clicking on Create Process, you can add a process parameter in the modal window Initial Process Parameters. These parameters
become available in the Designer Toolbar through 'Process info' option in the tab 'Process Parameters'.
import React, {useRef, useState} from "react";
import {Button, Container, Modal} from "rsuite";
import WorkflowDesigner from "@optimajet/workflow-designer-react";
import settings from "./settings";
import SchemeMenu from "./SchemeMenu";
import ProcessMenu from "./ProcessMenu";
import ProcessParameters from "./ProcessParameters";

const Designer = (props) => {
    const {schemeCode, ...otherProps} = {props}
    const [code, setCode] = useState(props.schemeCode)
    const [processId, setProcessId] = useState(props.processId)

    const [processParametersState, setProcessParametersState] = useState({
        open: false,
        defaultParameters: []
    })
    const [processParameters, setProcessParameters] = useState([])

    const designerRef = useRef()

    const designerConfig = {
        renderTo: 'wfdesigner',
        apiurl: settings.designerUrl,
        templatefolder: '/templates/',
        widthDiff: 300,
        heightDiff: 100,
        showSaveButton: !processId
    };

    const createOrLoad = (code) => {
        setCode(code)
        setProcessId(null)
        const data = {
            schemecode: code,
            processid: undefined
        }
        const wfDesigner = designerRef.current.innerDesigner;
        if (wfDesigner.exists(data)) {
            wfDesigner.load(data);
        } else {
            wfDesigner.create(code);
        }
    }

    const refreshDesigner = () => {
        designerRef.current.loadScheme();
    }

    const onOpenProcessWindow = () => {
        fetch(`${settings.workflowUrl}/schemeParameters/${code}`)
            .then(result => result.json())
            .then(data => {
                setProcessParametersState({
                    open: true,
                    defaultParameters: data
                })
            })
    };
    const onCloseProcessWindow = () => setProcessParametersState({...processParametersState, open: false});

    const onCreateProcess = () => {
        fetch(`${settings.workflowUrl}/createInstance/${code}`,
            {
                method: "post",
                headers: {
                    'Accept': 'application/json',
                    'Content-Type': 'application/json'
                },
                body: JSON.stringify({
                    processParameters: processParameters
                })
            })
            .then(result => result.json())
            .then(data => {
                setProcessId(data.id)
                const params = {
                    schemecode: code,
                    processid: data.id
                };
                designerRef.current.innerDesigner.load(params,
                    () => console.log('Process loaded'),
                    error => console.error(error));
                setProcessParametersState({...processParametersState, open: false});
            });
    }

    return <Container style={{maxWidth: '80%', overflow: 'hidden'}}>
        {!processId &&
            <SchemeMenu {...otherProps} schemeCode={code}
                        onNewScheme={createOrLoad} onCreateProcess={onOpenProcessWindow}/>
        }
        {!!processId && <ProcessMenu processId={processId} afterCommandExecuted={refreshDesigner}/>}
        <Modal open={processParametersState.open} onClose={onCloseProcessWindow} overflow={true}>
            <Modal.Header>
                <Modal.Title>Initial process parameters</Modal.Title>
            </Modal.Header>
            <Modal.Body>
                <ProcessParameters onParametersChanged={(processParameters) => setProcessParameters(processParameters)}
                                   defaultParameters={processParametersState.defaultParameters}/>
            </Modal.Body>
            <Modal.Footer>
                <Button onClick={onCreateProcess} appearance="primary">
                    Create Process
                </Button>
                <Button onClick={onCloseProcessWindow} appearance="subtle">
                    Cancel
                </Button>
            </Modal.Footer>
        </Modal>

        <WorkflowDesigner
            schemeCode={code}
            processId={processId}
            designerConfig={designerConfig}
            ref={designerRef}
        />
    </Container>
}
export default Designer;
Users
Finally, a minor change in Users function. The Division was added to be displayed in the drop-down user list.
import {useEffect, useState} from "react";
import {SelectPicker} from "rsuite";
import settings from "./settings";

const Users = (props) => {
    const [users, setUsers] = useState([]);

    const onChangeUser = user => {
        props.onChangeUser?.(user);
    }

    useEffect(() => {
        fetch(`${settings.userUrl}/all`)
            .then(response => response.json())
            .then(data => {
                setUsers(data);
                onChangeUser(data[0].name)
            })
    }, []);

    const data = users.map(u => {
        const roles = u.roles.join(', ');
        return ({label: `${u.name} (${roles}) (${u.division})`, value: u.name})
    });

    return <SelectPicker data={data} style={{width: 224}} menuStyle={{zIndex: 1000}}
                         value={props.currentUser} onChange={onChangeUser}/>
}

export default Users;
Starting the application
Once the code improvements are completed in the backend and frontend, the application can be compiled and run, so start it by executing the following commands:
cd docker-files
docker compose up --build --force-recreate
Then, open the application url http://localhost:3000/ in your preferred browser.
Upload the process scheme
Download the ParametersScheme.xml.
Click on tab Designer and upload the provided scheme as indicated below:
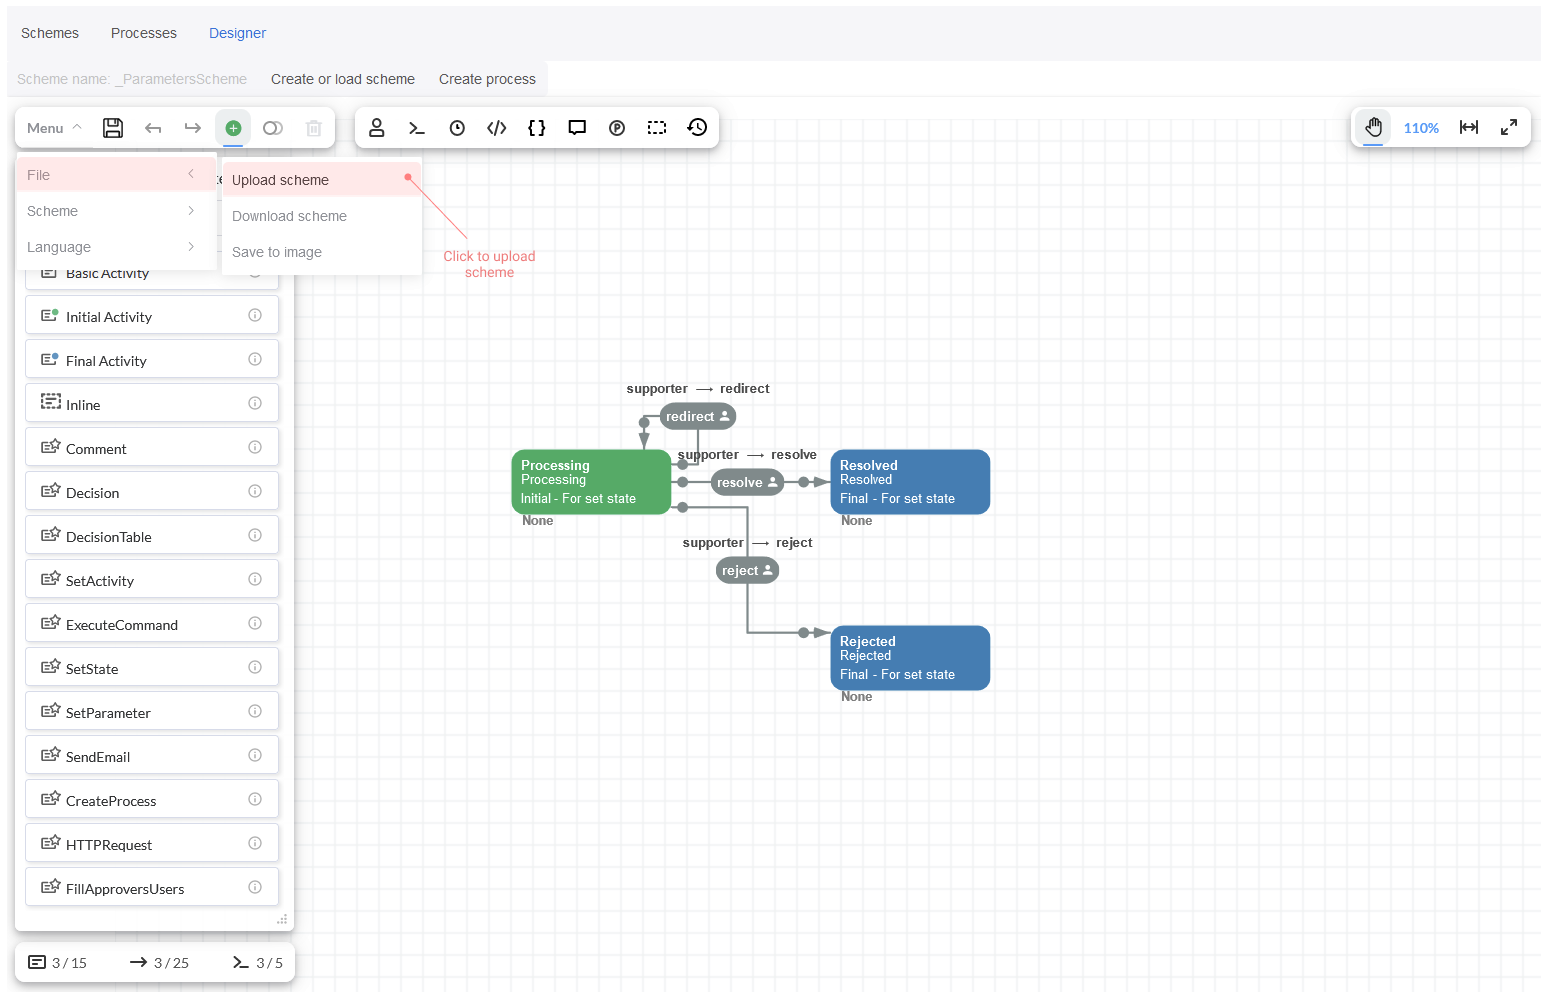
Then click Save.
Running the process
Now, we are going to explain how the process can be run.
Process triggering
When a certain request comes to the state Processing, the access to the report is defined essentially based on the User that might fulfill
this request with the help of 'supporter' actor that is specified in the Transitions.
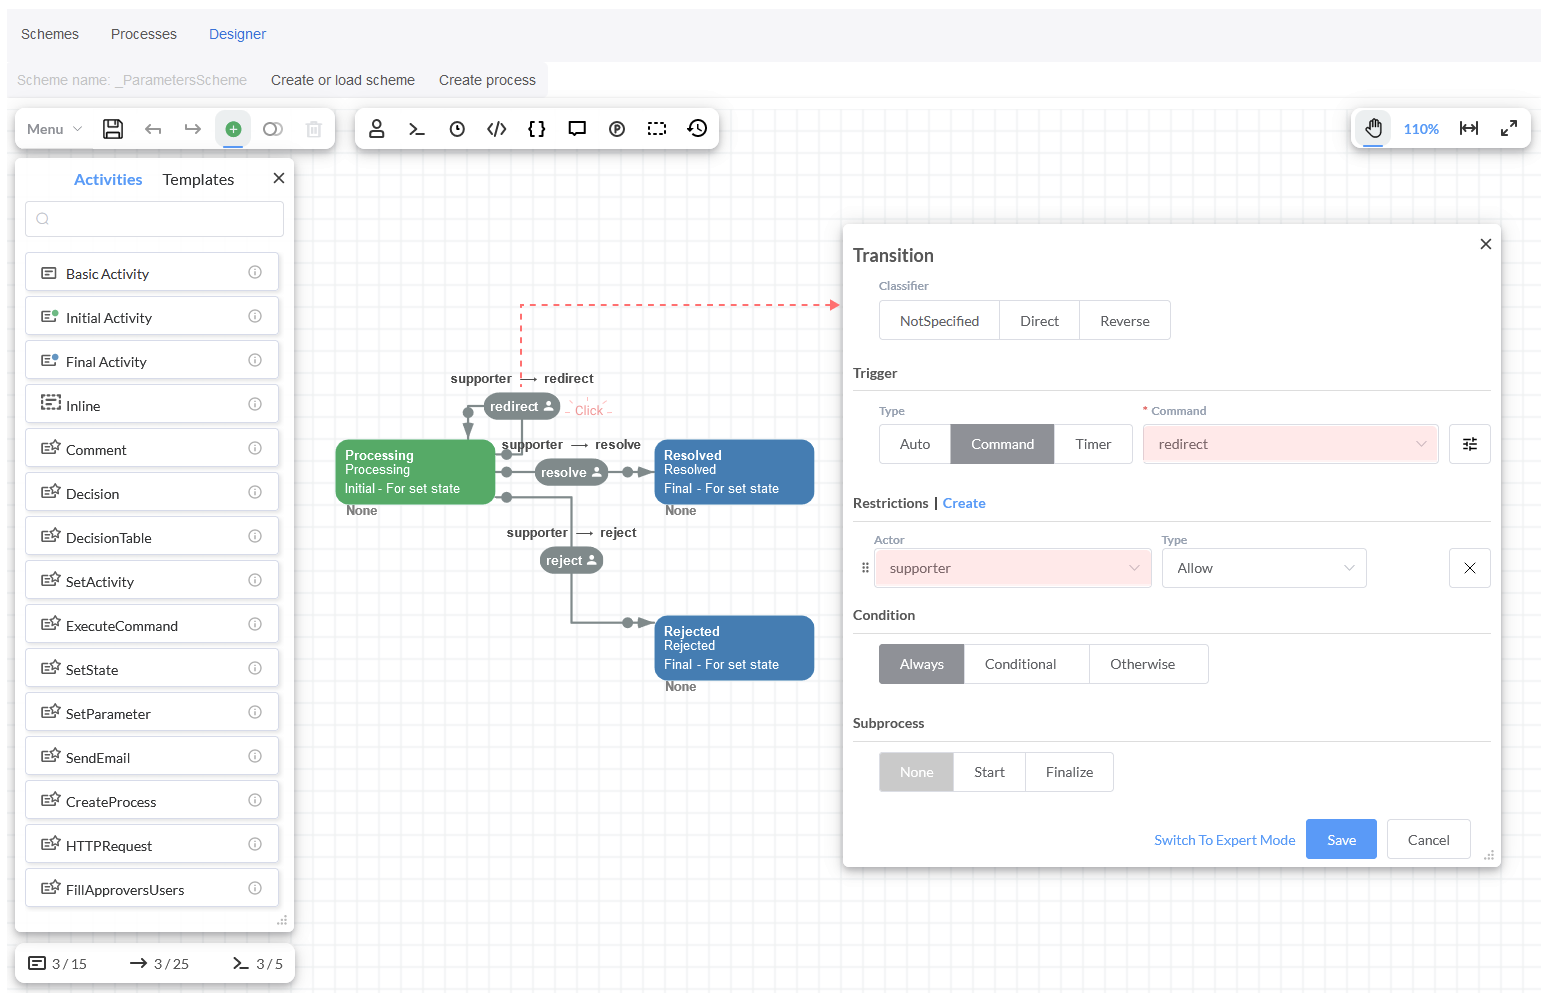
Then, the actor forwards this report request to the Rule also called 'Supporter'. This simple rule is set
as CodeAction where the Parameter 'Division' is gotten from the process instance, and it calls the
class Users where the user Division coincides with this parameter to return the Name of the user.
var division = processInstance.GetParameter<string>("Division");

return WorkflowLib.Users.Data.Where(u => u.Division == division).Select(u => u.Name).ToList();
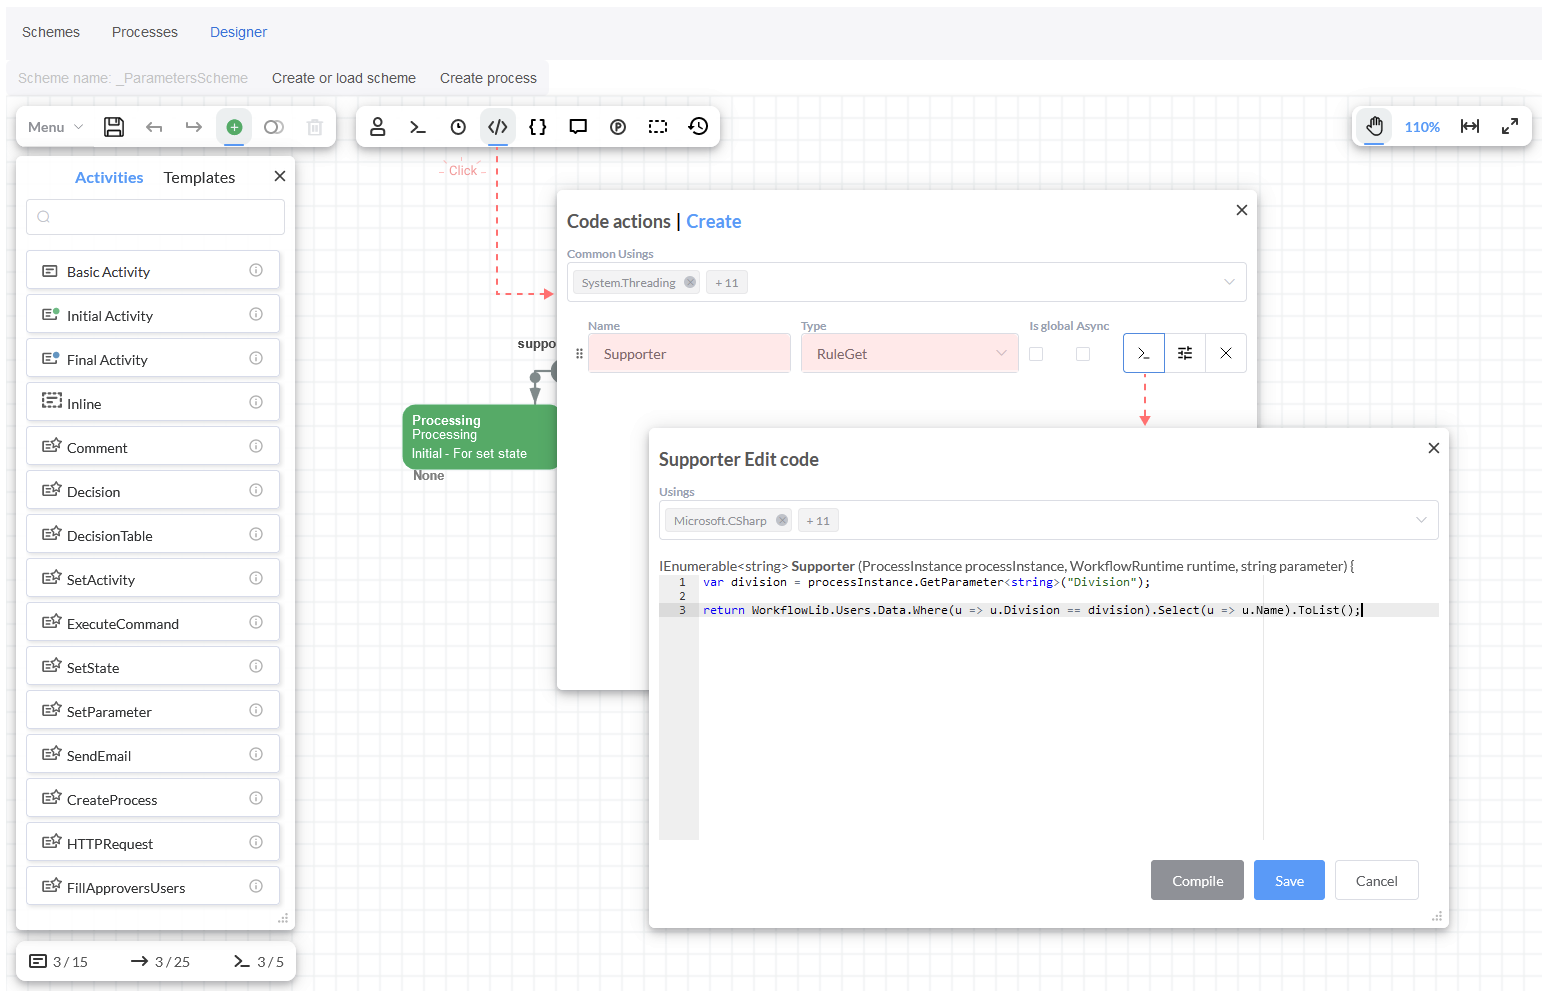
We have the list of all users and the Divisions where they work in Users class.
Furthermore, the commands have registered parameters.
- The
Redirectcommand - it transfers the requests to another department, and it has two mandatory parameters 'Division' which indicates the department for sending the request, and 'Comment' where should be specified the reason for redirecting. The 'IT department' is set as default division because the requests are handled by them mostly. Resolve- it is used when the request is fulfilled, and it has only one parameter 'Comment'. Once the request is resolved a brief description related to the resolution is indicated in this field.Reject- when a request is declined. It has also one parameter 'Comment' to write the reason for discarding.
Process execution
Overall, three methods to pass process parameters are described:
- First method - when the process is created, the initial process parameters can be transmitted, and the parameters values saved to be used later. You can keep all kind of objects in any type for the report request in process parameters, but it must be serialized in JSON.
- Second method - when running a process instance, parameters can be also transferred. In this case, the parameters that have been already
saved in the process, they can be passed or modified through
Change process parameters. Moreover, you can add your own parameters or even delete the parameters that had been saved in the process. All process parameters can be overwritten. - Third method - parameters can be transferred along with the commands. When a command is executed, you can modify the parameters that were saved in the process.
First, we have the parameters: 'Division', 'Description' and 'Comment' which are defined in the process scheme through the Designer
Toolbar in the button 'Parameters' {}. The InitialValues are set by default.
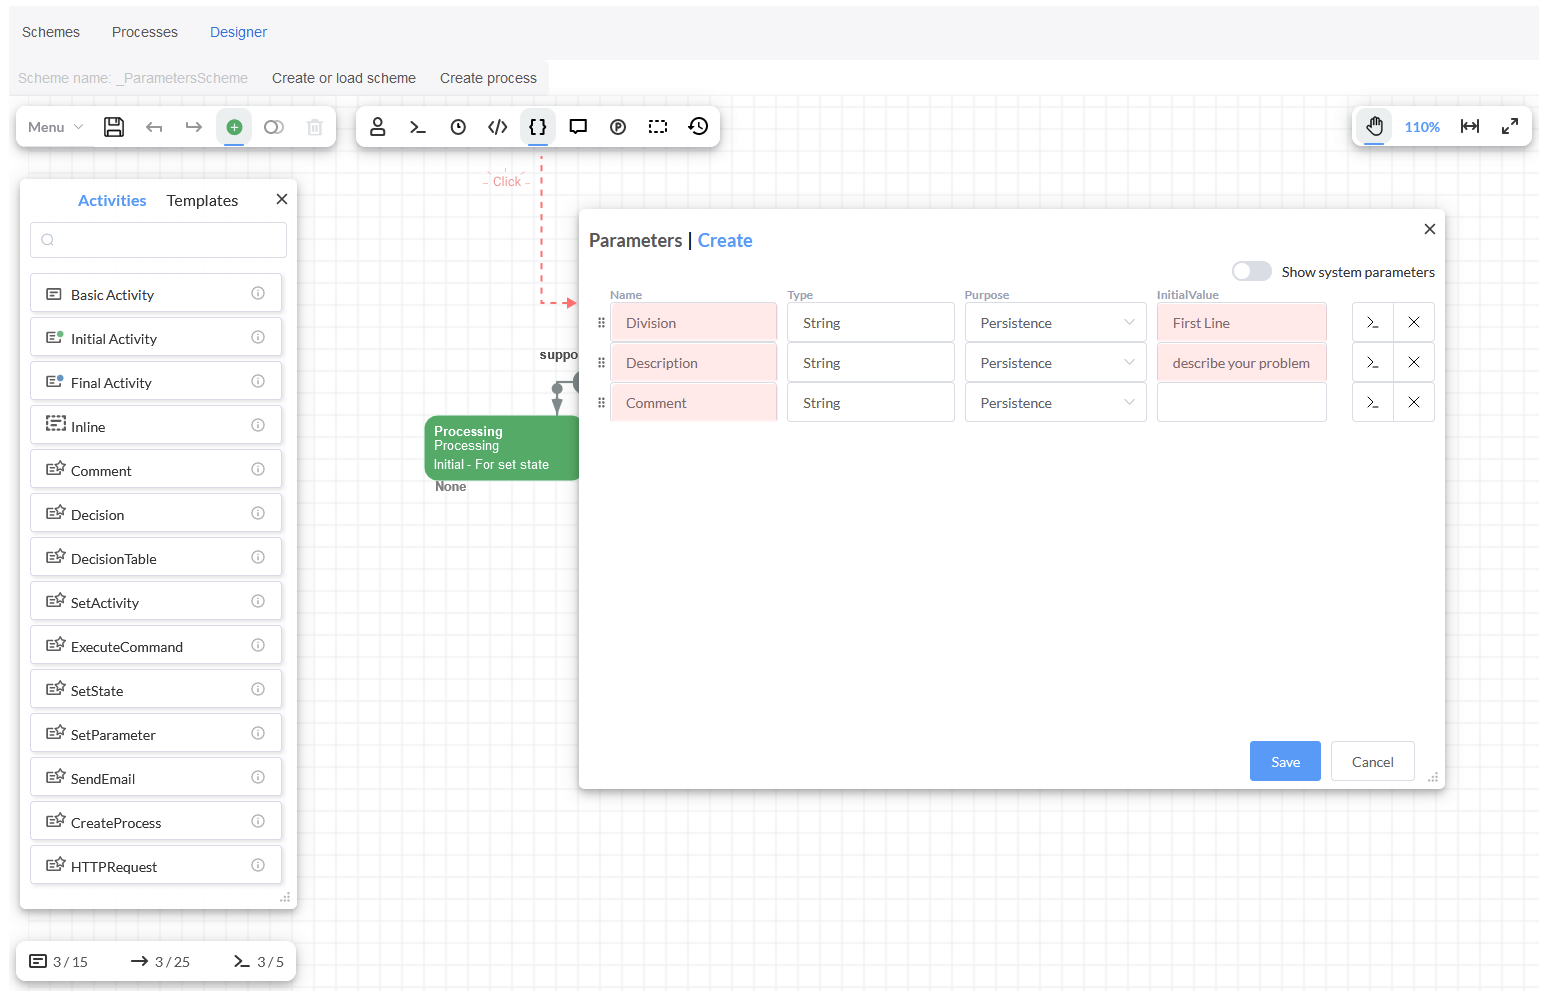
Next, you should click on Create Process and the modal window Initial Process Parameters will be opened, it displays also these
parameters.
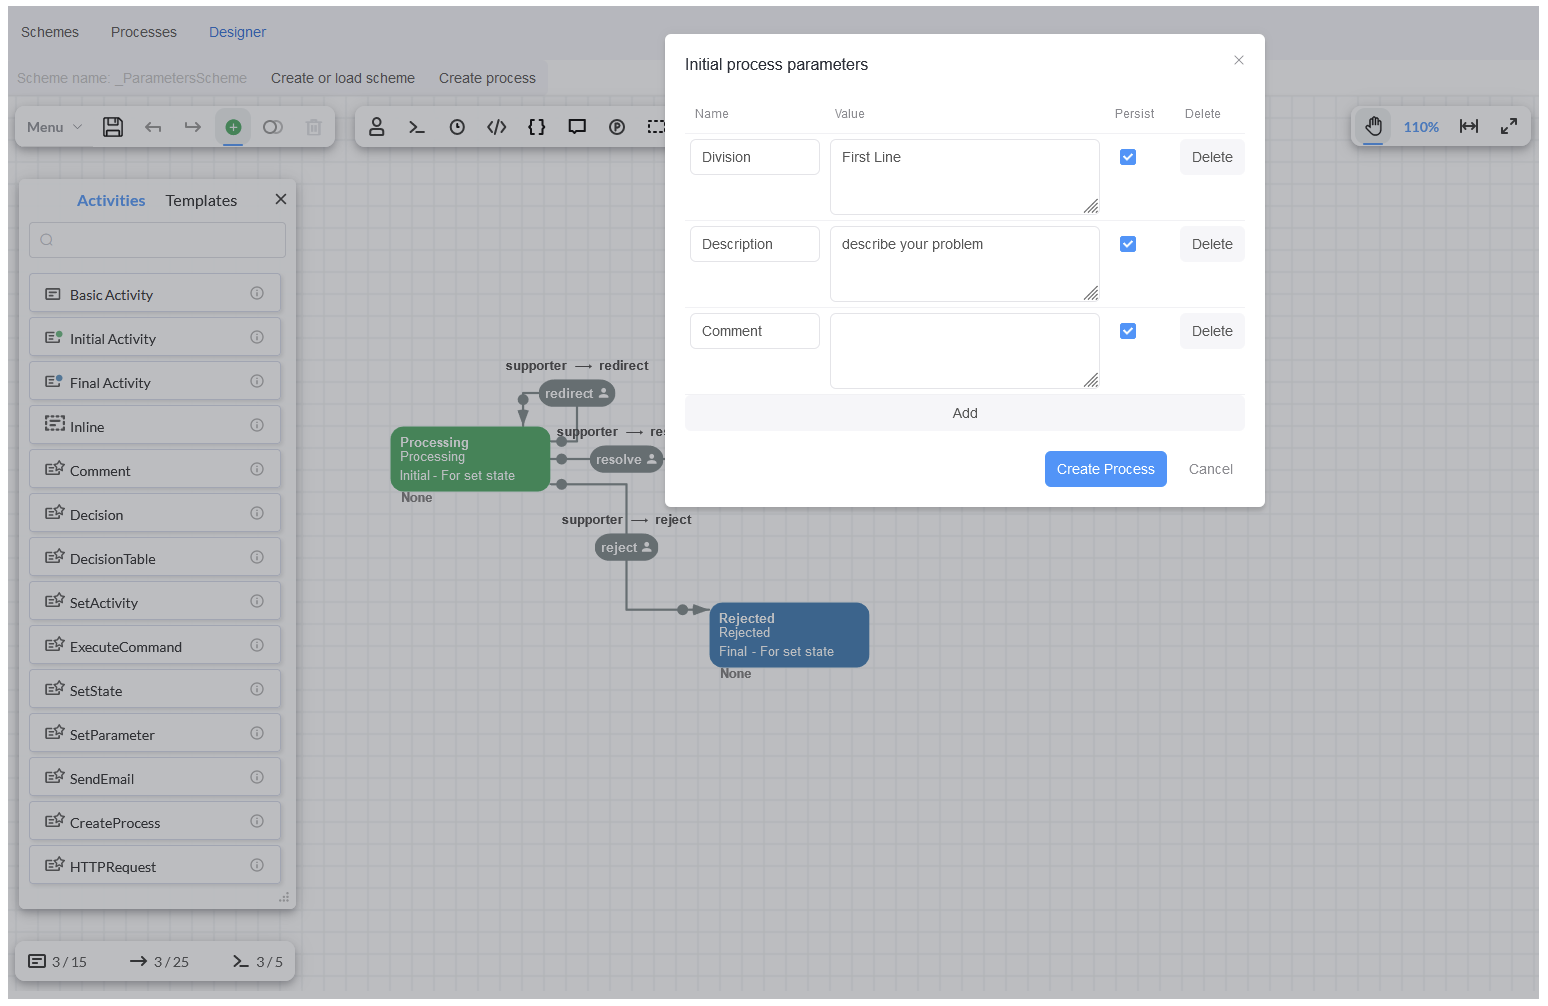
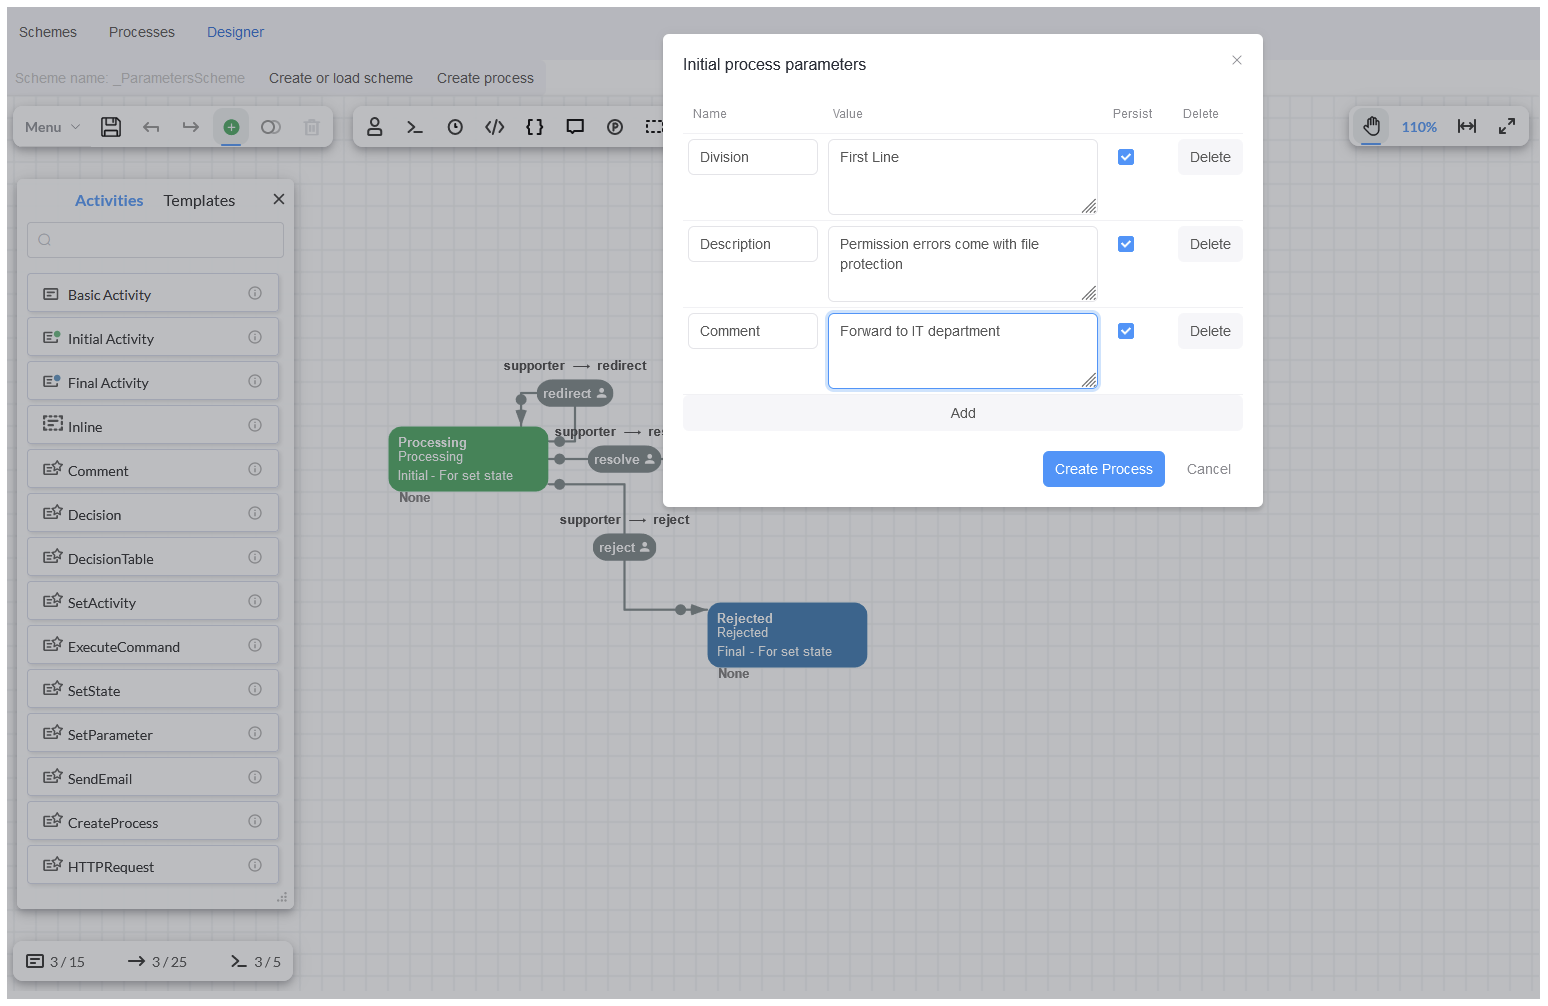
Then, the 'Division' should be indicated and the 'Description' added in order to transfer the request to another department by clicking on
the button Create Process. When this code is executed, these two parameters are passed and saved in the process as well.
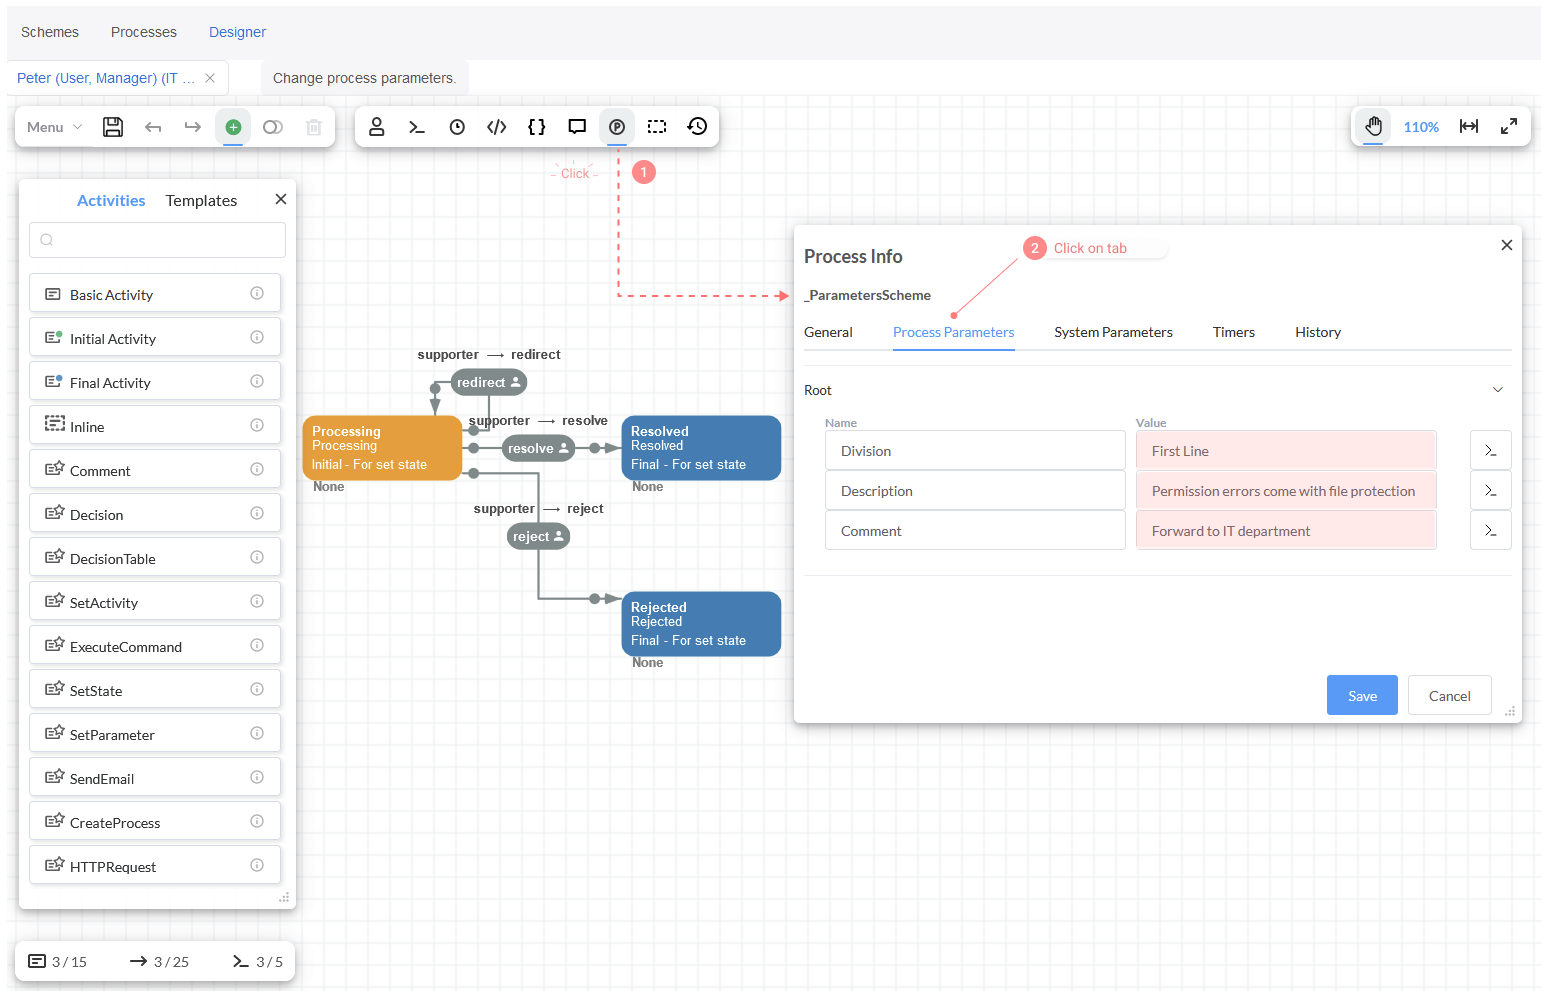
Once clicking on Create Process, the process instance starts and the first state 'Processing' is set. Besides, if you check the
'Process info' in the tab 'Process Parameters', the two parameters that were captured previously will be displayed.
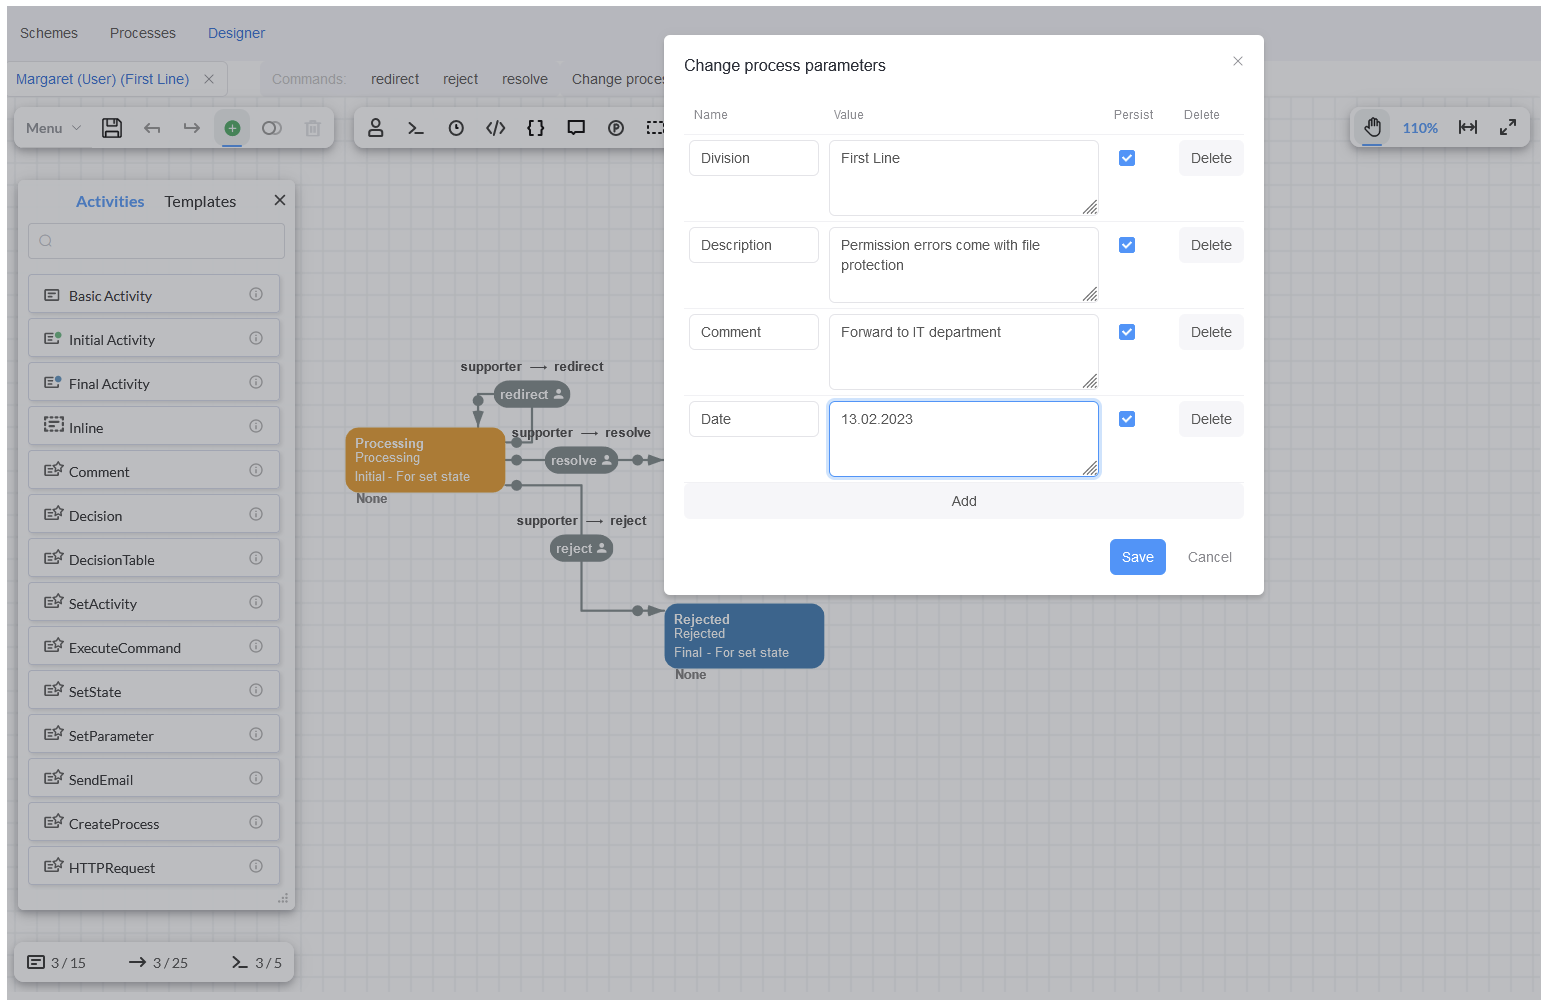
Now, the request is set on First Line. You can check the current Parameters 'Division' and 'Description' by clicking on button Change process parameters. Besides, you might edit the current parameters or add new ones.
If you change the current user and set the user who works in the Fist line Division, then the commands redirect, resolve and
reject come up. These commands are not available in this stage for those users, who work in the rest of departments.
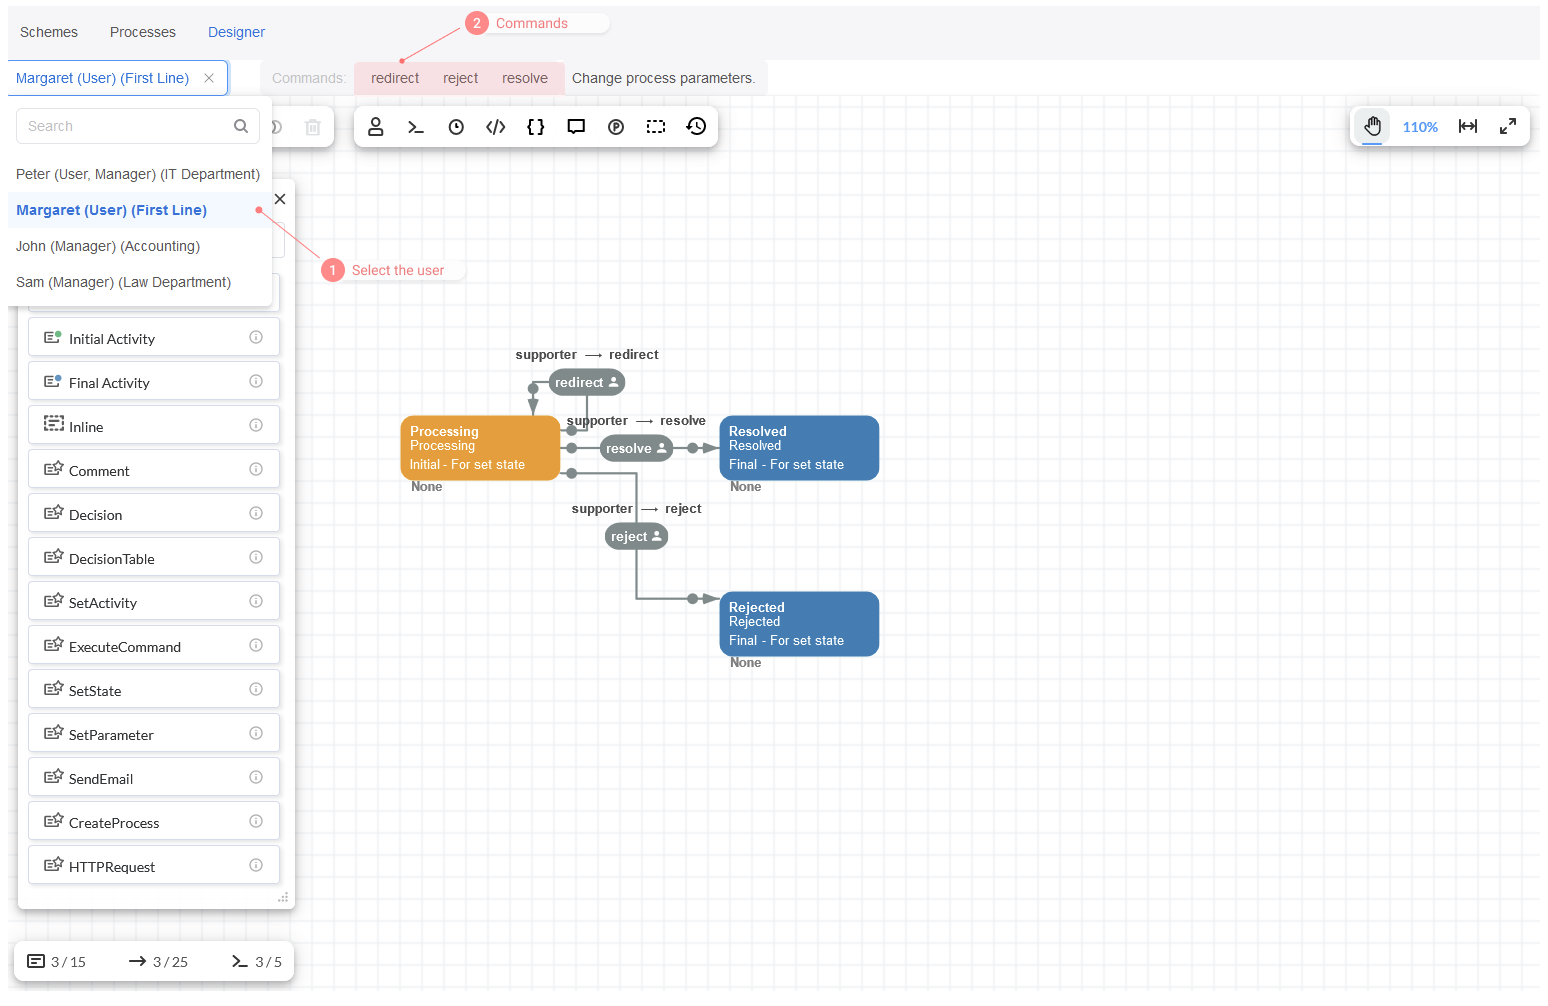
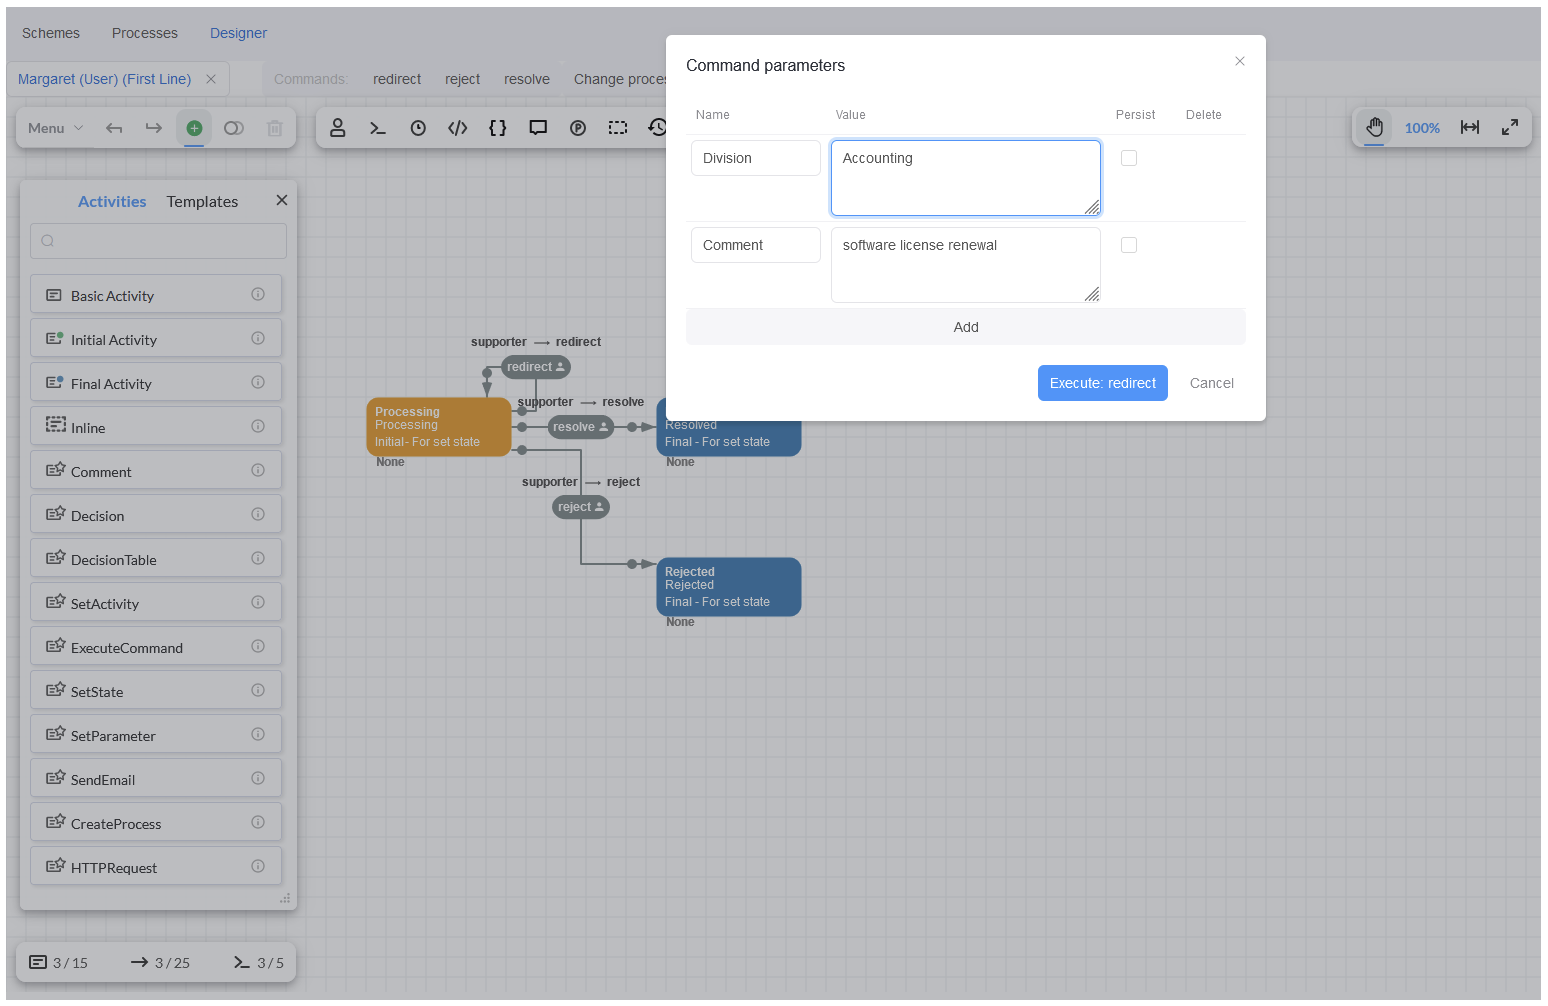
When you click on command redirect, the report form Command Parameters shows up. It displays the Parameters which are passed through
commands. Here, we have the first parameter 'Division' which is captured when creating a process, it is called initial process parameter.
This parameter is transferred along with the command. Then, we can update the value and redirect the request to the 'Accounting' department.
We pass the parameter to the process and fill out the comment where should be indicated the reason for redirecting. After that, the
command redirect can be performed by clicking on button Execute redirect.
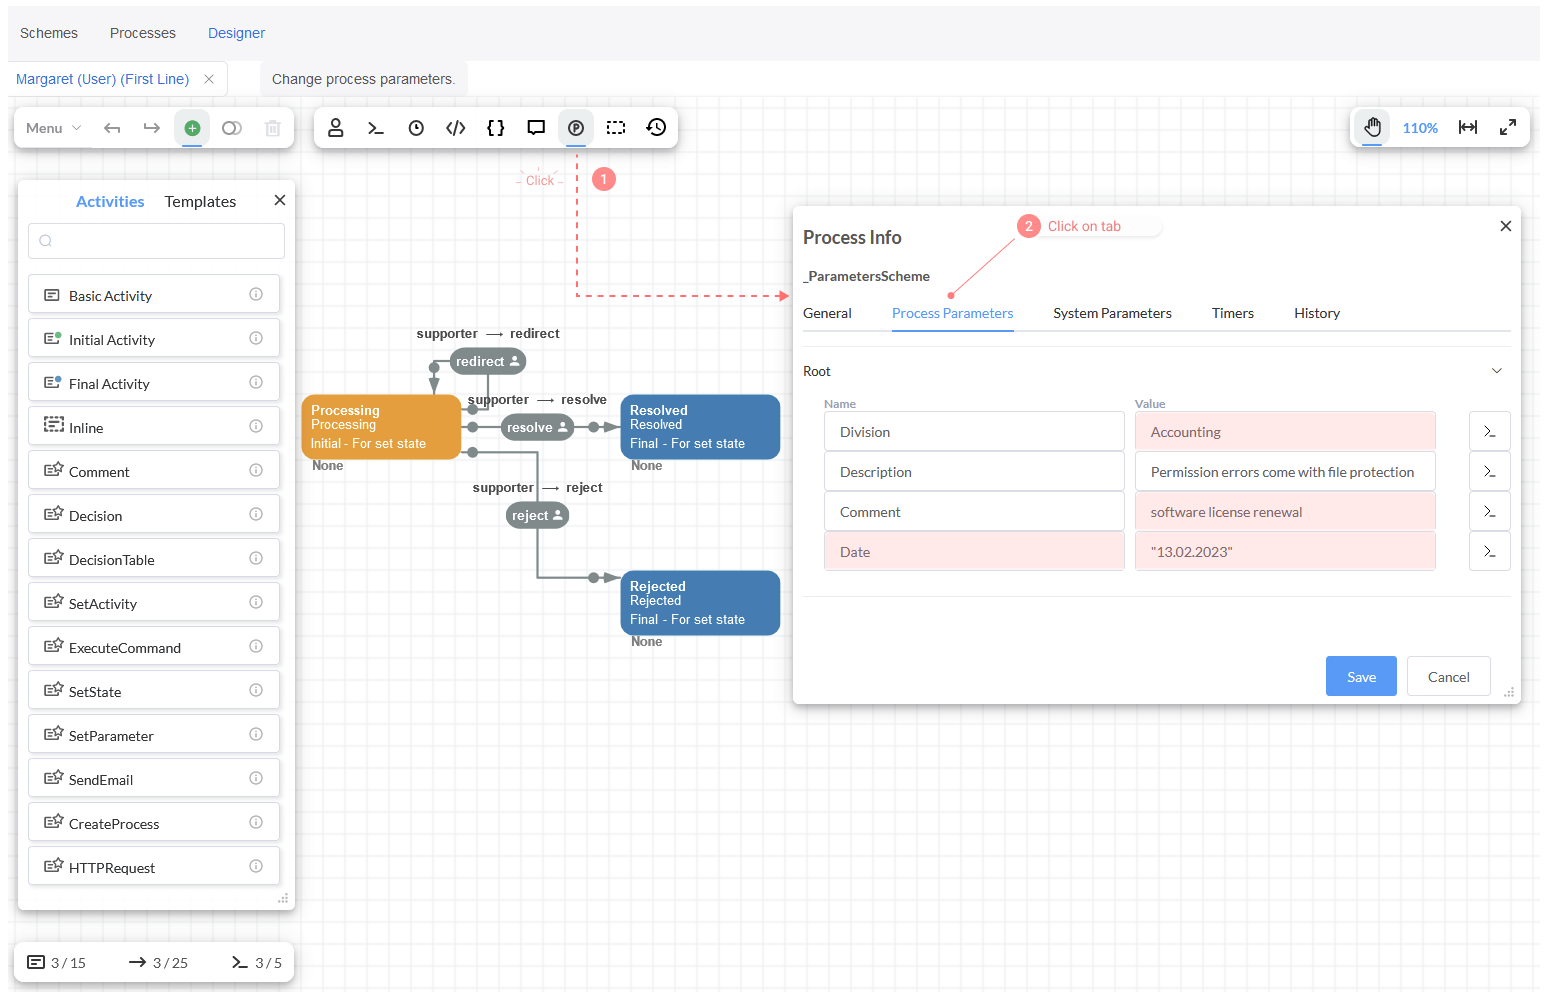
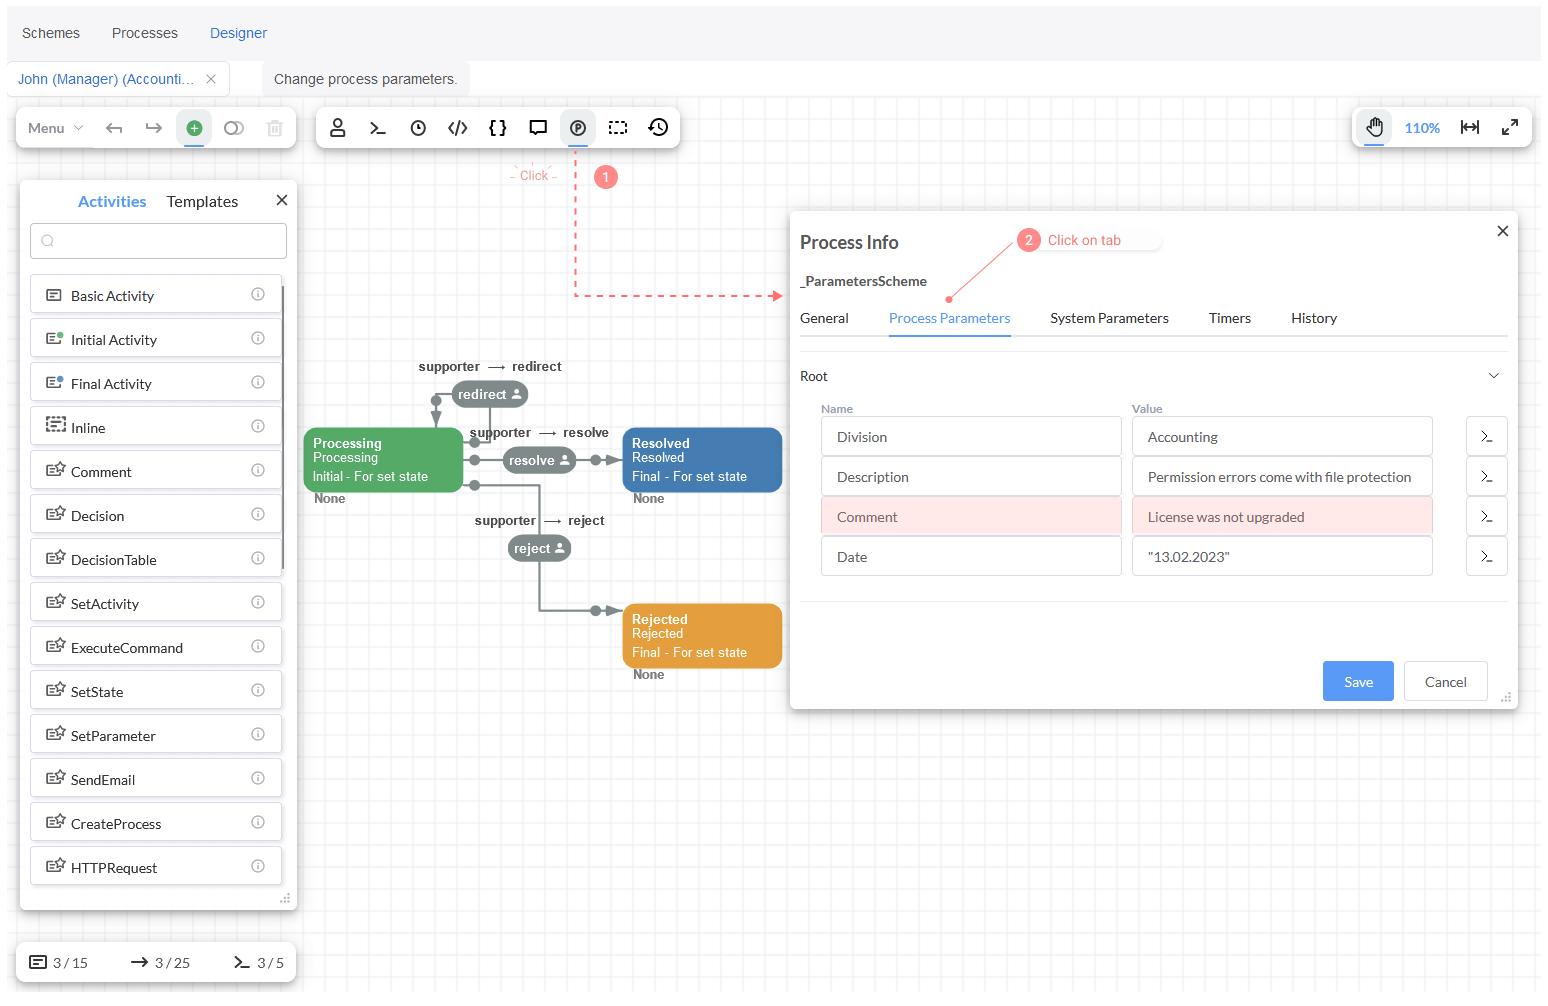
If you check the process state through 'Process info' -> tab 'Process Parameters', the new parameters values will be displayed.
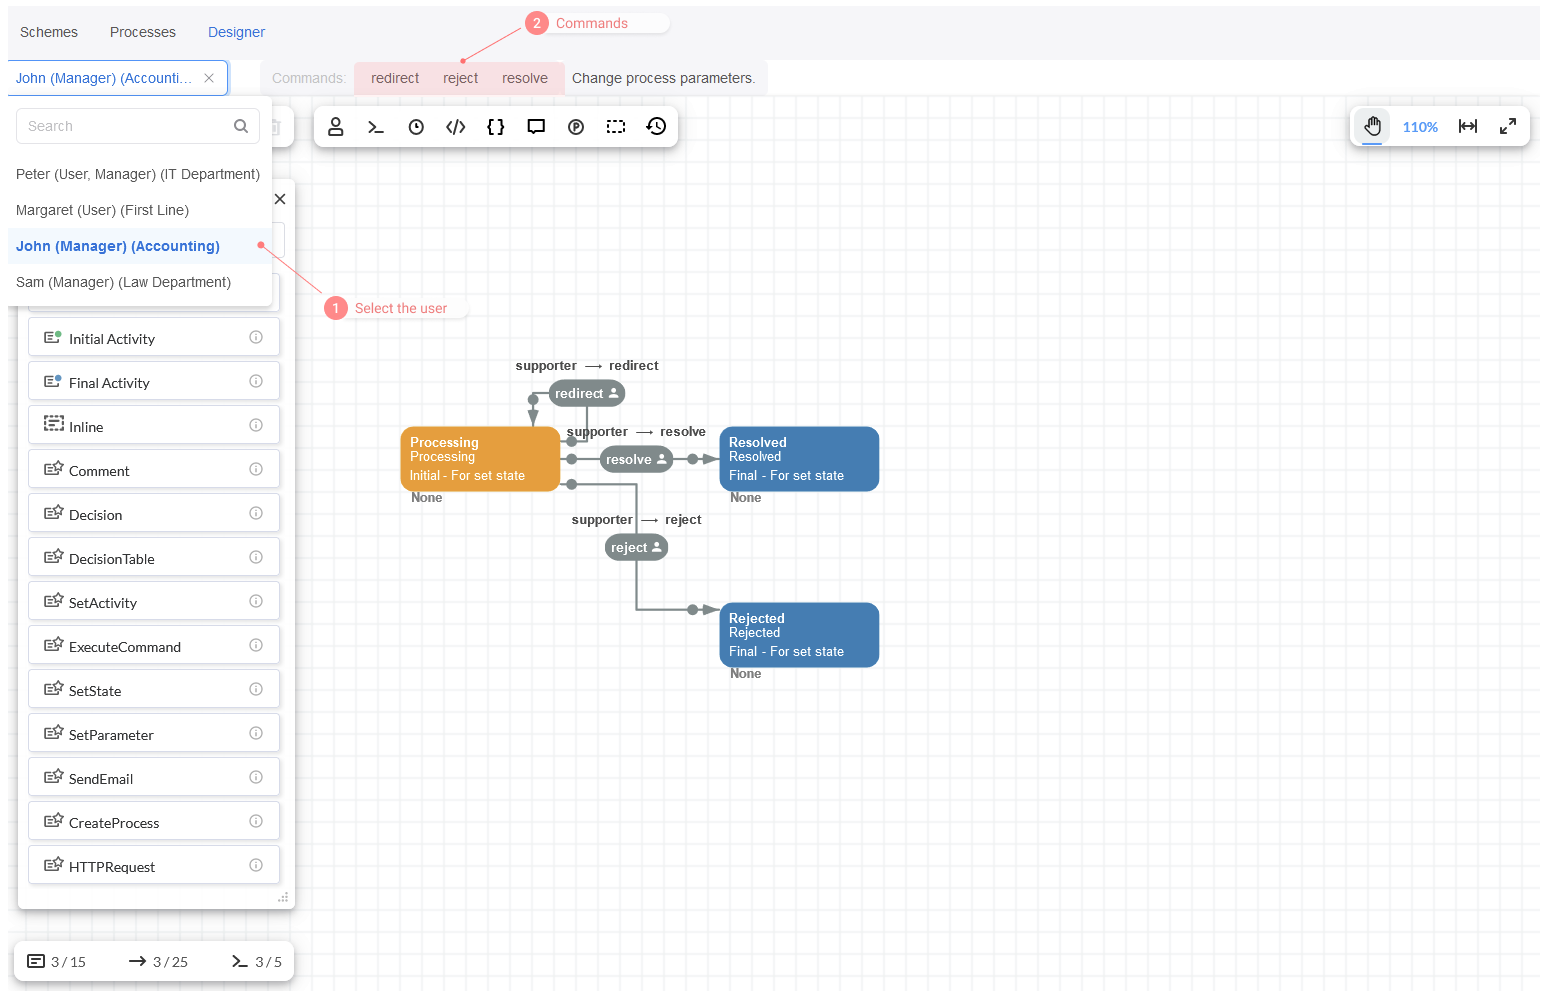
Once the current user is changed in the drop-down list again, the commands redirect, reject and resolve become available for the user
who works in the 'Accounting' department.
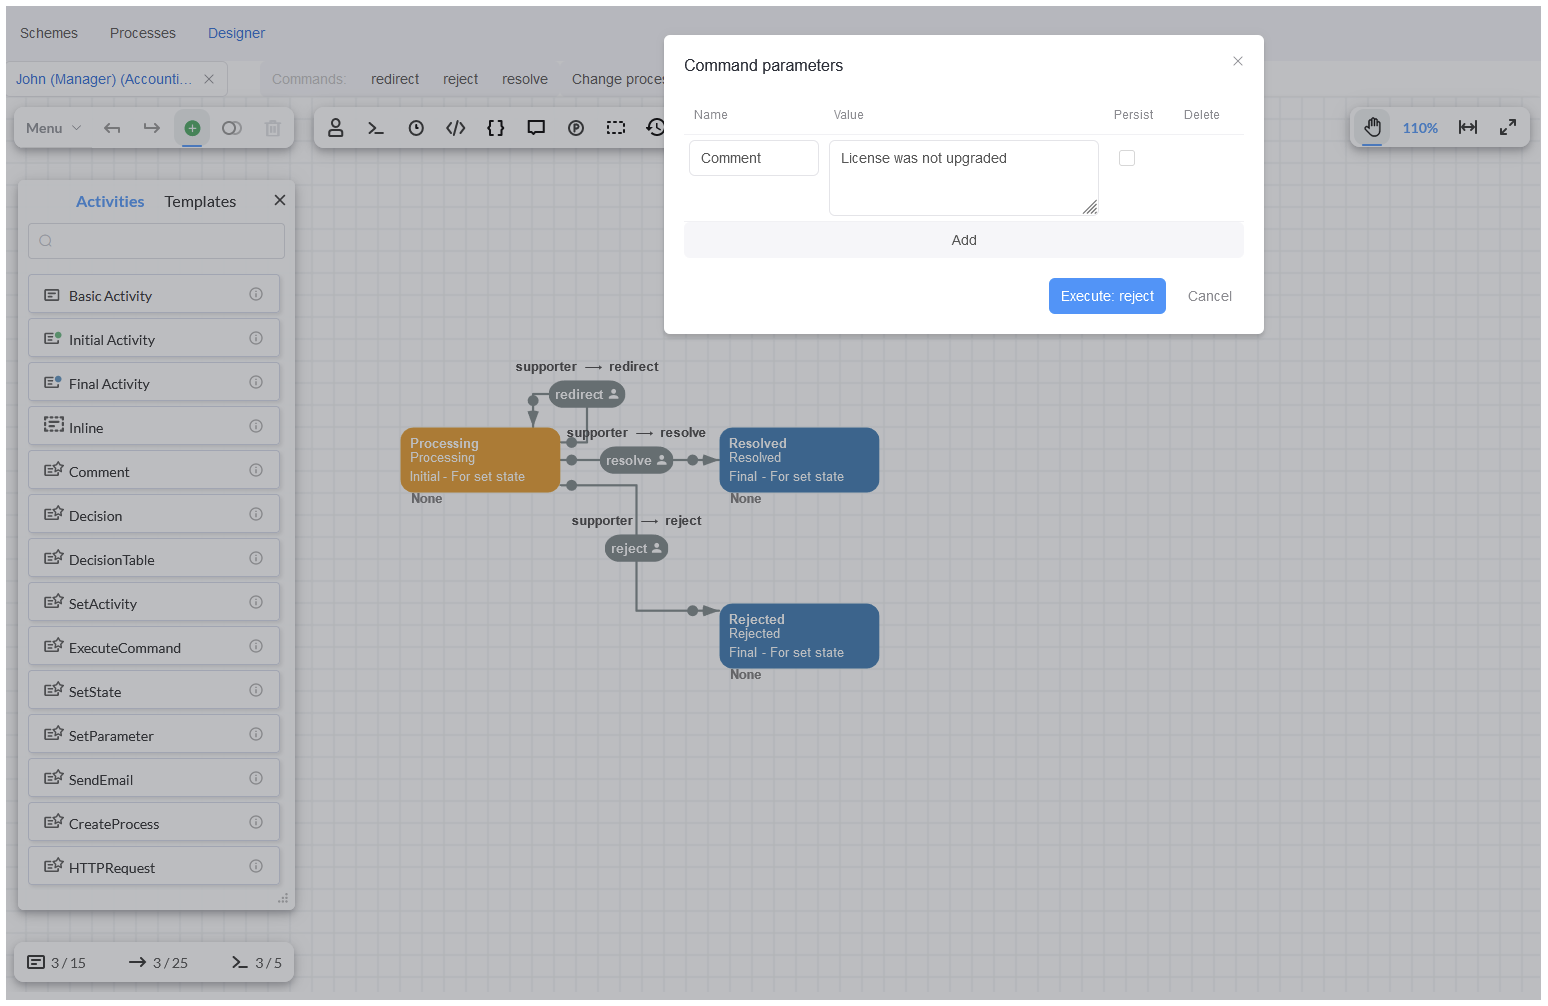
Then, if you click on reject command, the parameter 'Comment' will be displayed only in the form Command Parameters. Here, you can just
write the reason for rejecting the request and click on the button Execute reject. After that, the process state is updated and the value
of the parameter 'Comment' will be registered through the 'Process info' where you can check it.
The parameters 'Division', 'Description' and 'Date' are kept because they were not changed by the reject command.
Conclusion
Finally, Process Parameters are really useful, and they can be implemented in creative ways. An implementation case, in a React Application, is provided in this tutorial where the following methods to transfer parameters were described:
- When creating a new process.
- While executing a command.
- In case of rewriting parameters in a running process instance.