Workflow Server Deployment
IIS deploy
Prerequisites
- A database must be setup and operating, as per instructions at How to configure and run Workflow Server
- Setup parameters (at least, these: Provider, ConnectionString, ServerType, ) must be set in the config.json file as described in the Configuration section.
Deploy
To run an ASP.NET Core application under IIS, the installation of .NET Core Hosting Bundle is required. Since Workflow Server uses .NET Core 3.1, please, install the appropriate version using the link.
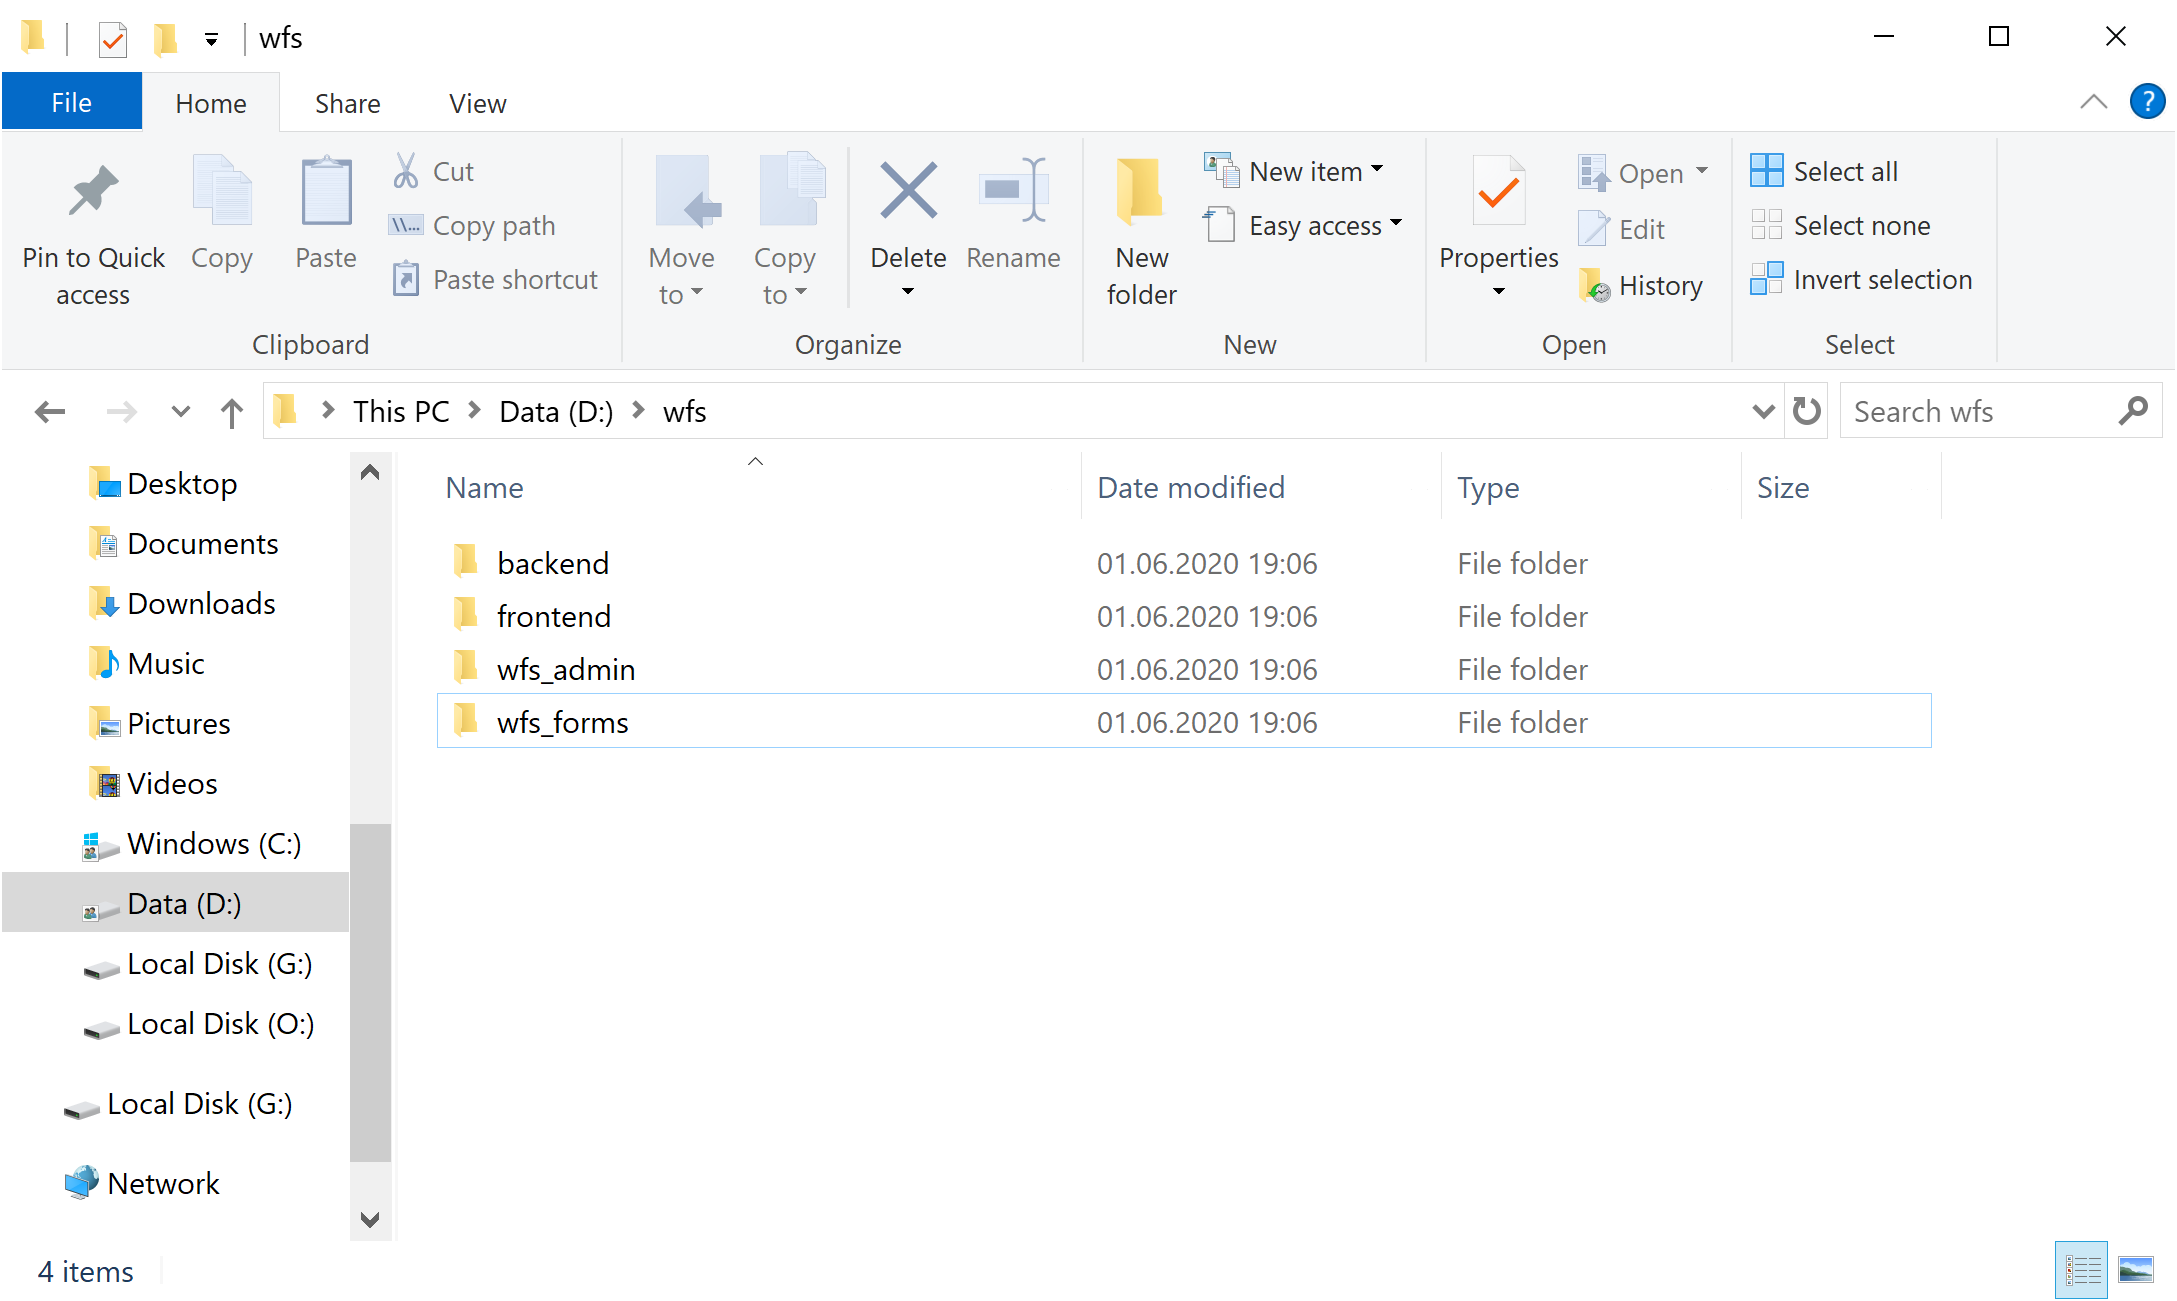
First, we create a folder to contain the Workflow Server files. Then, we copy into this folder the following items: the backend and frontend folders from the workflowserver project with javascript code, and static files for the admin panel and the form manager. Since Workflow Server uses two web hosts, one for the admin panel and web API, and the other for the form manager, we have to create two IIS sites. Therefore, we create two folders to contain the assemblies of these sites: wfs_admin for the admin panel, and wfs_forms for the form manager.
info
Set the write (or full control) permission for these folders for ApplicationPoolIdentity (or user which you use in Application Pools)!
Make sure that:
the web.config file is copied into each of the domain folders.
no runtimeid.config files are copied to these new folders as they uniquely identify the applications delete them if they are present.
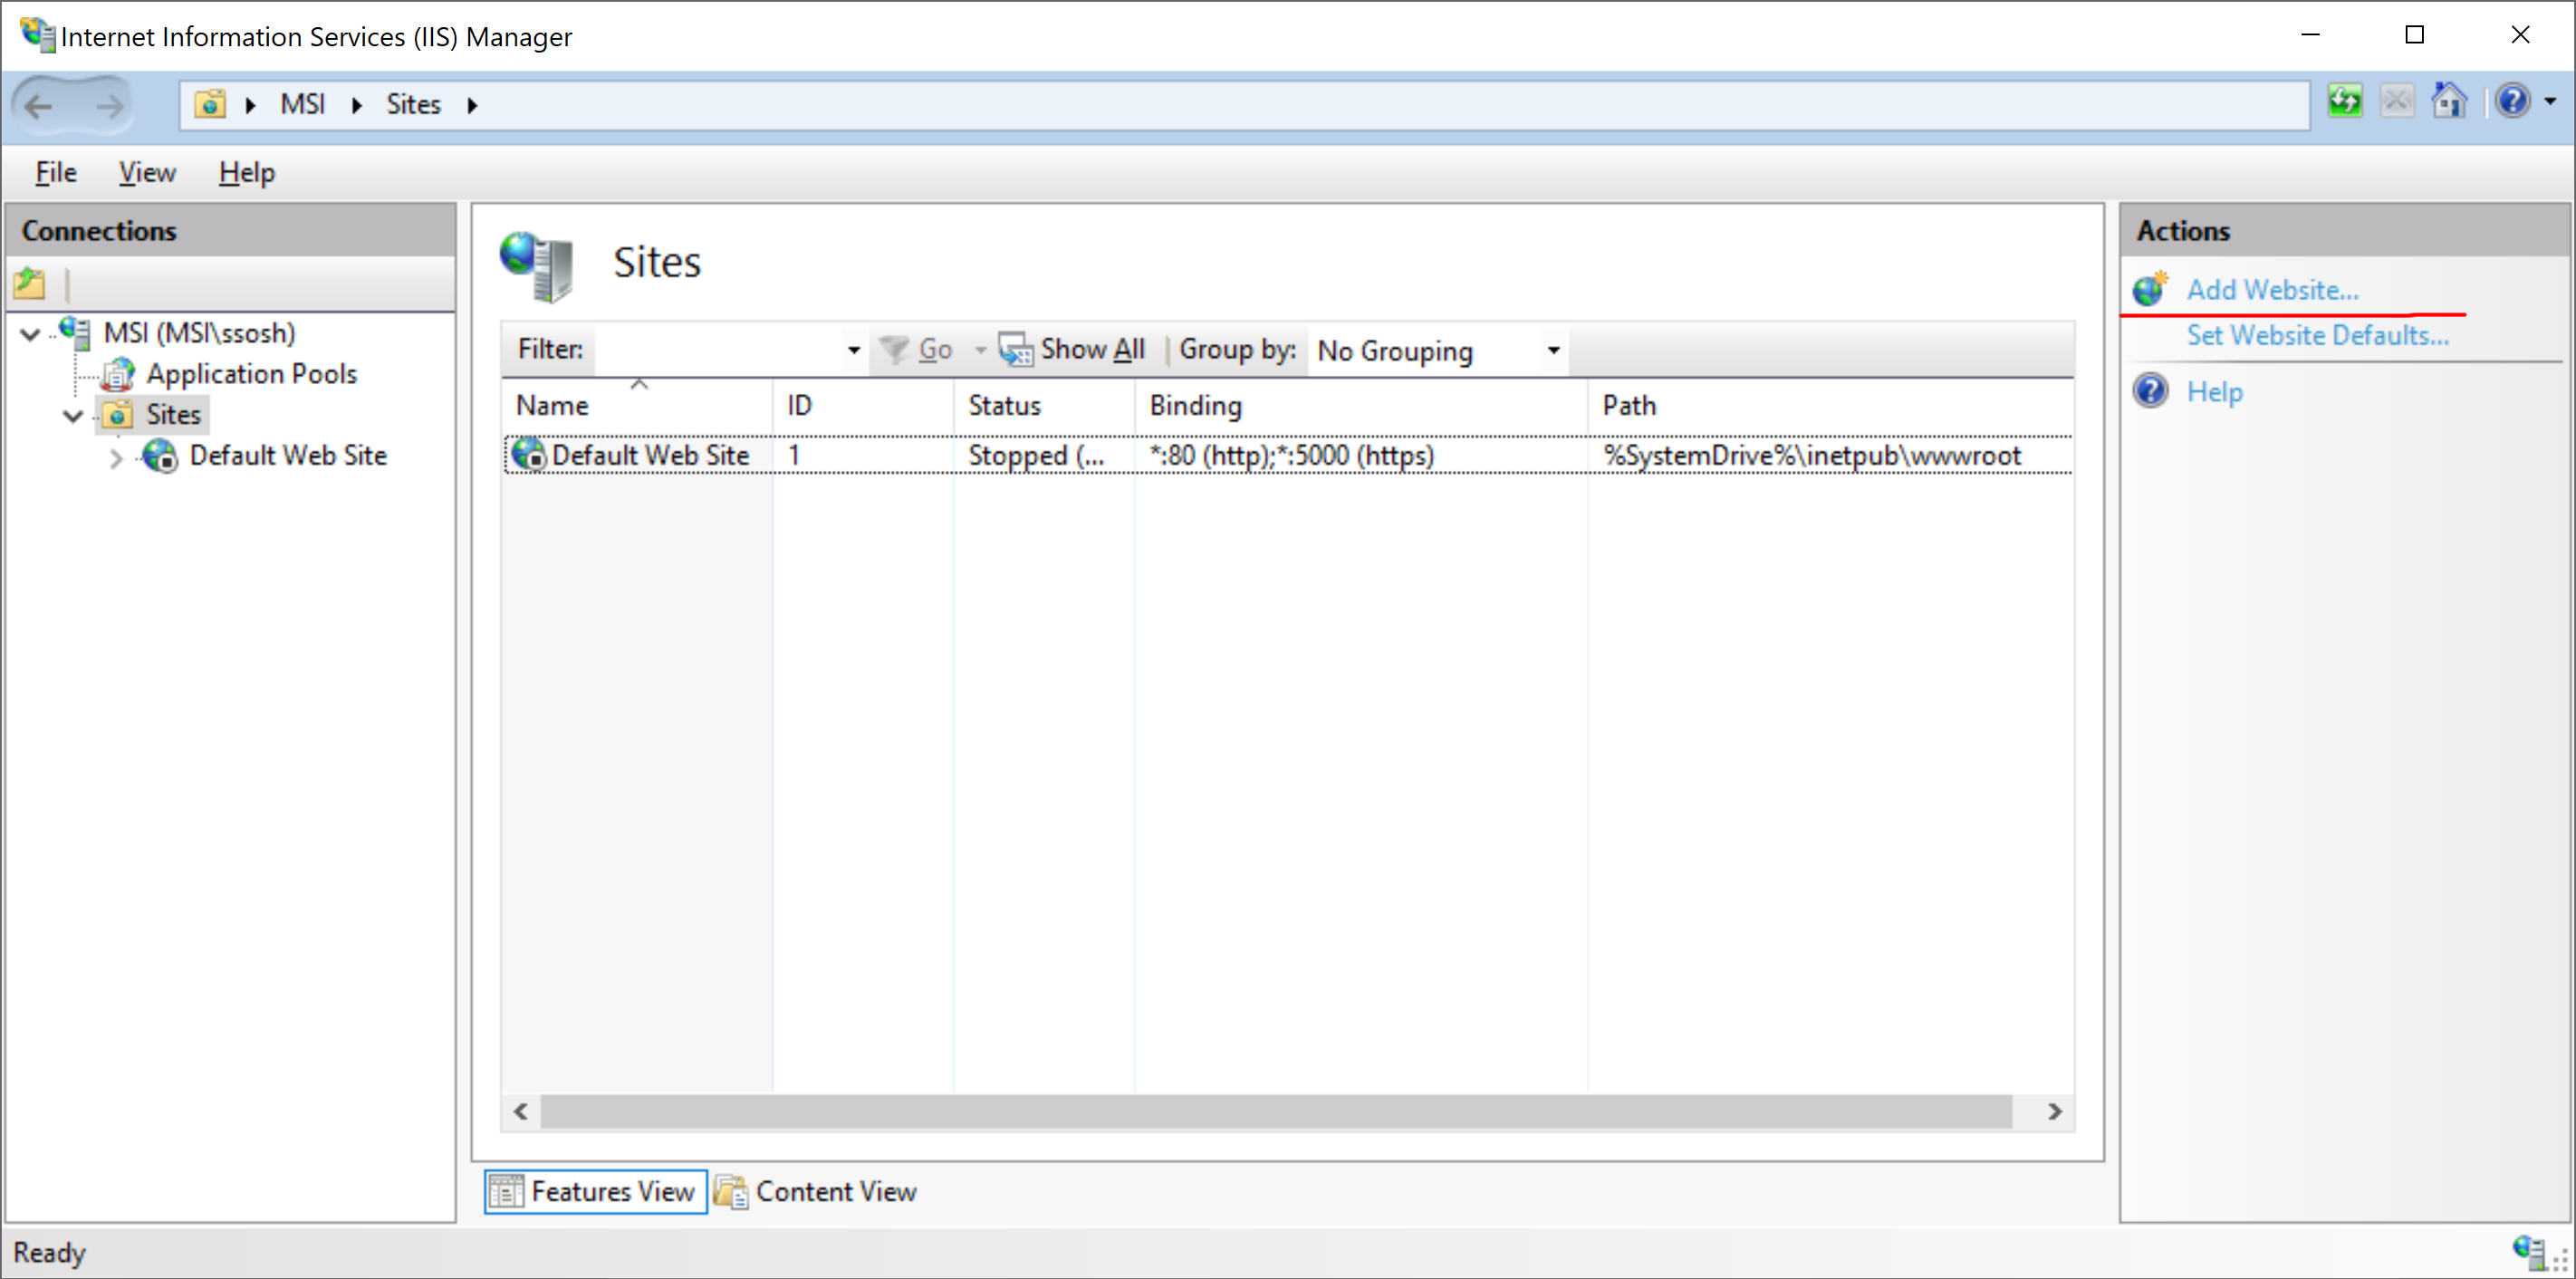
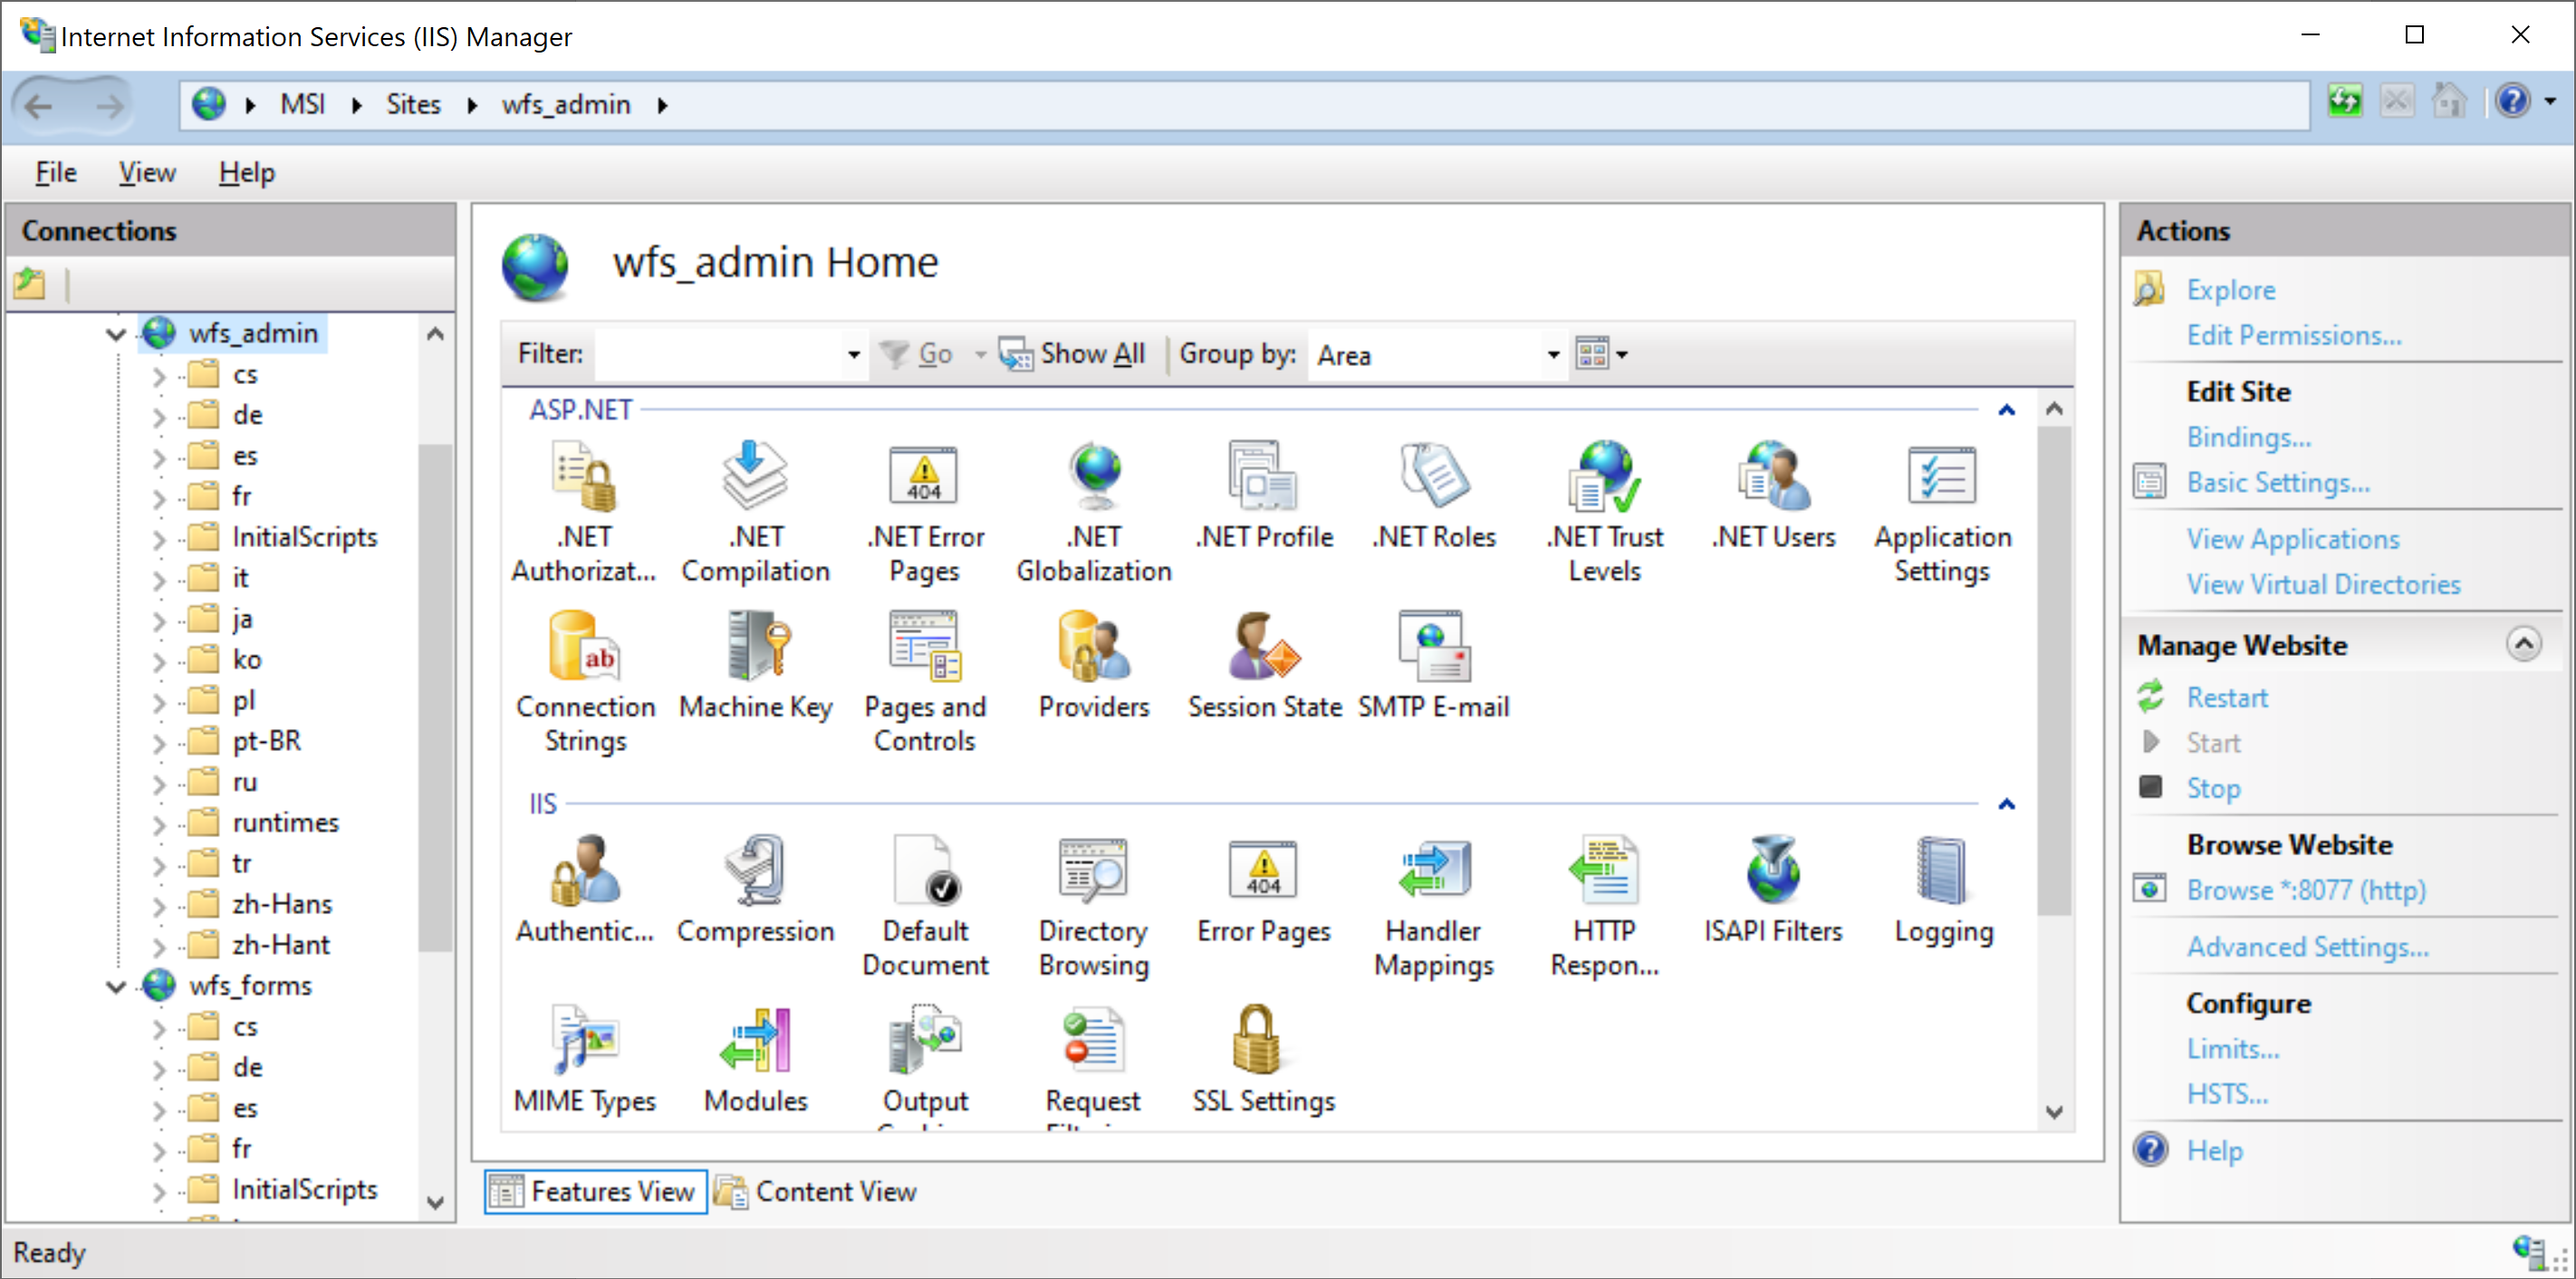
To create the IIS admin panel, please, launch the Internet Information Services (IIS) Manager and select "Add Website ..." from the Actions list.
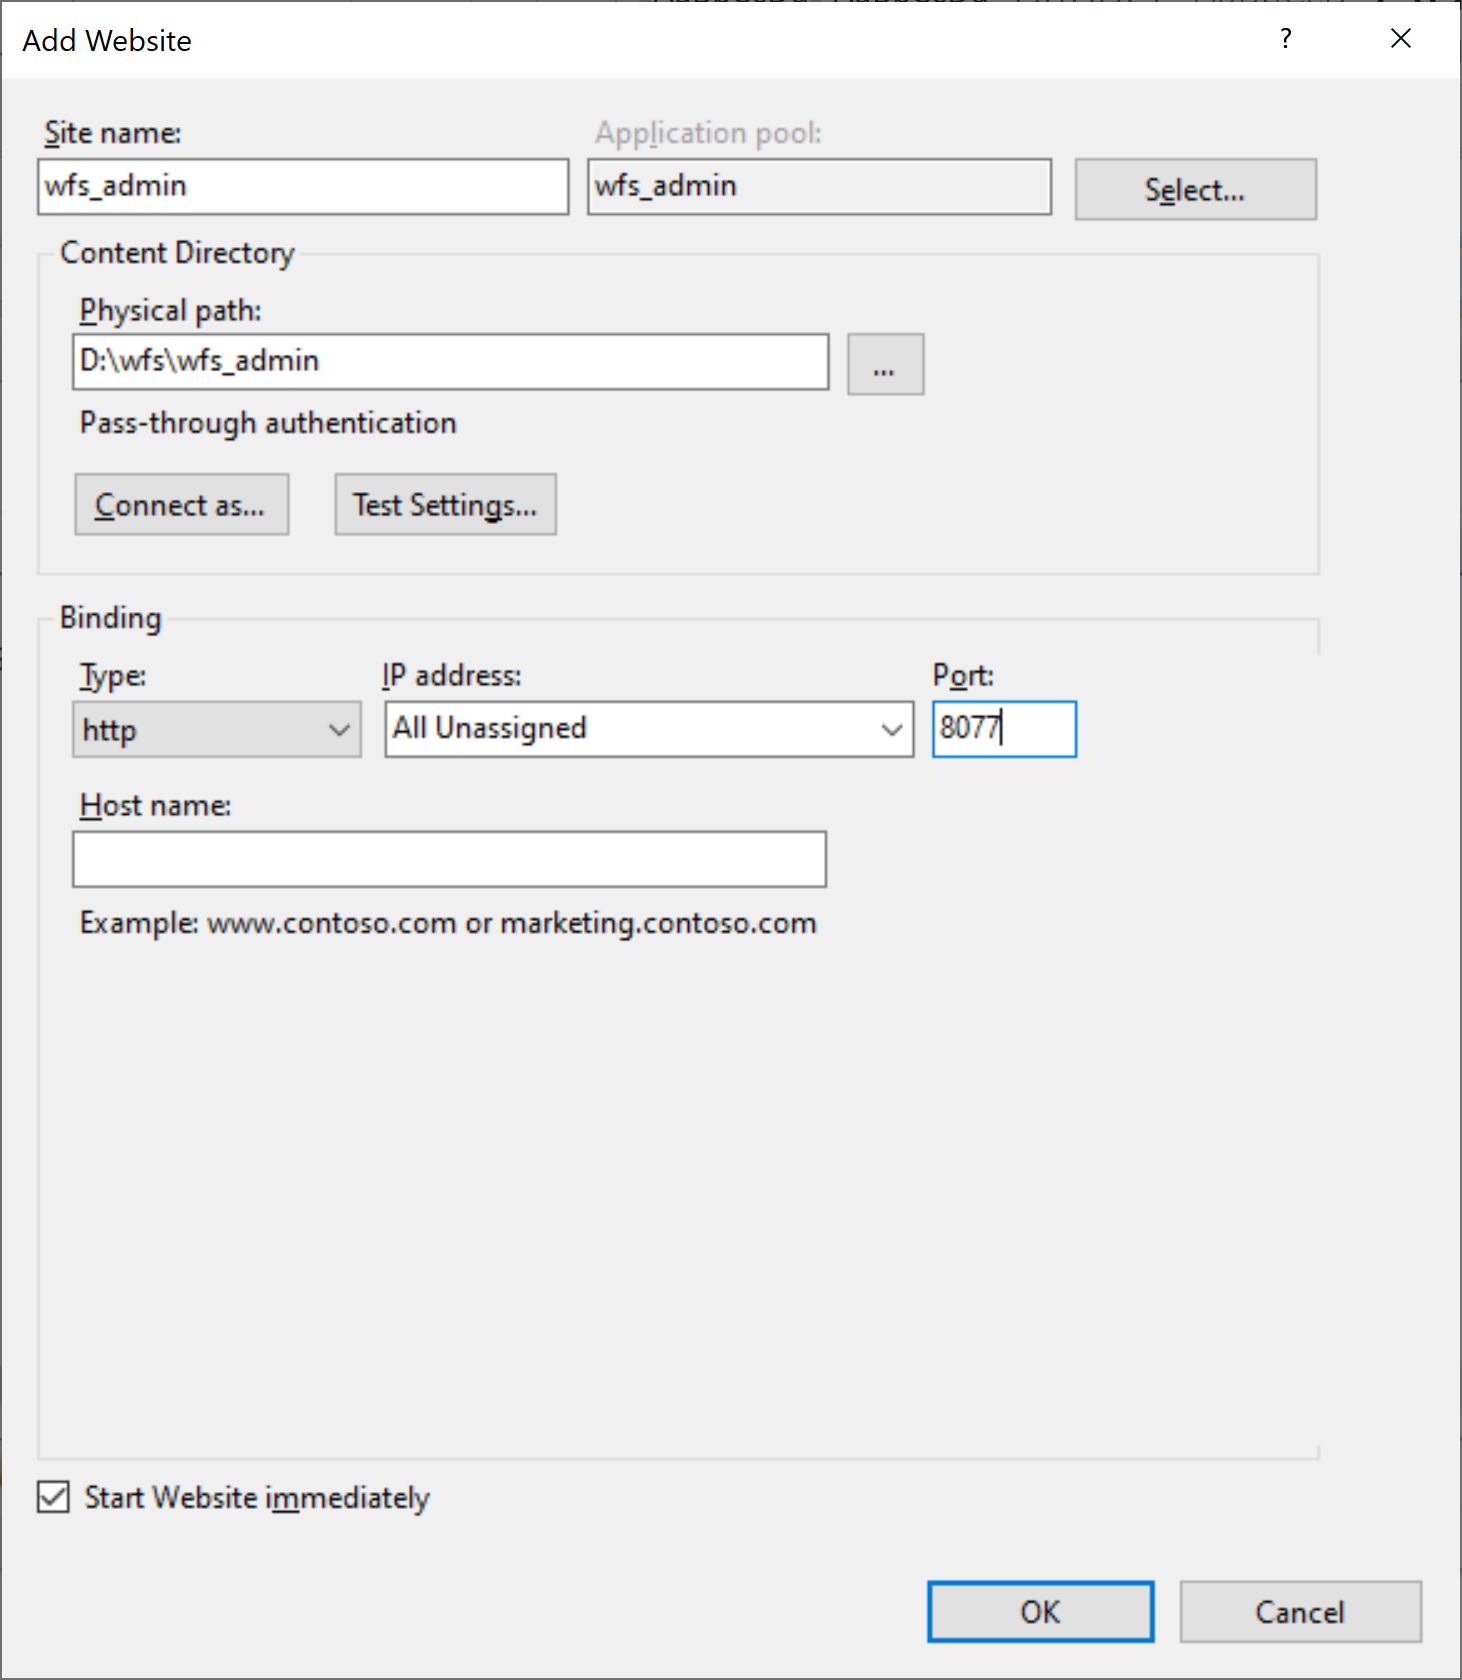
In the window that appears, the following fields should be filled:
Site name: wfs_admin
Physical path: the path to the wfs_admin folder, created in Step 2.
Port: an unallocated port through which the admin panel is available, for example 8077.
The Application pool for the wfs_admin site should be set up to avoid unnecessary restarts of the Workflow Server runtime or shutdowns when idle. Thus, in the Internet Information Services (IIS) Manager, go to the Application Pools List and select the wfs_admin pool.
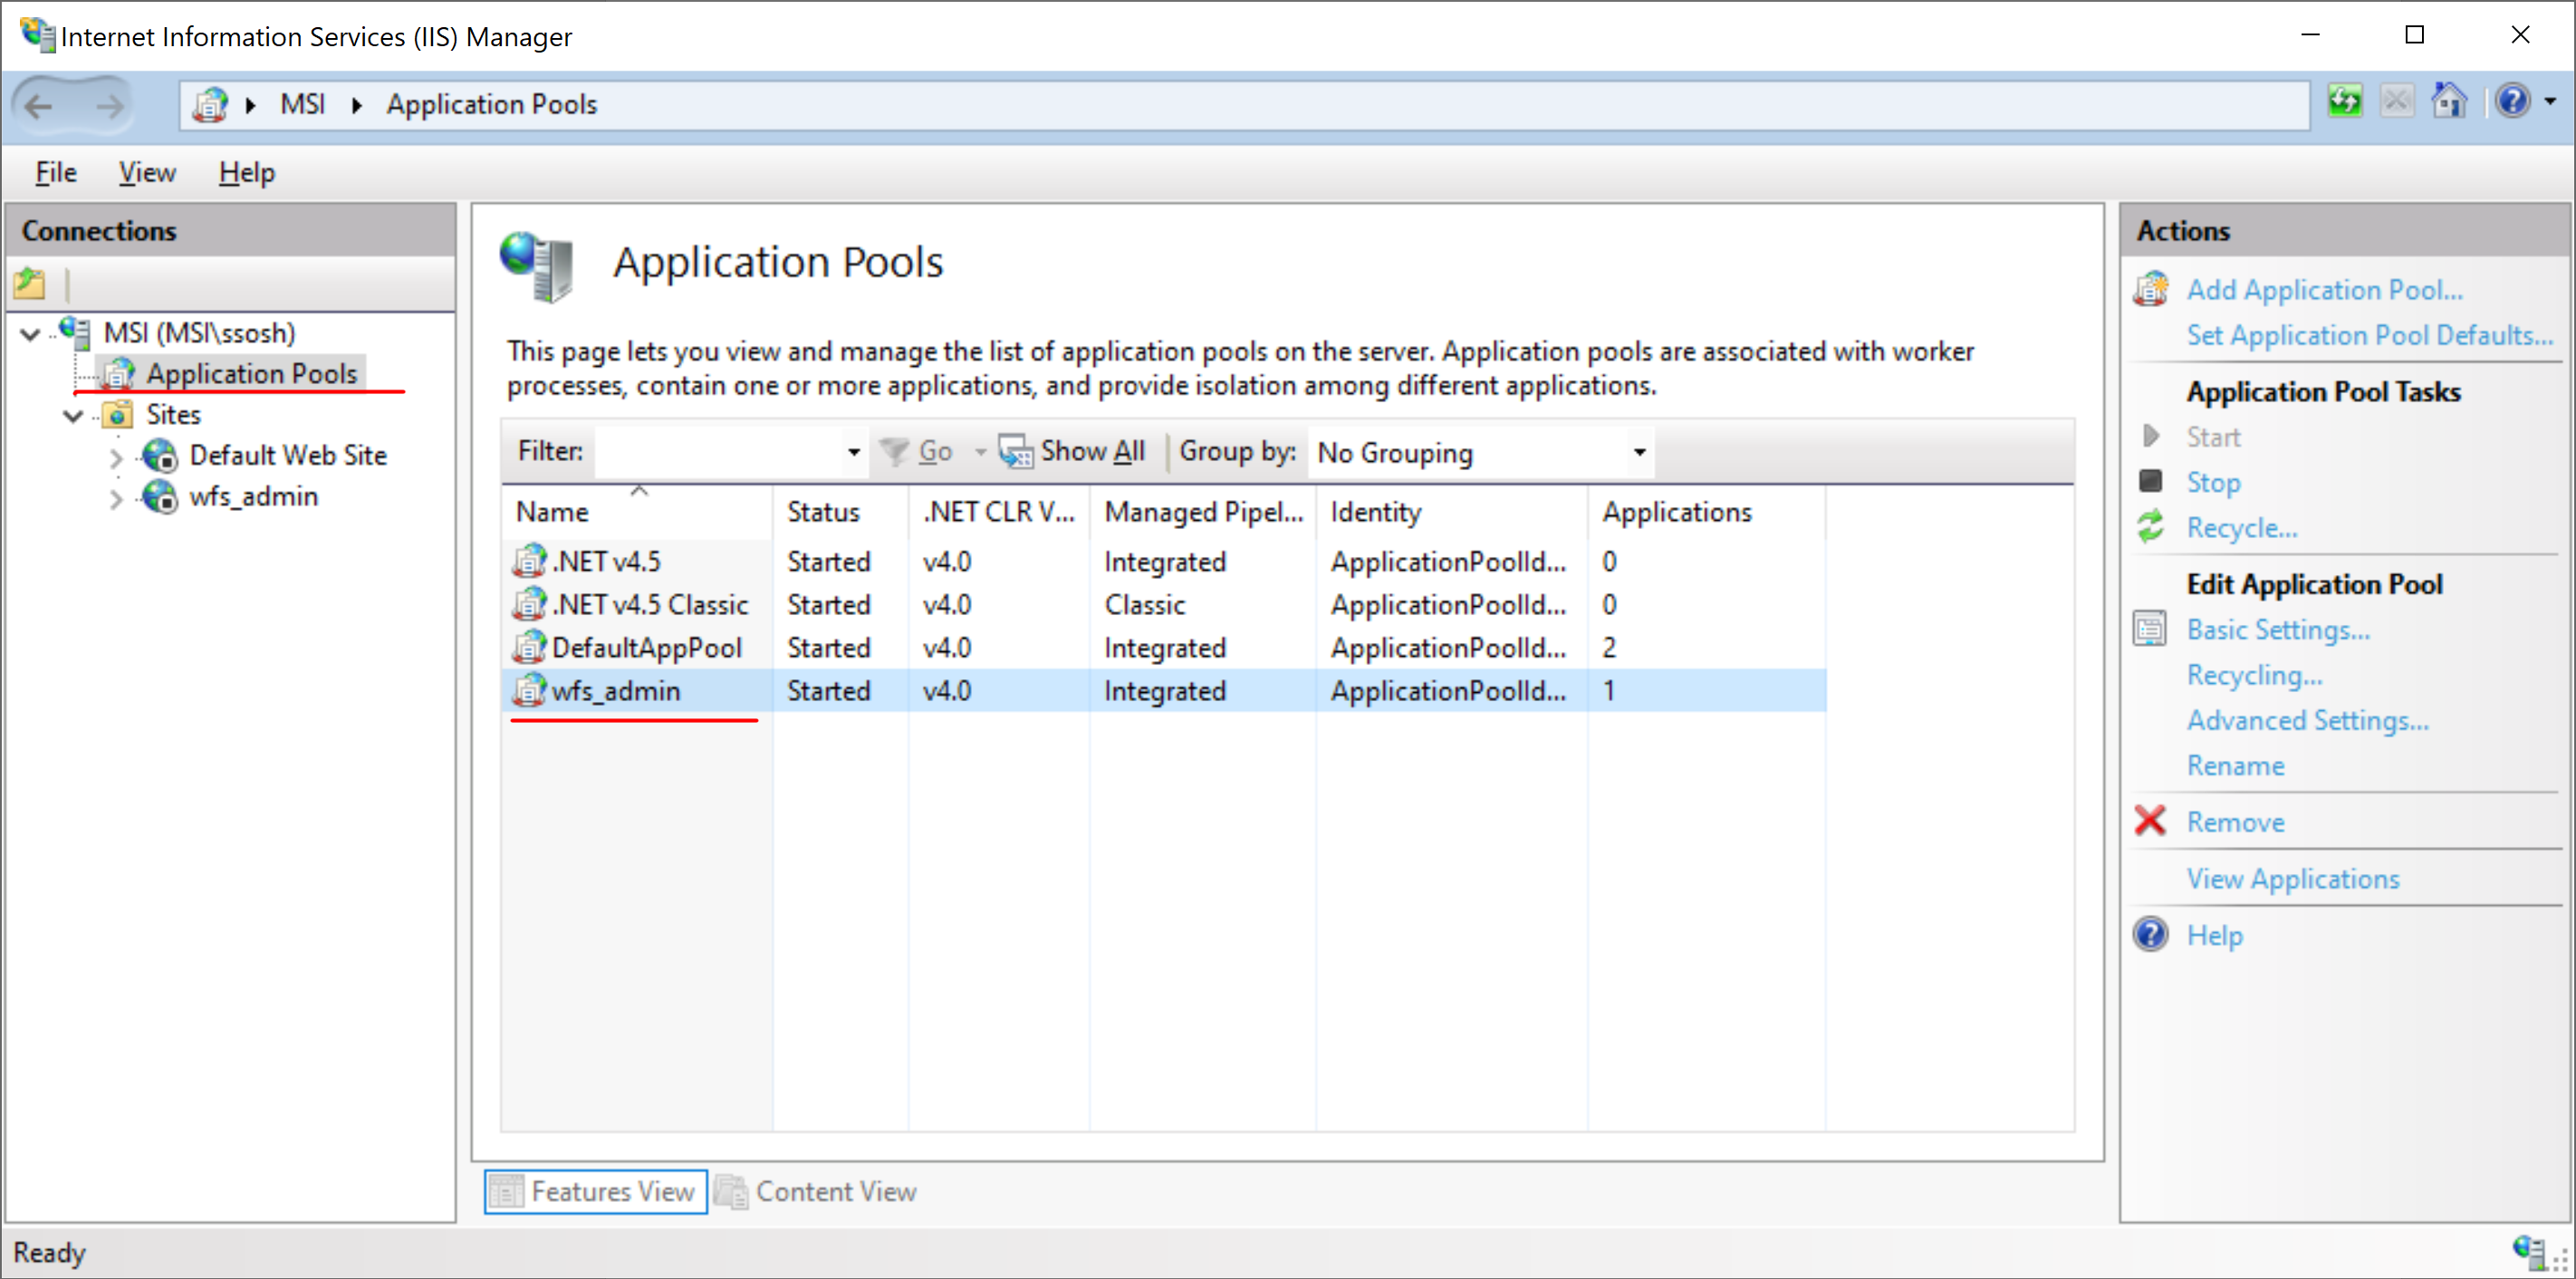
Select Edit Application Pool -> Recycling, in the dialog box that appears, turn off the Regular time intervals (in minutes) option.
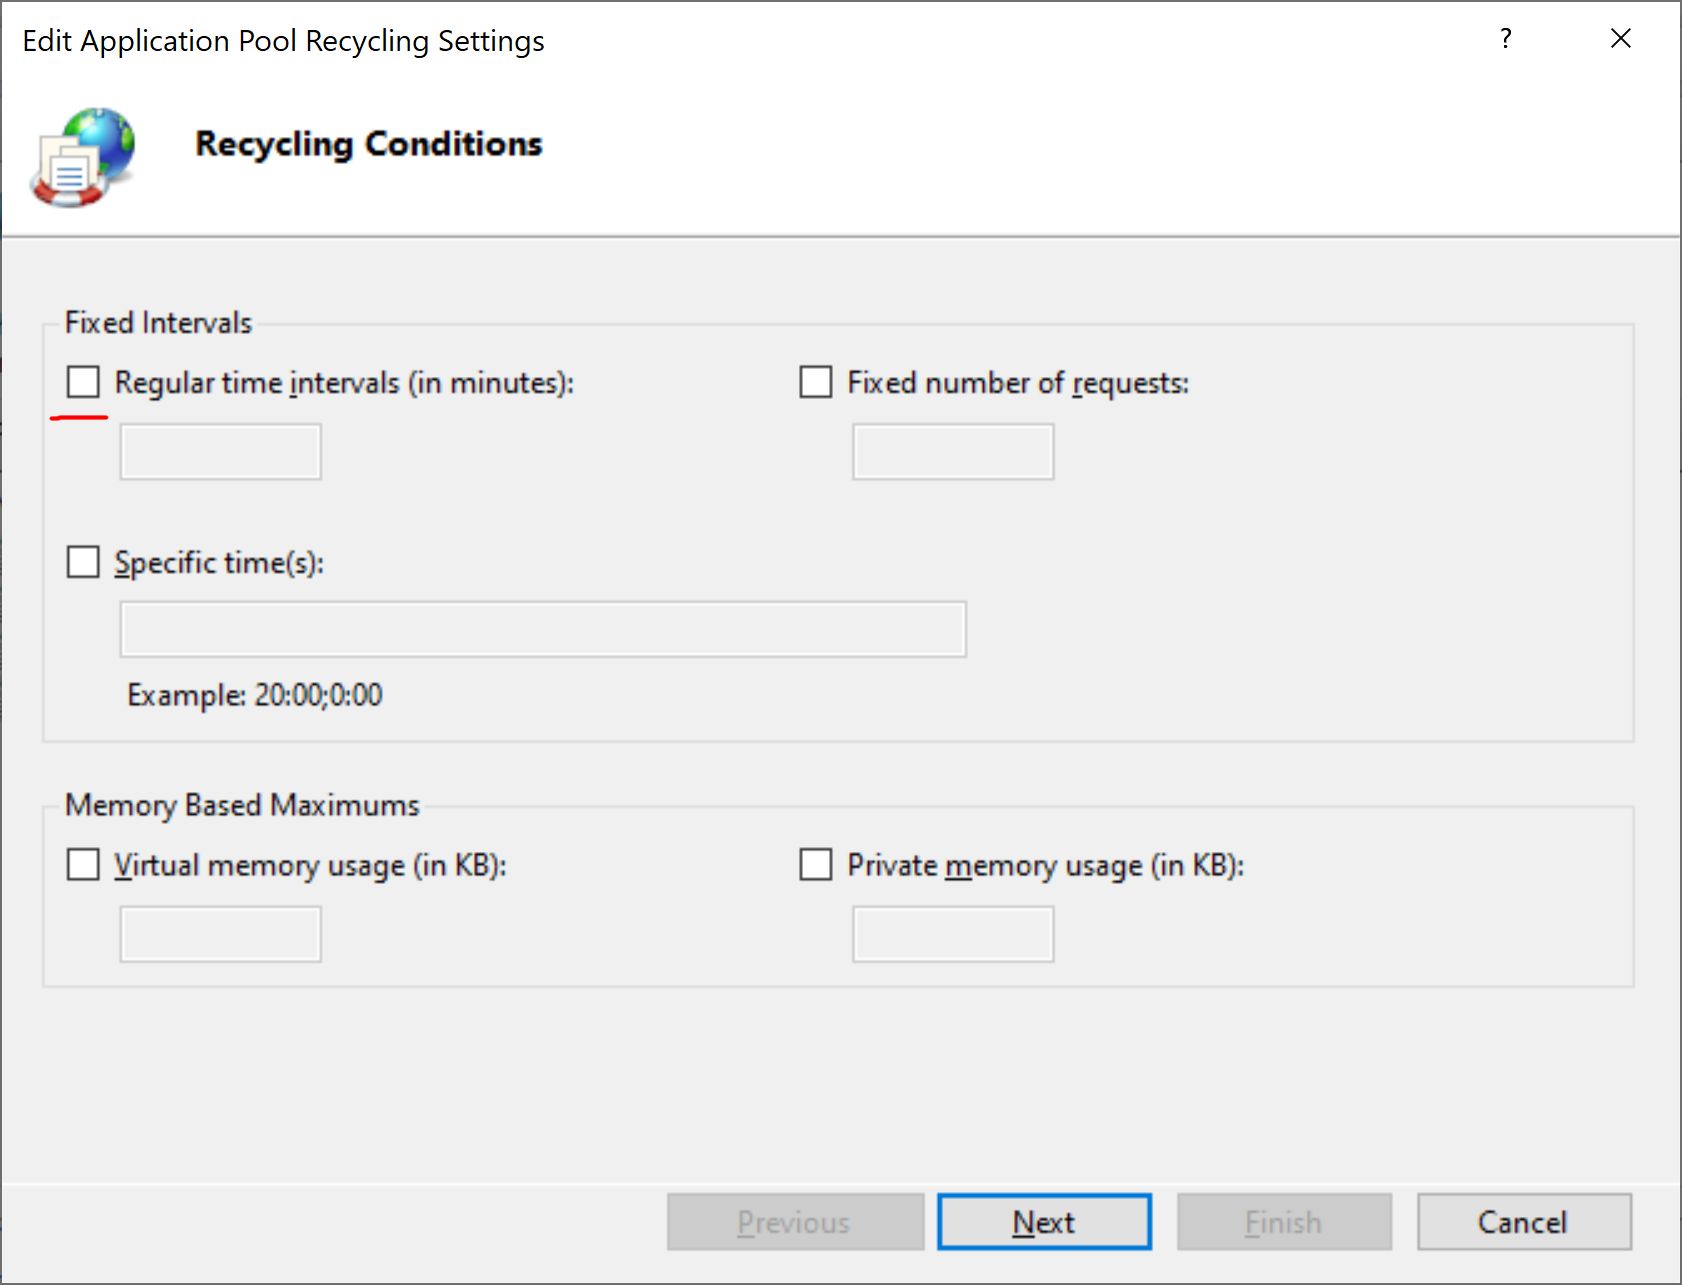
Click Next -> Finish Select Edit Application Pool -> Advanced Settings In the window that appears, find the Process Model -> Idle time-out (minutes) option, and change its value from 20 to 0.
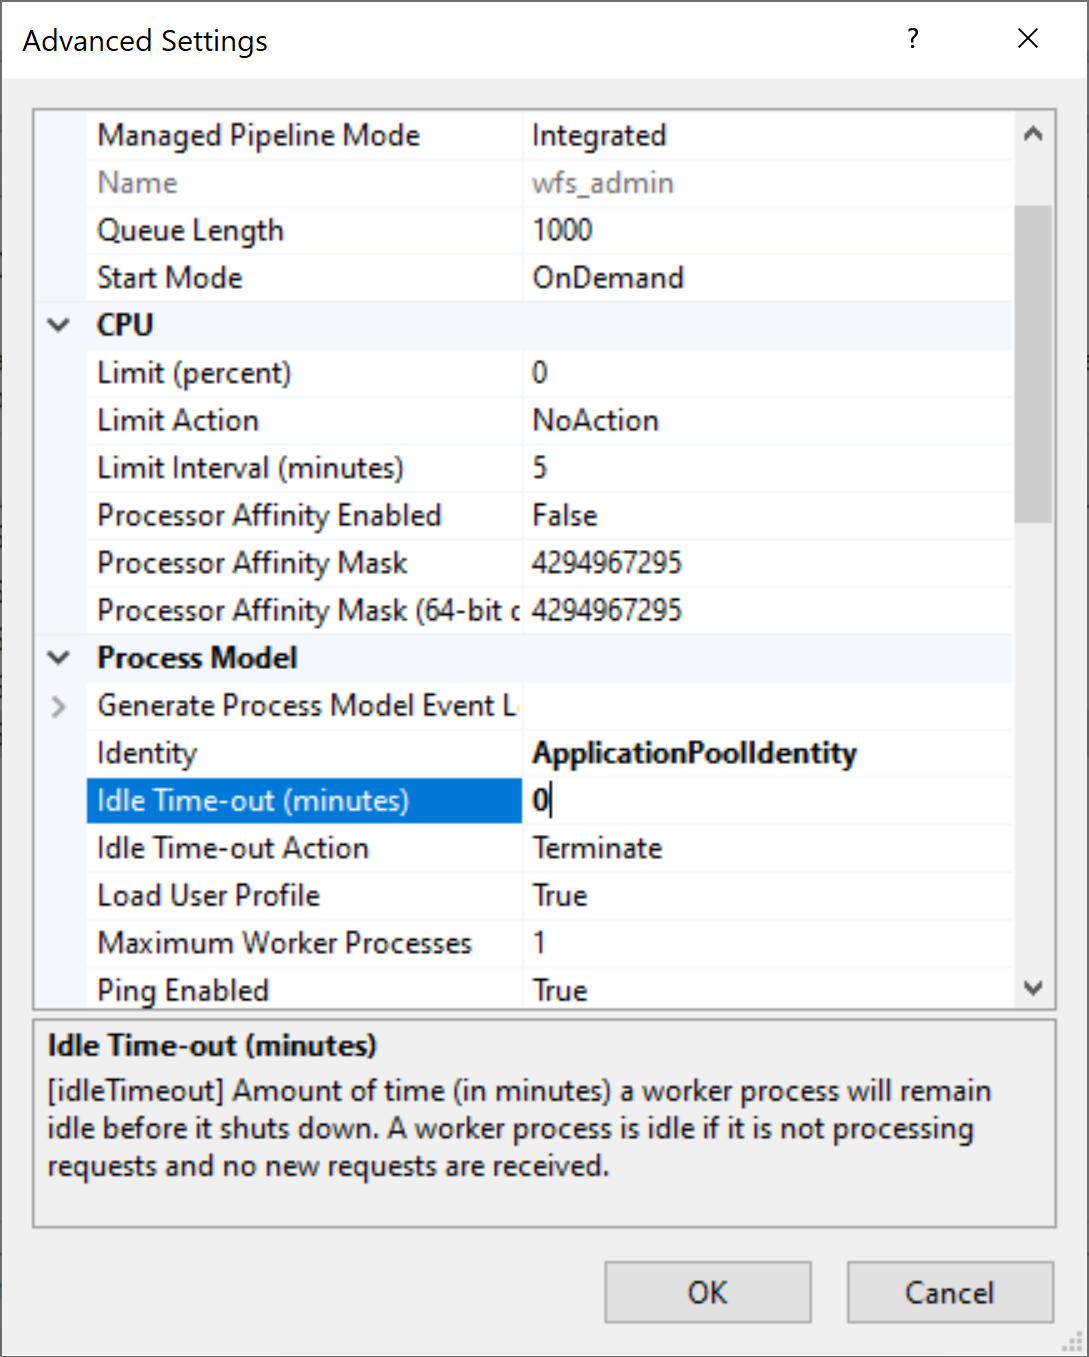
Press OK, the wfs_admin pool is set up.
Then, prepare the config.json file for the admin panel. In the default mode, Workflow Server starts 2 web hosts simultaneously (the admin panel and the form manager). This operation mode is incompatible with IIS, therefore we set the ServerType property to Admin, and change the BackendFolder property so that it contains the relative path from the wfs_admin folder to the backend folder copied in Step 2. Since we are going to launch 2 copies of the Workflow Server, we enable the Multiserver mode by setting the IsMultiServer property to true.
{
  "BackendFolder": "../backend",
  "ServerType": "Admin",
  "IsMultiServer": true,
}Please, note that the url property set in config.json is ignored; instead, the IIS binding sets for the wfs_admin site are used.
Now, we publish Workflow Server for the wfs_admin site.
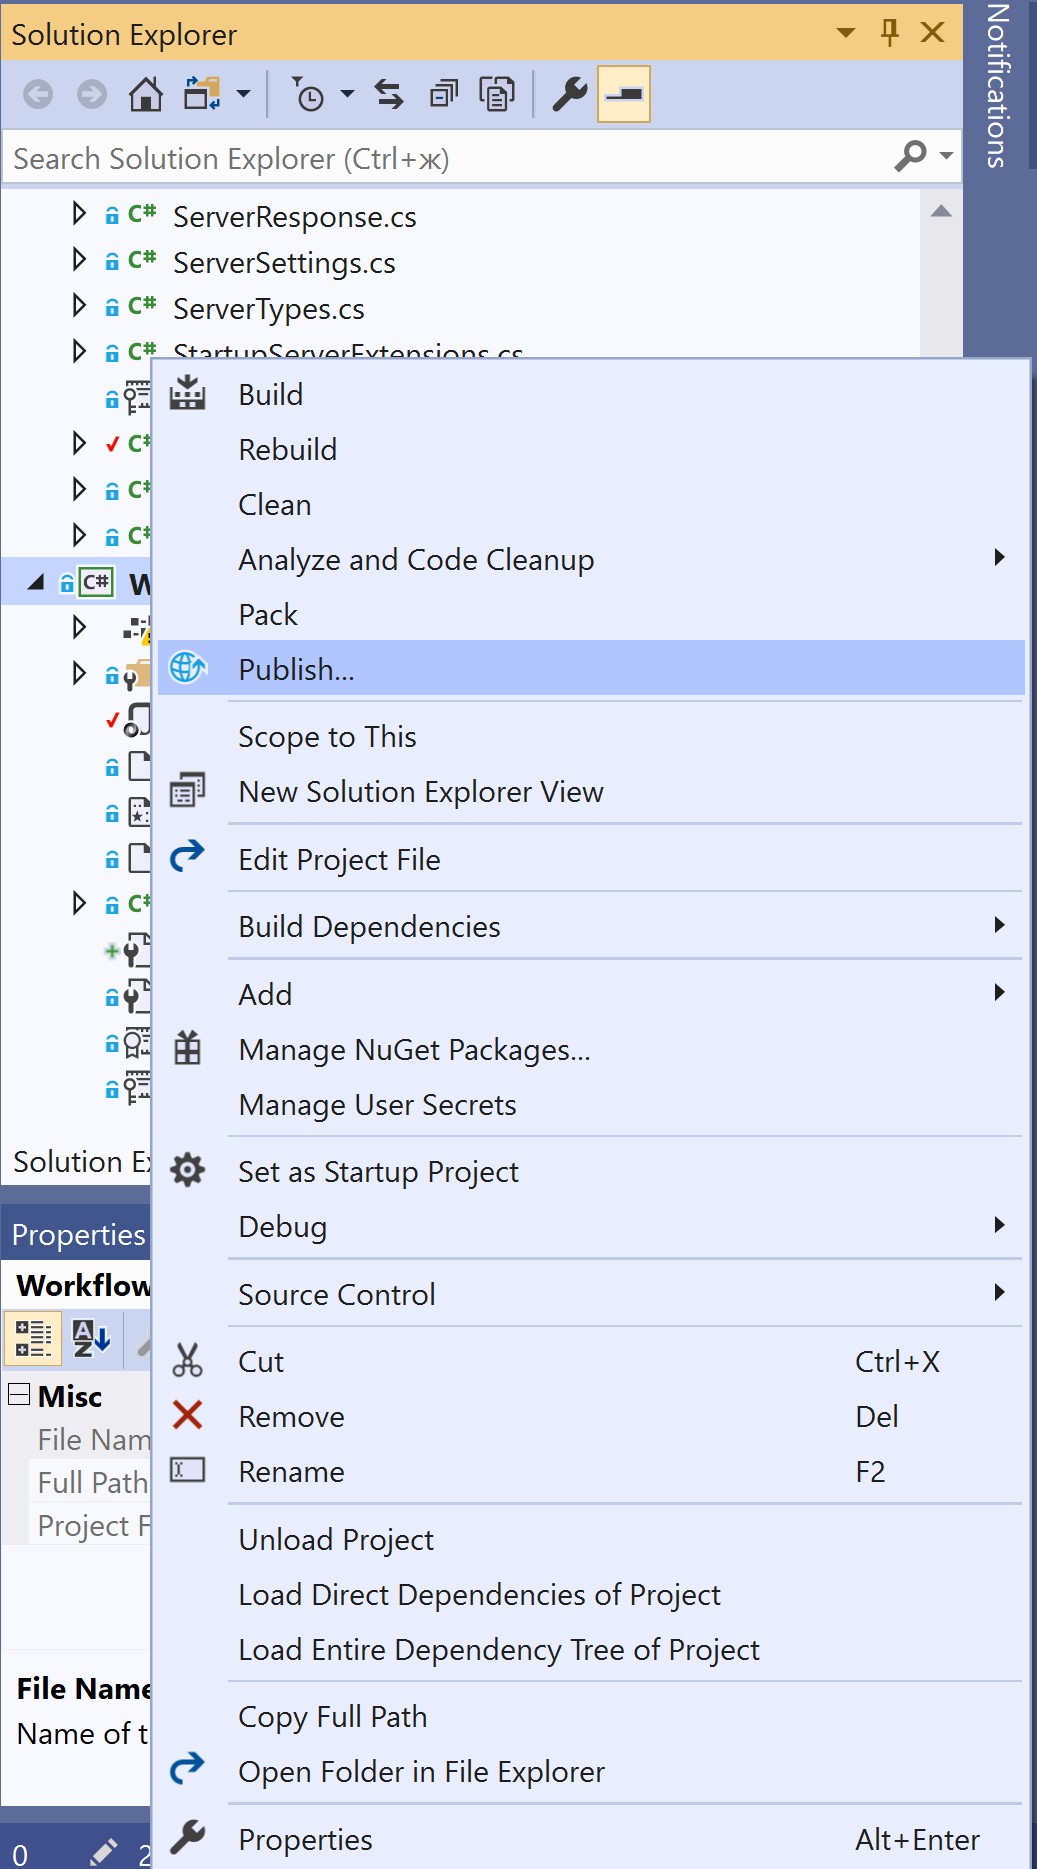
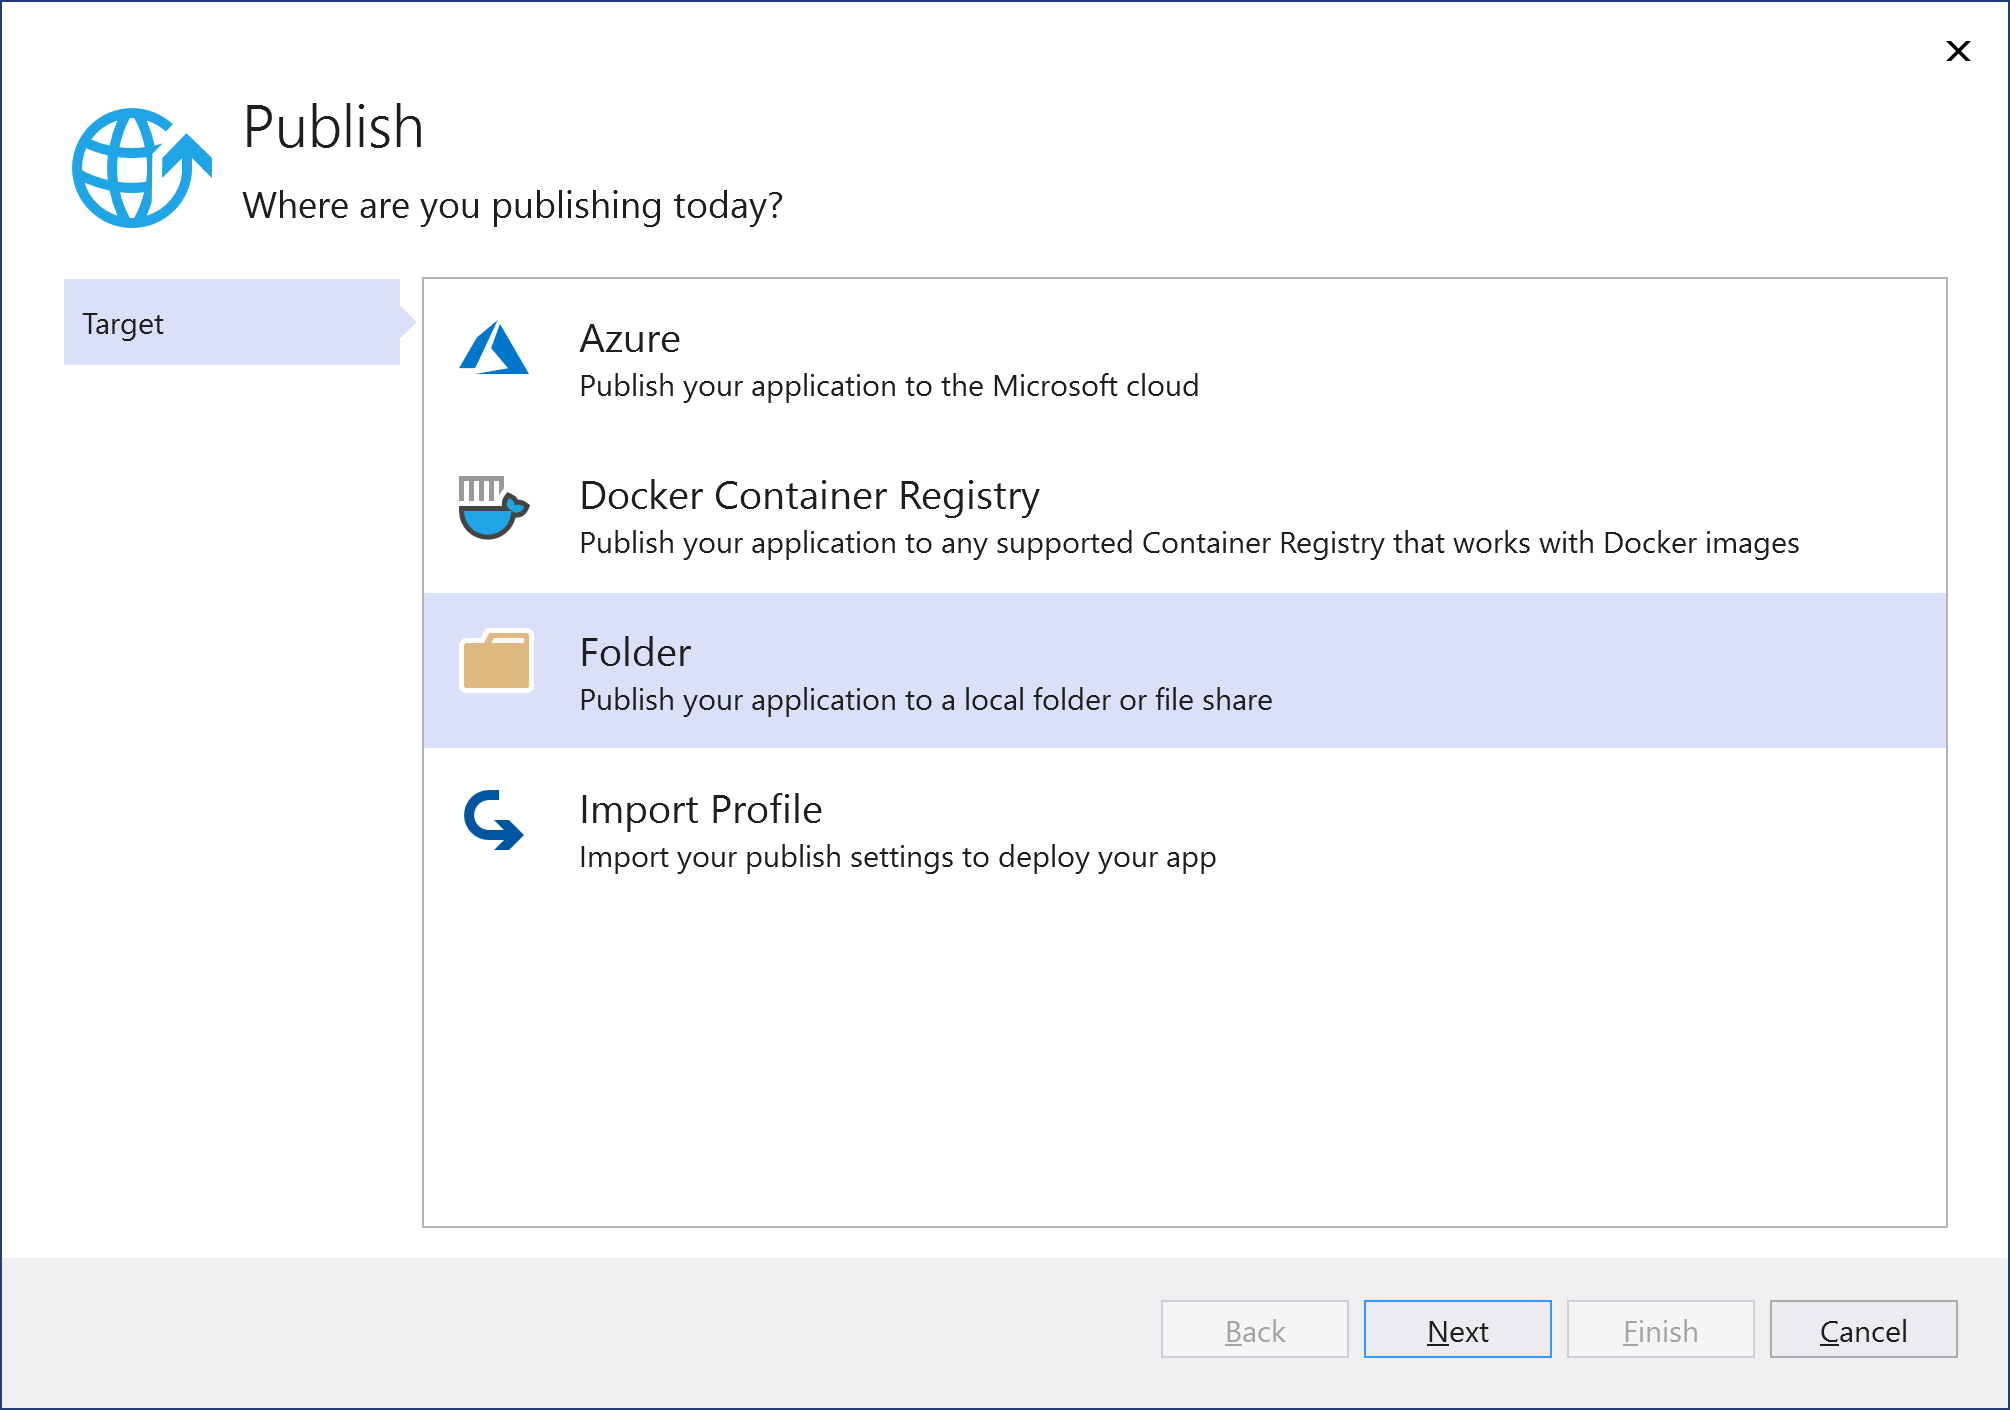
Using Visual Studio 2019. In the context menu of the WorkflowServer project, select Publish (or, select Build -> Publish WorkflowServer in the main menu)
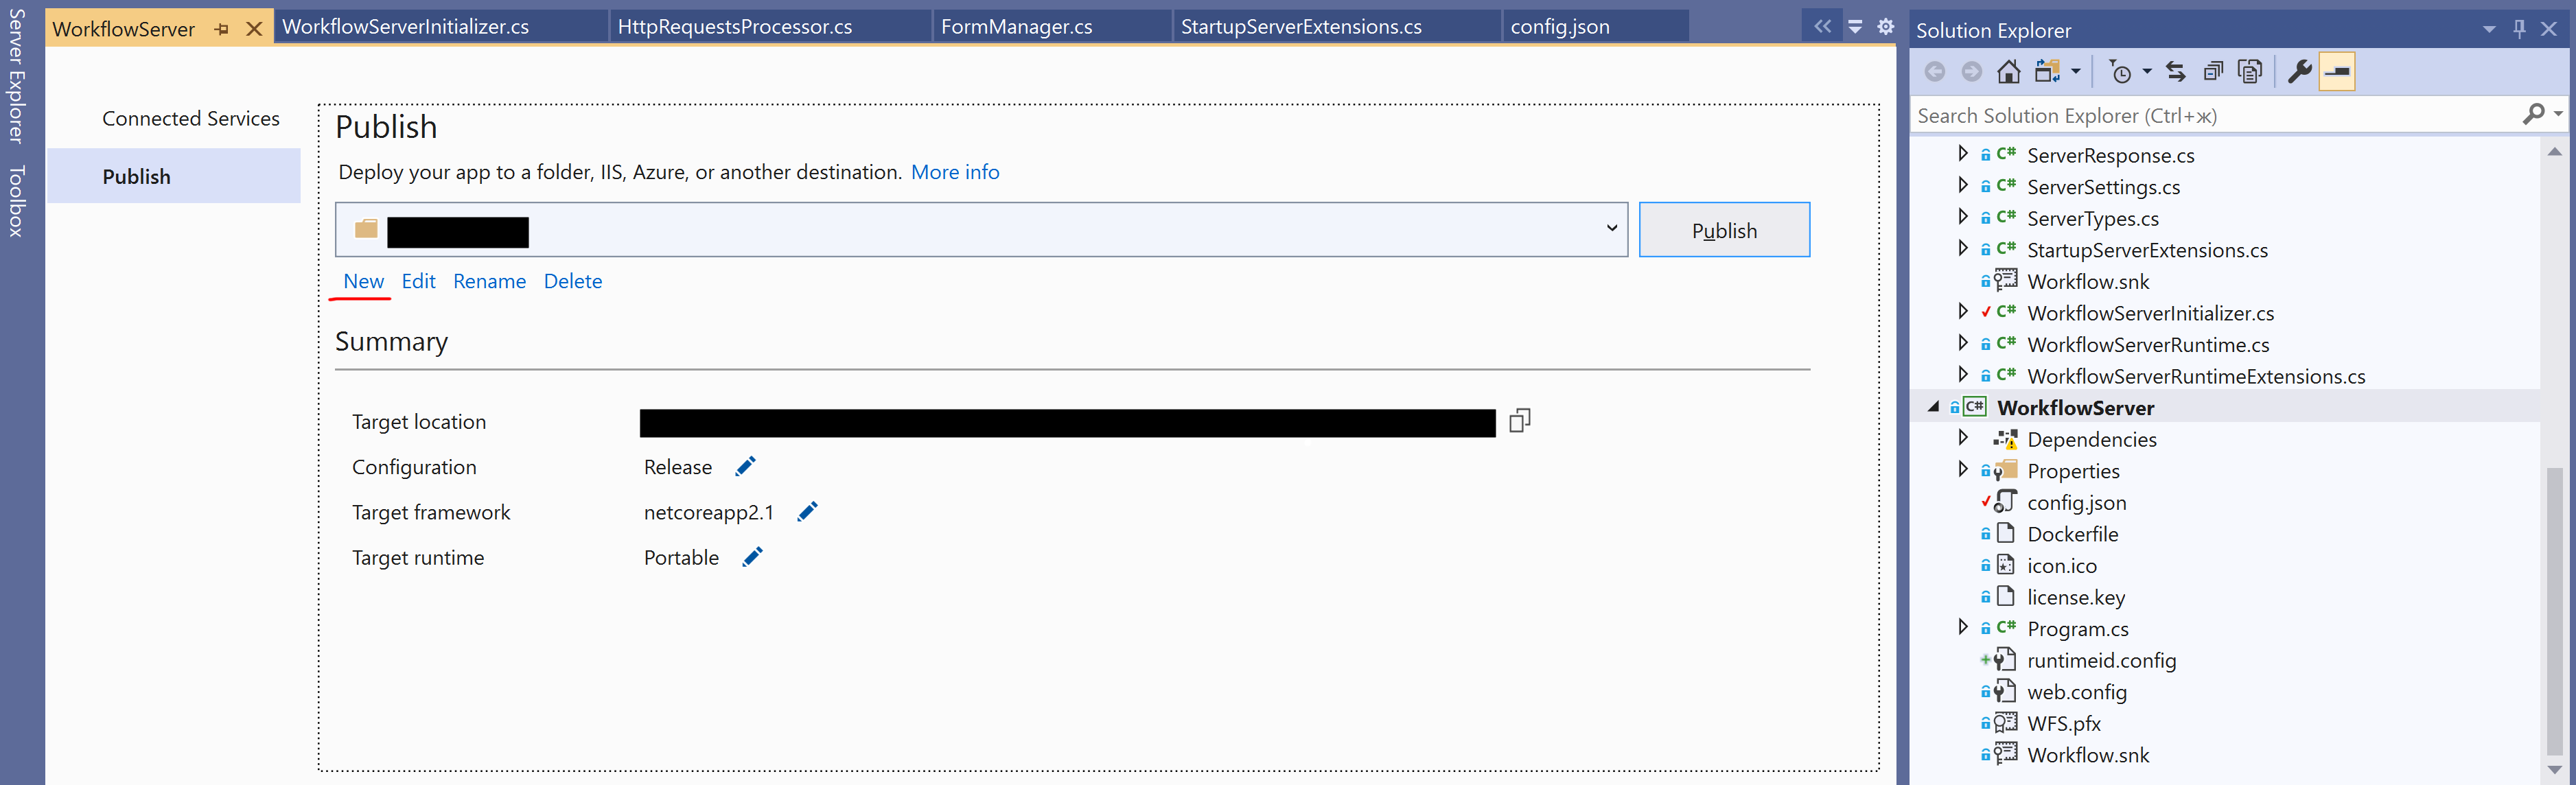
In the publishing window that appears, create a new profile by selecting "new":
In the dialog box that appears, select Folder and press Next:
As the Folder location, specify the path to the wfs_admin folder created in Step 2, and click Finish.
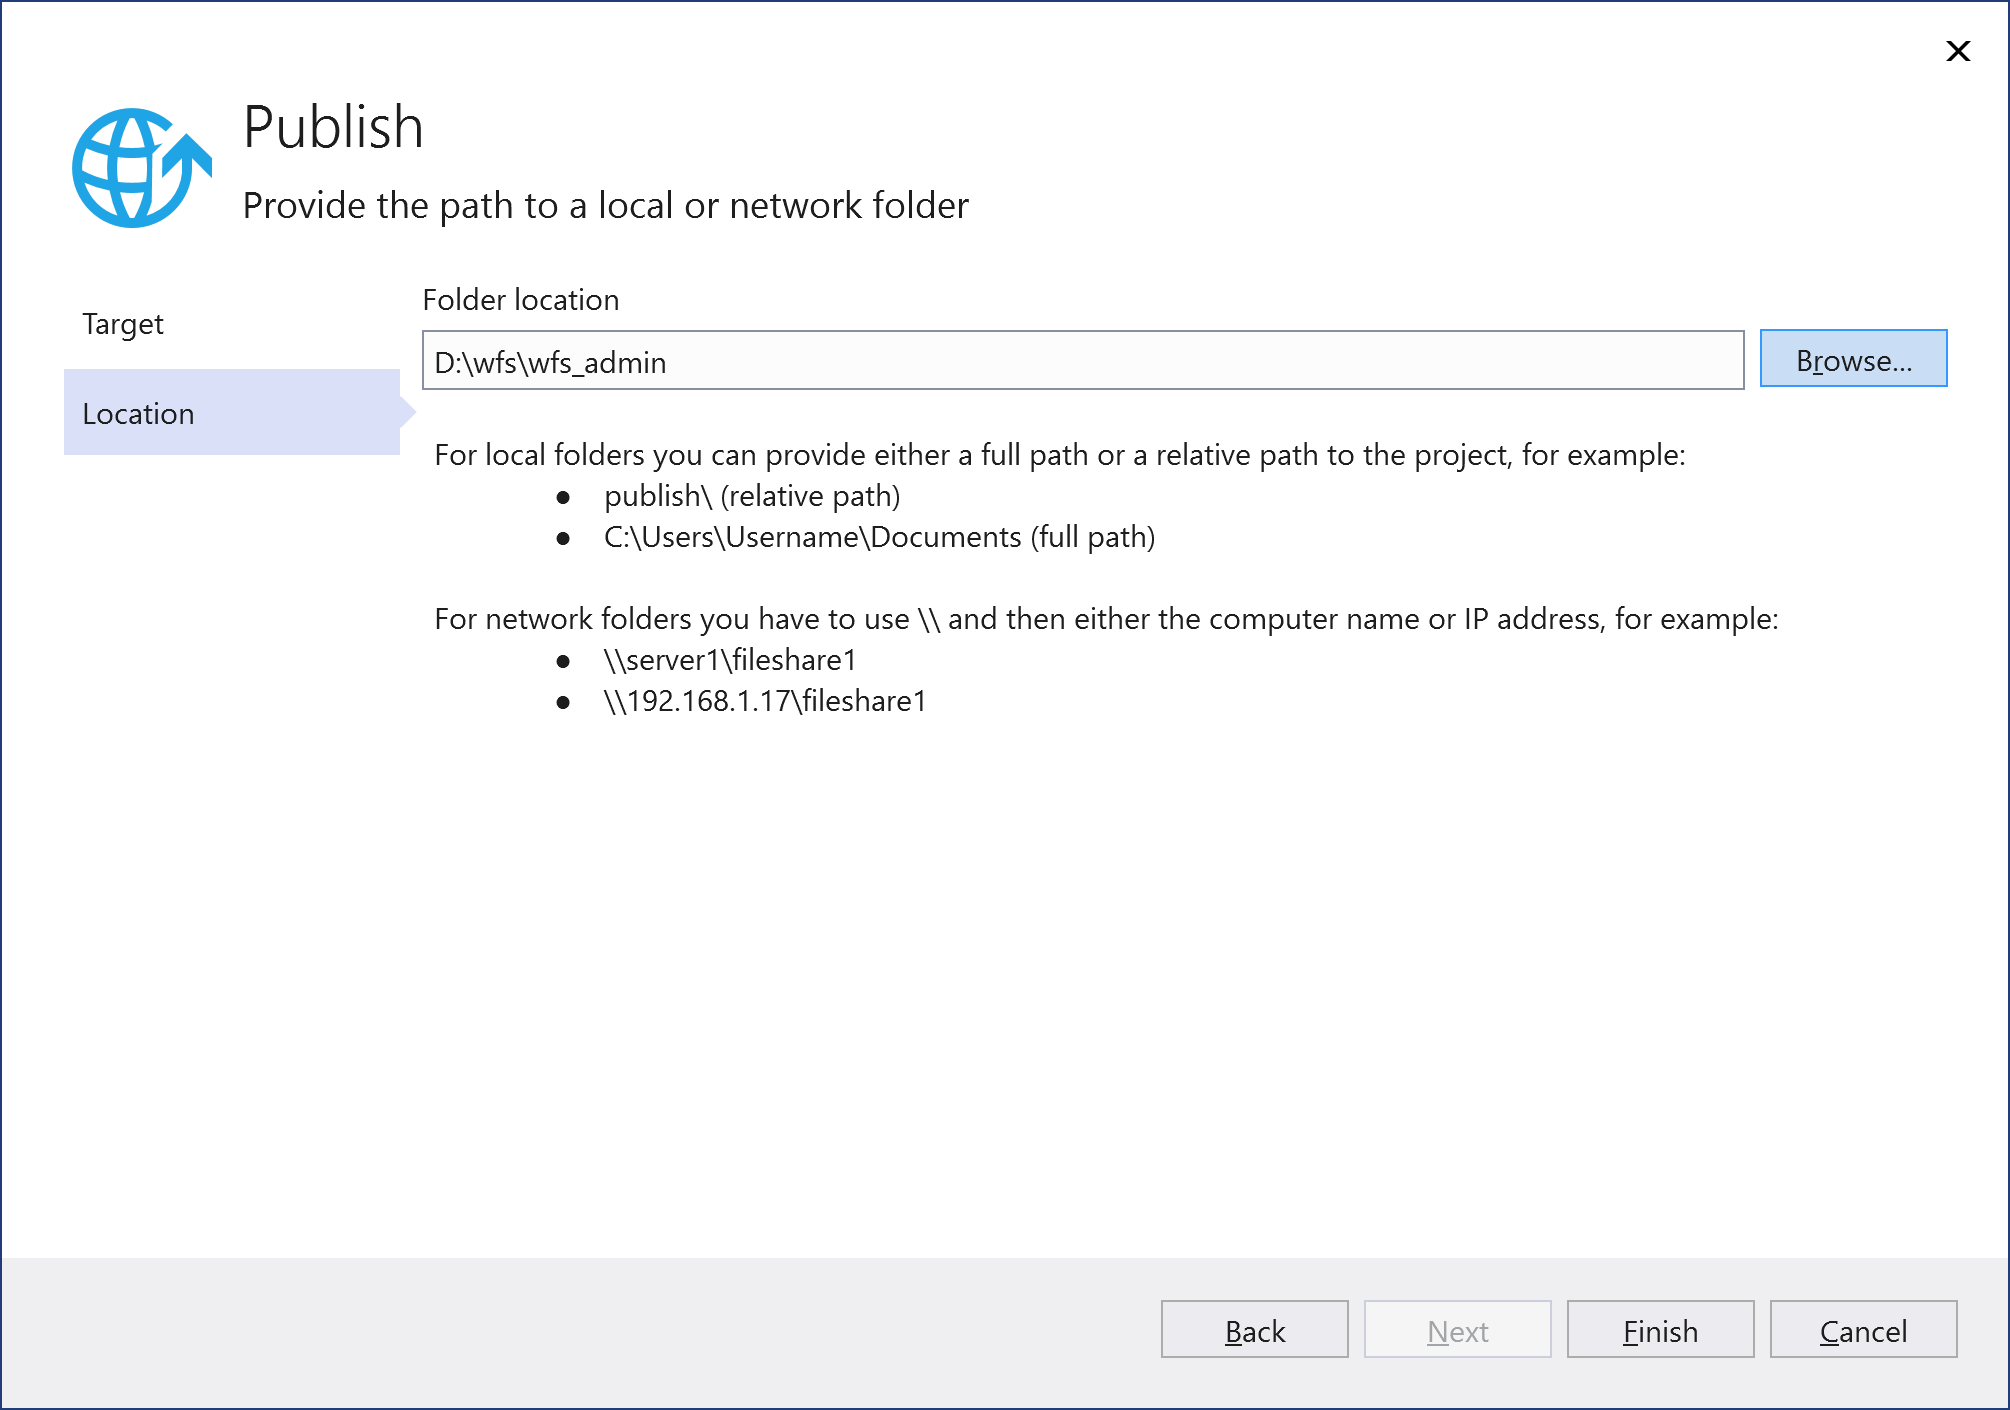
Publish Workflow Server by pressing the Publish button.
Alternatively, publishing can be performed without Visual Studio, through the command line. In the workflowserver project folder, containing WorkflowServer.sln, run the command:
dotnet publish WorkflowServer.sln -o <WFS_ADMIN_PATH>Where <WFS_ADMIN_PATH> - the path to the wfs_admin folder created in Step 2.
If the wfs_admin folder is not available on the computer where the application is being developed, any available folder can be selected for publishing; then, its contents should be copied to the wfs_admin folder.
Then, we create the form manager IIS site and configure its Application pool as described in Steps 3-5. The site settings are:
- Site name: wfs_forms
- Physical path: the path to the wfs_forms folder created in Step 2.
- Port: a free port through which the form manager is available, different from the admin panel port, for example 8078.
Now, we prepare the config.json file to publish the form manager. First, set the ServerType property to Forms, then, change the FrontendFolder property so that it contains the relative path from the wfs_forms folder to the frontend folder copied in Step 2. Since we are going to launch 2 copies of Workflow Server, we enable the Multiserver mode by setting the IsMultiServer property to true.
{
  "FrontendFolder": "../frontend",
  "ServerType": "Forms",
  "IsMultiServer": true,
}Please, note that the DefaultFrontendPort property set in the config.json file is ignored; instead, the IIS binding sets for the wfs_forms site are used.
Now, we publish Workflow Server for the wfs_forms site, similarly to Step 7, using the wfs_forms folder created in Step 2 as the target for publishing.
IIS deploy is done; both the admin panel and the form manager are accessible according to the IIS binding sets, specified for the wfs_admin site and the wfs_forms site respectively.
In case of any issues, please check the steps you've taken in the Troubleshooting section.
IIS deploy troubleshooting and Checkup list
Ensure the following measures have been taken:
- set the write (or full control) permission for the 'wfs_admin' and 'wfs_forms' folders for ApplicationPoolIdentity (or user which you use in Application Pools).
- provide correct paths to frontend and backend paths are indicated in the config.json file.
- allocate free, vacant and non-conflicting, ports to each of the domains: wfs_admin and wfs_forms.
- the web.config file is successfully copied to both the 'wfs_admin' and 'wfs_forms' folders.
Docker deploy with nginx as a reverse-proxy
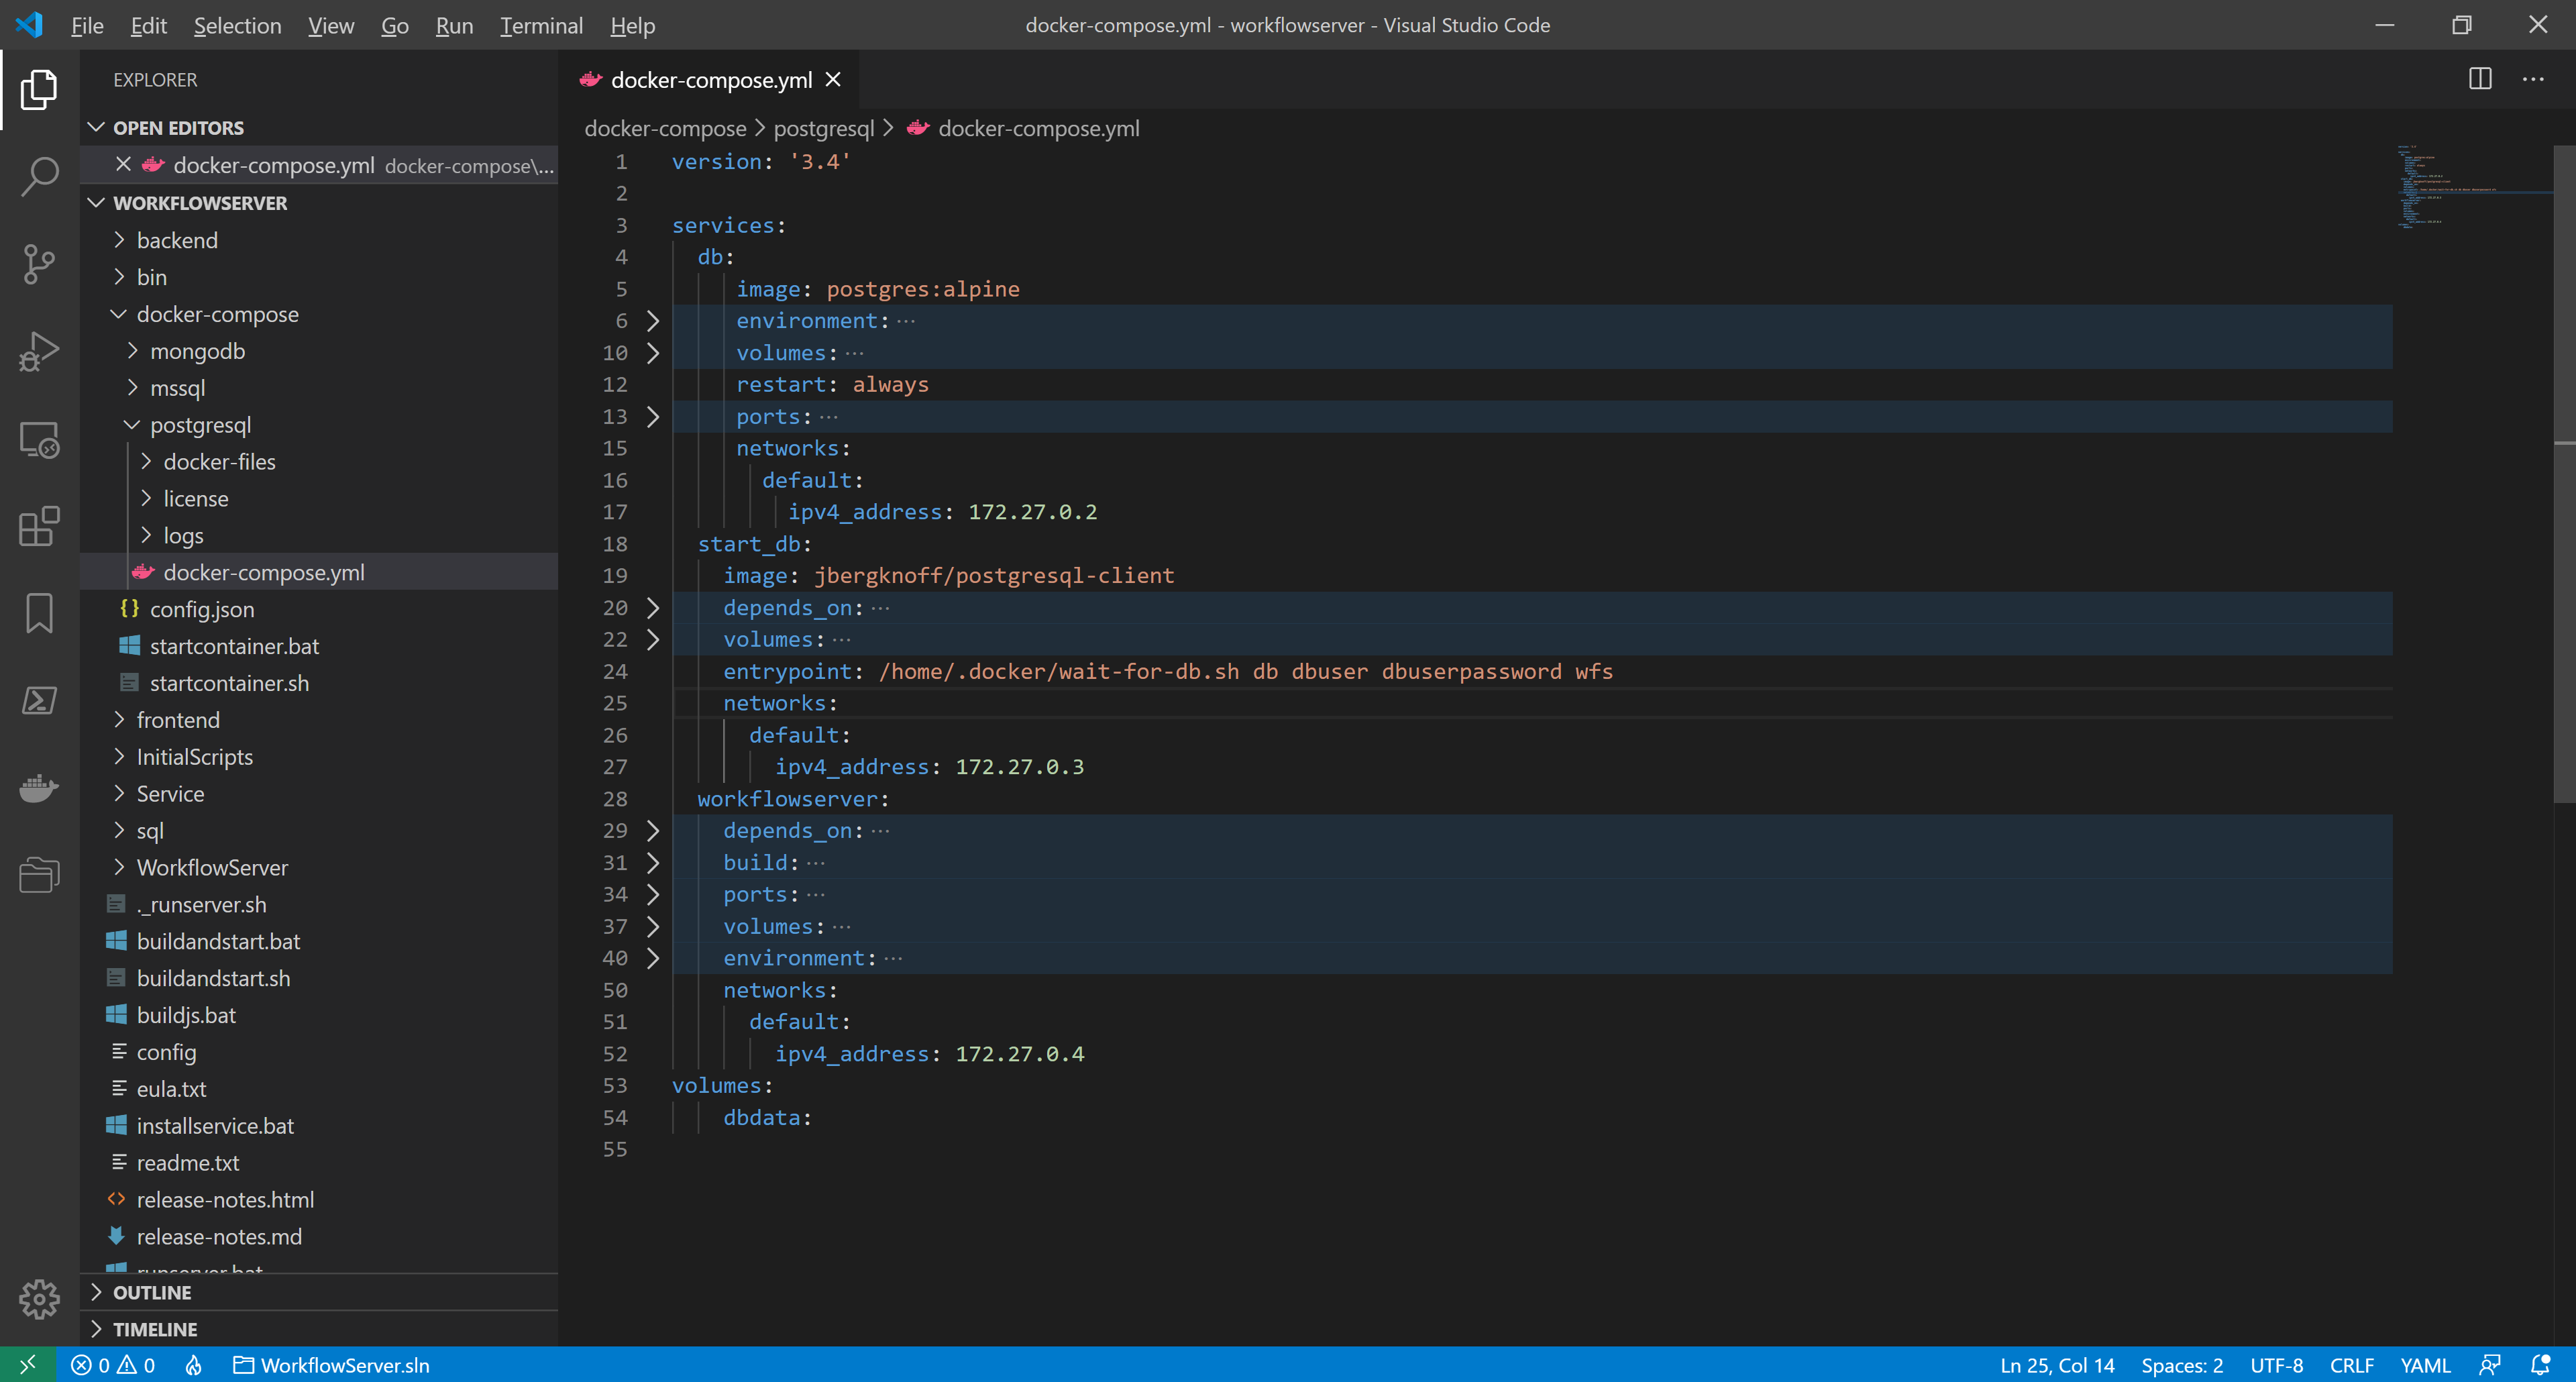
To deploy WFS with nginx as a reverse-proxy, we need at least 2 Docker containers; one for Workflow Server, and the other for nginx. To manage the containers, we use Docker Compose and take docker-files/docker-compose.yml from the workflowserver project as the basis solution for deploying Workflow Server and PostgreSQL.
This solution consists of the following three containers:
- db – PostgreSQL DBMS container.
- workflowserver – Workflow Server container.
- start_db – the container to prevent the workflowserver container from starting until PostgreSQL is fully activated and ready to accept queries.
To correctly determine the IP address and client protocol in WFS when working through a reverse-proxy, the forwarded headers must be enabled. To configure forwarding, the ProxySettings property in ServerSettings is used as follows:
public class ProxySettings
{
  public List<string> KnownNetworks { get; set; } = new List<string>();
  public List<string> KnownProxies { get; set; } = new List<string>();
  public List<ForwardedHeaders> Headers { get; set; } =
      new List<ForwardedHeaders> { ForwardedHeaders.XForwardedFor, ForwardedHeaders.XForwardedProto };
  public bool Enabled { get; } = true;
}
Where Headers is the list of headers to be forwarded.Possible values are:
You can also see more info here.
For security reasons, header forwarding should be restricted to trusted proxies only. You can set the trusted proxies using the following properties:
KnownNetworks- the list of trusted subnets in the CIDR notation (IP address / mask)KnownProxies- the list of the IPs of trusted proxy servers.
ProxySettings parameters can be configured using both config.json and environment variables. For debugging purposes,
ProxySettings can be used without specifying KnownNetworks or KnownProxies, then the headers are forwarded for any
addresses. To enable this mode, set the environment variable ProxySettings__Enabled to true.
caution
Warning! In production mode, ProxySettings without specifying KnownNetworks or KnownProxies are not recommended.
We define the parameters of the subnet made for our containers. The subnet is created when the compose project is launched for the first time; thus, we start this project using startcontainer.bat or startcontainer.sh, and then stop it by pressing Ctrl+C. In the command prompt, execute the following:
docker network inspect docker-files_defaultIt shows the default network info of the workflowserver project.
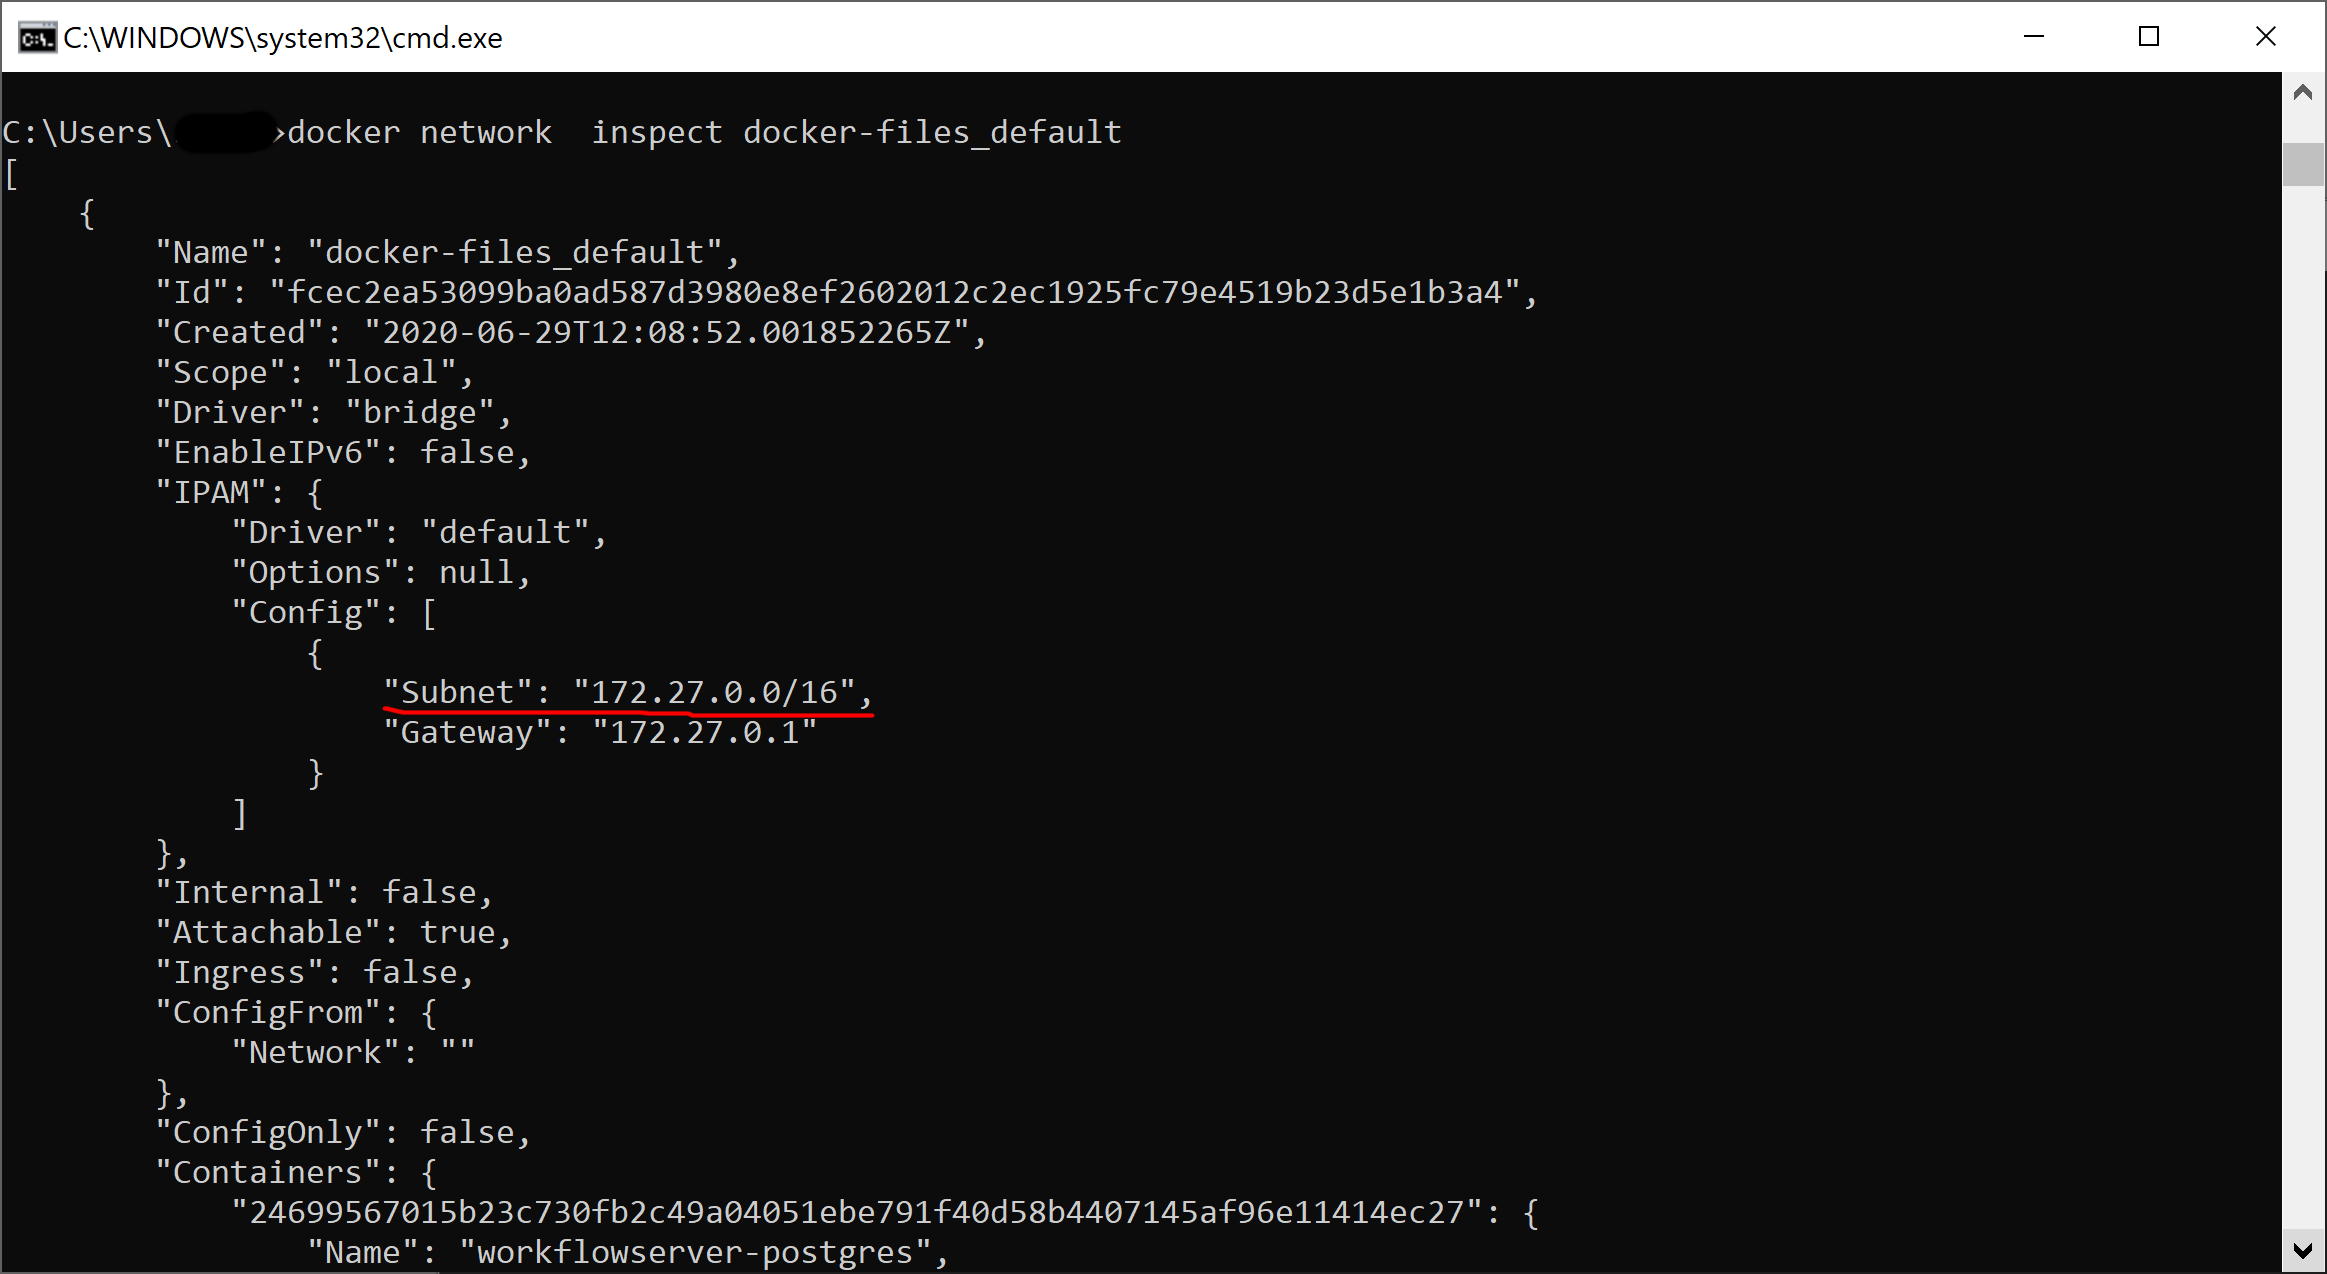
As you can see, in our case, the default network has 172.27.0.0/16 mask and 172.27.0.1 gateway. The containers are given dynamic addresses on creating. To set
KnownProxies, we assign static addresses for the existing containers by adding a node to each service configuration:networks:
default:
ipv4_address: <IP_address>where <IP_address> - a unique IP-address within 172.27.0.2 - 172.27.1.254.
We create the configuration file nginx.conf in the folder docker-compose/postgresql. It contains the following:
worker_processes 4;

events { worker_connections 1024; }

http {
    sendfile on;

    server {
        listen 8077;
        location / {
            proxy_pass         http://workflowserver:8077;
            proxy_http_version 1.1;
            proxy_set_header   Upgrade $http_upgrade;
            proxy_set_header   Connection $http_connection;
            proxy_set_header   Host $host;
            proxy_cache_bypass $http_upgrade;
            proxy_set_header   X-Forwarded-For $proxy_add_x_forwarded_for;
            proxy_set_header   X-Forwarded-Proto $scheme;
        }
    }

    server {
        listen 8078;
        location / {
            proxy_pass         http://workflowserver:8078;
            proxy_http_version 1.1;
            proxy_set_header   Upgrade $http_upgrade;
            proxy_set_header   Connection $http_connection;
            proxy_set_header   Host $host;
            proxy_cache_bypass $http_upgrade;
            proxy_set_header   X-Forwarded-For $proxy_add_x_forwarded_for;
            proxy_set_header   X-Forwarded-Proto $scheme;
        }
    }
}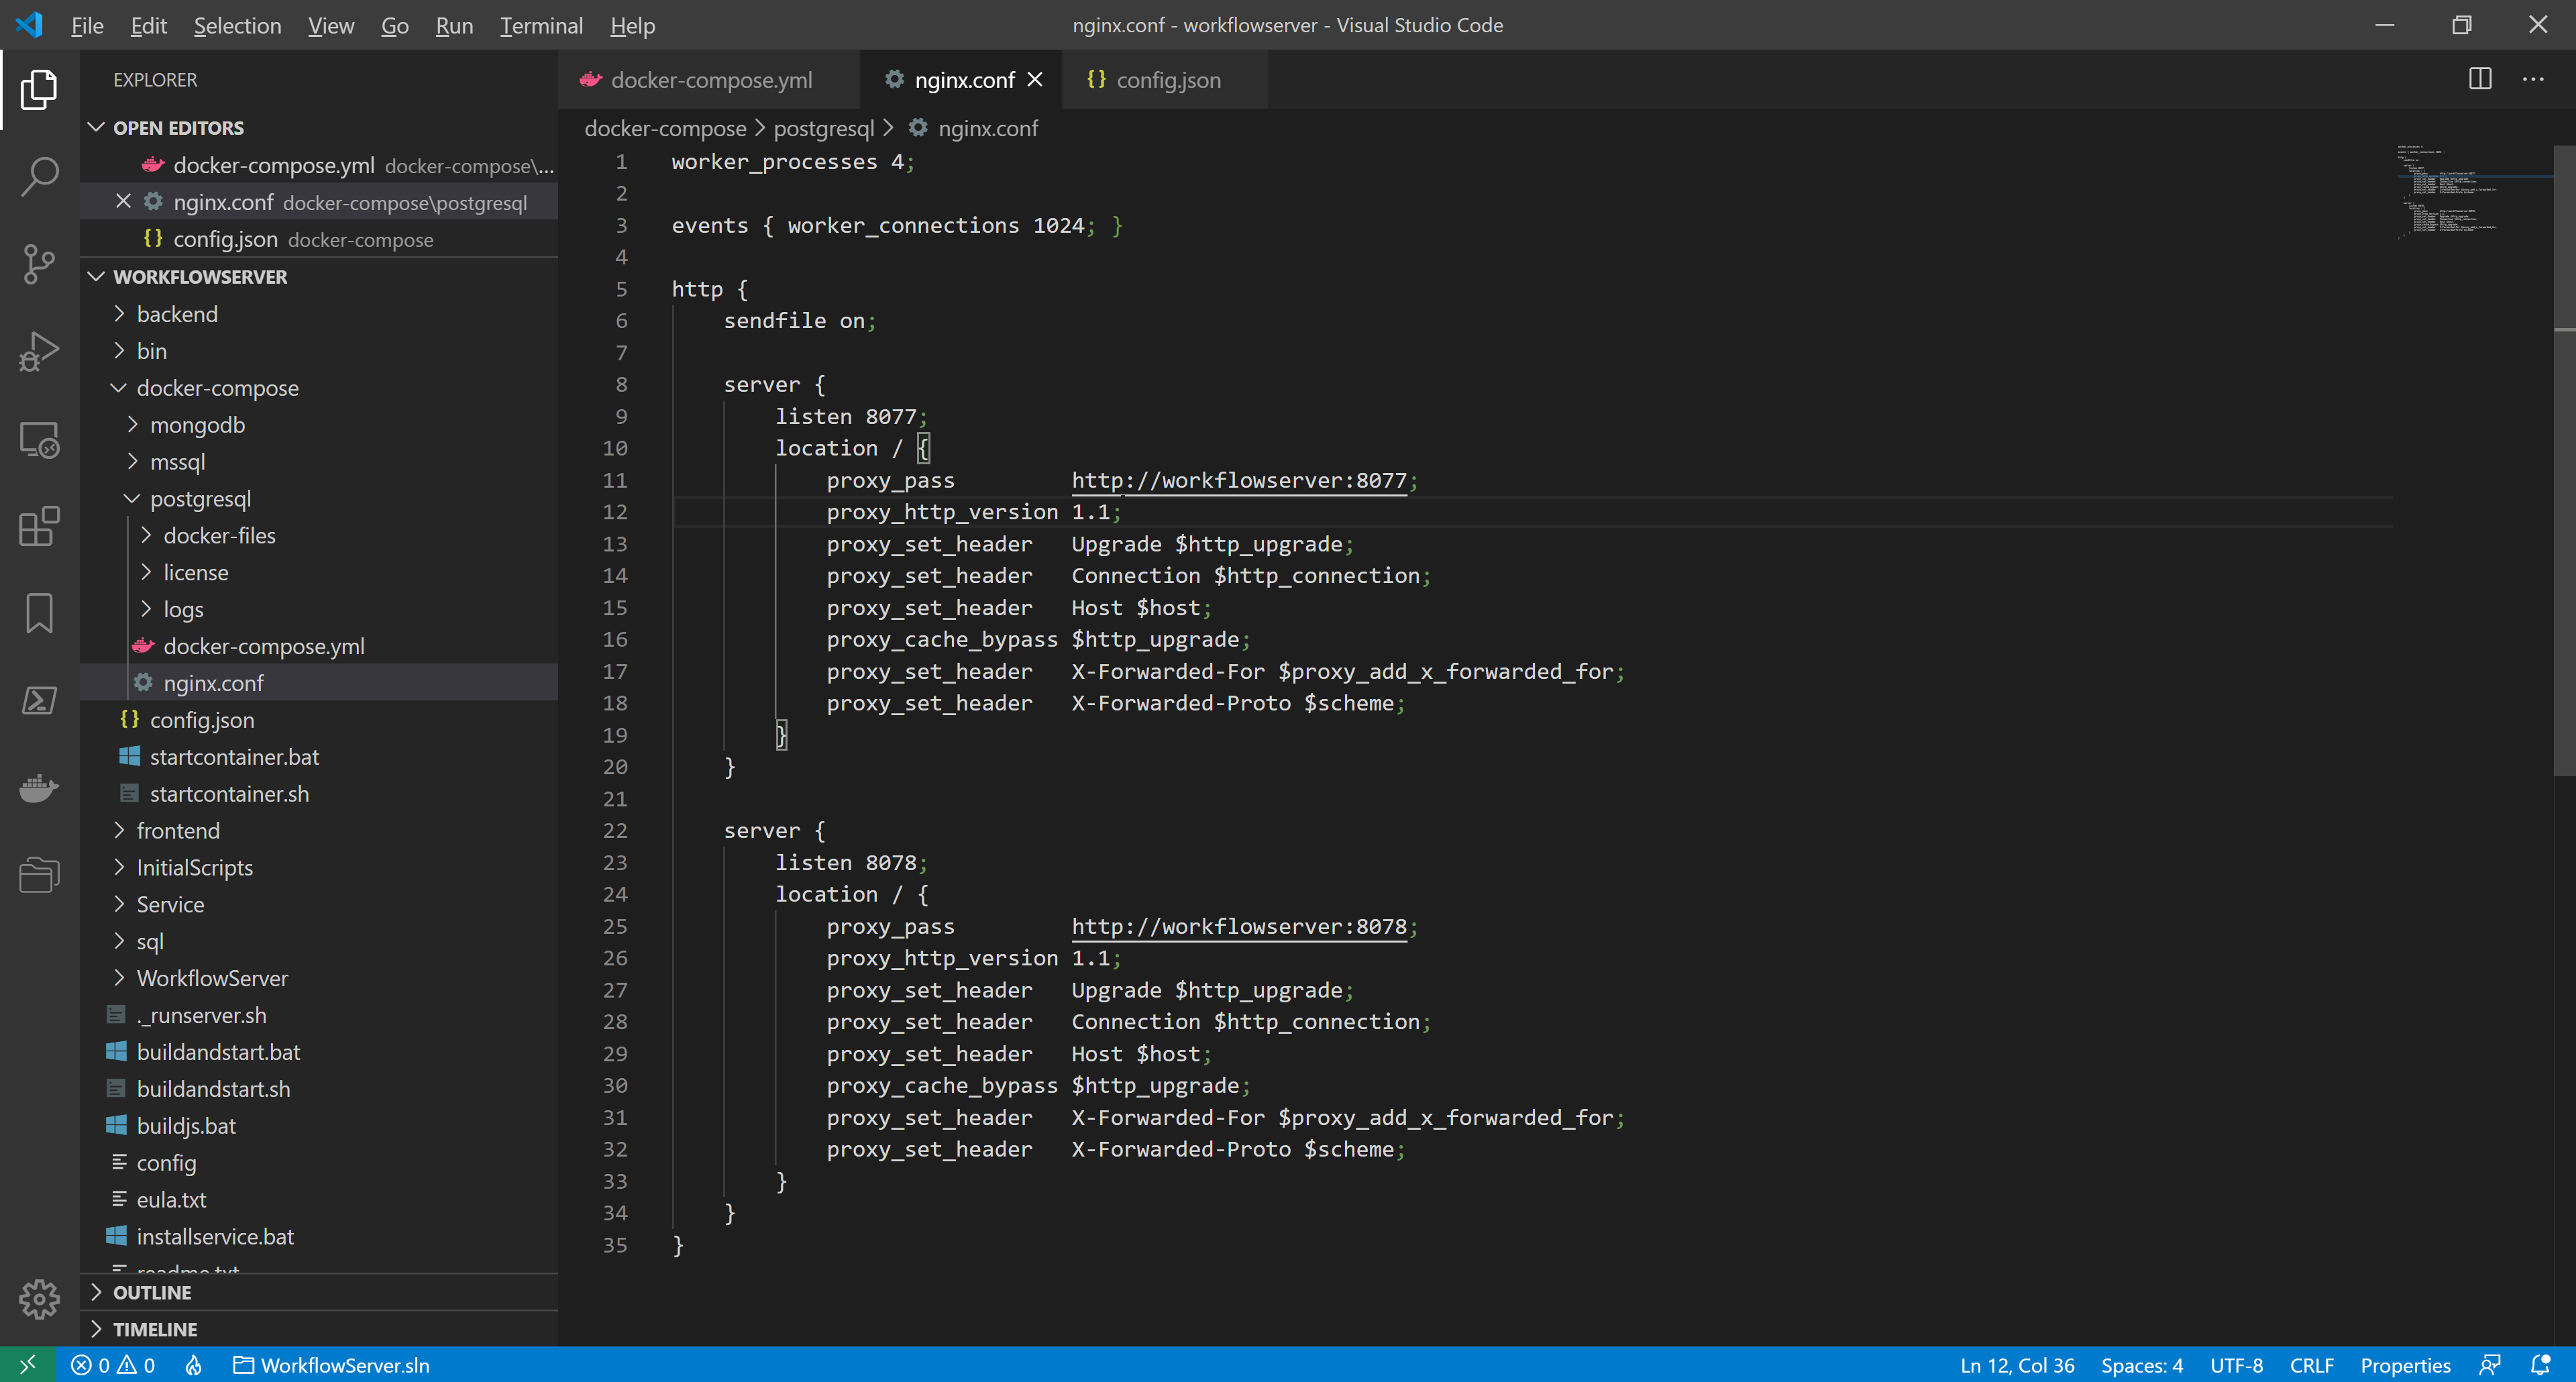
The file describes the two servers corresponding to the two Workflow Server web hosts: Admin Panel/Web API and Form Manager. Line 9:
listen 8077;It sets the external port to access Admin Panel/Web API. Line 11:
proxy_pass http://workflowserver:8077;It indicates the Admin Panel/Web API address in the internal network. The workflowserver host name corresponds to the service name in the docker-compose.yml configuration file, and the port number must match the url specified in config.json. Similarly, line 23 defines the external port to access Form Manager, and line 25 indicates the Form Manager address in the internal network (the port number must match DefaultFrontendPort specified in config.json).
To remove the port from the workflowserver container, making it inaccessible from the external network, we delete these lines in docker-compose.yml:
ports:
  - "8077:8077"
  - "8078:8078"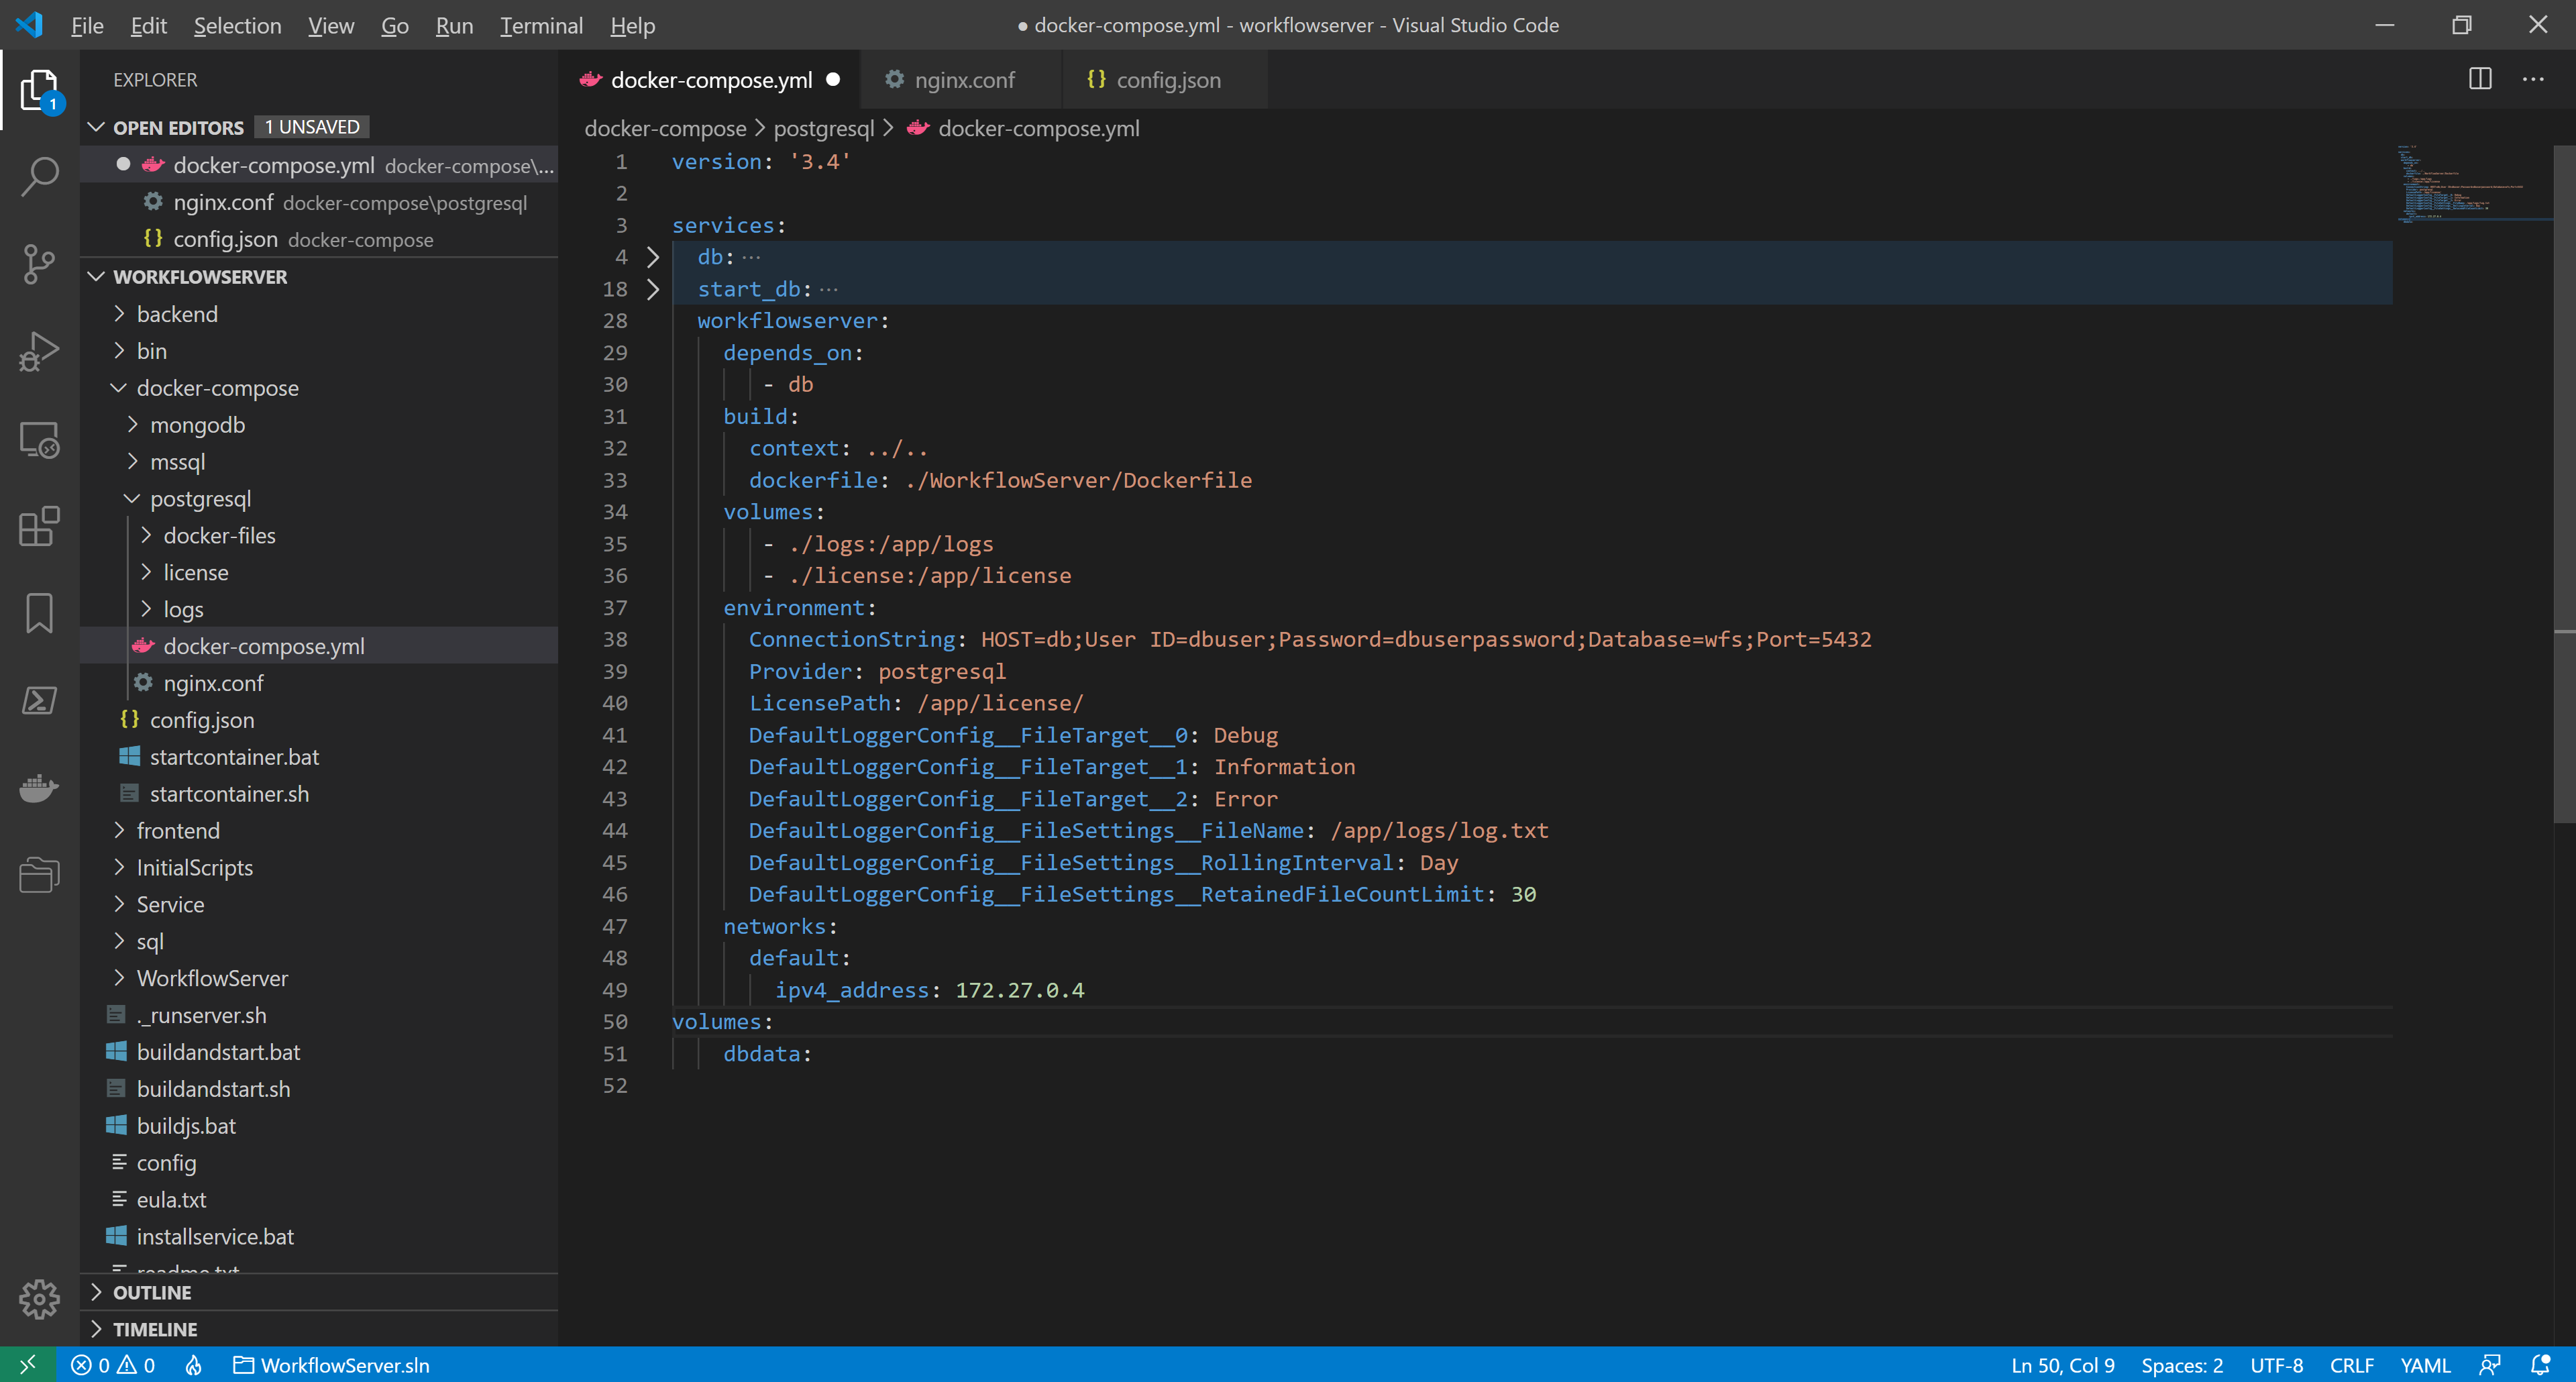
We add the following description of the nginx container in docker-compose.yml:
nginx:
  depends_on:
    - workflowserver
  image: nginx:latest
  volumes:
    - ./nginx.conf:/etc/nginx/nginx.conf
  ports:
    - "8077:8077"
    - "8078:8078"
  networks:
    default:
        ipv4_address: 172.27.0.5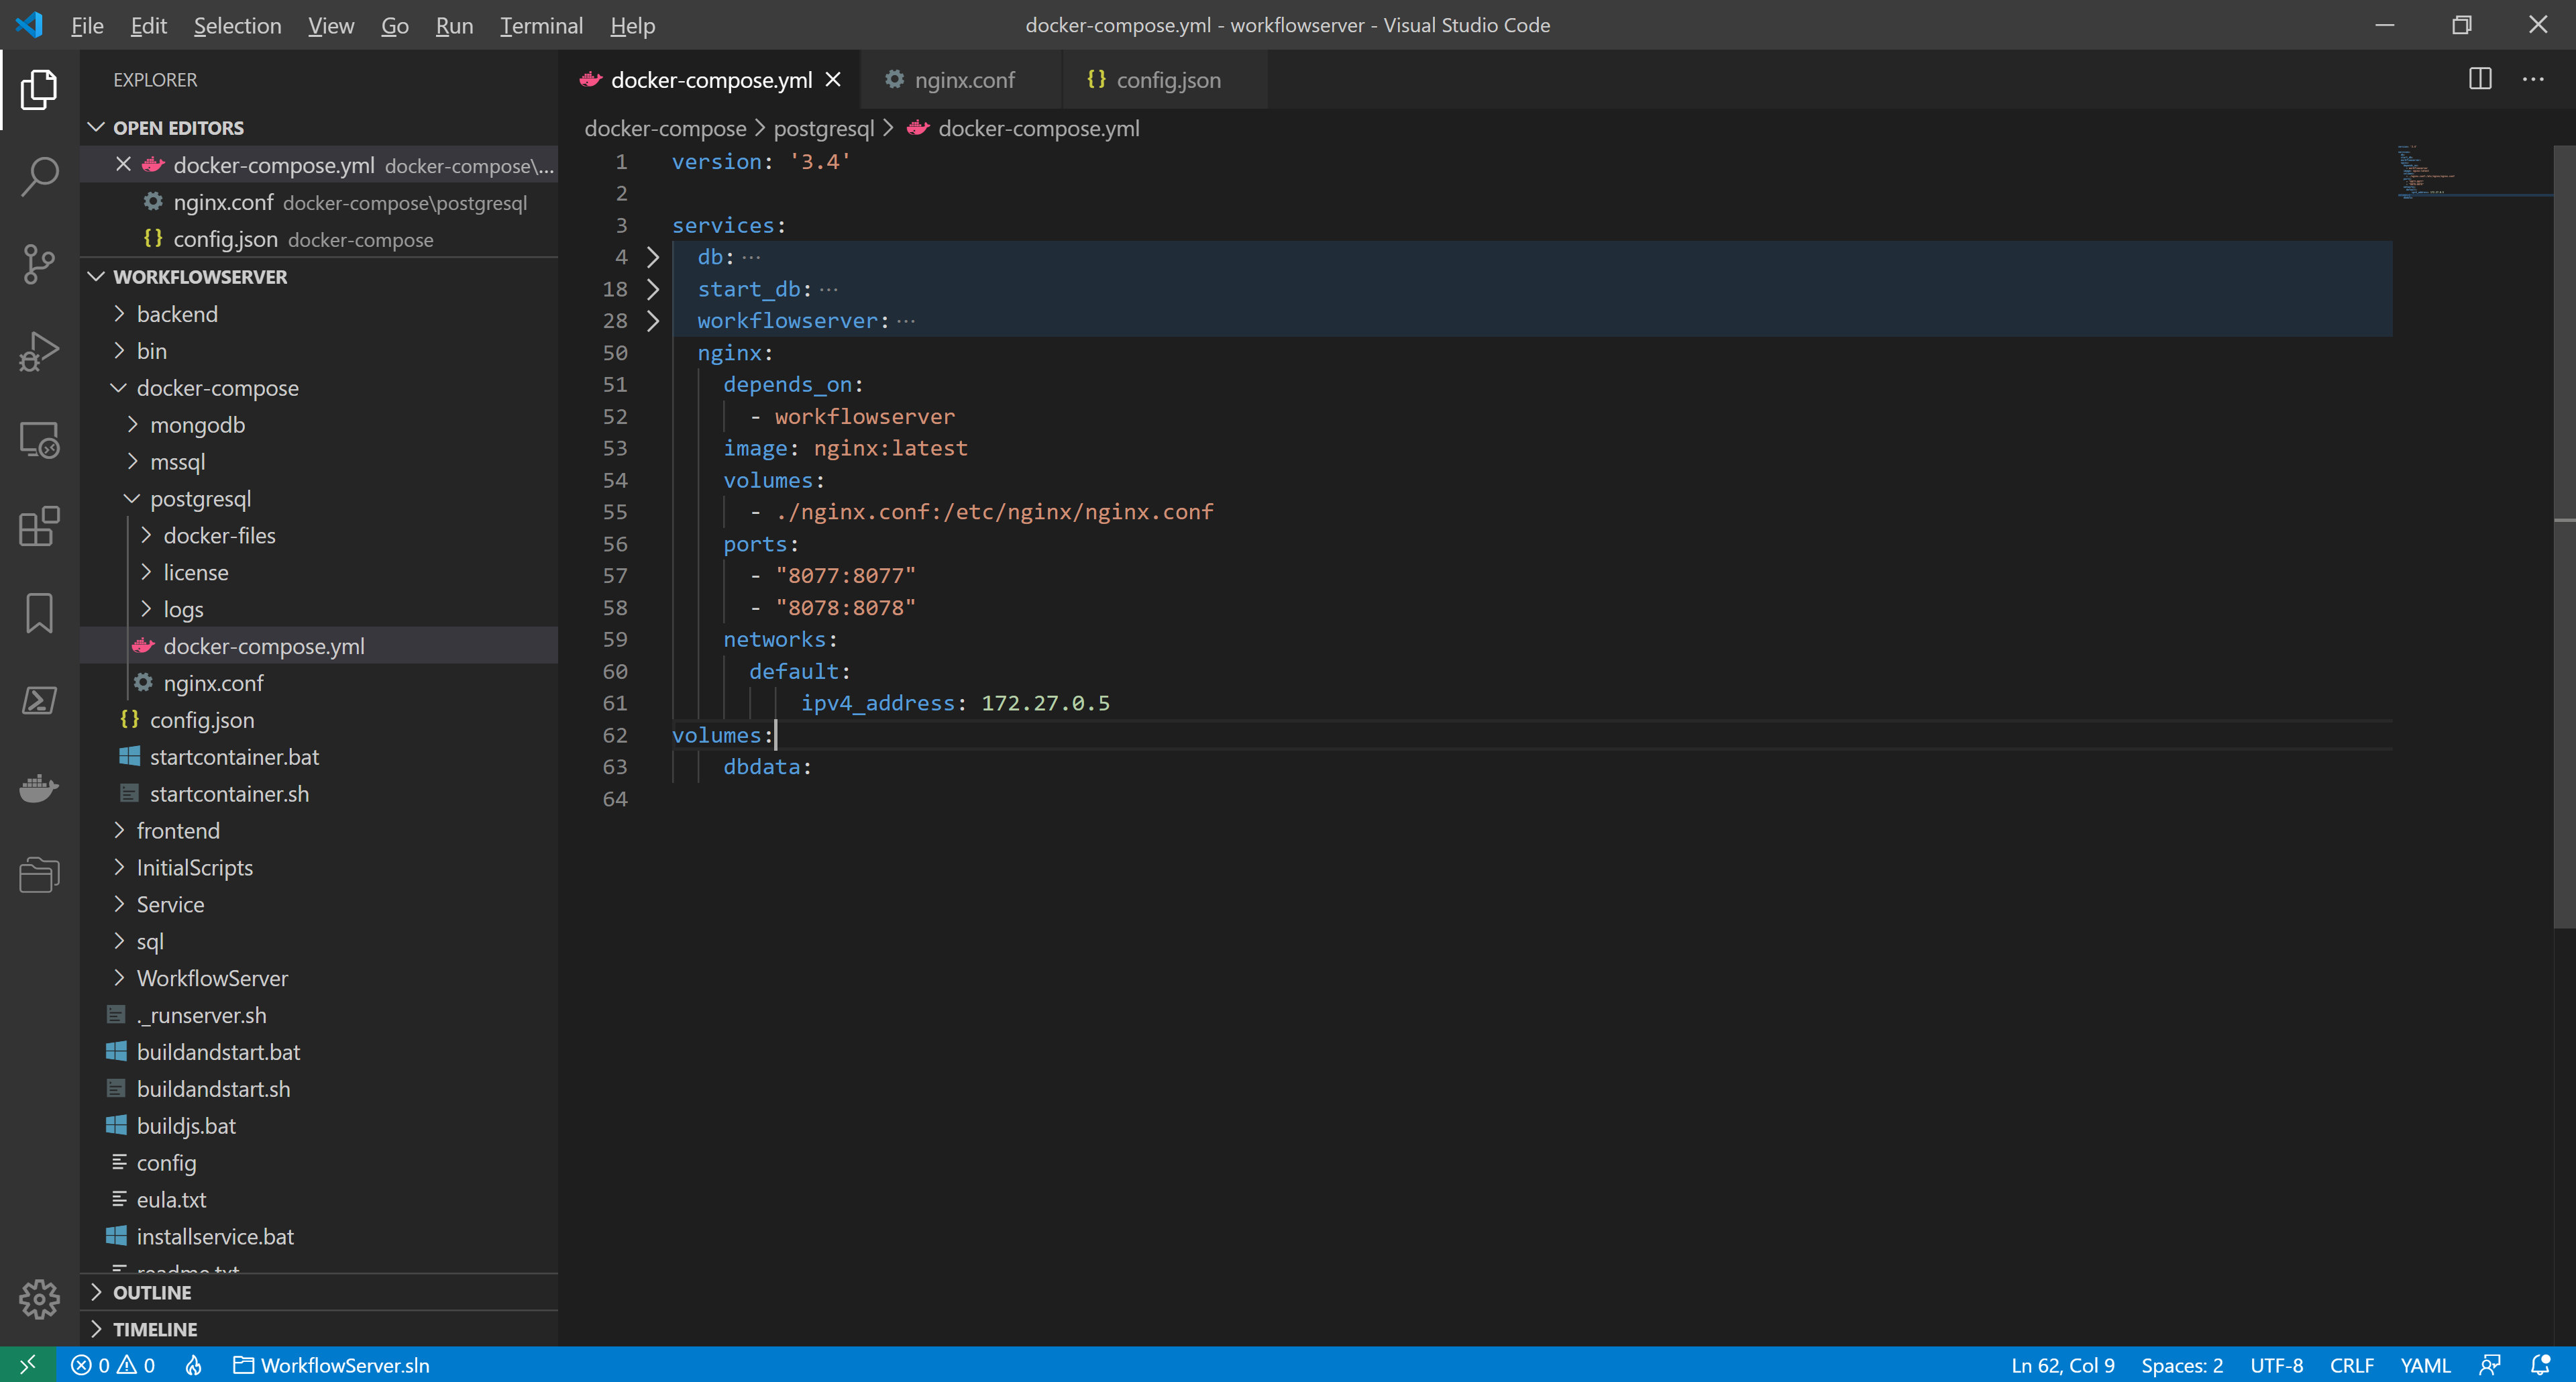
To add the nginx server IP-address to the list of
KnownProxies, we add the following line in docker-compose.yml in the environment node of the workflowserver:ProxySettings__KnownProxies__0: 172.27.0.5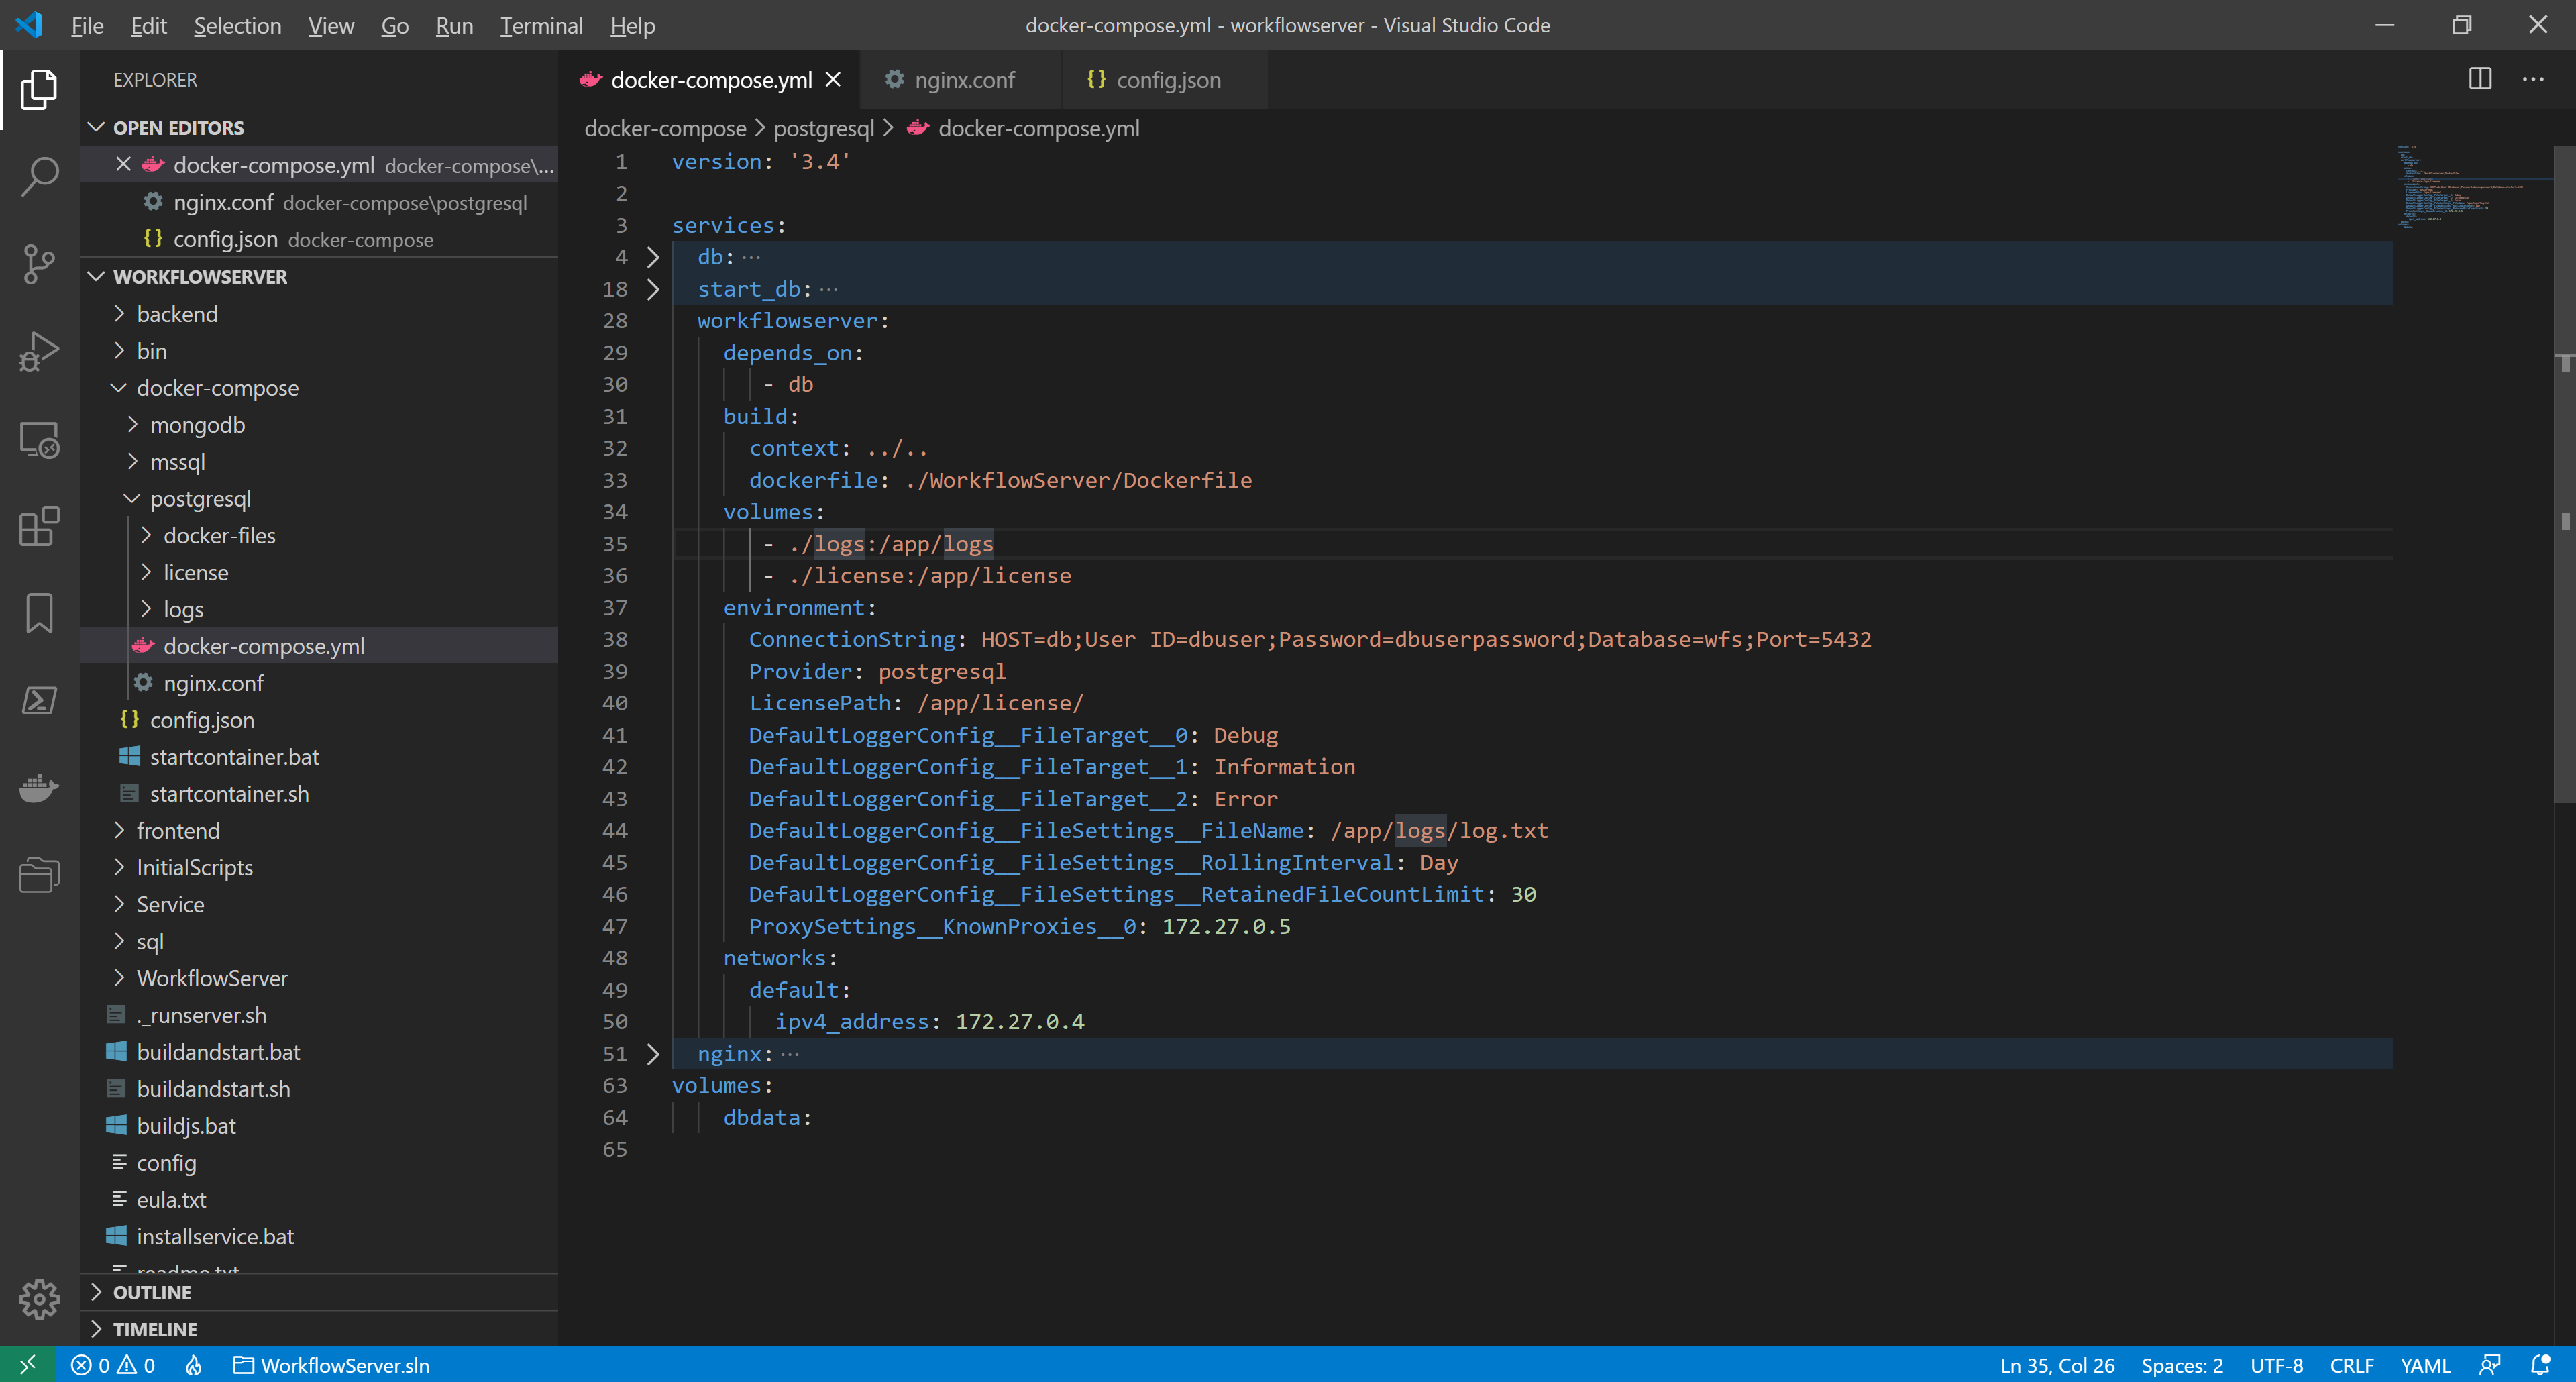
docker-compose.yml is ready, the full listing is as follows:
version: '3.4'

services:
  db:
     image: postgres:alpine
     environment:
       POSTGRES_DB: wfs
       POSTGRES_USER: dbuser
       POSTGRES_PASSWORD: dbuserpassword
     volumes:
       - dbdata:/var/lib/postgresql/data
     restart: always
     ports:
       - "5432:5432"
     networks:
       default:
         ipv4_address: 172.27.0.2
  start_db:
    image: jbergknoff/postgresql-client
    depends_on:
       - db
    volumes:
       - ./docker-files:/home/.docker
    entrypoint: /home/.docker/wait-for-db.sh db dbuser dbuserpassword wfs
    networks:
      default:
        ipv4_address: 172.27.0.3
  workflowserver:
    depends_on:
       - db
    build:
      context: ../..
      dockerfile: ./WorkflowServer/Dockerfile
    volumes:
       - ./logs:/app/wfs/logs
       - ./license:/app/wfs/license
    environment:
      ConnectionString: HOST=db;User ID=dbuser;Password=dbuserpassword;Database=wfs;Port=5432
      Provider: postgresql
      LicensePath: /app/wfs/license/
      DefaultLoggerConfig__FileTarget__0: Debug
      DefaultLoggerConfig__FileTarget__1: Information
      DefaultLoggerConfig__FileTarget__2: Error
      DefaultLoggerConfig__FileSettings__FileName: /app/wfs/logs/log.txt
      DefaultLoggerConfig__FileSettings__RollingInterval: Day
      DefaultLoggerConfig__FileSettings__RetainedFileCountLimit: 30
      ProxySettings__KnownProxies__0: 172.27.0.5
    networks:
      default:
        ipv4_address: 172.27.0.4
  nginx:
    depends_on:
      - workflowserver
    image: nginx:latest
    volumes:
      - ./nginx.conf:/etc/nginx/nginx.conf
    ports:
      - "8077:8077"
      - "8078:8078"
    networks:
      default:
          ipv4_address: 172.27.0.5
volumes:
dbdata:Now, we run the containers using any of the scripts: startcontainer.bat or startcontainer.sh.
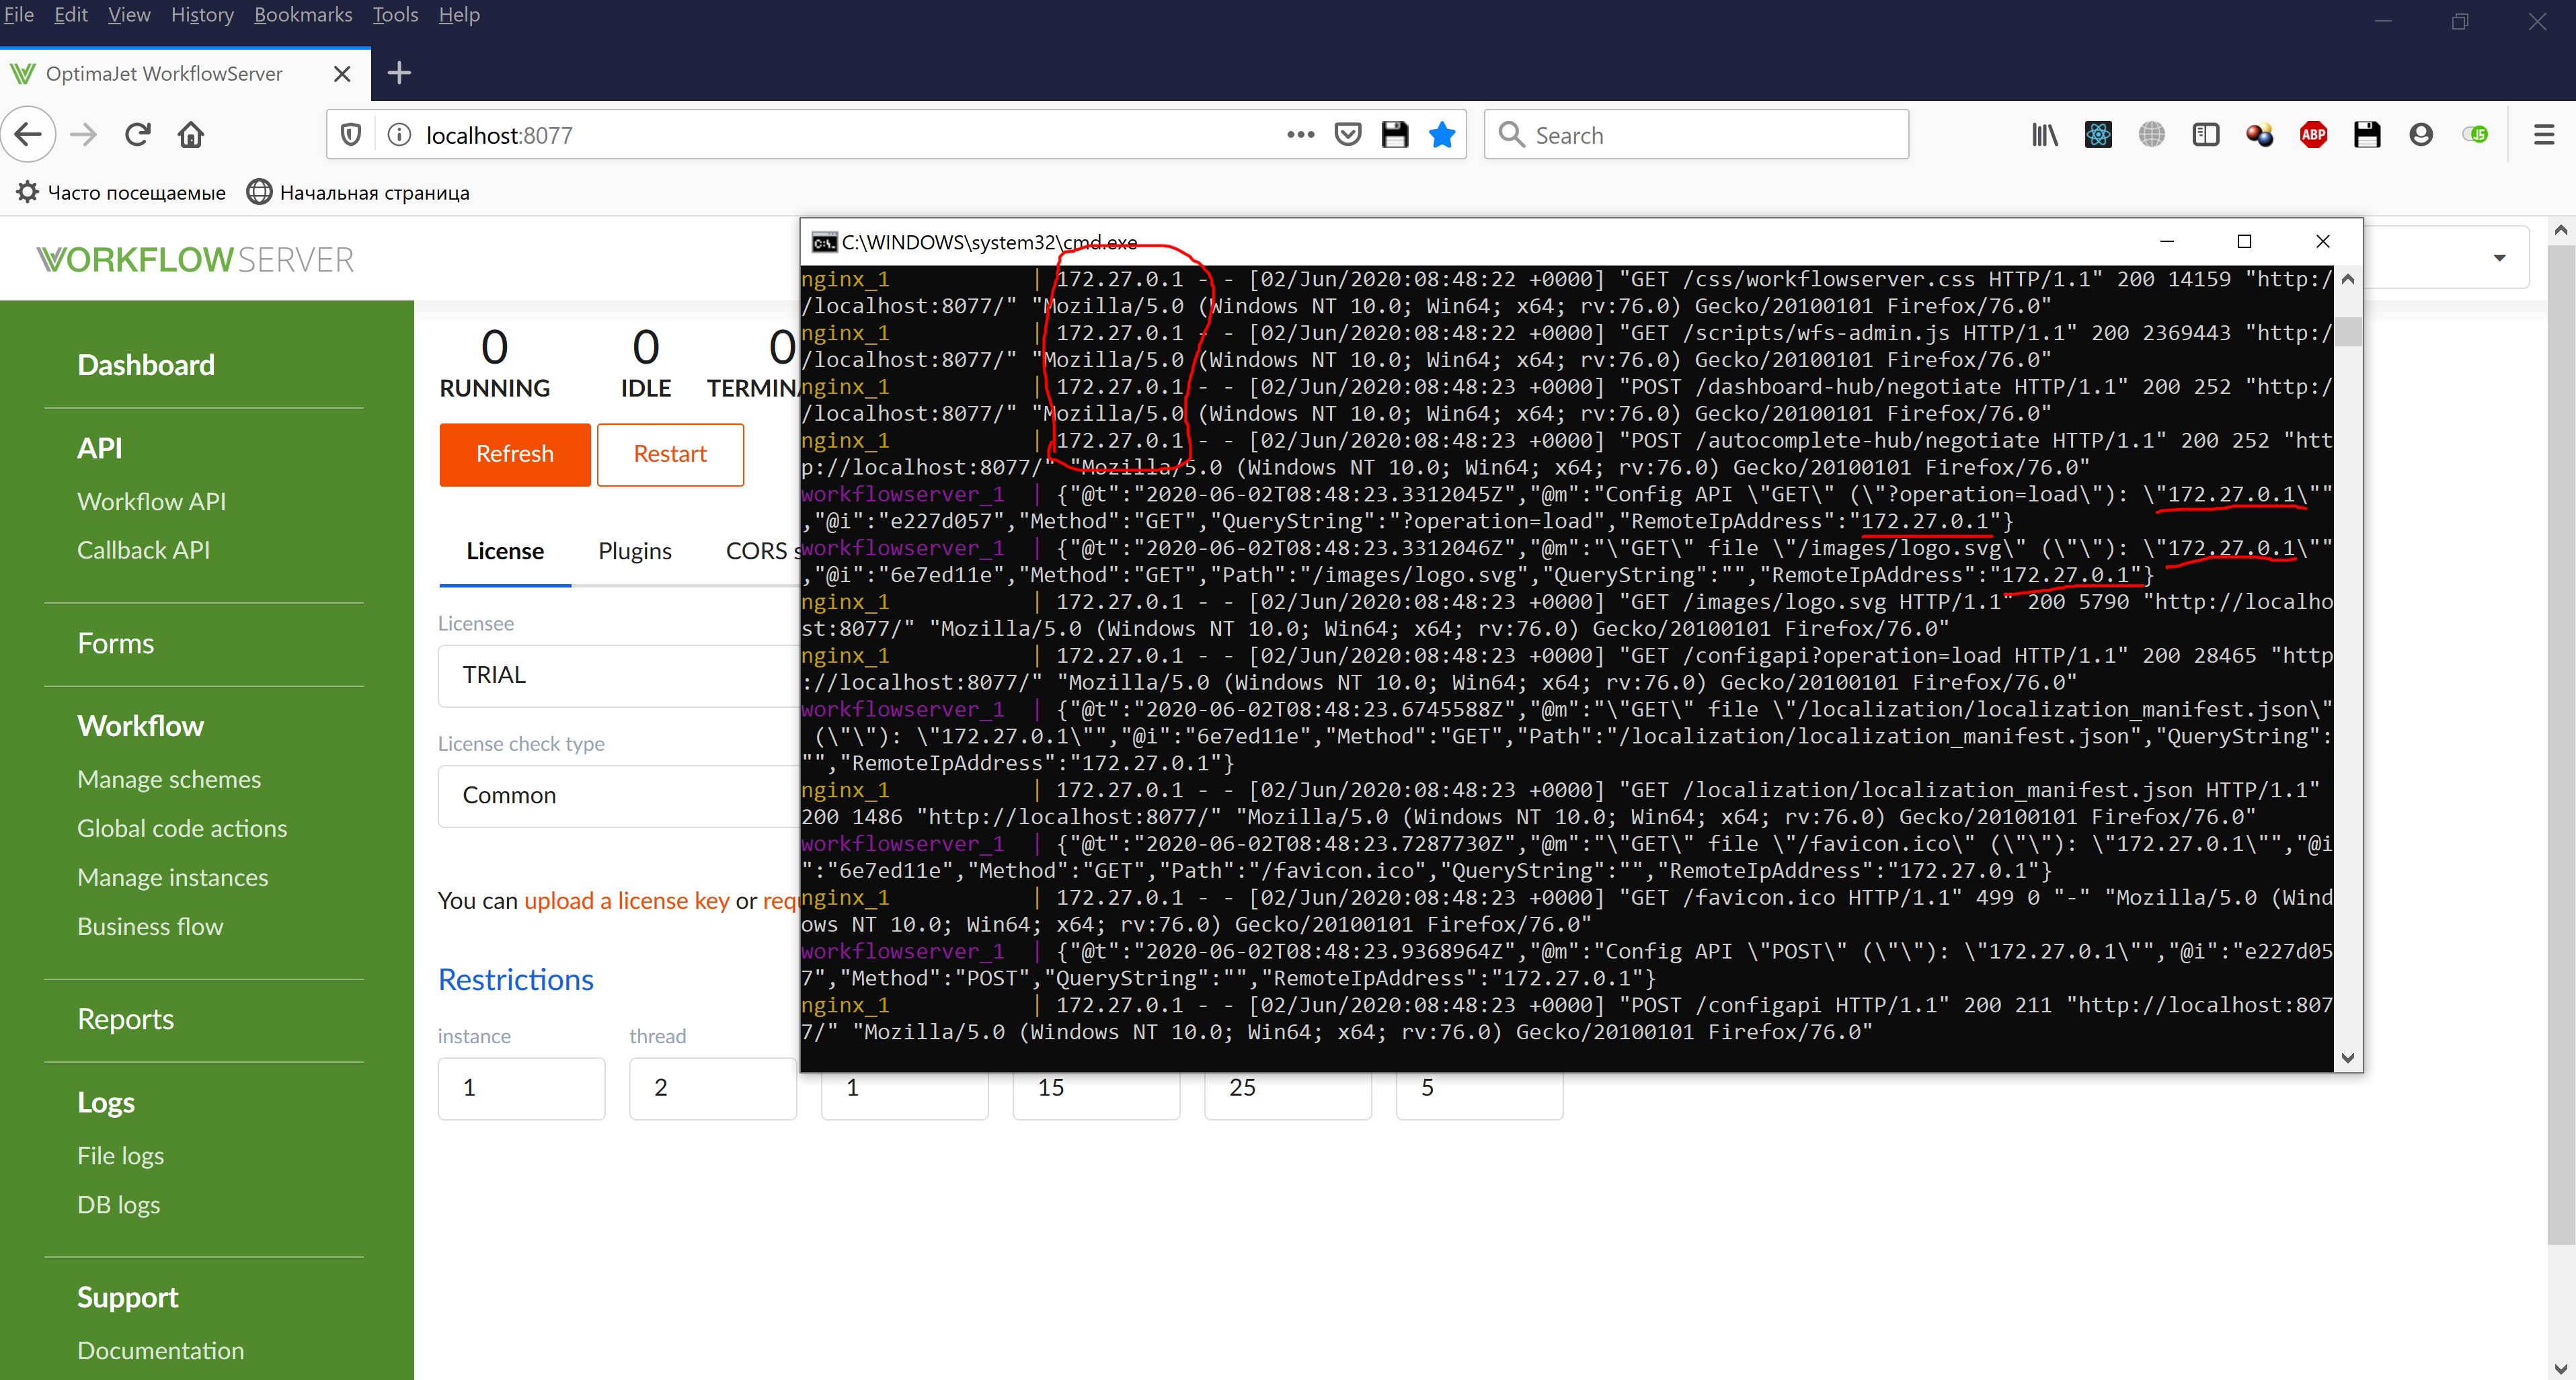
As seen in the logs, queries come from 172.27.0.1 (the client IP-address) to nginx_1 (the reverse-proxy server) and successfully redirected to workflowserver_1, where Workflow Server is running. In turn, Workflow Server correctly defines the RemoteIPAddress of the client as 172.27.0.1.