Workflow Server Security Settings
General information
When talking about the Workflow Server security system, we indicate the following three components:
- access to the Workflow API. It is considered separately.
- access to the admin panel.
- access to the forms.
The settings related with security are edited in the following locations:
- in the Dashboard page - in the Security tab.
- in the Users section.
- in each of the forms, separately.
Restricting Access to Admin Panel
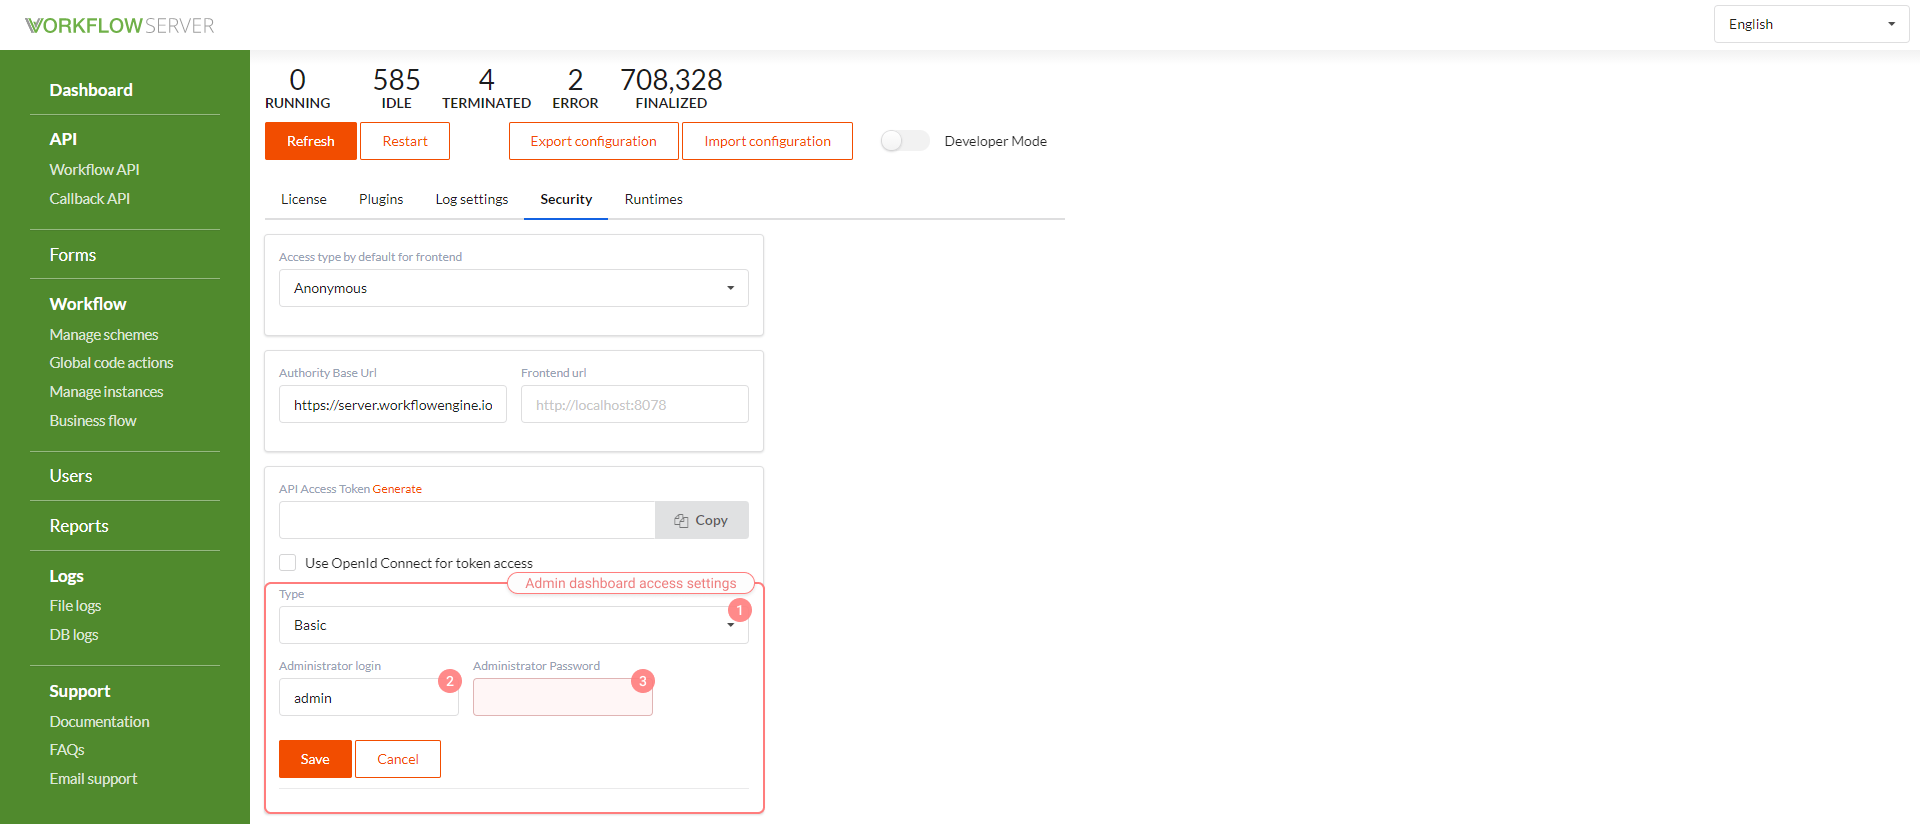
The types of access to the admin panel.
- None - the access is not checked.
- Basic - by login and password.
- OpenId Connect - by login and password, together with the built-in Identity Server.
Administrator login - only one person has access to the admin panel - a special user.
Administrator password.
Working with Users
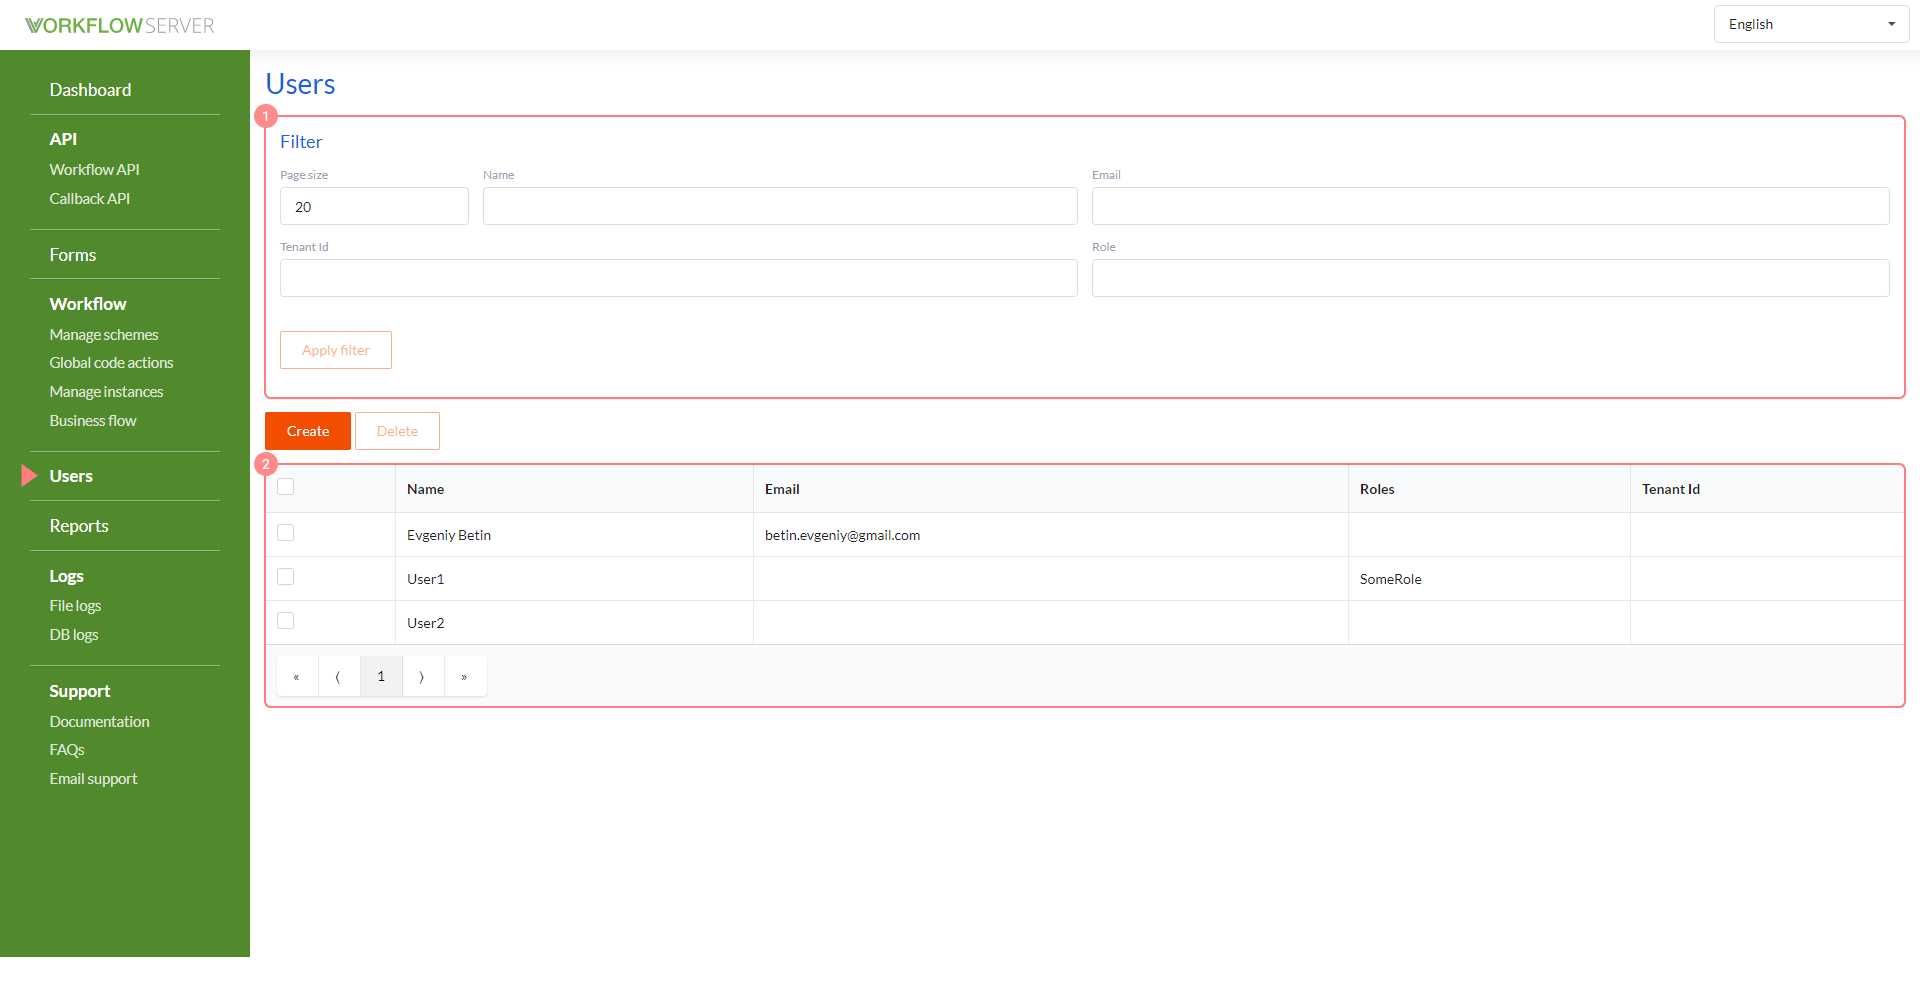
The User interface is quite simple.
1 - the search filter. 2 - the list of Users, double click opens the User card.
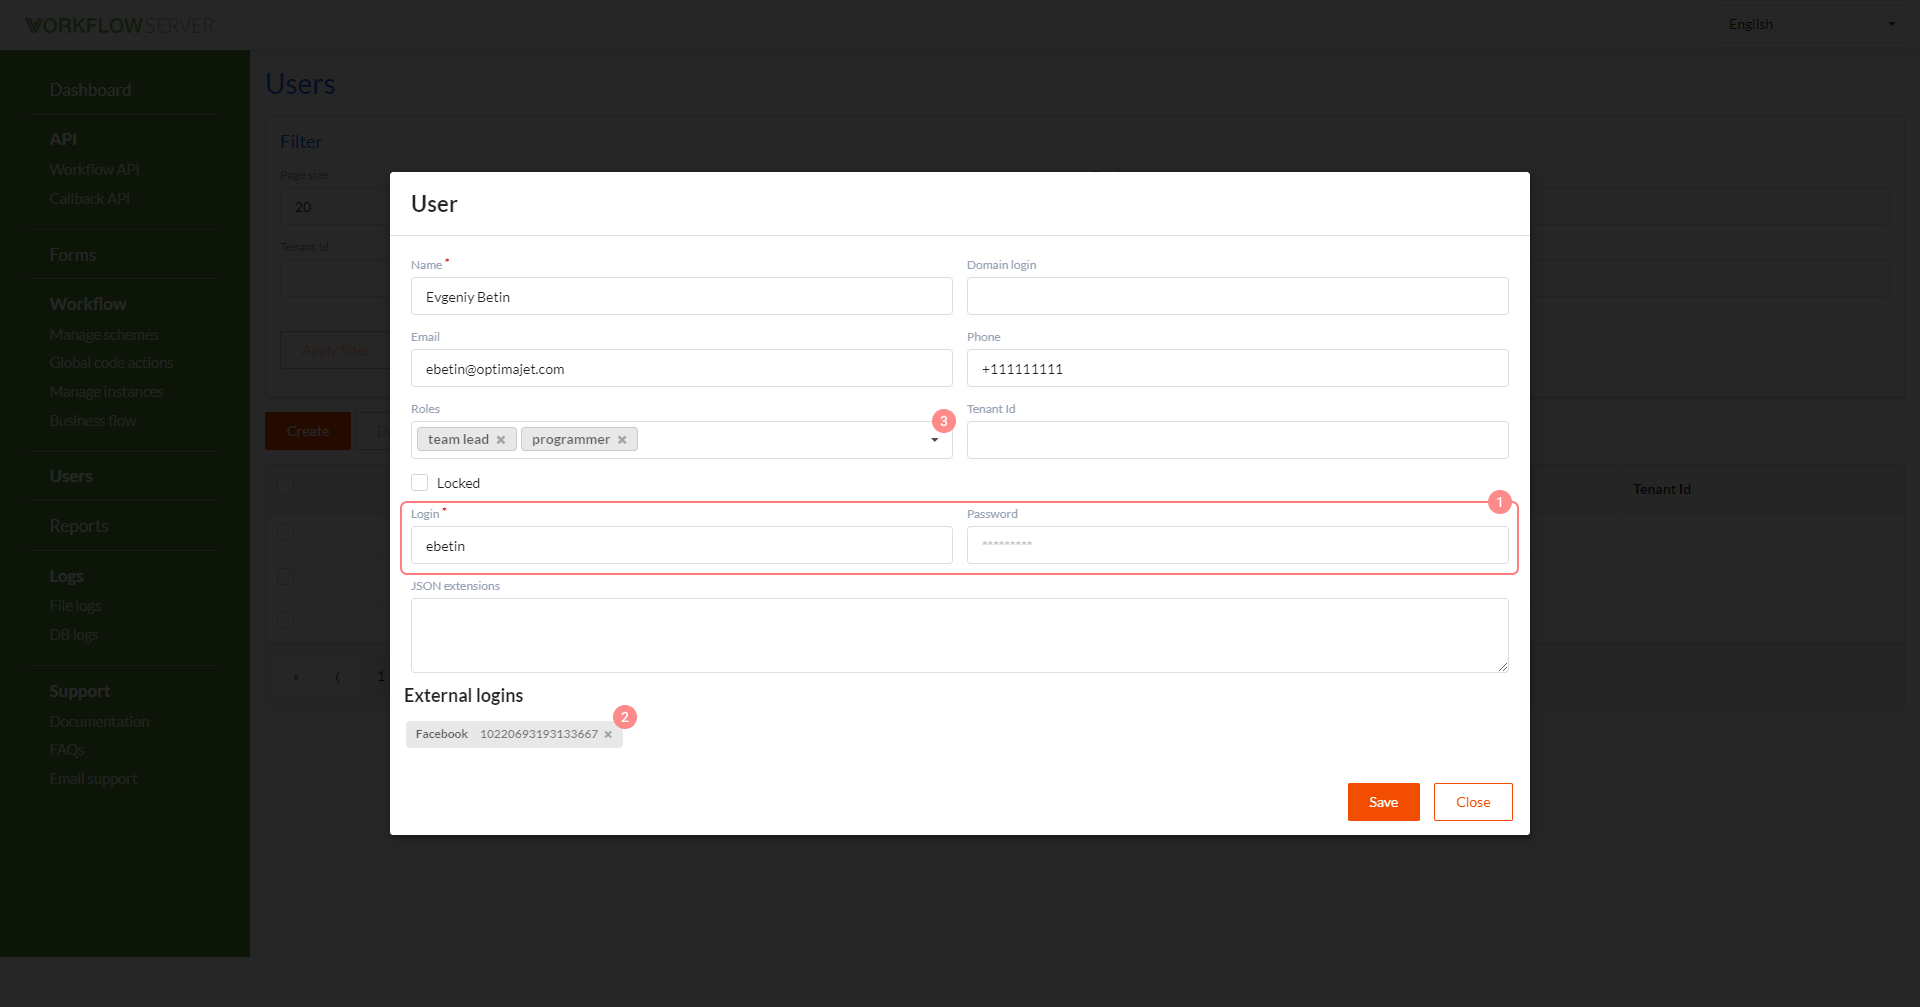
The user editing interface is also very simple.
- If you want the user to log in by login and password, which are stored (password as a hash) in the database, then you can specify them in the user card.
- External user logins are displayed here if the user logged in through OpenId (for example, through Facebook, Google, Okta etc.).
- Roles can be assigned to a User, and then, checked in your workflow.
There are four main ways to create Users in the Workflow Server:
- Creating and editing Users through the admin panel interface.
- Creating and editing Users through the Workflow API.
- Importing Users via LDAP.
- Automatic User creation when logging in through external sources that support OpenId (Facebook, Google, Okta etc.).
User import settings via LDAP are in the Dashboard page - in the Security tab.
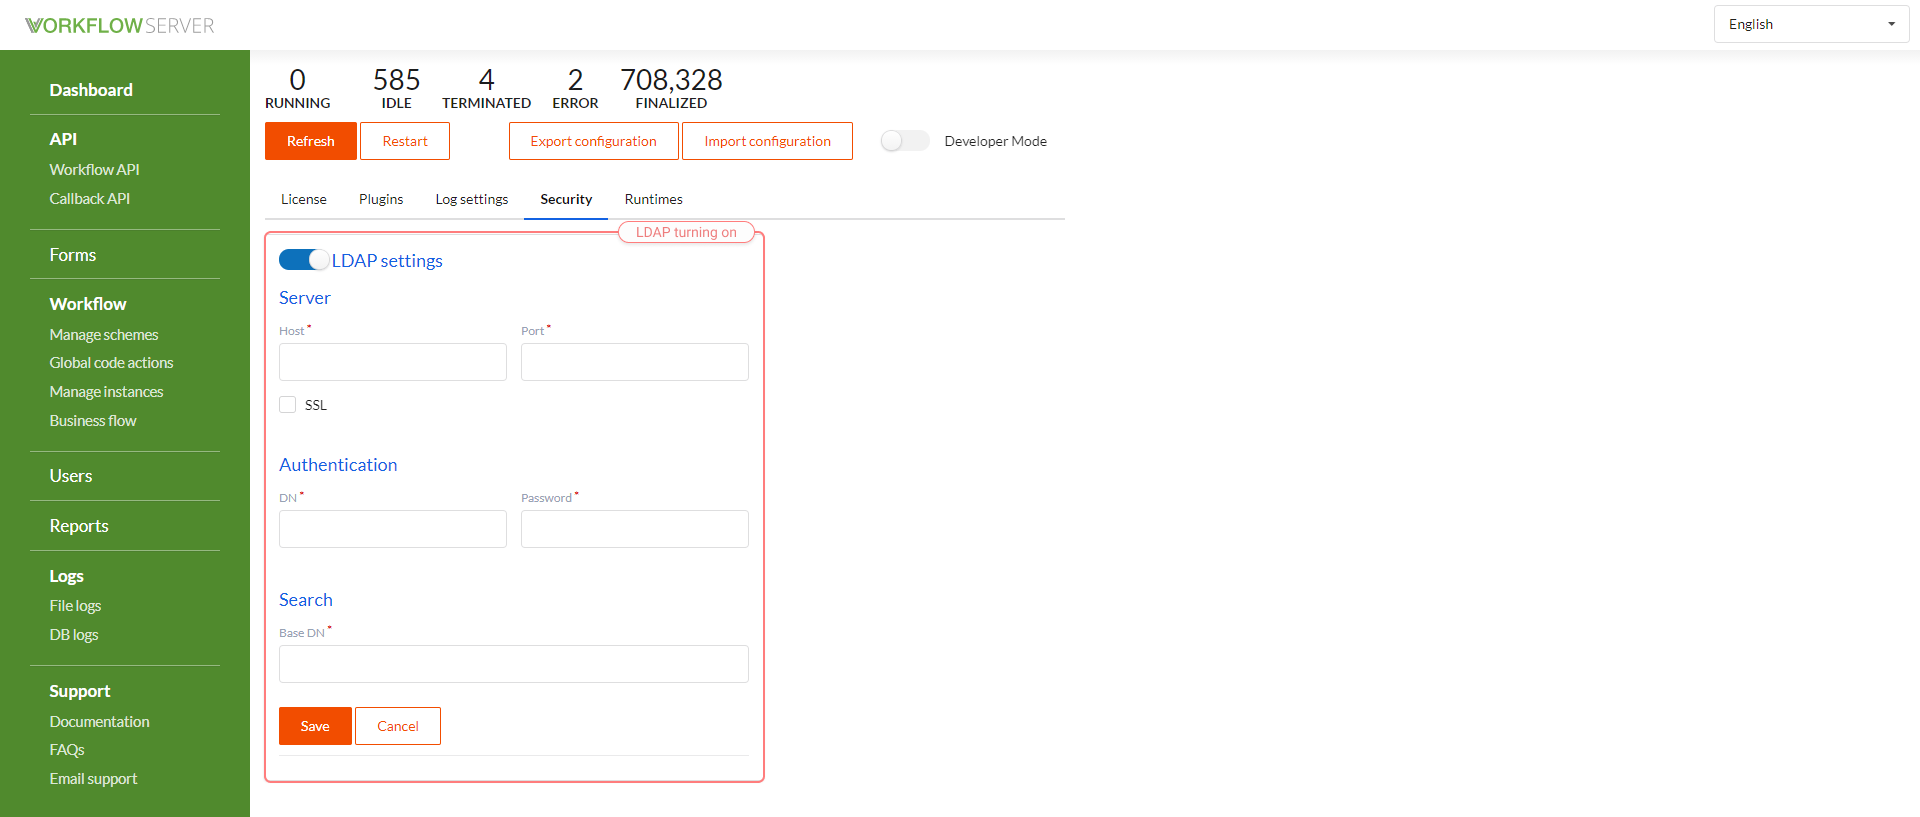
If you configure the connection to LDAP, the Import from AD button will appear in the User interface; clicking on it, you can import Users. In this case, User groups are registered as the roles of these Users.
info
To encrypt the LDAP password in the database, set the properties in the config.json file:
{
  //...
  "LdapEncryptPassword": true,
  "Salt": "someSecureSaltForEncryption",
  //...
}
Then restart the WorkflowServer and save the LDAP settings through the admin panel. This will update the LDAP settings in your database.
Authorization Settings for Forms
For each form, 4 access parameters can be set.
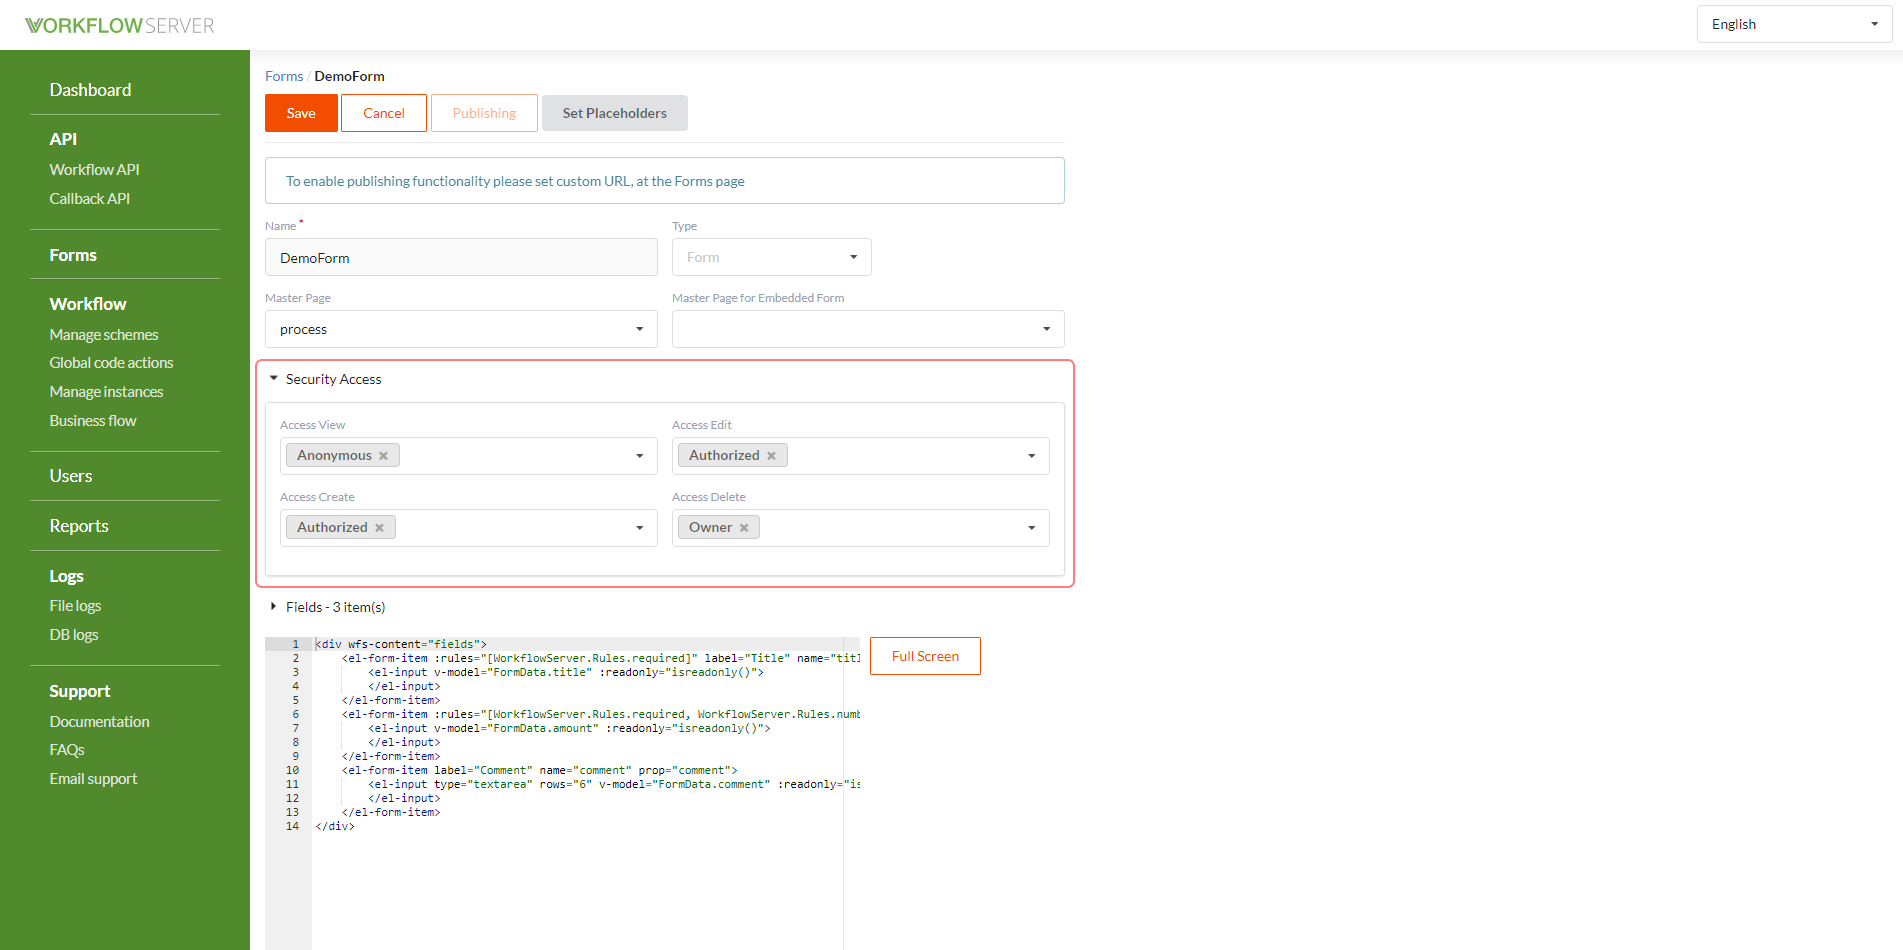
- who can create a process/document, in the Workflow Server document = process, from the given form.
- who can view the process/document content through the form.
- who can edit the values of the process/document parameters through the form.
- who can delete the process/document.
Available options:
- Anonymous - anyone, even an unauthorized User.
- Authorized - any authorized User.
- Owner - the one who created the process/document.
If the access type value is not specified, then the default value is taken, which can be changed in the Dashboard page - in the Security tab.
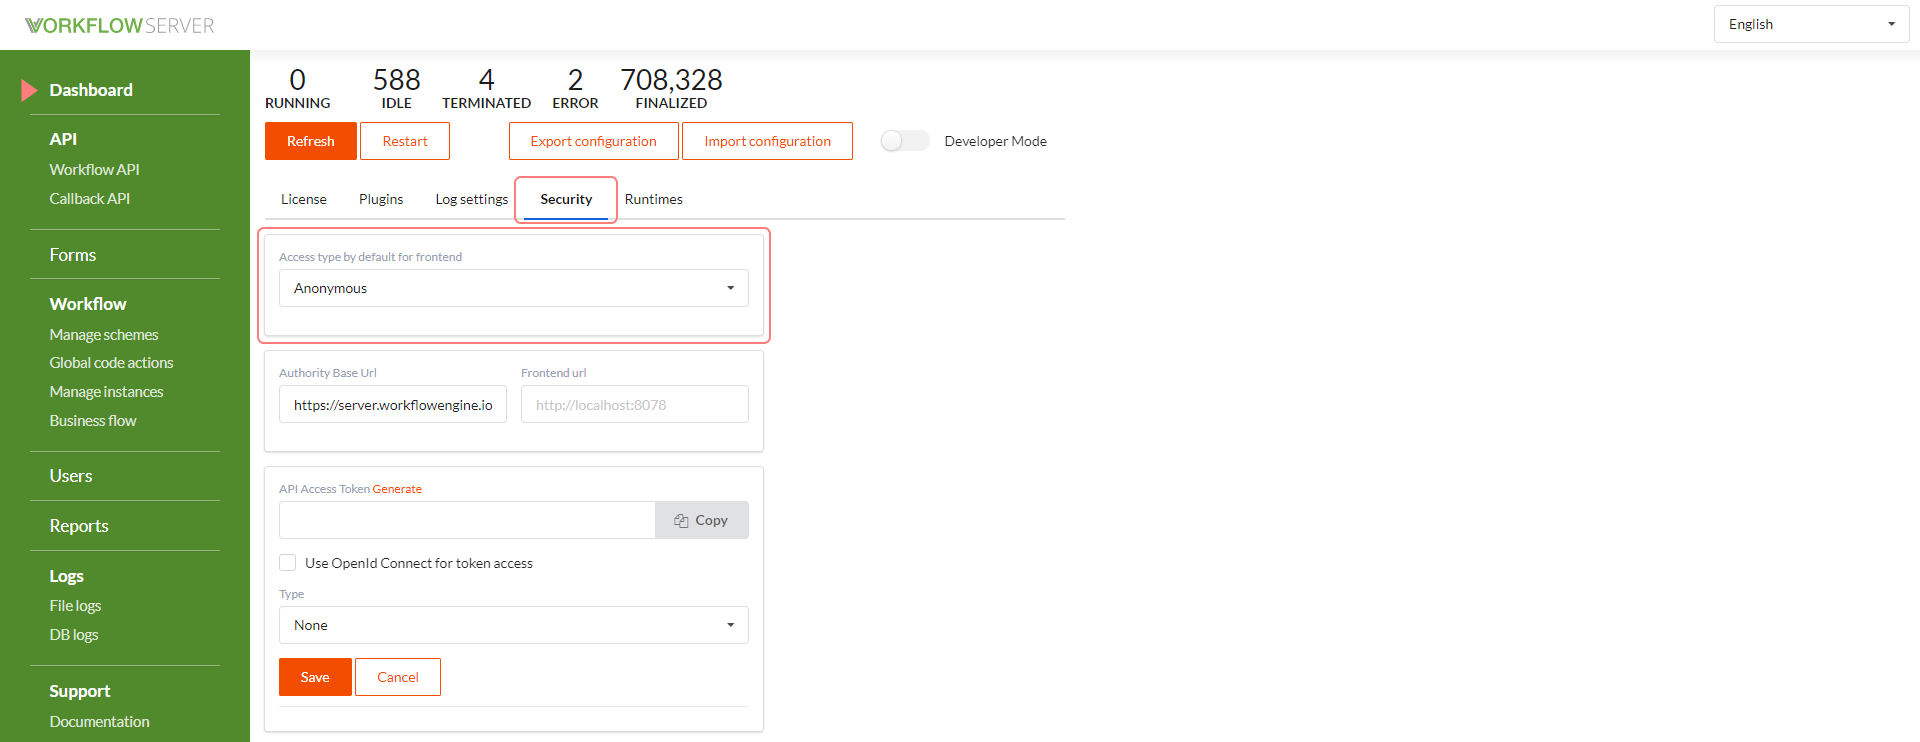
There are two possible options. By default, access to the forms is granted even for unauthorized Users, or exceptionally for authorized Users.
Authentication Settings
To authenticate Users, Identity Server 4, running inside the Workflow Server is used. Authentication can be performed both by login and password and through external sources that support OpenId (Facebook, Google, Okta etc.).
To ensure correct authentication settings, it is very important to fill in URLs for redirects. The settings are in the Dashboard page - in the Security tab.
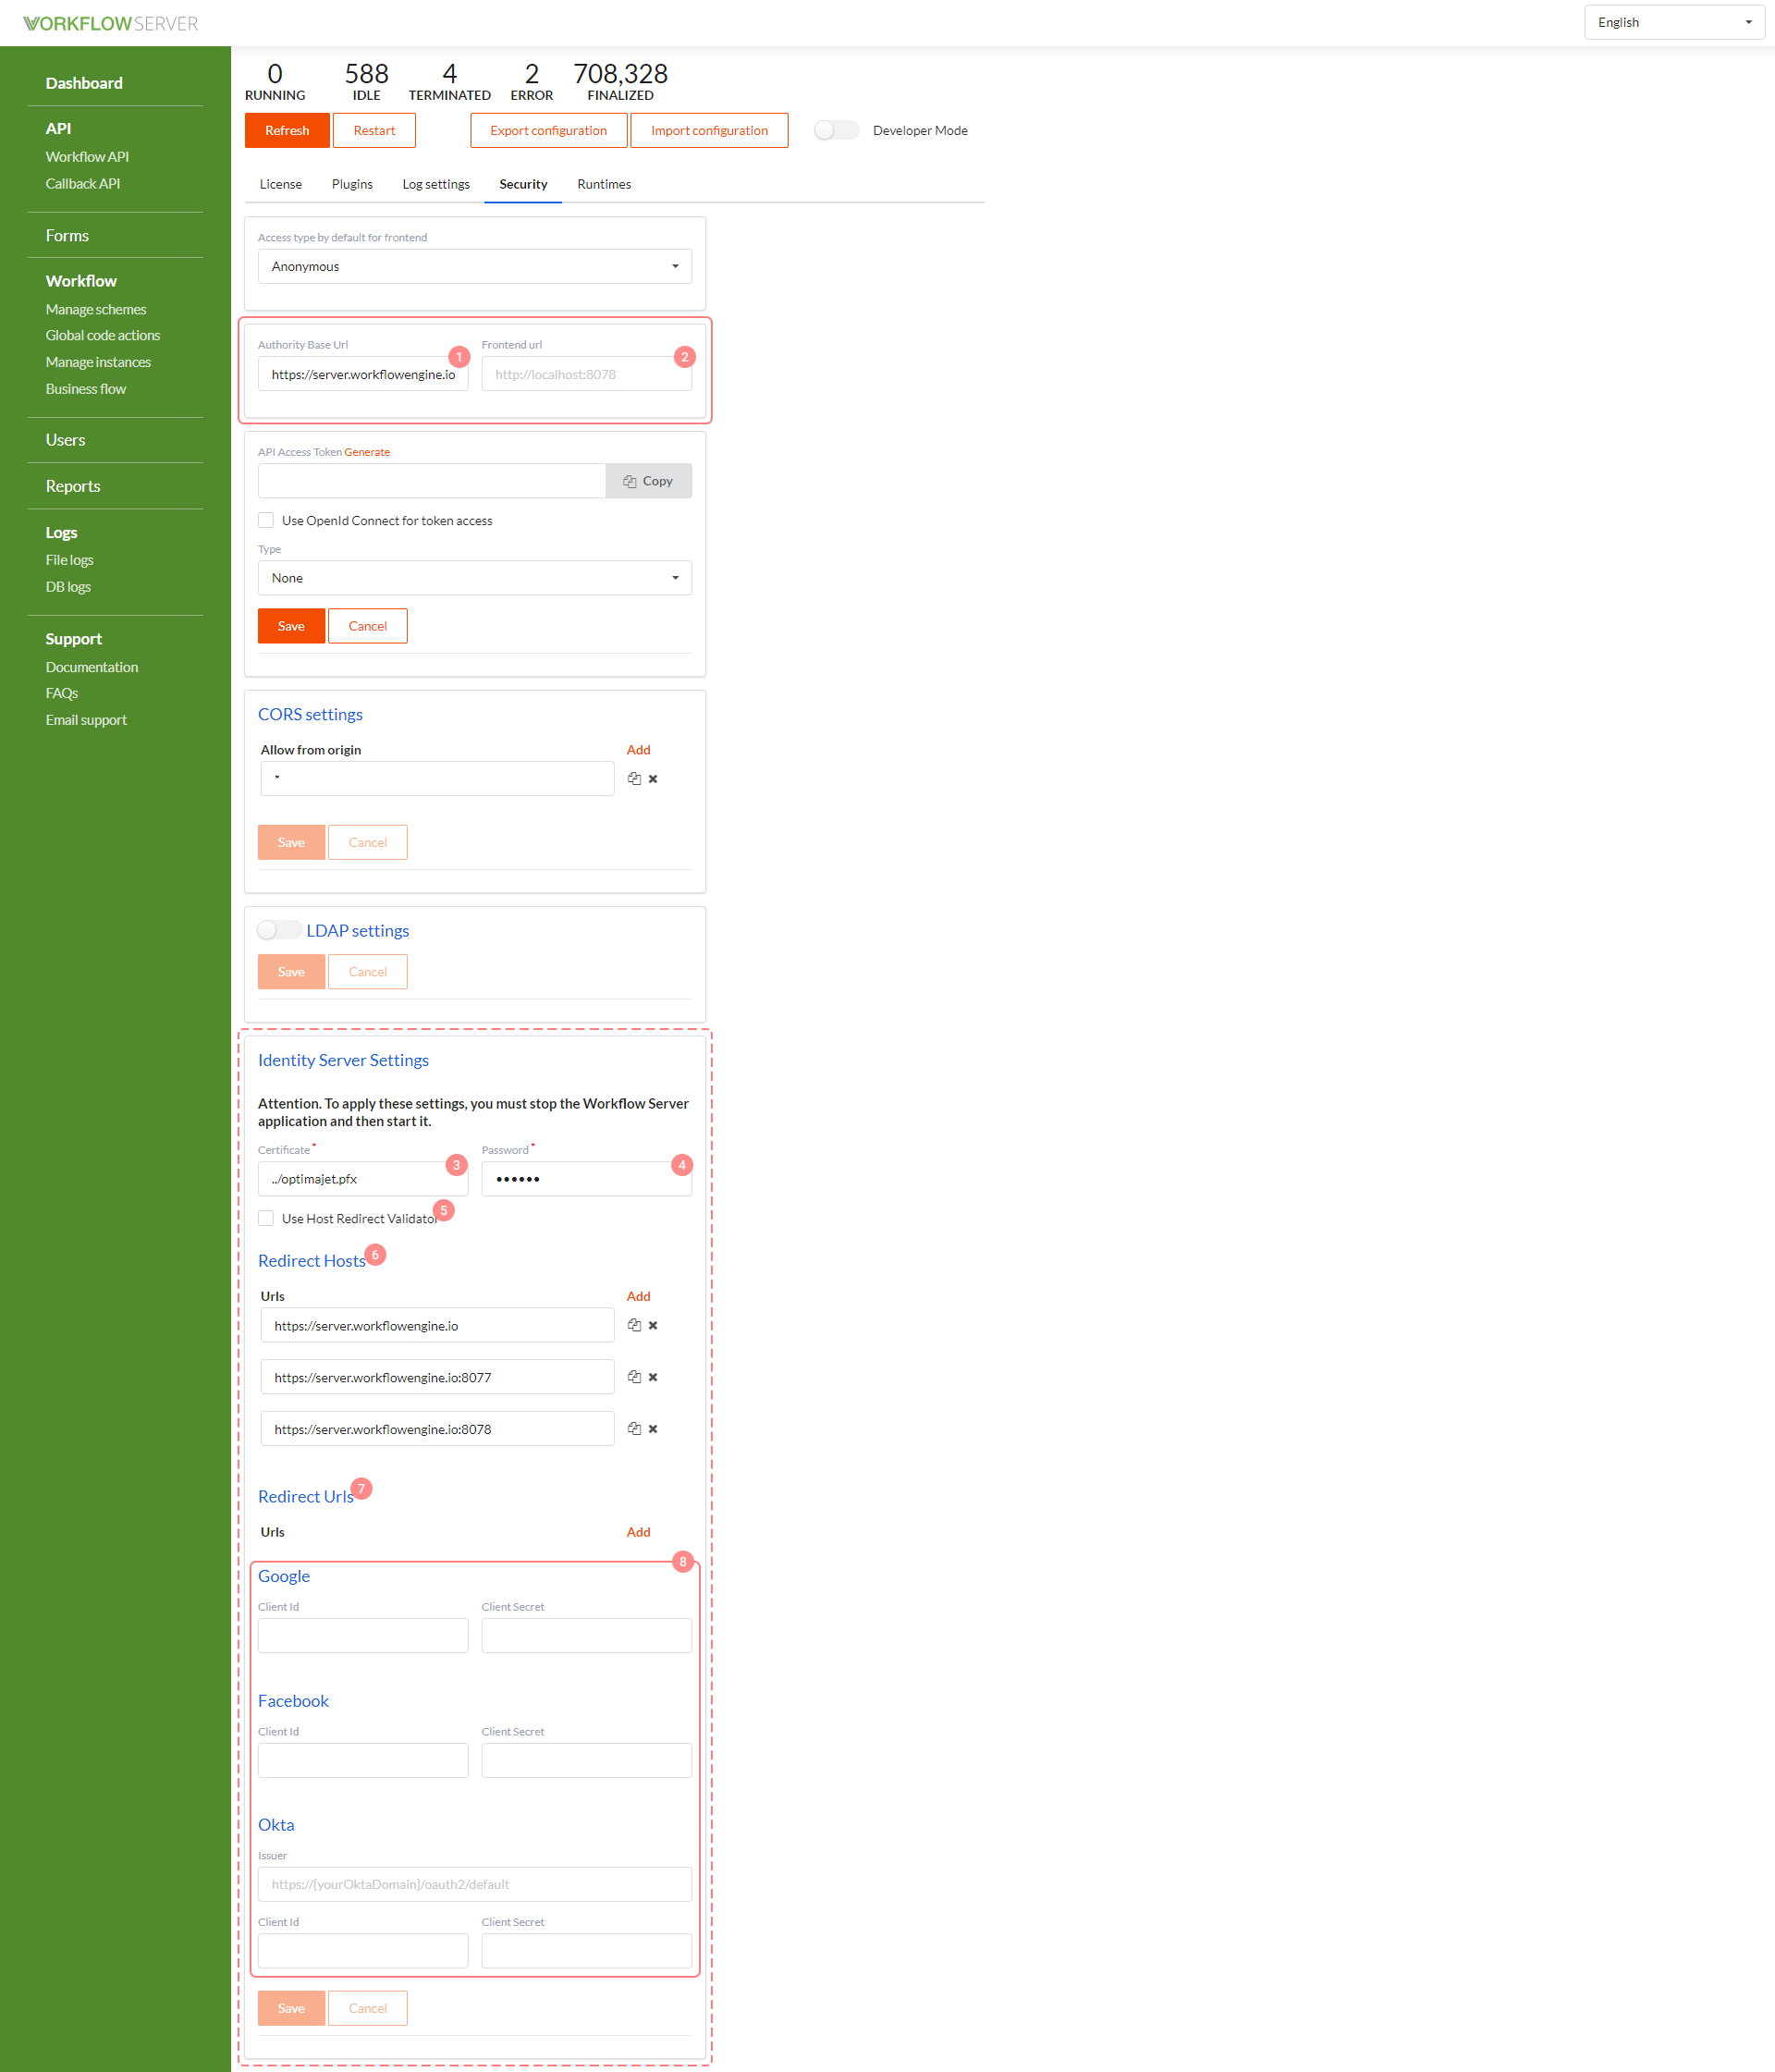
- Authority Base Url - the identity server address, usually matches URL, where the Workflow Server is available. If not specified, the hostname of the local computer is used.
- Frontend url - the front-end address, also, a page to redirect after logging in through an external provider, if the return url parameter was not passed. Automatically added to the Allow Redirects list in the identity server. If the server is running in the Admin mode, this address will be used in the Forms section.
- Certificate file - the path to the certificate for signing authorization tokens. If there is no certificate, it will be generated automatically, but that is not recommended.
- Certificate password - the certificate password for signing authorization tokens.
Redirect check settings. When a User logs in, the first redirect is to the page with the login form (built into the Workflow Server, or external), and then, the back redirect. It is necessary to inform the identity server(s) about the addresses it can receive requests from and the addresses it can redirect to after logout. Therefore, to ensure correct authentication in forms, Redirect hosts and Redirect urls should be specified.
- Use host redirect validation - if active, then, to check the redirect, the scheme, host and port addresses specified in the Redirect Hosts array are used instead of the whole address.
- Redirect hosts - a list of the hosts allowed for redirects.
- Redirect urls - a list of the URLs allowed for redirects. By default, the values from the Frontend url field are used.
If you use the forms interface built into the Workflow Server, then its host must be registered in the Redirect hosts array, while Redirect urls are optional. But if you embed forms into your site, then the host of this site must be included in the Redirect hosts list, and the url of the page where you embed the form should be in the Redirect urls list. The reason is that the forms built into the Workflow Server have special pages formssignincallback.html and formssignoutcallback.html that manage redirects, and redirects are performed to them, not to a custom page. Therefore, if you use the forms built into the Workflow Server, you do not need to write the Redirect url for each page. However, it is possible to set the Use host redirect validation checkbox; then, it is enough to specify Redirect host only, even for embedded forms.
- Facebook - ClientId and ClientSecret to login through Facebook.
- Google - ClientId and ClientSecret to login through Google.
- Okta - Issuer, ClientId and ClientSecret to login through Okta.
caution
If you change any of these settings, the server instance must be physically restarted. That is, the Workflow Server application should be stopped and then restarted.
Disabling Identity Server
By default, the Identity Server is launched when a Workflow Server instance is started within that instance. However, for some instances, the Identity Server can be disabled. To do this, add the following to the config file:
{
  "DisableIdentityServer": true
}
CORS (Cross-Origin Resource Sharing)
Used to provide a web page with access to resources from another domain.
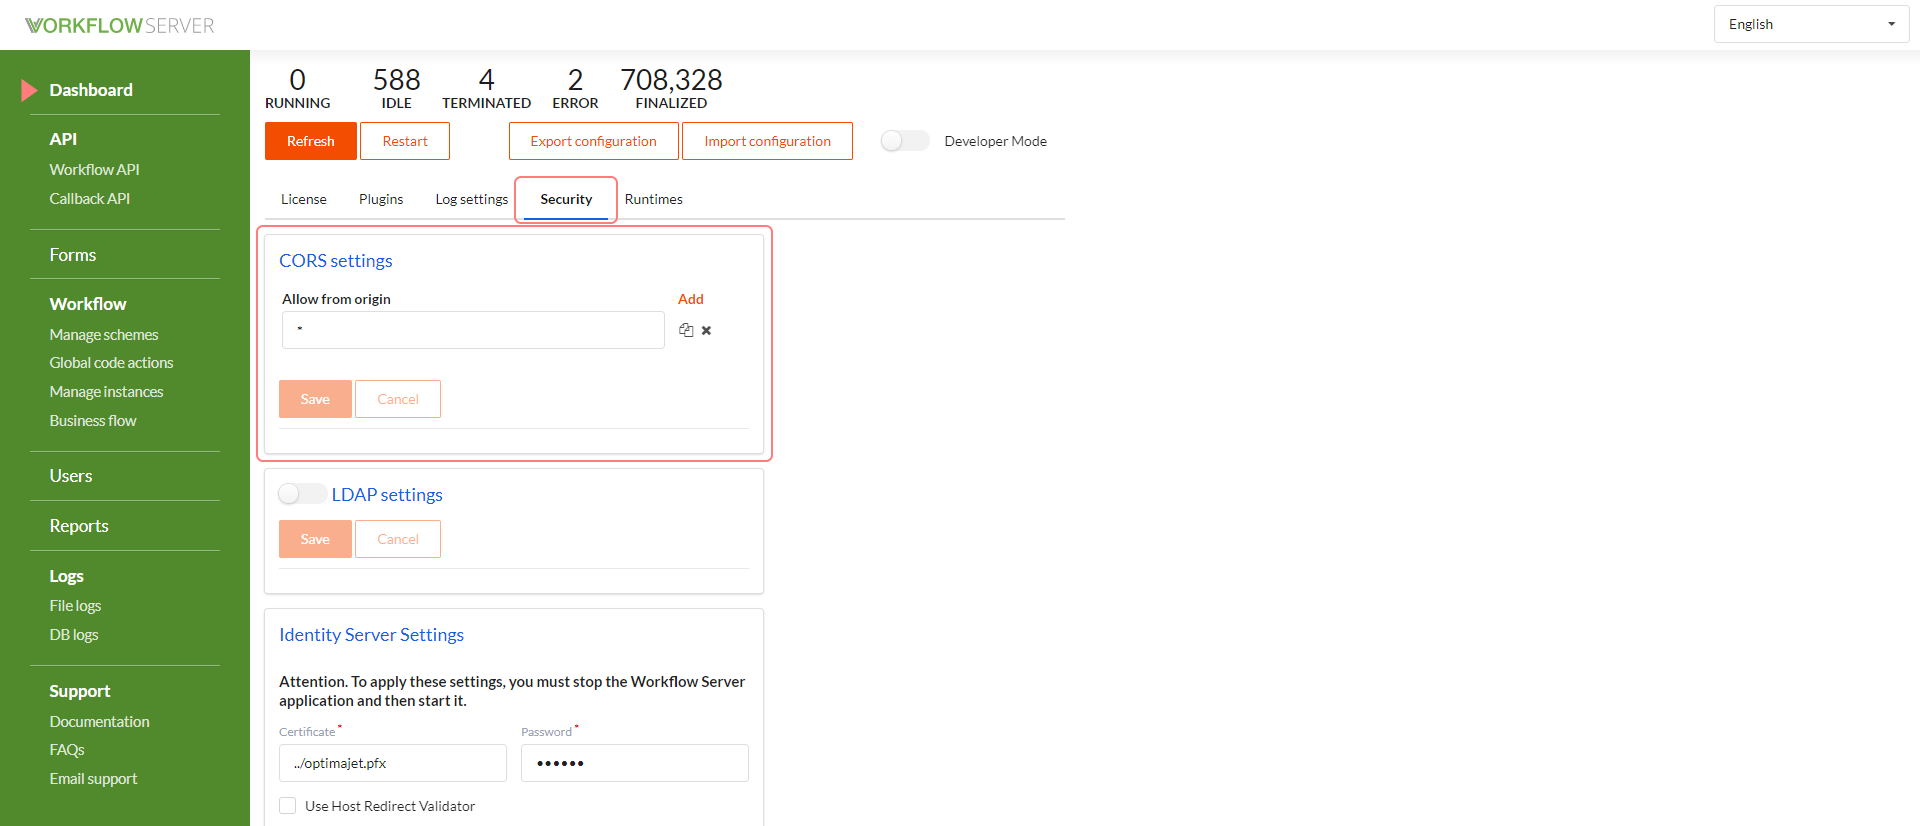
Adjusted parameters:
- Allow from origin - addresses to send requests, with allowed access to the Workflow Server, for example, to the Workflow API.
Custom OpenId Connect Providers
Custom OpenId Connect providers are connected using the WorkflowServerRuntime.RegisterOpenIdConnectProviders method.
That is, you can only add them by customizing the Workflow Server code.
public void RegisterOpenIdConnectProviders(params Action<AuthenticationBuilder>[] registerActions)
Through WorkflowServerInitializer:
(bool success, IWebHost host) = initializer.BuildWebHost(workflowServer =>
{
    ...
    // Register your own Identity Providers:
    workflowServer.RegisterOpenIdConnectProviders(authBuilder =>
    {
        authBuilder.AddOpenIdConnect("Authentication scheme name", "Display name", options =>
        {
            // ... adjust Id, key, etc
            options.SignInScheme = IdentityServer4.IdentityServerConstants.ExternalCookieAuthenticationScheme;
        });
    });
});
You can use your own implementations of IExternalLogonService and IExternalCredentialsProcessor after registering
them via the WorkflowServerRuntime methods:
public WorkflowServerRuntime SetExternalLogonService(IExternalLogonService externalLogonService)
public WorkflowServerRuntime SetExternalCredentialsProcessor(IExternalCredentialsProcessor externalCredentialsProcessor)