Workflow Designer: Customization
Reading time: 4 minutes
Introducing Formengine - The New Formbuilder, try for FREE formengine.io.


Reading time: 4 minutes
Feel free to download the source code. The sample based on the original ASP.NET MVC Sample - MS SQL from here. In this acticle I will change WF.Sample\Views\Designer\Index.cshtml file only.
It was always possible to customize our product designer (one of the modules could be re-defined), but it was difficult.
Starting from version 4.0 we have added an option which allows you to change standard elements of the designer. You can modify the following edit forms and activity and transition display (ActivePoint so far) in the canvas.
I am going to show you how to do it in this article.
Add forms property into initialization parameters to change standard edit forms, and specify which objects these edit changes will apply to. At the moment you can change edit forms for the following scheme objects:
Specify view function for these parameters:
function(params){
    //...
}
Input parameter (params) for activity object, for example, will look like this:
{
    data: {OriginalName: null, OriginalSchemeCode: null, LastTimeInlineName: null, FirstTimeInlineName: null, WasInlined: false, …}
    elements: (5) [{…}, {…}, {…}, {…}, {…}]
    graph: WorkflowGraph {container: "wfdesigner", designer: WorkflowDesigner, suggestionsCache: {…}, parametersCache: {…}, Settings: {…}, …}
    readonly: undefined
    saveFunc: ƒ (e)
    title: "Activity"
    type: "form"
}
The following properties are very important:
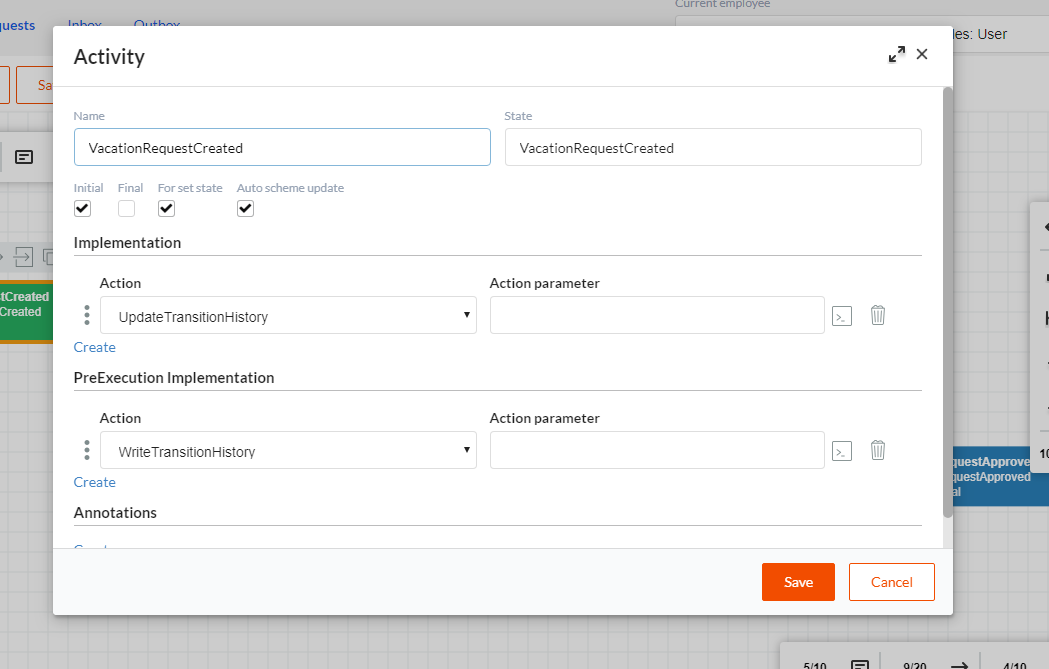
data - contains info on the current object. saveFunc - function which saves object changes in the scheme.Let's replace the activity edit form as an example. We want it to display two fields only - Name and State.
To do this, we need to create a function which will open the edit form and save changes result. In my example, I will use WorkflowDesignerForm object, it's part of WorkflowEngine and has a simple interface allowing you to create modal windows. But you can always use your own implementation.
var wfdesigner = new WorkflowDesigner({
    name: 'simpledesigner',
    apiurl: '/Designer/API',
    renderTo: 'wfdesigner',
    imagefolder: '/Images/',
    graphwidth: graphwidth,
    graphheight: graphheight,
    forms:{
        activity:  function(params){
            params.elements = [
                { name: "Name", field: "Name", type: "input" },
                { name: "State", field: "State", type: "input" }
            ];
            var form = new WorkflowDesignerForm(params);
            var saveFunc = function (data) {
                form.ClearTempField(data);
                form.parameters.saveFunc(Object.assign(params.data, data));
                return true;
            };
            form.showModal(saveFunc);
        },
        // transition:  function(params){
        //     console.log(params);
        // },
        // actors:  function(params){
        //     console.log(params);
        // },
        // commands:  function(params){
        //     console.log(params);
        // },
        // timers:  function(params){
        //     console.log(params);
        // },
        // codeactions:  function(params){
        //     console.log(params);
        // },
        // parameters:  function(params){
        //     console.log(params);
        // },
        // localization:  function(params){
        //     console.log(params);
        // },
        // legend: function(params){
        //     console.log(params);
        // },
        // processinfo: function(params){
        //     console.log(params);
        // }
    },
});
This is the original activity edit form:
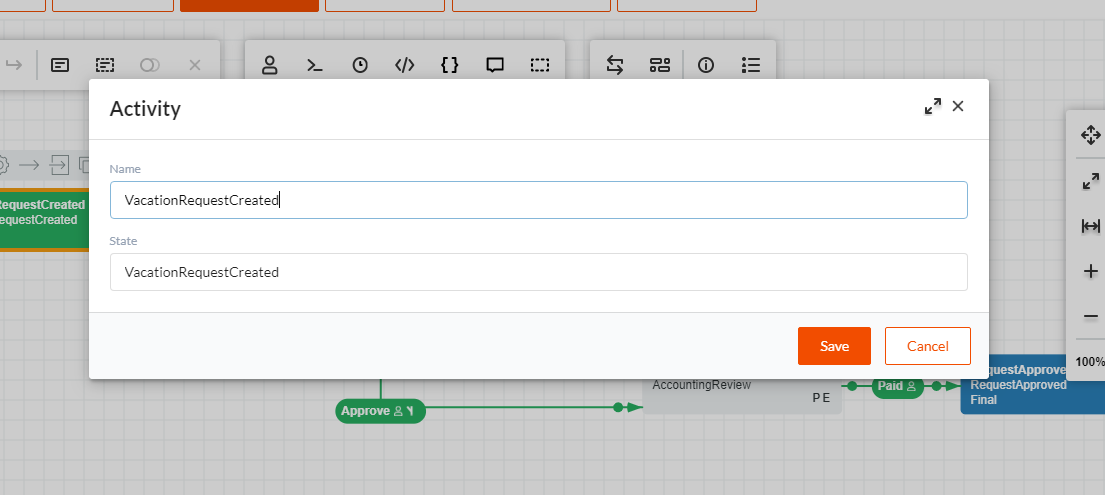
And this is how it looks after we applied our changes to it:
You will need basic knowledge of KonvaJS to change Activity and Transition appearance. Specify functions, which will draw elements, to change their appearance.
This is the activity function:
function(element){
//.....
};
The input parameter (element) is an instance of WorkflowDesignerActivityControl object. To access the object scheme description, use element.item. The scheme element itself must be rendered into the element.control property, WorkflowDesigner will use it to connect with other scheme elements.
If this function returns false, a standard element will be rendered.
You can change central element drawing for transition. The drawing function will look the following:
function(element, x, y){
//.....
};
The input parameter (element) is an instance of WorkflowDesignerTransitionControl object. To access the object scheme description, use element.item. The function should return the Konva.Group object as a result, which will be displayed on the canvas.
If this function returns false, a standard element will be rendered.
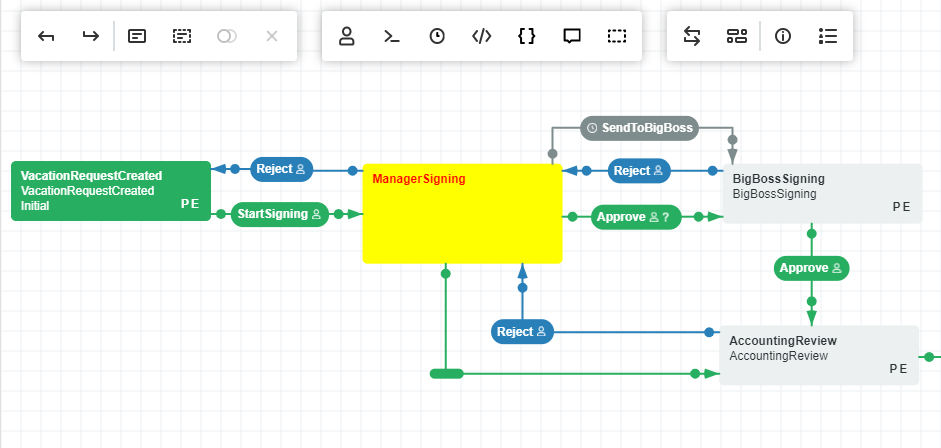
Now, let's draw the ManagerSigning activity in yellow and 40 pixels higher than a standard activity. We will be drawing the ManagerSigning_Approved_1 transition empty (contains no text).
var wfdesigner = new WorkflowDesigner({
name: 'simpledesigner',
apiurl: '/Designer/API',
renderTo: 'wfdesigner',
imagefolder: '/Images/',
graphwidth: graphwidth,
graphheight: graphheight,
drawElements: {
activity: function (element) {
console.log(element);
if (element.item.State != "ManagerSigning")
return false;
element.control = new Konva.Group({
x: element.x,
y: element.y,
rotation: 0,
draggable: true,
dragBoundFunc: function (pos) {
var kx = element.graph.Settings.DefaultMoveStep * element.manager.Layer.getScaleX();
var ky = element.graph.Settings.DefaultMoveStep * element.manager.Layer.getScaleY();
var pos = {
x: Math.round(pos.x / ky) * ky,
y: Math.round(pos.y / ky) * ky
};
if (element.selected) {
var oldpos = element.control.getAbsolutePosition();
element.manager.ObjectMove({ sender: element, changepos: { x: pos.x - oldpos.x, y: pos.y - oldpos.y } });
}
return pos;
}
});
element.rectangle = new Konva.Rect({
x: 0,
y: 0,
width: element.graph.Settings.DefaultActivityWidth,
height: element.graph.Settings.DefaultActivityHeight + 40,
fill: 'yellow',
cornerRadius: 5
});
element.control.add(element.rectangle);
if (!element.graph.Settings.disableobjectmovements) {
element.control.on('dragend', element.Sync);
element.control.on('dragmove', element._onMove);
element.control.on('click', element._onClick);
element.control.on('touchend', element._onClick);
}
element.control.on('dblclick', element._onDblClick);
element.text = new Konva.Text({
x: 10,
y: 10,
text: element.GetName(),
fontSize: 12,
fontFamily: 'Arial',
fontStyle: 'bold',
fill: 'red'
});
element.control.add(element.text);
var path = element.graph.Settings.imagefolder;
var buttons = [
{ img: path + 'wfe.settings.png', click: function () { element.ShowProperties();}}];
if (!element.graph.Settings.readonly){
buttons.push({ img: path + 'wfe.transition.png', click: function () { element._onCreateTransition(); }});
buttons.push({ img: path + 'wfe.activity.png', click: function () { element._onCreateTransitionAndActivity(); }});
buttons.push({ img: path + 'wfe.clone.png', click: function () { element.manager.Clone(me); }});
buttons.push({ img: path + 'wfe.delete.png', click: function () { element._onDelete() }});
}
var pos = { x: element.rectangle.getWidth() - buttons.length * 30, y: -40};
element.bar = WorkflowDesignerBar(element.manager.Layer, buttons, pos);
element.control.add(element.bar);
element.bar.hide();
element.manager.Layer.add(element.control);
},
transitionActivePoint: function(element, x, y){
if(element.item.Name != "ManagerSigning_Approved_1"){
return false;
}
var draggable = !element.graph.Settings.disableobjectmovements;
var cActivePoint = new Konva.Group({
x: x,
y: y,
draggable: draggable
});
var circle = new Konva.Rect({
x: -16,
y: -5,
width: 34,
height: 10,
fill: element.GetColor(),
cornerRadius: 15
});
cActivePoint.add(circle);
cActivePoint.transition = element.control;
var redraw = function (d, r) {
var point = element.graph.CorrectPossition(cActivePoint.getAbsolutePosition(), element.manager.Layer);
element.middle = point;
element.DrawTransition();
if (!element.graph.Settings.readonly){
element.DrawTouchPoints();
}
if (d) {
element.DrawActivePoint();
element.Sync();
}
element.manager.batchDraw();
};
var onclick = function (e) {
if (element.graph.Settings.disableobjectmovements)
return;
var tmpSelect = element.selected;
if (!e.evt.ctrlKey)
element.graph.DeselectAll();
if (tmpSelect)
element.Deselect();
else
element.Select();
element.graph.onSelectionChanged();
element.manager.batchDraw();
};
cActivePoint.on('click', onclick);
cActivePoint.on('touchend', onclick);
cActivePoint.on('dblclick', function () {
element.graph.DeselectAll();
element.Select();
element.manager.batchDraw();
if (element.graph.Settings.notshowwindows)
return;
element.ShowProperties();
});
cActivePoint.on('dragstart', function () {
if (element.graph.Settings.disableobjectmovements)
return;
if (element.activePoint.ToolTip != undefined) {
element.activePoint.ToolTip.hide();
}
});
cActivePoint.on('dragmove', function () {
if (element.graph.Settings.disableobjectmovements)
return;
redraw(false);
});
cActivePoint.on('dragend', function () {
if (element.graph.Settings.disableobjectmovements)
return;
redraw(true);
});
return cActivePoint;
}
}
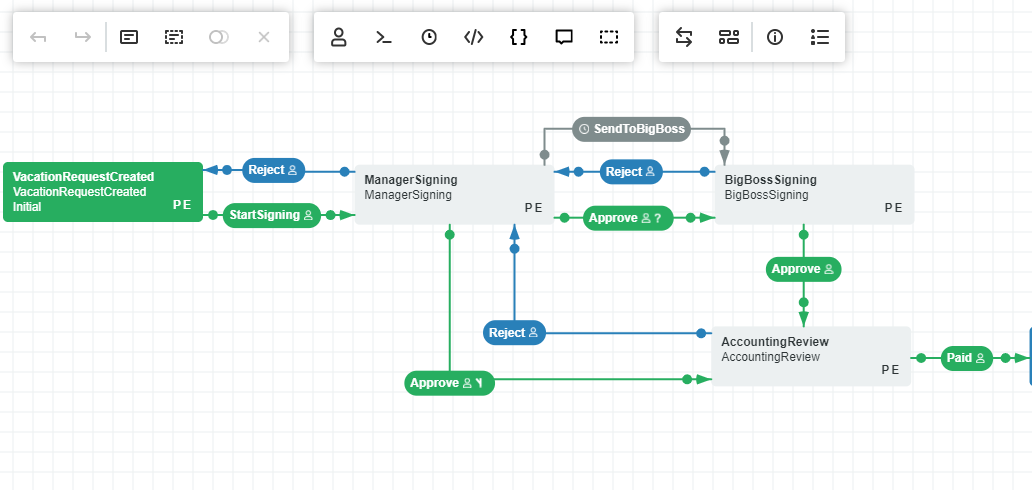
});This is how our original canvas looked like:
And this is what it looks like after we applied changes to it:
We have suggested the easiest method of the graphic designer customization. It is truly the simplest solution which allows full and comprehensive integration of your app and Workflow Engine, both in terms of program code and interface. You will be able to adapt the designer for your business users and add custom parameters for activity and transition elements.