Sample project
Getting Started
Clone the GitHub repository. In the root README, you’ll find instructions on how to run the application. In short, this is a highly simplified sample app where a developer submits a weekly work report, and their manager approves, rejects, or sends the report back for revision.
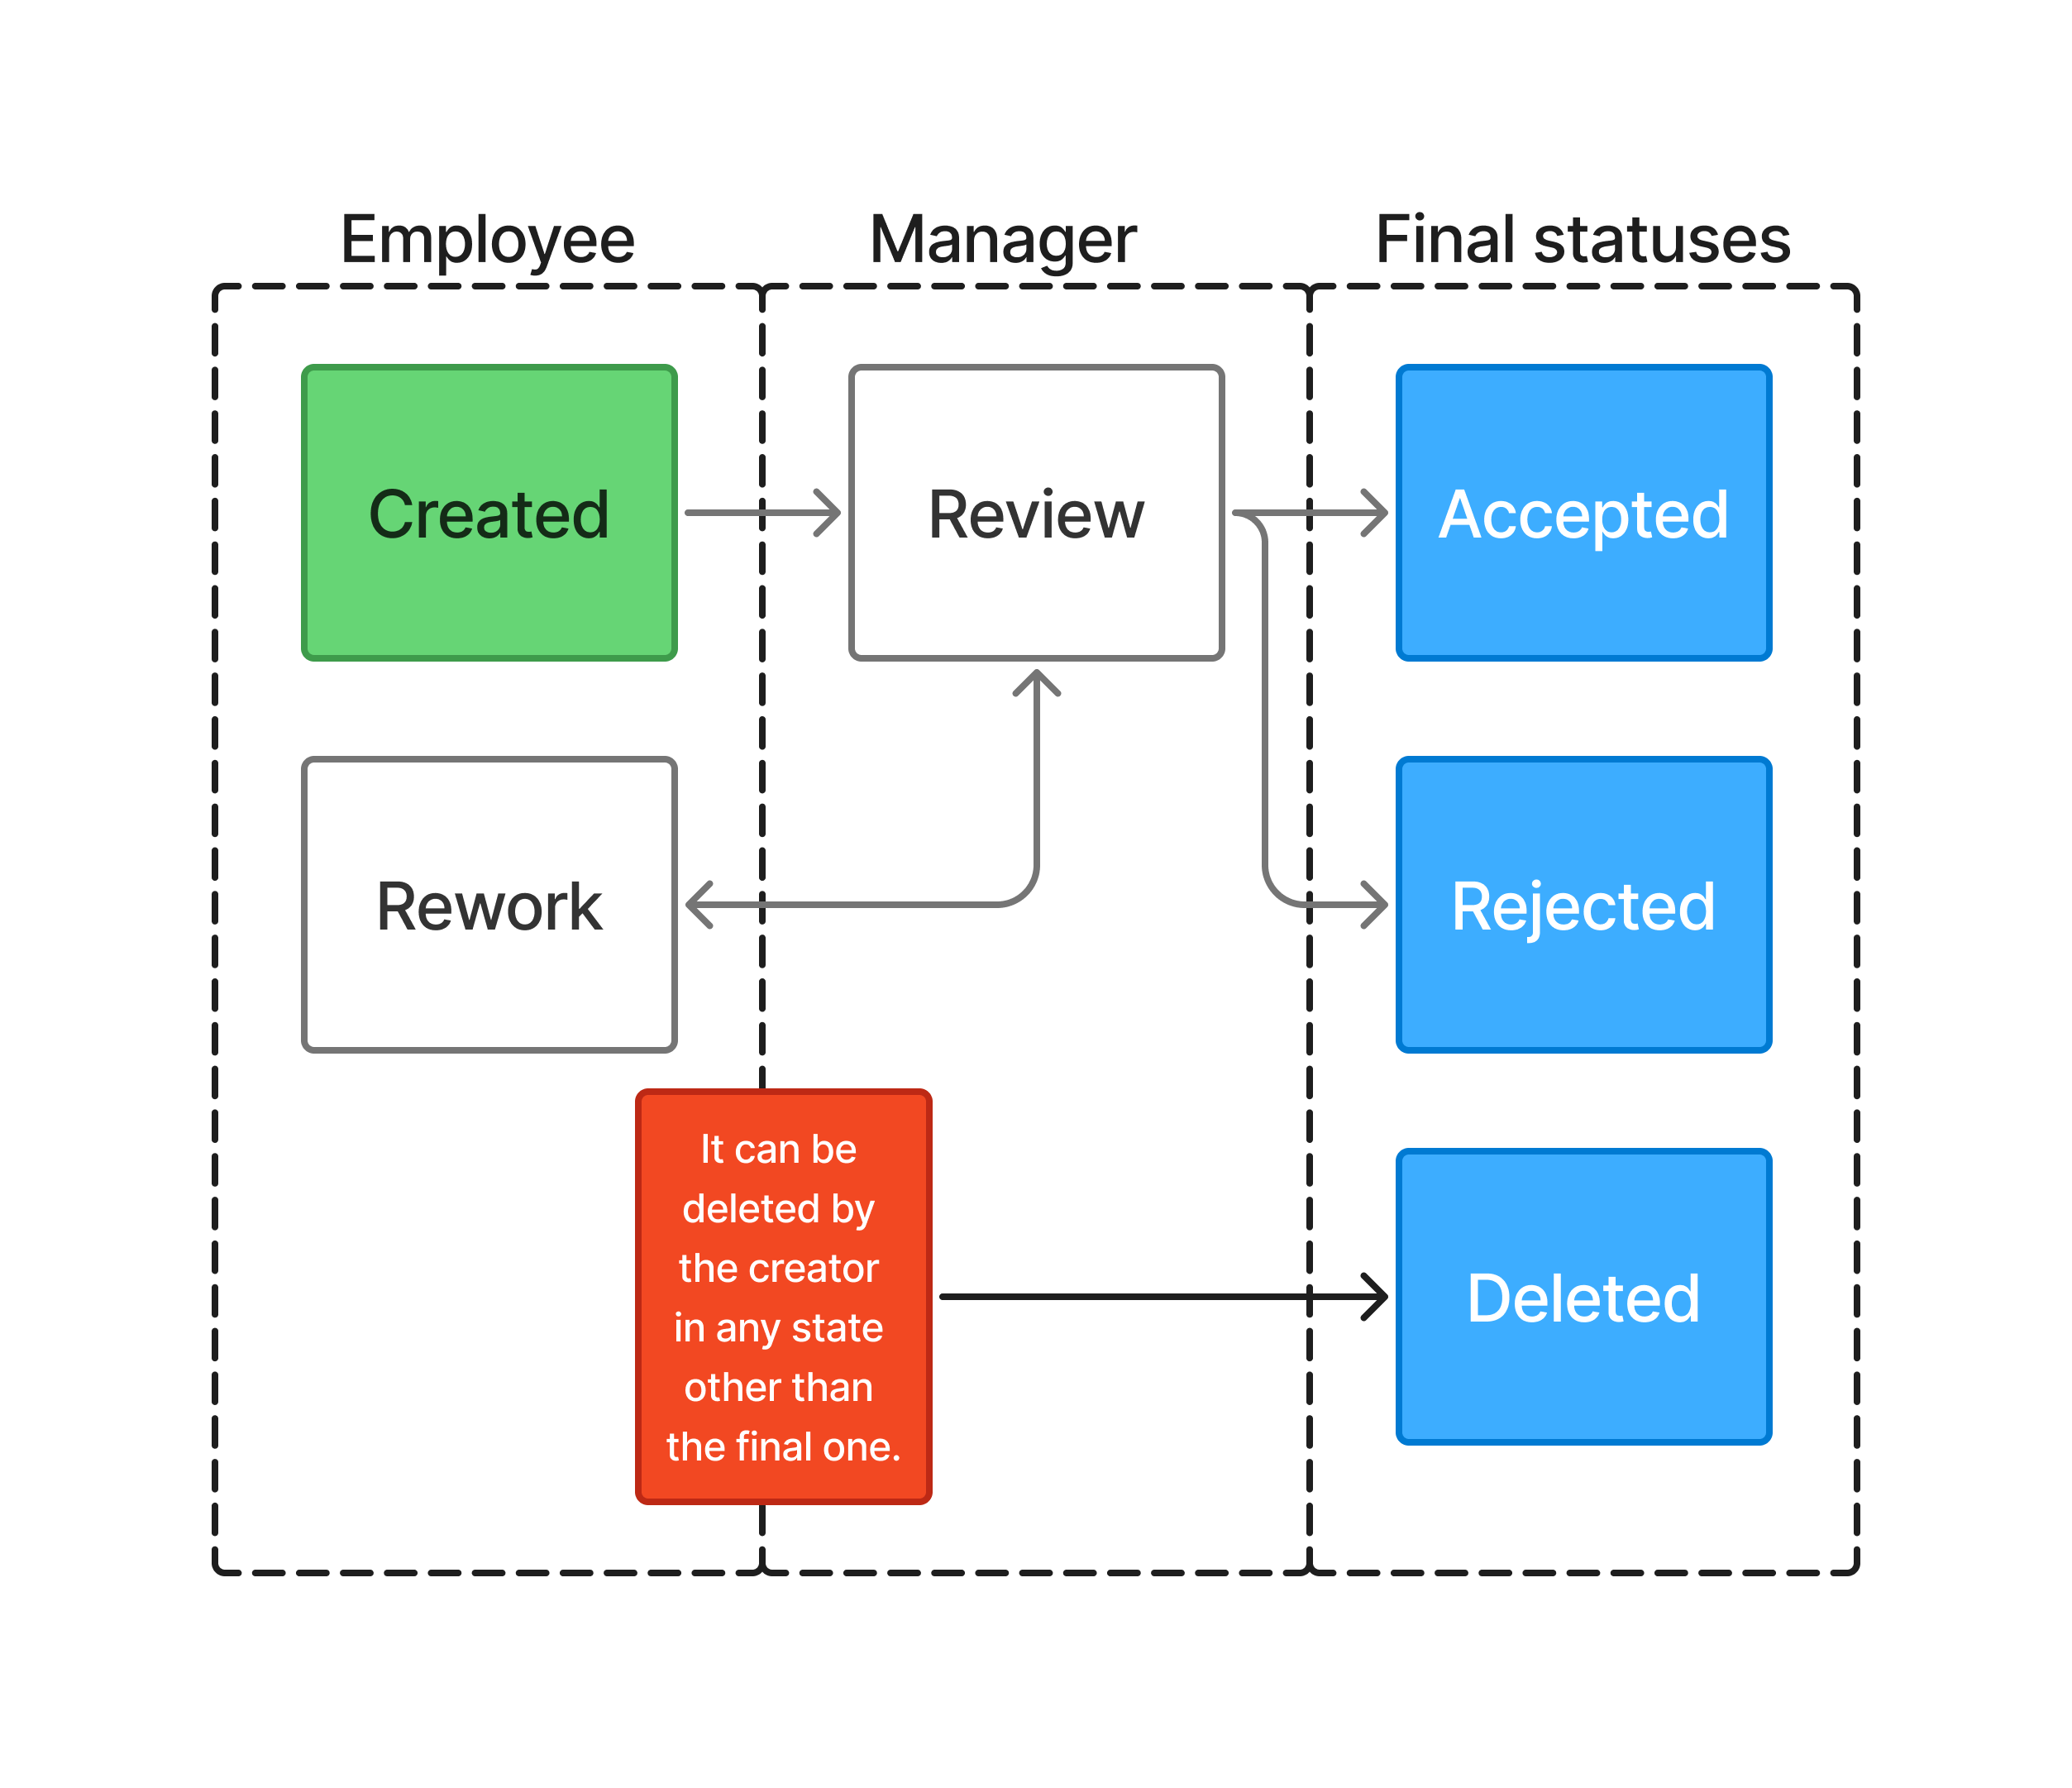
Here’s a schematic of the process. In each state, a specific form is shown, and only the necessary fields are editable. For example, the manager can write their review but can’t modify what the developer wrote. The process also allows the developer to move the report to the Deleted state.
The first screen of the application lists all reports relevant to the user: a regular developer sees only their own reports, while a manager sees theirs and those of all developers in their department.

- Page with available reports.
- Page with Forms Manager, where you can edit forms.
- Page with the workflow scheme designer.
- User selector.
The Forms Manager page looks like this.
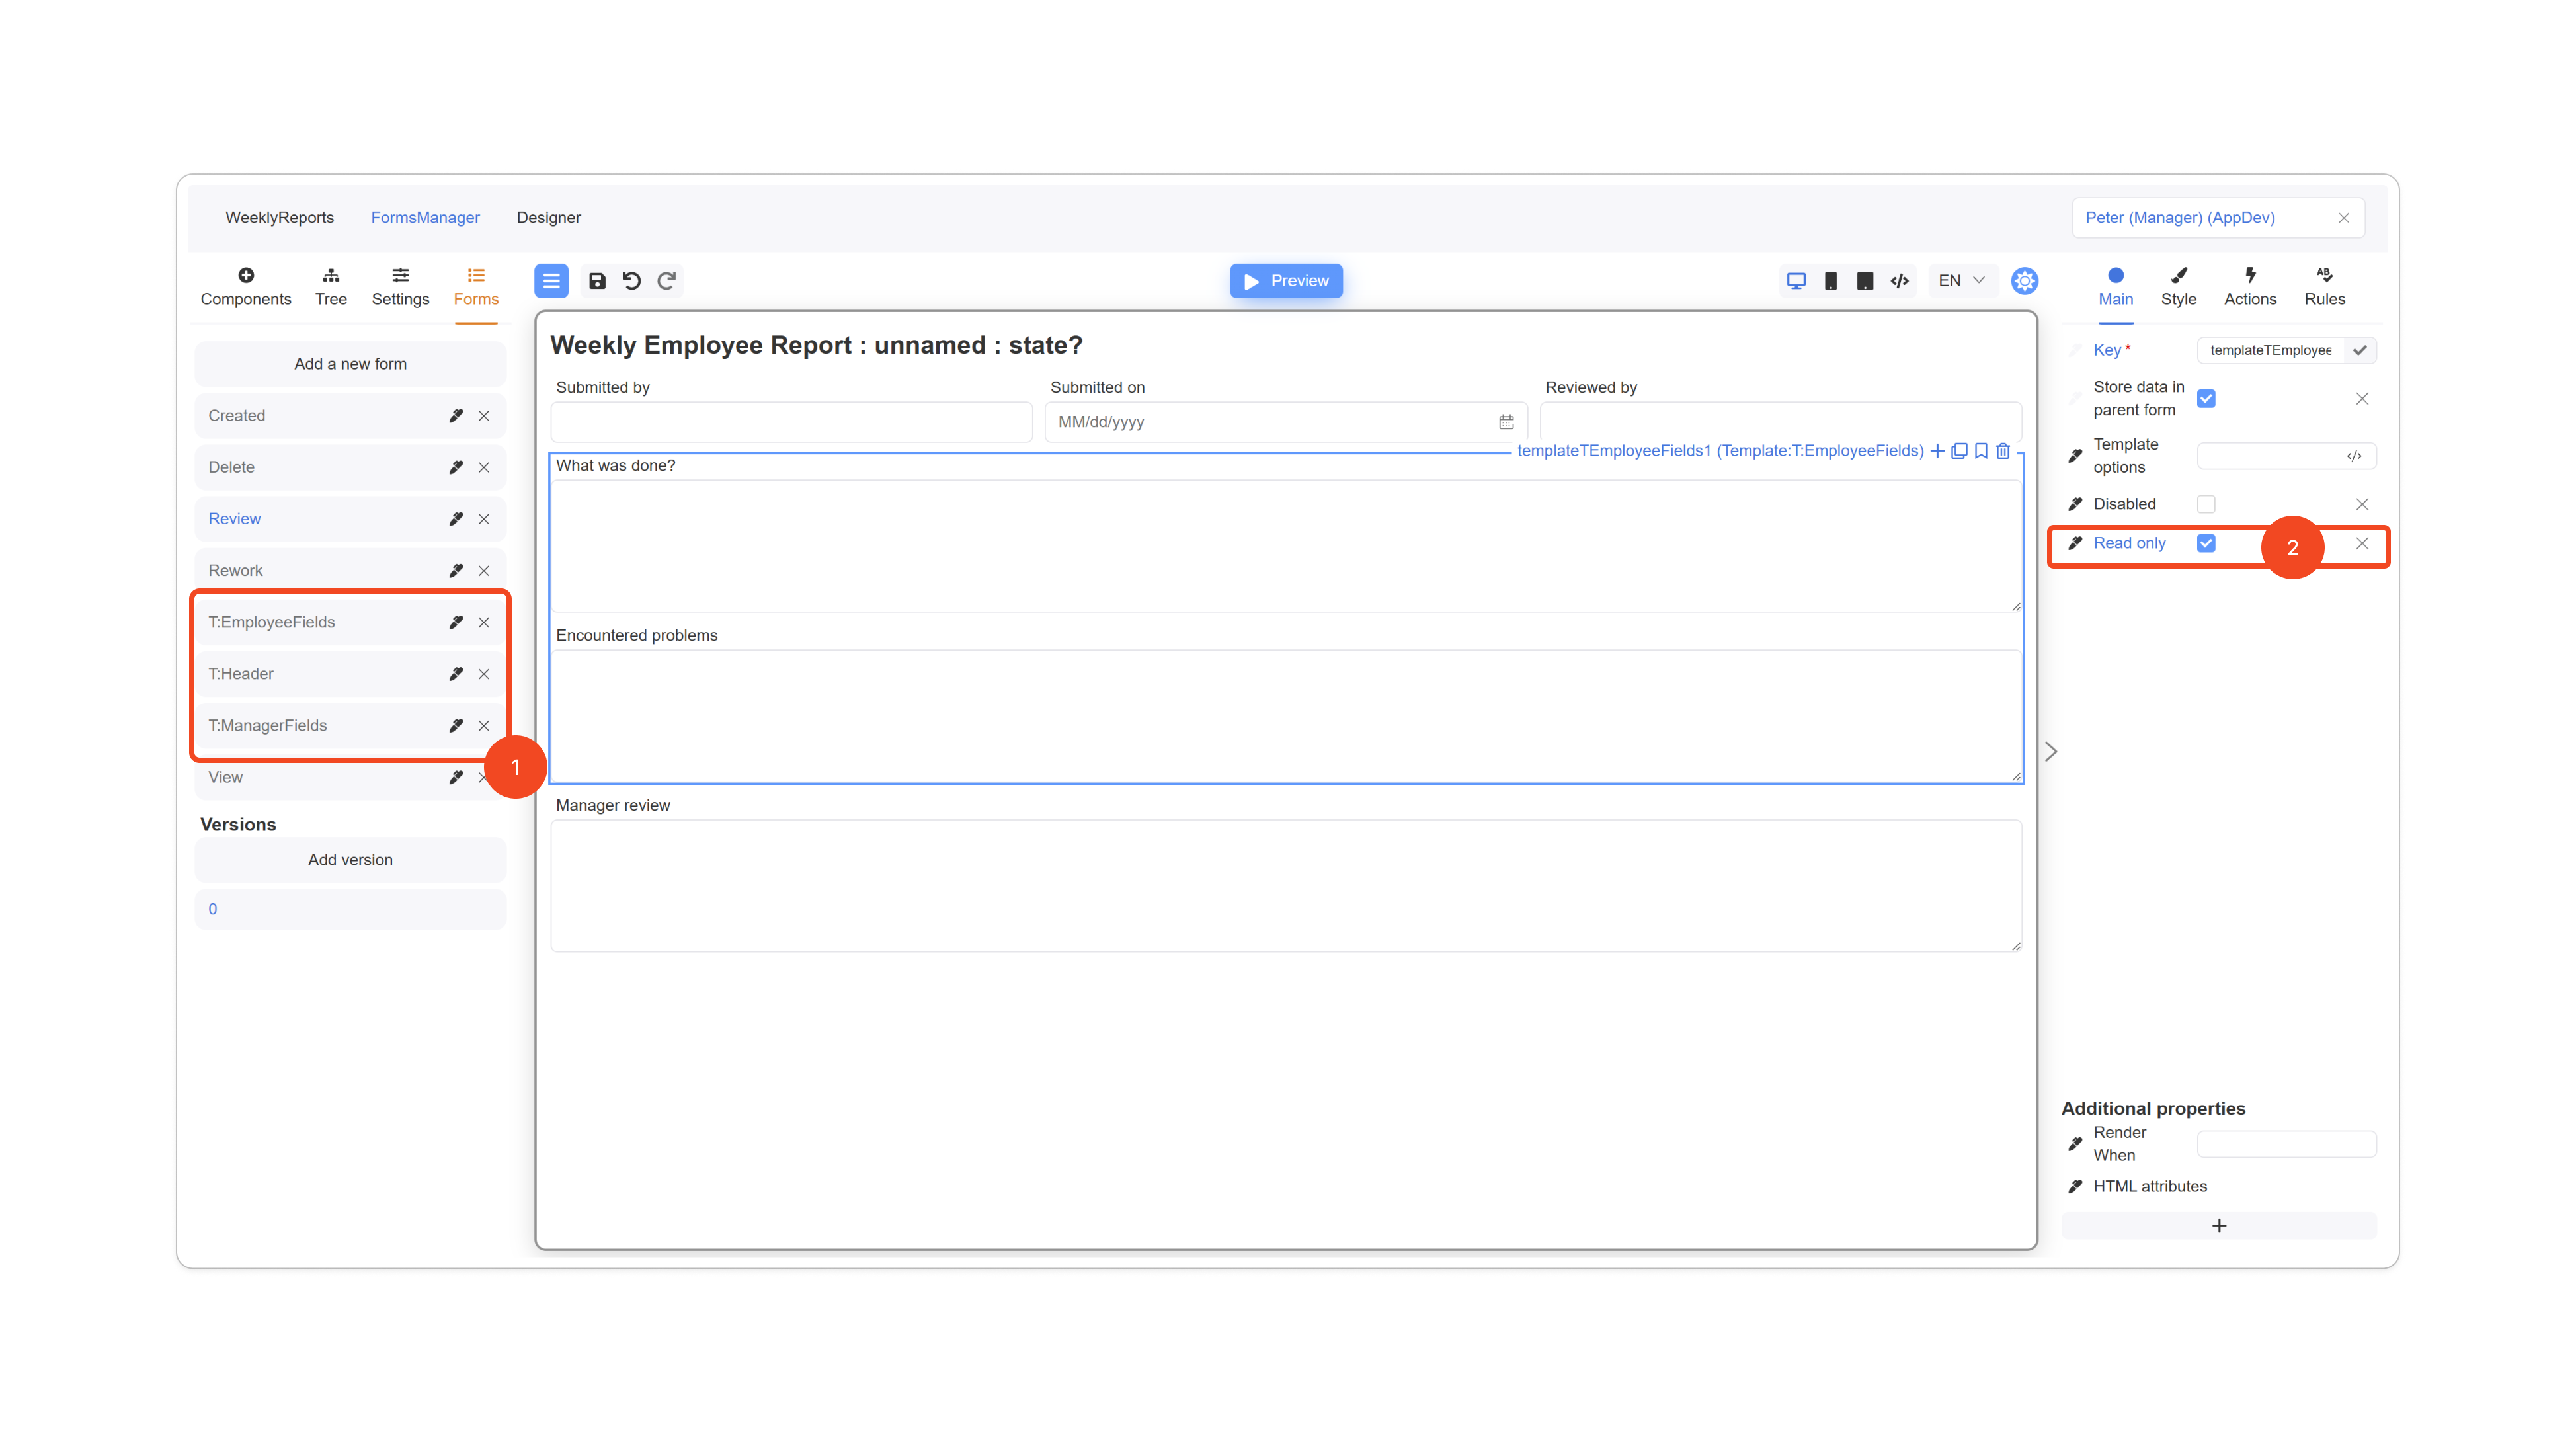
Take note of the following. In practice, most forms in this application are very similar. To avoid recreating the same components repeatedly, we use templates.
- Any form whose name starts with
"T:"is a template then reused in other forms. - In the final (end-user) forms, you configure which fields are editable and which are not by using the readonly flag, which is set as a property of the template.
And the Workflow Designer page looks like this.
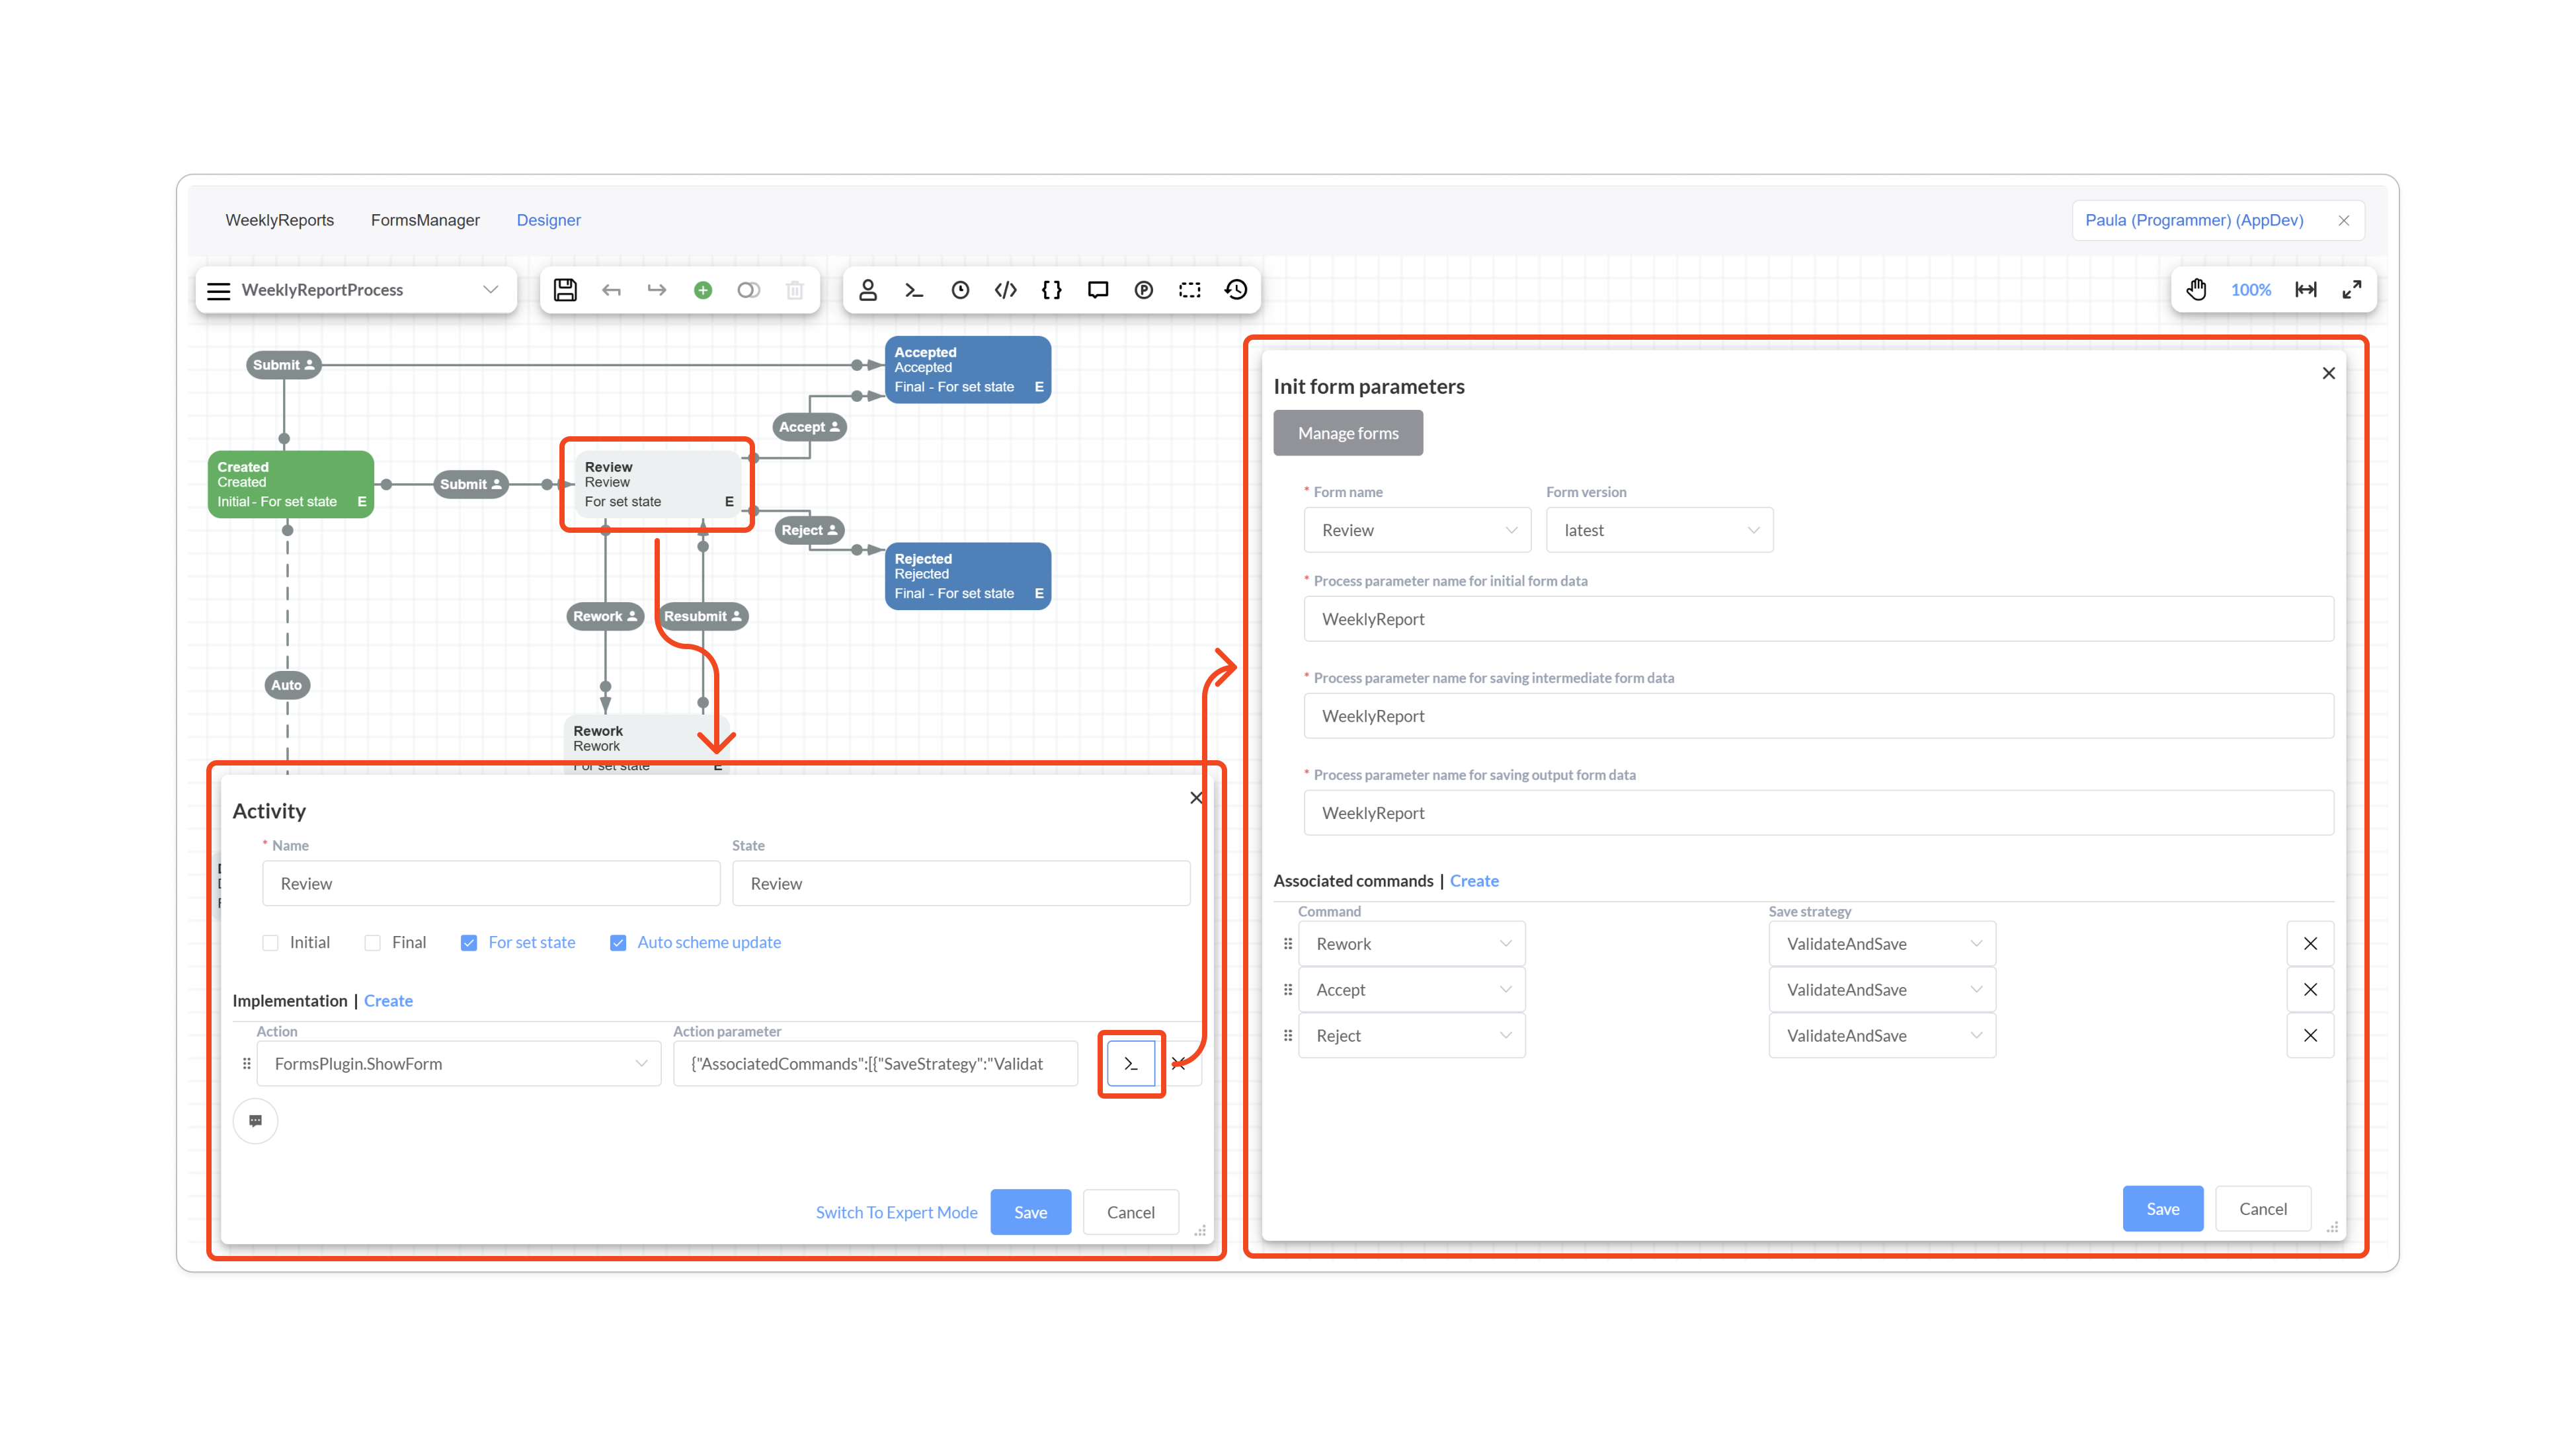
It’s straightforward: each activity is configured to display a single form. In its settings, you specify which form to show, which commands govern access to the form, and which process parameter stores its data.
Now let’s focus on the key aspects of using the Forms Plugin.
Storing Form Data
The sample is set up specifically to show how to store form data in regular—and possibly already existing—database tables. Remember, if you don’t have (or don’t need) database tables, form data can be stored in a standard process parameter, which significantly reduces the amount of work. In this example, the form data is stored in a straightforward table.
CREATE TABLE dbo.WeeklyReport
(
    Id          UNIQUEIDENTIFIER NOT NULL
        CONSTRAINT PK_WeeklyReport PRIMARY KEY,
    SubmittedBy NVARCHAR(256)     NOT NULL,
    SubmittedOn DATETIME         NOT NULL,
    Name        NVARCHAR(1024)    NOT NULL,
    ReviewedBy  NVARCHAR(256)     NULL,
    Details     NVARCHAR(MAX)     NOT NULL,
    Version     INT              NOT NULL
);
Some data is stored explicitly as columns, while the remaining fields are stored as JSON in the Details column. Here’s what the typed DTO on the backend looks like.
public sealed class WeeklyReportData : IDynamicParameterCompatible
{
    public Guid Id { get; set; }
    public string SubmittedBy { get; set; }
    public DateTime SubmittedOn { get; set; }
    public string Name { get; set; }
    public string? ReviewedBy { get; set; }
    public string Details { get; set; } = "{}";
    public int Version { get; set; }
    public string? StateName { get; set; }

    public WeeklyReportData()
    {
        Id = Guid.NewGuid();
        SubmittedOn = DateTime.UtcNow;
    }

    public IDictionary<string, object?> GetPropertiesAsDictionary()
    {
      ...
    }

    public void SetPropertiesFromDictionary(IDictionary<string, object> properties)
    {
      ...
    }
}
The two key methods are GetPropertiesAsDictionary and SetPropertiesFromDictionary, which are part of the IDynamicParameterCompatible interface. They let Workflow Engine treat a strongly typed parameter as dynamic and expand additional fields stored in Details into properties of the dynamic object. The implementation of these methods is located in WeeklyReportData.
Next, to persist data in the database, we need to implement an External Parameters Provider that saves and retrieves our document from the DB. Here are the key implementation points:
public sealed class ReportParameterProvider : IWorkflowExternalParametersProvider
{
    private WeeklyReportRepository _weeklyReportRepository;

    public const string ParameterWeeklyProgressReport = "WeeklyReport";

    public WeeklyReportParameterProvider(WeeklyReportRepository weeklyReportRepository)
    {
        _weeklyReportRepository = weeklyReportRepository;
    }

    public async Task<object> GetExternalParameterAsync(string parameterName, ProcessInstance processInstance)
    {
        return await _weeklyReportRepository.GetByIdAsync(processInstance.RootProcessId);
    }

    public async Task SetExternalParameterAsync(string parameterName, object parameterValue, ProcessInstance processInstance)
    {
        if (parameterValue is not WeeklyReportData weeklyReportData)
        {
            throw new System.ArgumentException();
        }

        weeklyReportData.Id = processInstance.RootProcessId;
        await _weeklyReportRepository.UpsertAsync(weeklyReportData);
    }

   ...

    public bool HasExternalParameter(string parameterName, string schemeCode, ProcessInstance processInstance)
    {
        return parameterName == ParameterWeeklyProgressReport;
    }
}

publi sealed class WeeklyReportRepository
{
    private readonly string? _connectionString;

    public WeeklyReportRepository(IConfiguration configuration)
    {
        _connectionString = configuration.GetConnectionString("Default");
    }

    public async Task UpsertAsync(WeeklyReportData weeklyReportData)
    {
        string query = """
                       ...
                       """;
        await using var connection = new SqlConnection(_connectionString);
        await connection.ExecuteAsync(query, weeklyReportData);
    }

    public async Task<WeeklyReportData> GetByIdAsync(Guid id)
    {
        string query = """
                       ...
                       """;
        await using var connection = new SqlConnection(_connectionString);
        return await connection.QuerySingleAsync<WeeklyReportData>(query, new { Id = id });
    }
   ...
}
For simplicity, Dapper is used here. See the implementation details in WeeklyReportParameterProvider and WeeklyReportRepository.
What this approach to data handling gives us:
- In our code, we always work with a strongly typed object.
- This object can hold any number of additional properties: add components to the form with keys named however you like, and they’ll be saved in the Details column of our table.
Here’s a schematic of how this flows from the Form to the DB and back.

It’s also worth noting that both the database table and WeeklyReportData have a Version field. This field is used for standard optimistic concurrency control. The Forms Plugin learns about this field through its settings. The ReportParameterProvider must also be connected to the Workflow Runtime.
var formsPluginSettings = new FormsPluginSettings
{
    ...
    FormVersionPropertyName = nameof(WeeklyReportData.Version),
    ...
};

var formsPlugin = new FormsPlugin(formsPluginSettings);
WorkflowRuntime runtime = new WorkflowRuntime()
    .WithPlugin(formsPlugin)
    .WithExternalParametersProvider(weeklyReportParameterProvider)
    ...
Forms Controller Implementation
You can find the implementation of the forms controller here: WeeklyReportsFormsController. We’ve already covered most of its implementation in the previous section.
A few notes:
- The controller includes an additional SubmitReport method that starts the process. It isn’t directly related to forms, but it’s necessary—no process, no forms.
[HttpPost]
[Route("submit")]
public async Task<ActionResult<SubmitReportApiResponse>> SubmitReport([FromBody] SubmitReportApiRequest request)
{
    var processId = Guid.NewGuid();
    var createdInstanceParams = new CreateInstanceParams("WeeklyReportProcess", processId) { IdentityId = request.User };
    await _runtime.CreateInstanceAsync(createdInstanceParams);
    return Ok(new SubmitReportApiResponse(processId));
}
- The GetForms method returns the forms available to the user. If none is available, it returns a read-only View form so any user can view the document. This illustrates that you can extend the forms list with items that have no commands. Saving for this form is also explicitly disabled.
[HttpGet]
[Route("get")]
public async Task<ActionResult<ExecutableForm[]>> GetForms([FromQuery] Guid processId, [FromQuery] string user)
{
    ...

    ImmutableList<ExecutableForm> forms = executableFormsResponse.AsSuccess.Forms;

    if (!forms.Any())
    {
        GetProcessFormResult processFormResponse = await formsPluginRuntimeApi.GetProcessFormAsync(new GetProcessFormParameters
        {
            FormKey = new FormKey { FormName = "View" },
            ProcessId = processId,
            DataParameterName = WeeklyReportParameterProvider.ParameterWeeklyProgressReport
        });

        if (processFormResponse.IsSystemError)
        {
            throw new Exception(executableFormsResponse.AsSystemError.Message);
        }

        ProcessForm defaultForm = processFormResponse.AsSuccess.Form;

        return Ok(new[]
        {
            new ExecutableForm
            {
                ProcessId = processId,
                FormKey = new FormKey { FormName = "View" },
                FormCode = defaultForm.FormCode,
                FormData = defaultForm.FormData.ToCamelCase(),
                AllowSave = false
            }
        });
    }

    ...
}
In conclusion, note the calls to ToCamelCase and ToPascalCase. Their use is mostly cosmetic. As explained here, data binding is performed by the component key. Since the frontend typically uses camelCase and the backend PascalCase, you’ll need to normalize names accordingly.
Additional Setup for the Workflow Runtime
The Workflow Runtime is initialized in the WorkflowRuntimeService class. In addition to the ReportParameterProvider described above, it also connects the WeeklyReportActionProvider and the WeeklyReportRuleProvider.
WeeklyReportActionProvider contains two actions:
- InitReport — creates the report object and records who submitted the report and the submission date.
- SetReviewer — records which manager processed the report.
It also contains one condition:
- CanDelete — defines the rules for deleting the document; the document can be logically deleted in any state other than the final ones.
WeeklyReportRuleProvider is the standard provider for authorizing access to commands. For details on how this works, see here.
It declares three authorization rules:
- Author — whether the user is the document’s author.
- CheckRole — checks the role; the relevant role here is Manager.
- CheckDivision — checks whether the authorized user works in the same department as the document’s author.
All users and roles, for educational purposes, are defined in Users.
Server-Side Validation
The sample uses server-side validation. The validator code is defined in WeeklyReportValidator.
It always checks whether WhatWasDone and EncounteredProblems are filled in, and whether ManagerReview is filled in when the document is in the Review state.
Client-side validation is not configured in the forms, but you can add it if needed; it will then work in tandem with the server-side validation. Client-side checks are run before attempting to submit to the server.
Implementing Forms on the Frontend
On the frontend, the primary file of interest is WeeklyReportPage. This is where the form is rendered to the user, and we’ve already detailed all the methods you need to implement here.
In FormsManagerPage, the Forms Manager is connected as described here. Note also that the Forms Manager works through the DesignerController, which you must implement anyway for the workflow scheme designer to operate.
Workflow Scheme Details to Pay Attention To
Here we’ll outline several specifics in the process scheme that are worth noting—these are the elements that make the application behave exactly as we need.
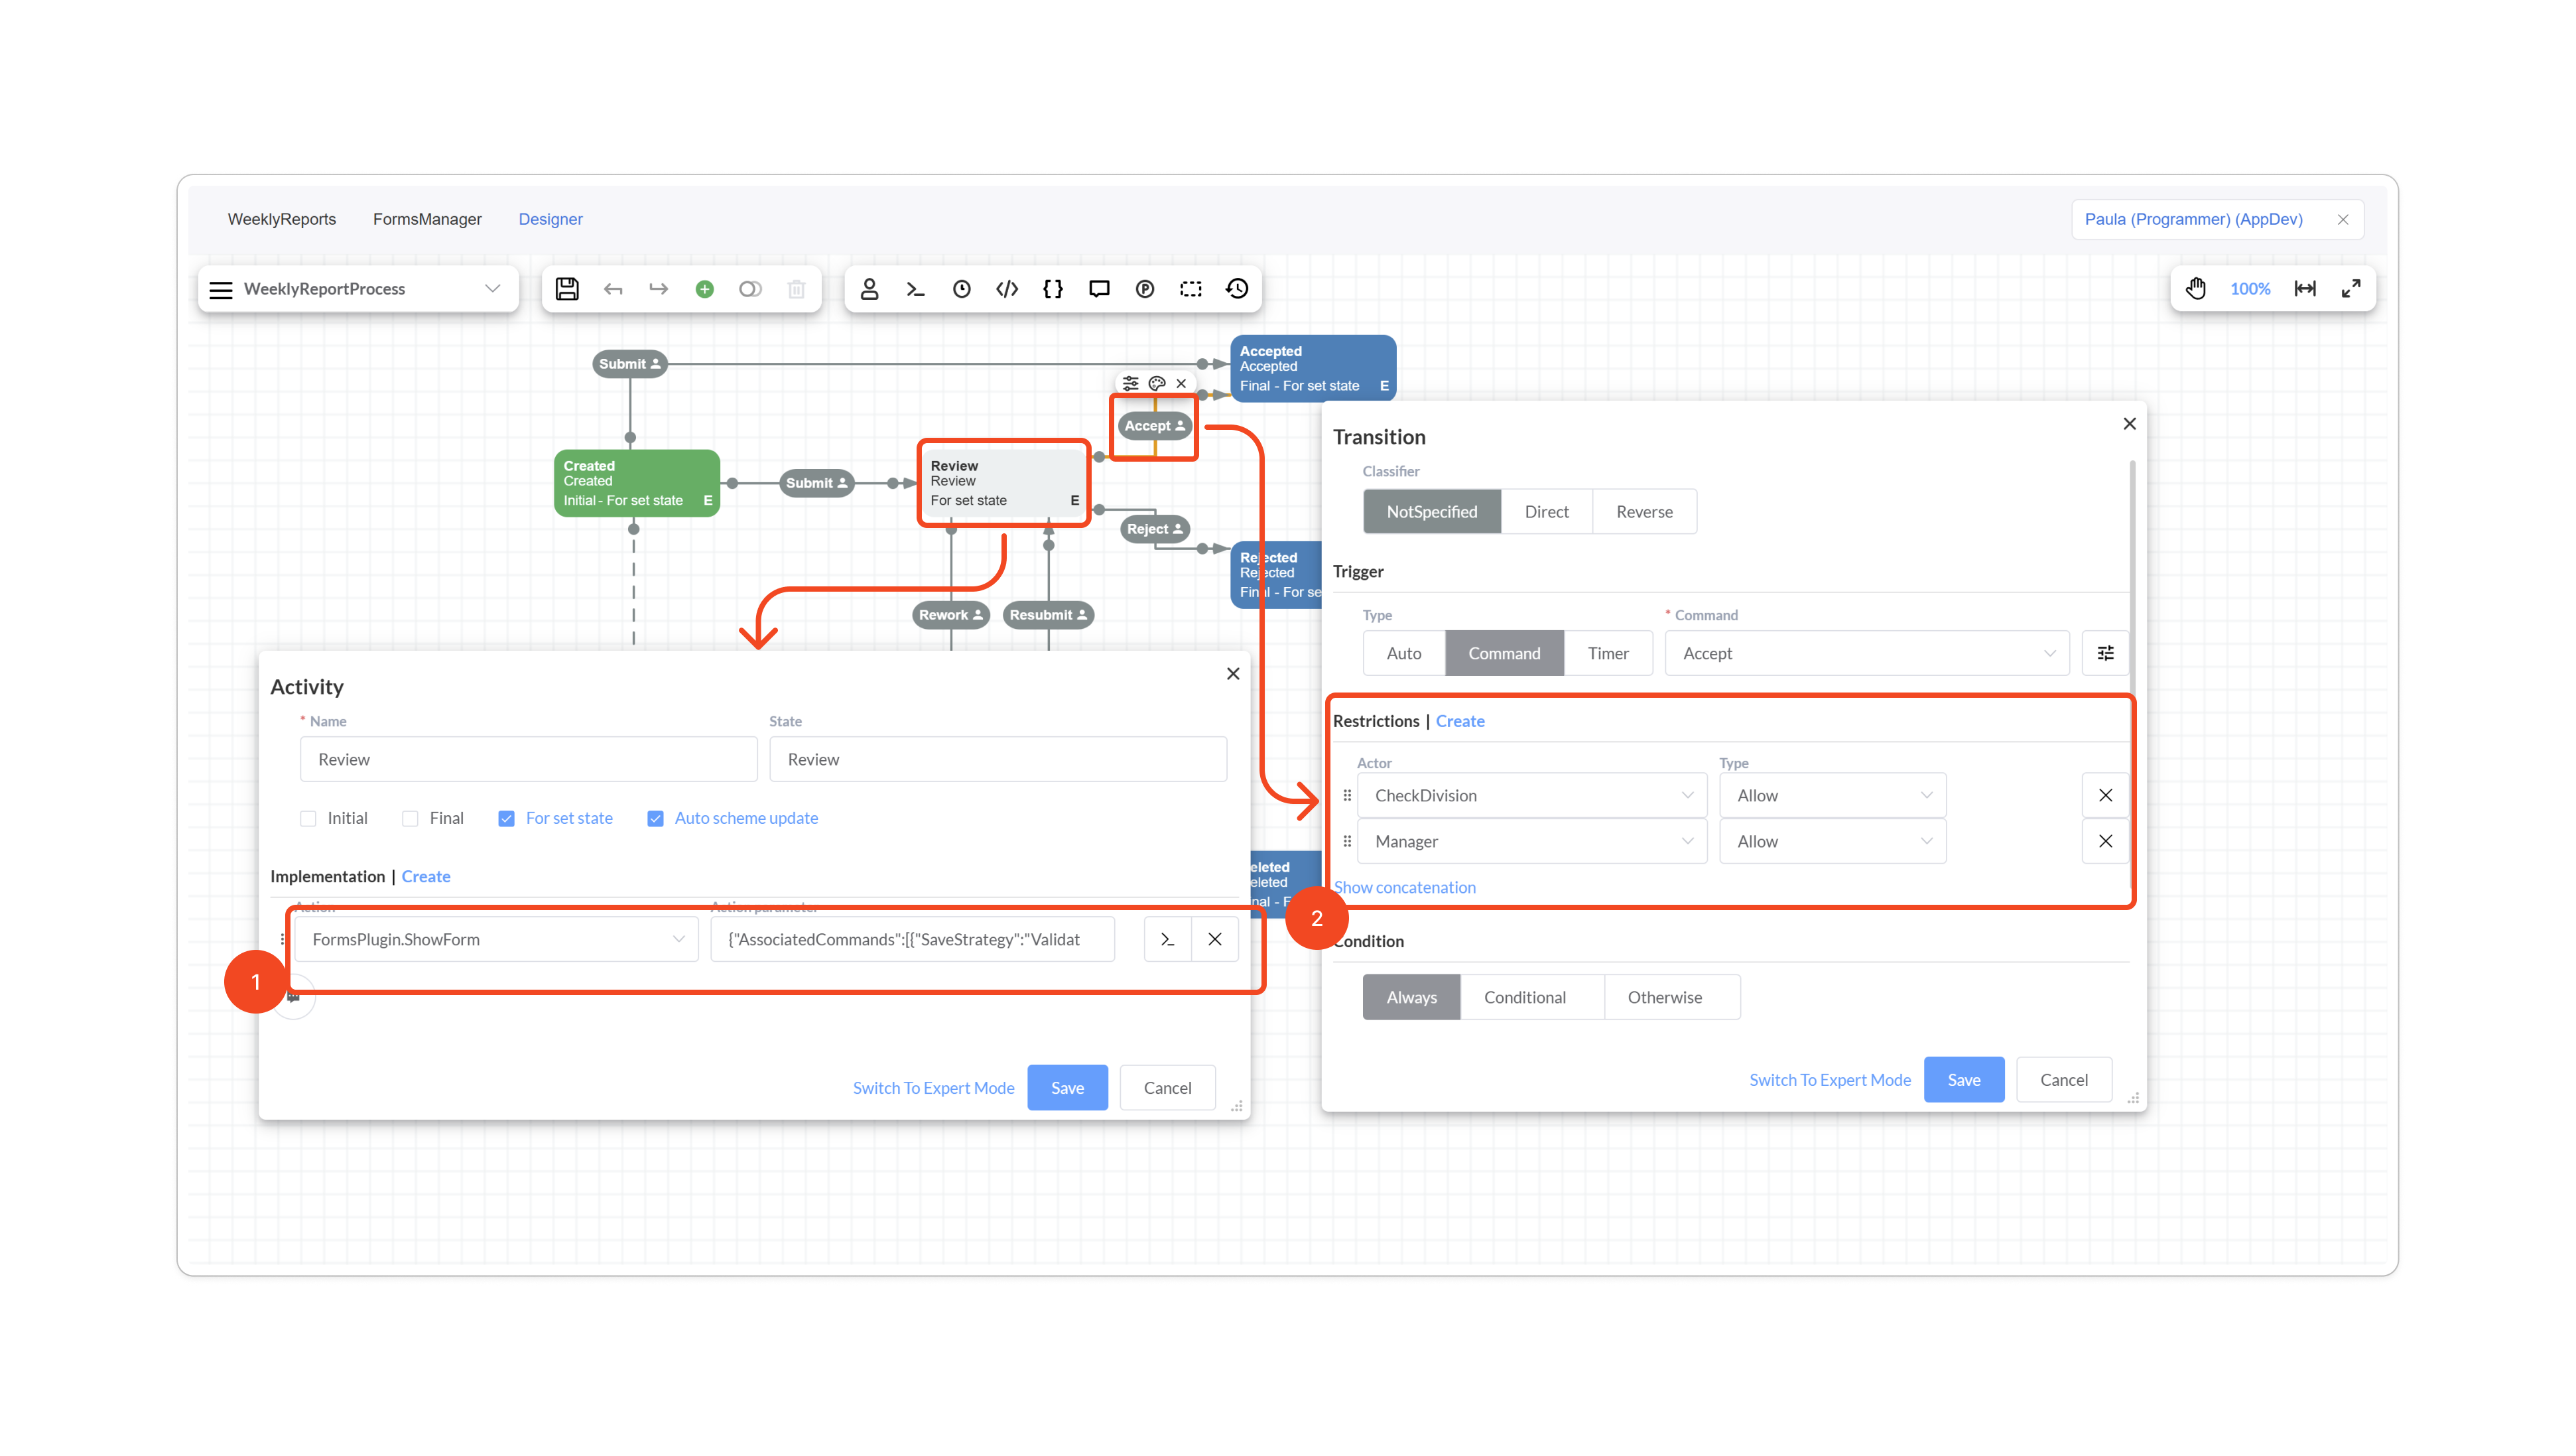
- In Activity Implementation, we specify which form should be displayed and which commands it’s associated with.
- In Transition Restrictions, we define access to the command—for example, in the screenshot it’s available to the manager of the author’s department. Through this command access, we also determine access to the form.

The report’s author can delete their report in any state except the final one. This is implemented via a subprocess. Note that the transition specifies not only that the command is available exclusively to the report’s author, but also the condition we mentioned earlier: the report can be deleted only when it is not in a final state.