Forms Plugin Features
In this section, we’ll focus on the settings and usage of the Forms Plugin.
Forms Plugin Settings
You connect the plugin to the Workflow Runtime as follows:
var formsPluginSettings = new FormsPluginSettings
{
    FormsManagerUrl = configuration.Workflow.FormsManagerUrl,
};

var formsPlugin = new FormsPlugin(formsPluginSettings);
WorkflowRuntime runtime = new WorkflowRuntime()
    .WithPlugin(formsPlugin)
    ...
Let’s go through all the settings you can define here and what they’re for.
- FormsManagerUrl — links the process-scheme designer with the Forms Manager. In short, this setting is only needed so that
this button works. When you click it, the form editor opens with the form that has the selected name and version preloaded.
- FormsProcessParameterName — the name of the process parameter into which the list of forms currently available at that point in the specific process is written.
- FormVersionPropertyName — the name of the field in the form data where the version of the opened document is stored for optimistic concurrency control.
- DefaultFormDefinition — the definition of an empty form. This setting is only needed if you integrate your own forms engine; set it to whatever value your engine expects for a form with no fields.
- FormValidator — the server-side form validator. Server-side validation will be described later.
Tenant-Scoped Forms
Forms Plugin supports tenant-specific form definitions. A form with an empty or null tenant ID is shared, while a form with a tenant ID
belongs only to that tenant. This lets you keep common forms in the shared scope and override them for selected tenants when needed.
The provider methods accept an optional tenantId:
GetFormNamesAsync(tenantId)returns only shared form names whentenantIdis not specified. WithtenantId, it returns distinct names from the tenant scope and shared scope.GetFormVersionsAsync(name, tenantId)returns tenant versions when the tenant has any rows for that form. Otherwise, it falls back to shared versions.GetFormAsync(name, version: null, tenantId)prefers the latest tenant form over the latest shared form. If a tenant form exists, it is returned even when the shared form has a higher version number.GetFormAsync(name, version, tenantId)first checks the tenant scope. If the tenant has any rows for the form, shared fallback is not used for a missing version. If the tenant has no rows for that form, the exact version can be read from the shared scope.CreateNewFormIfNotExistsAsync(...)andCreateNewFormVersionAsync(...)create forms only in the target scope. When bootstrapping the first tenant version, the definition can be copied from the shared scope.UpdateFormAsync(...),DeleteFormVersionAsync(...), andDeleteFormAsync(...)operate only in the exact target scope. They do not update or delete shared forms as a fallback.
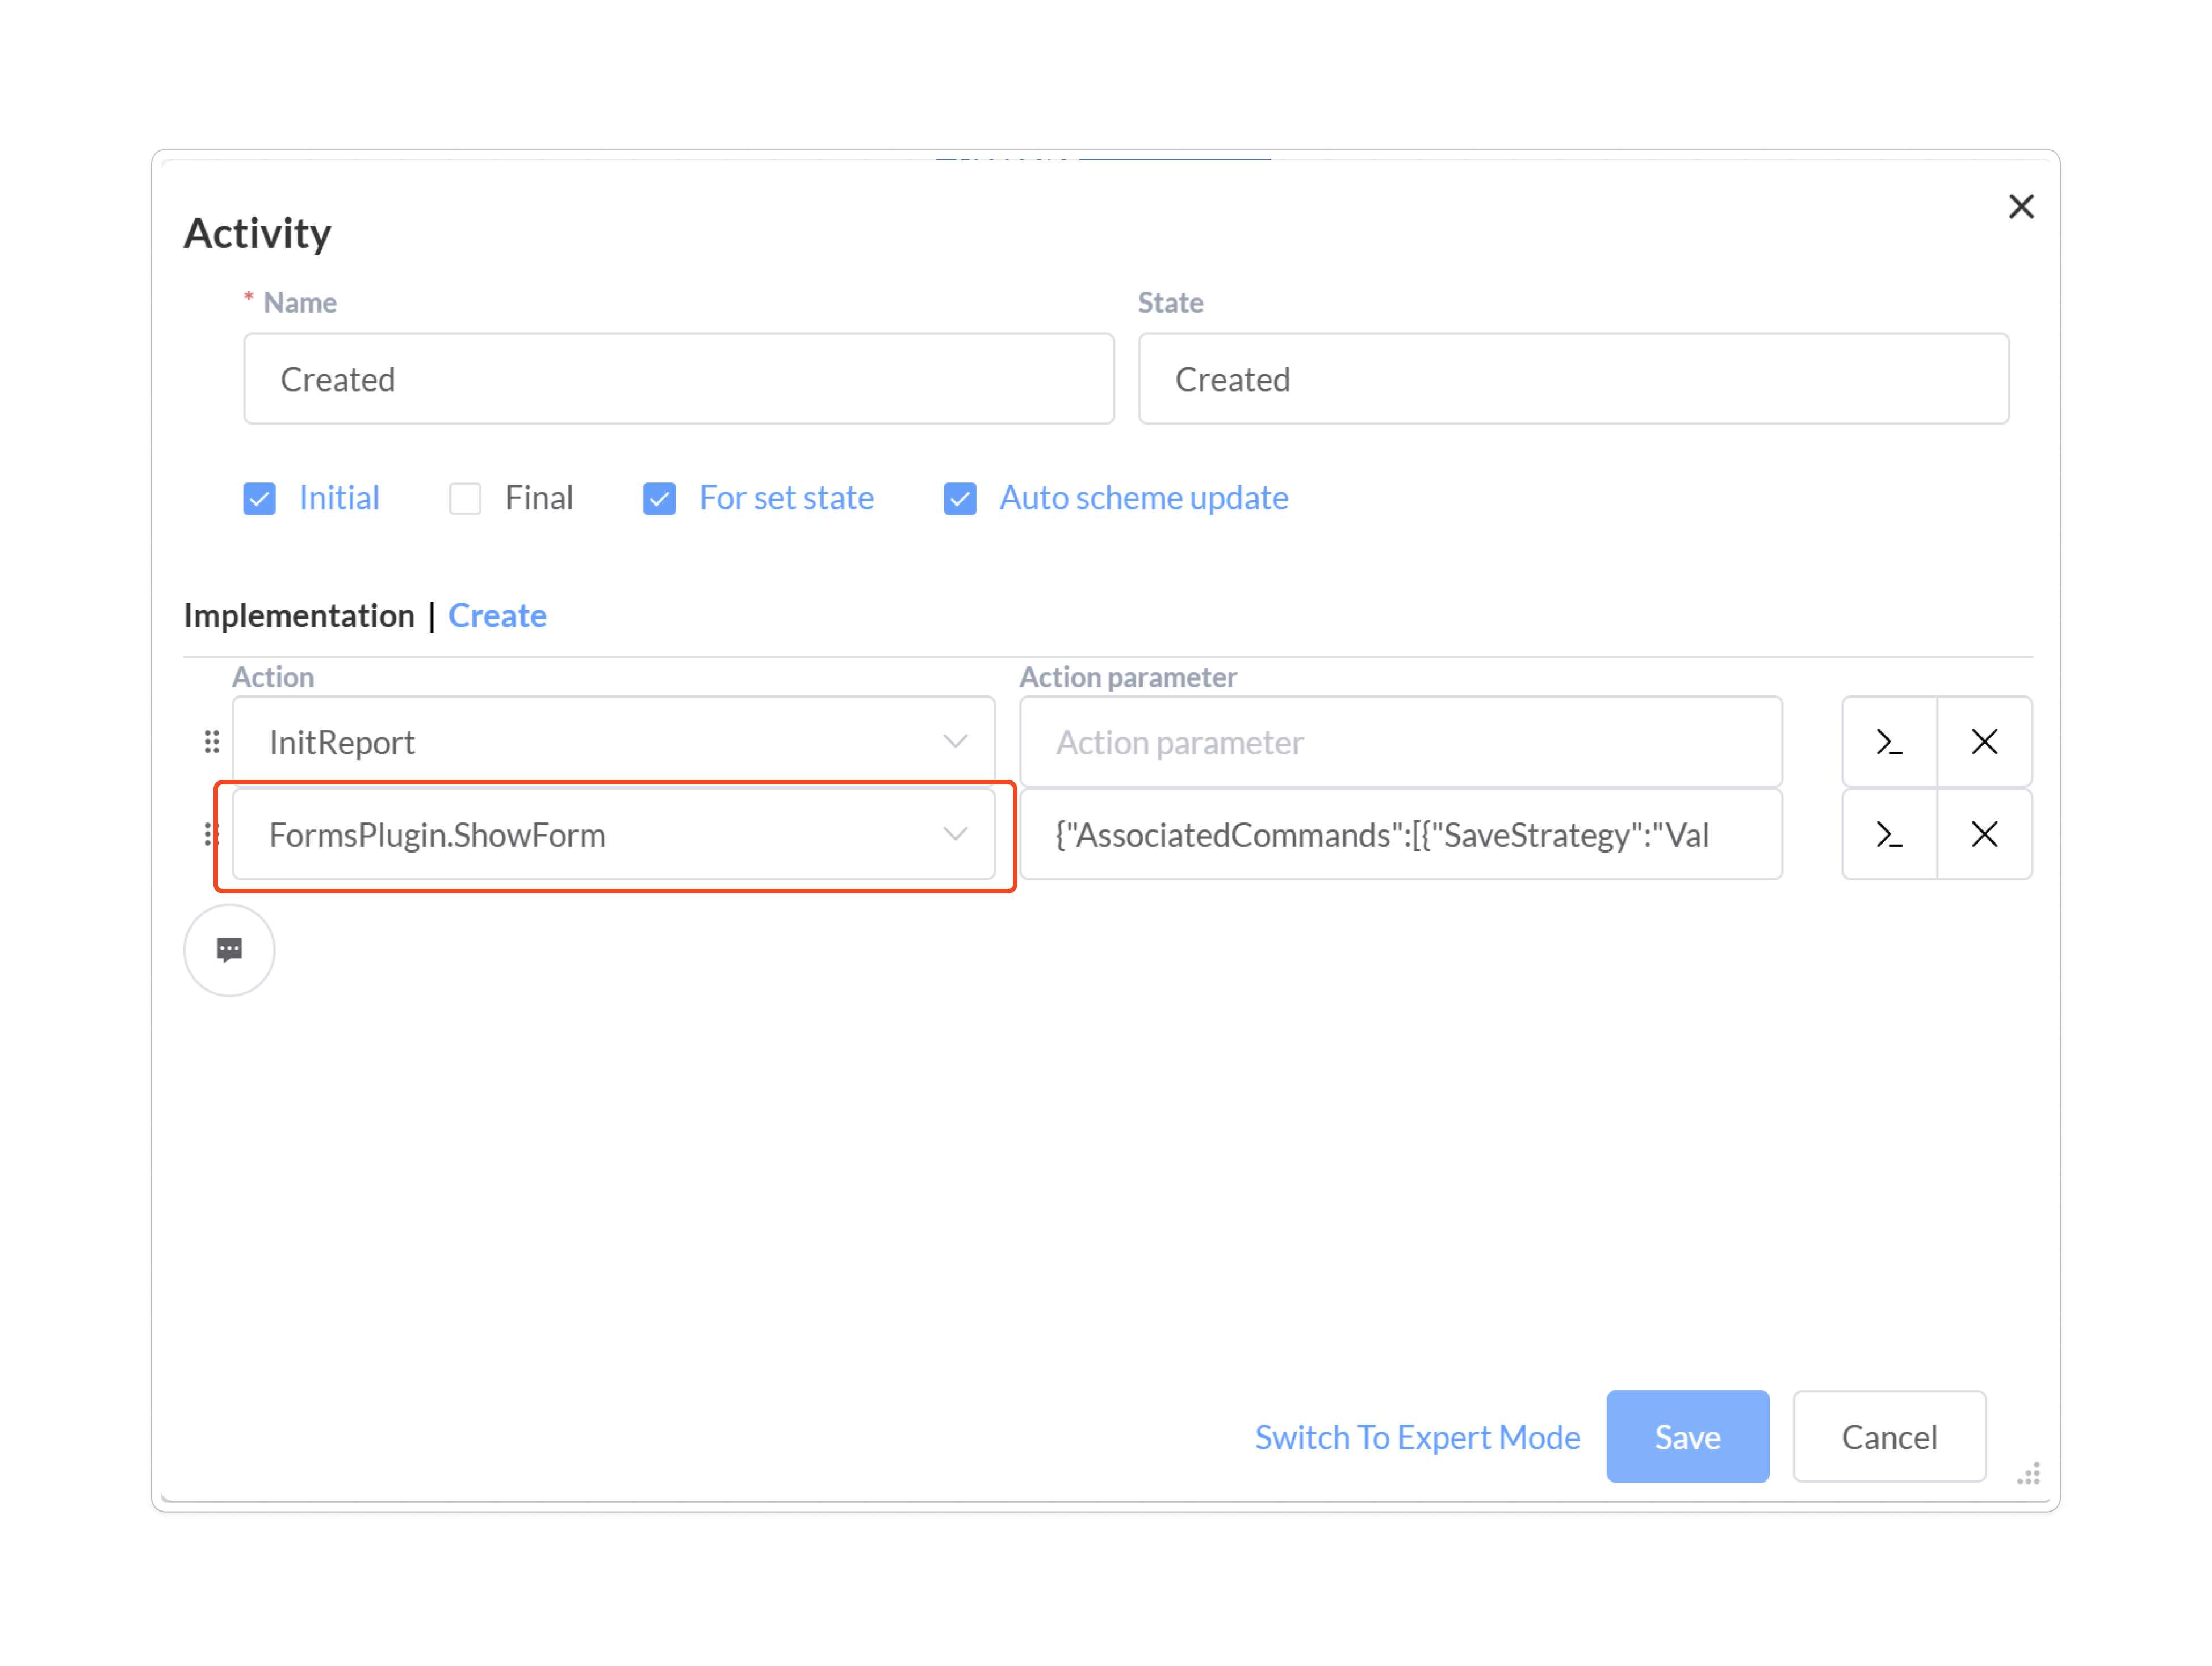
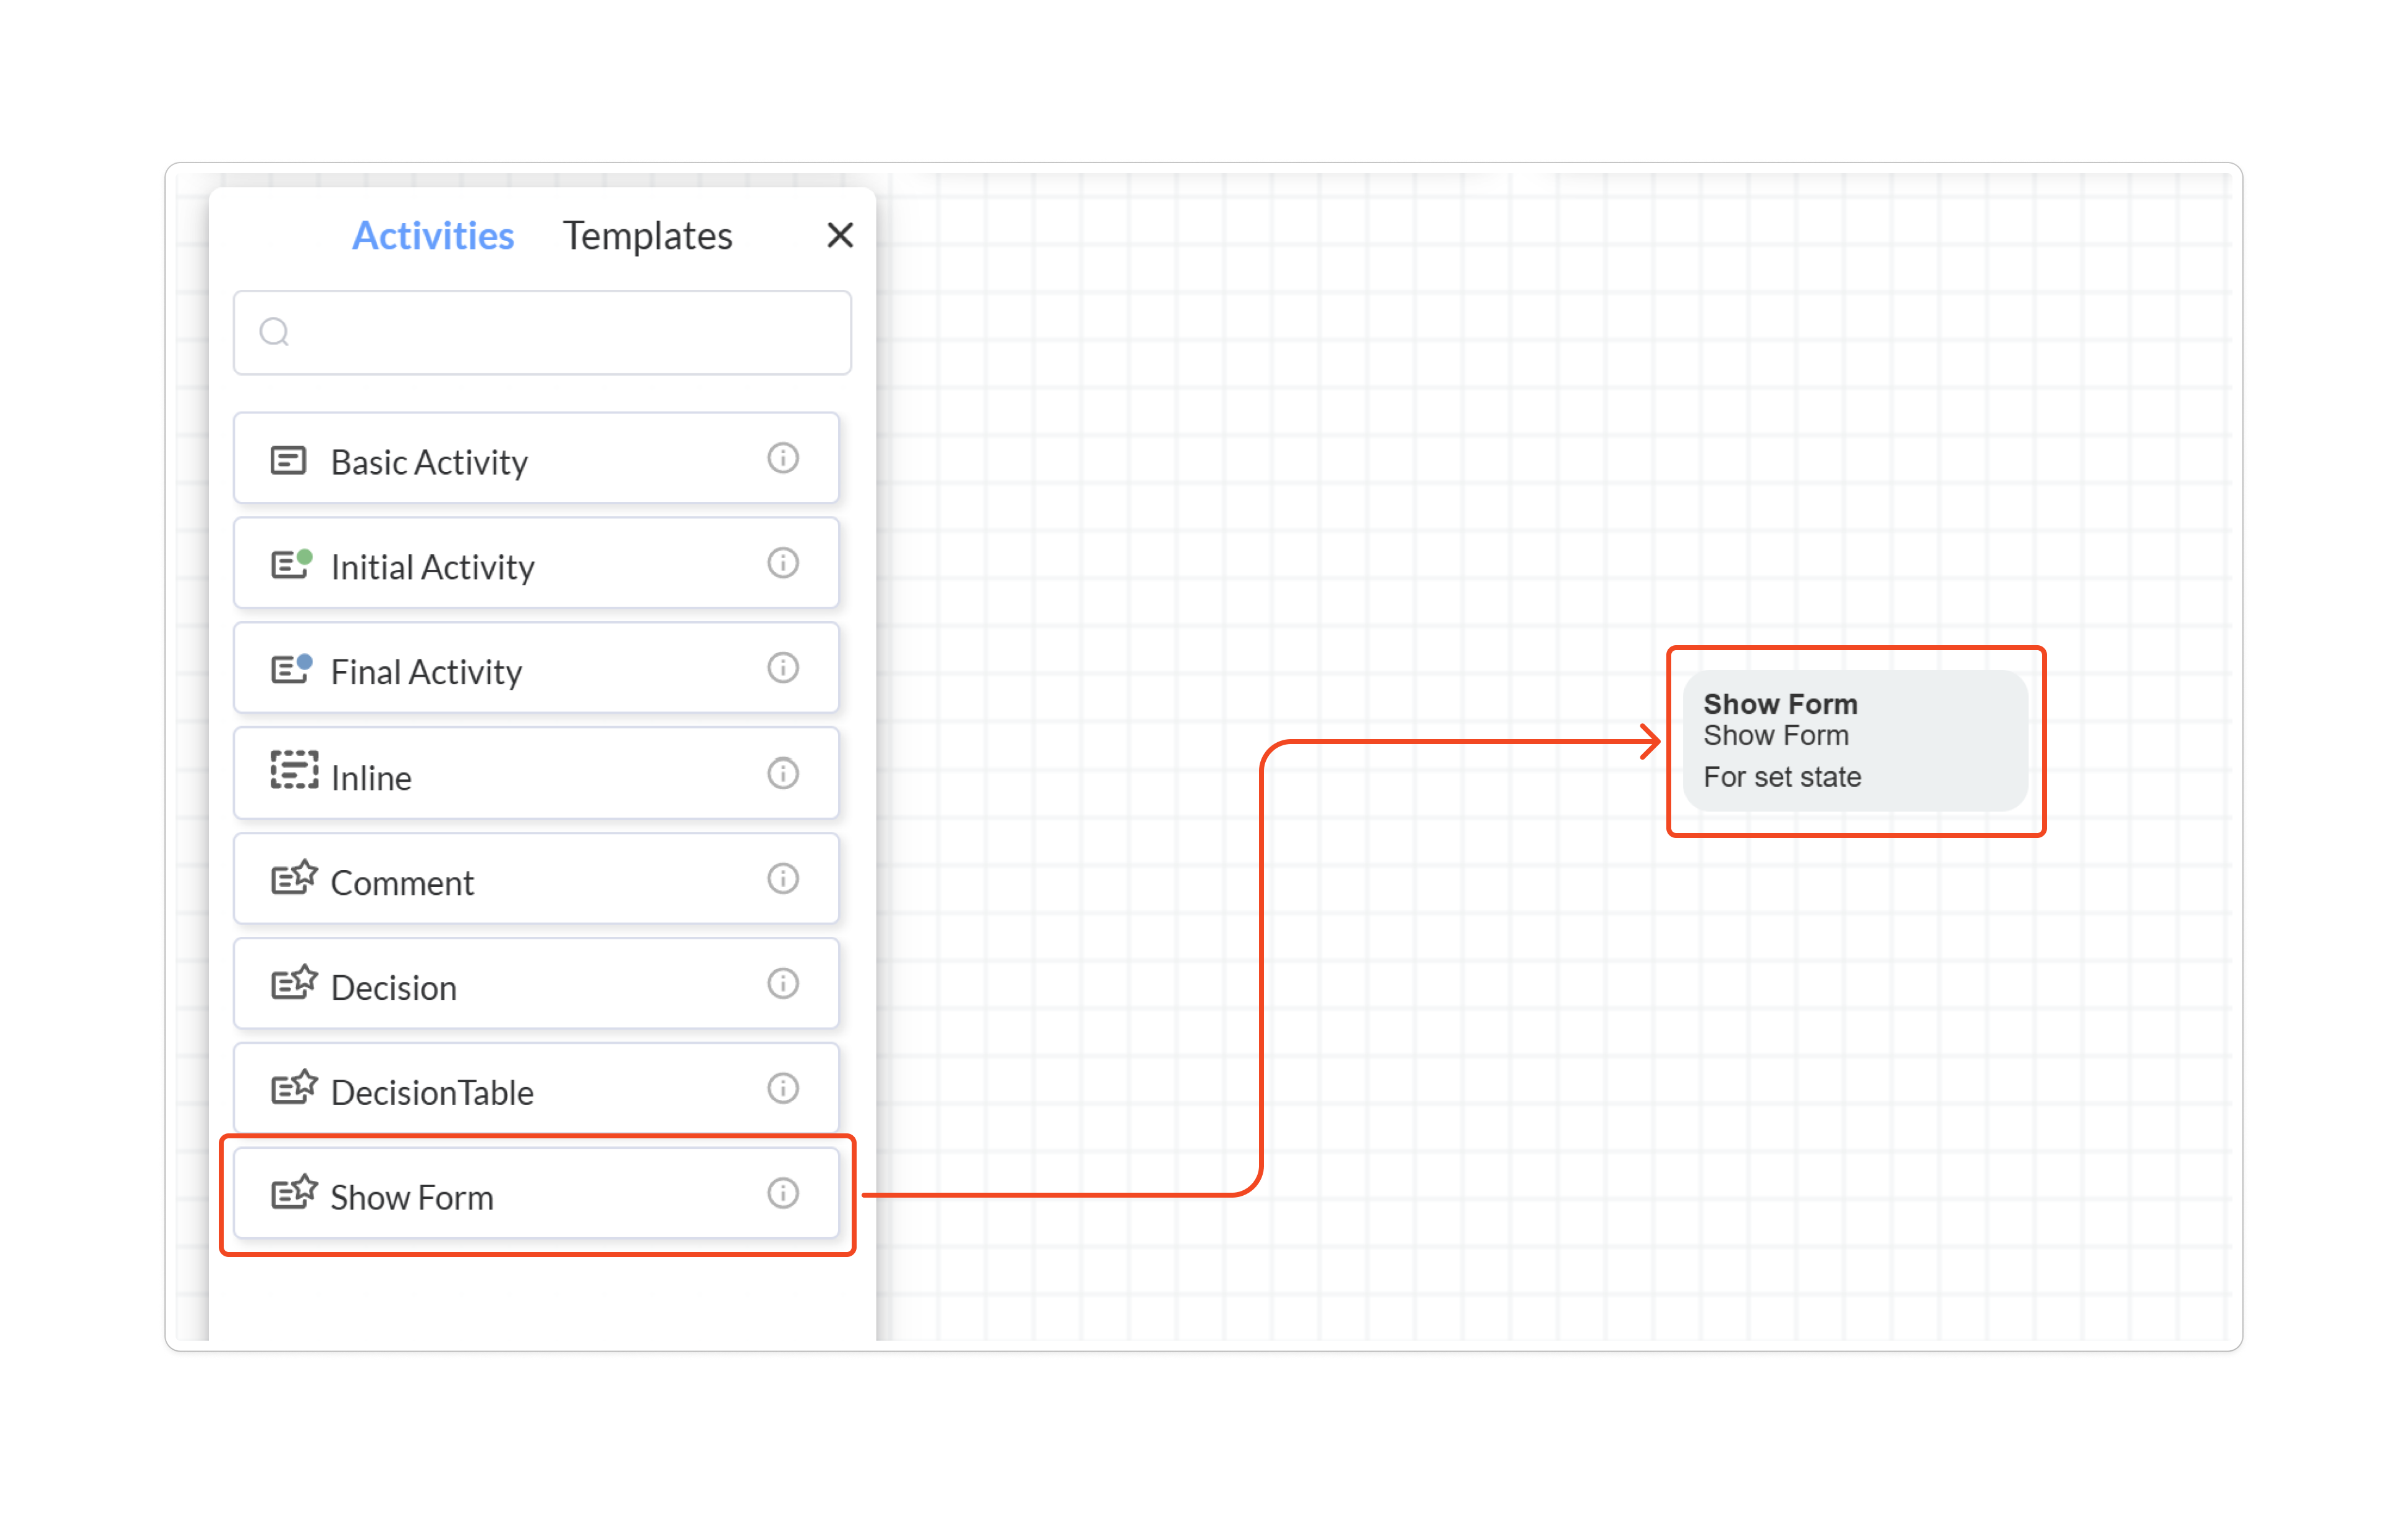
Using Forms in Processes
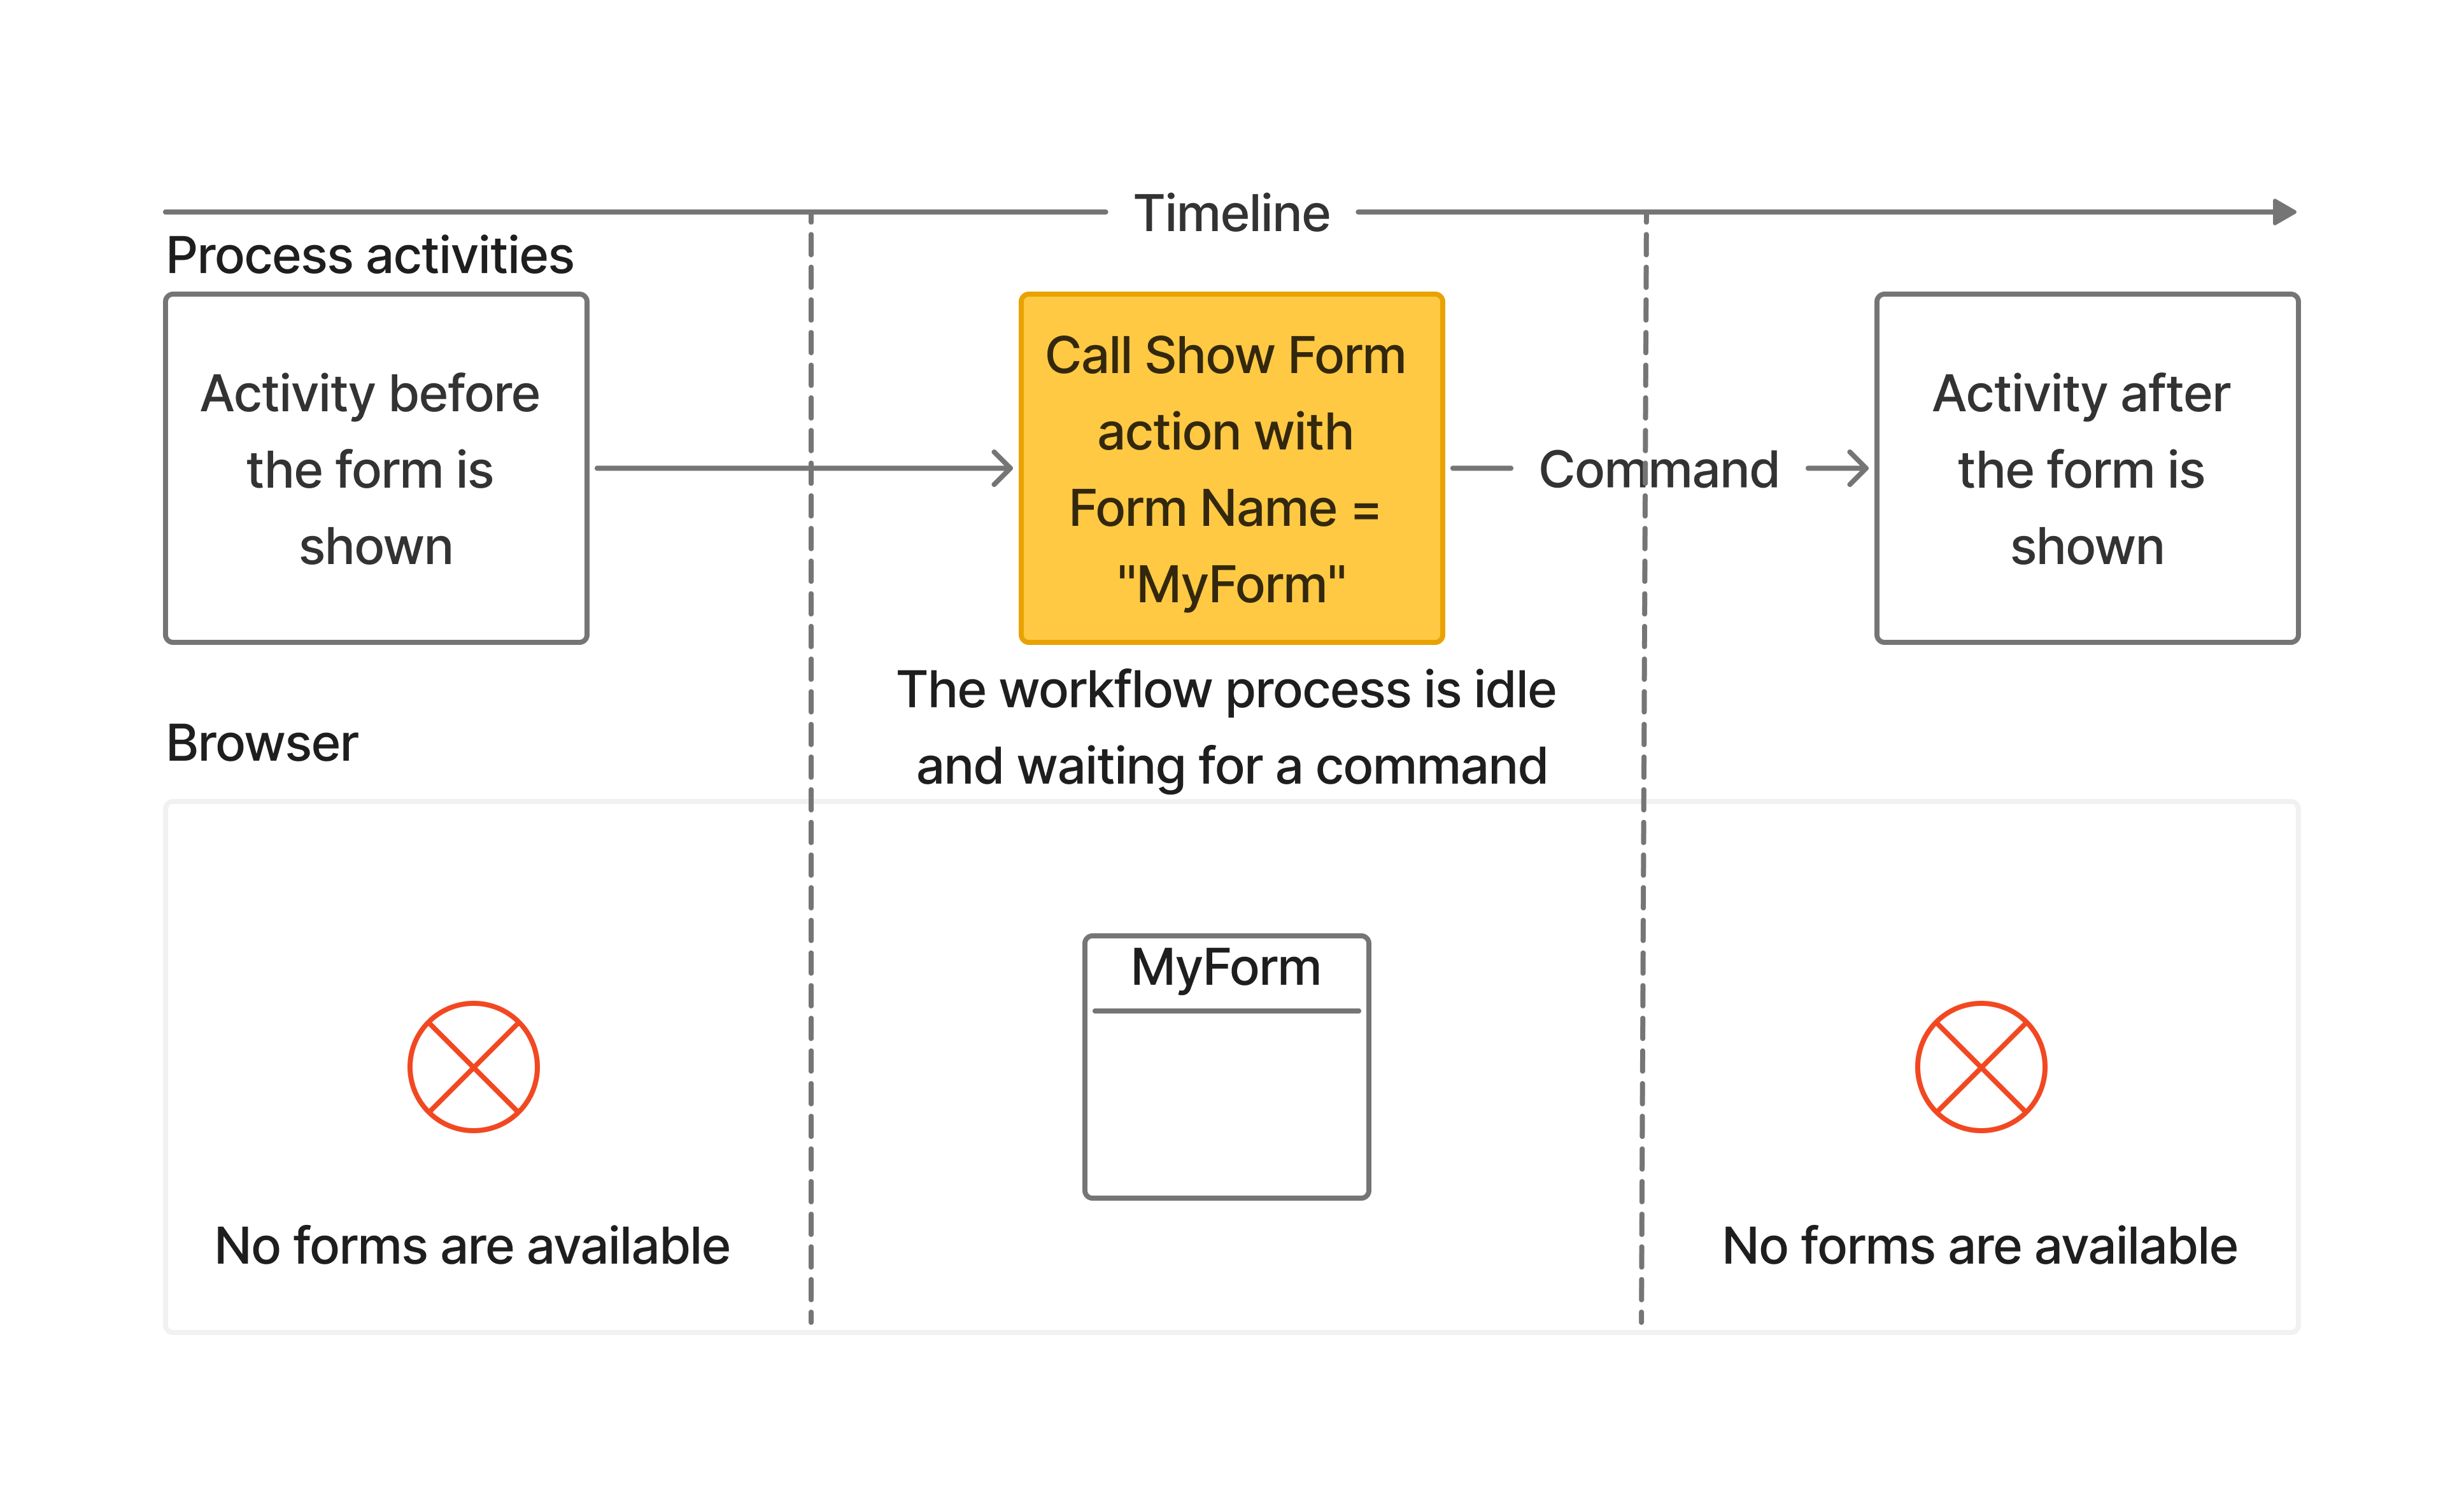
To display a form in your process, either call the FormsPlugin.ShowForm action or use the ShowForm activity and provide their specific settings. A single invocation (one action or one activity) shows only one form. To display two forms at the same time, either configure multiple FormsPlugin.ShowForm actions in sequence within one implementation or use subprocesses. The following rule applies: forms are available only while the process is in the Idled status at the activity where the FormsPlugin.ShowForm action was invoked (or while it is in the ShowForm activity).
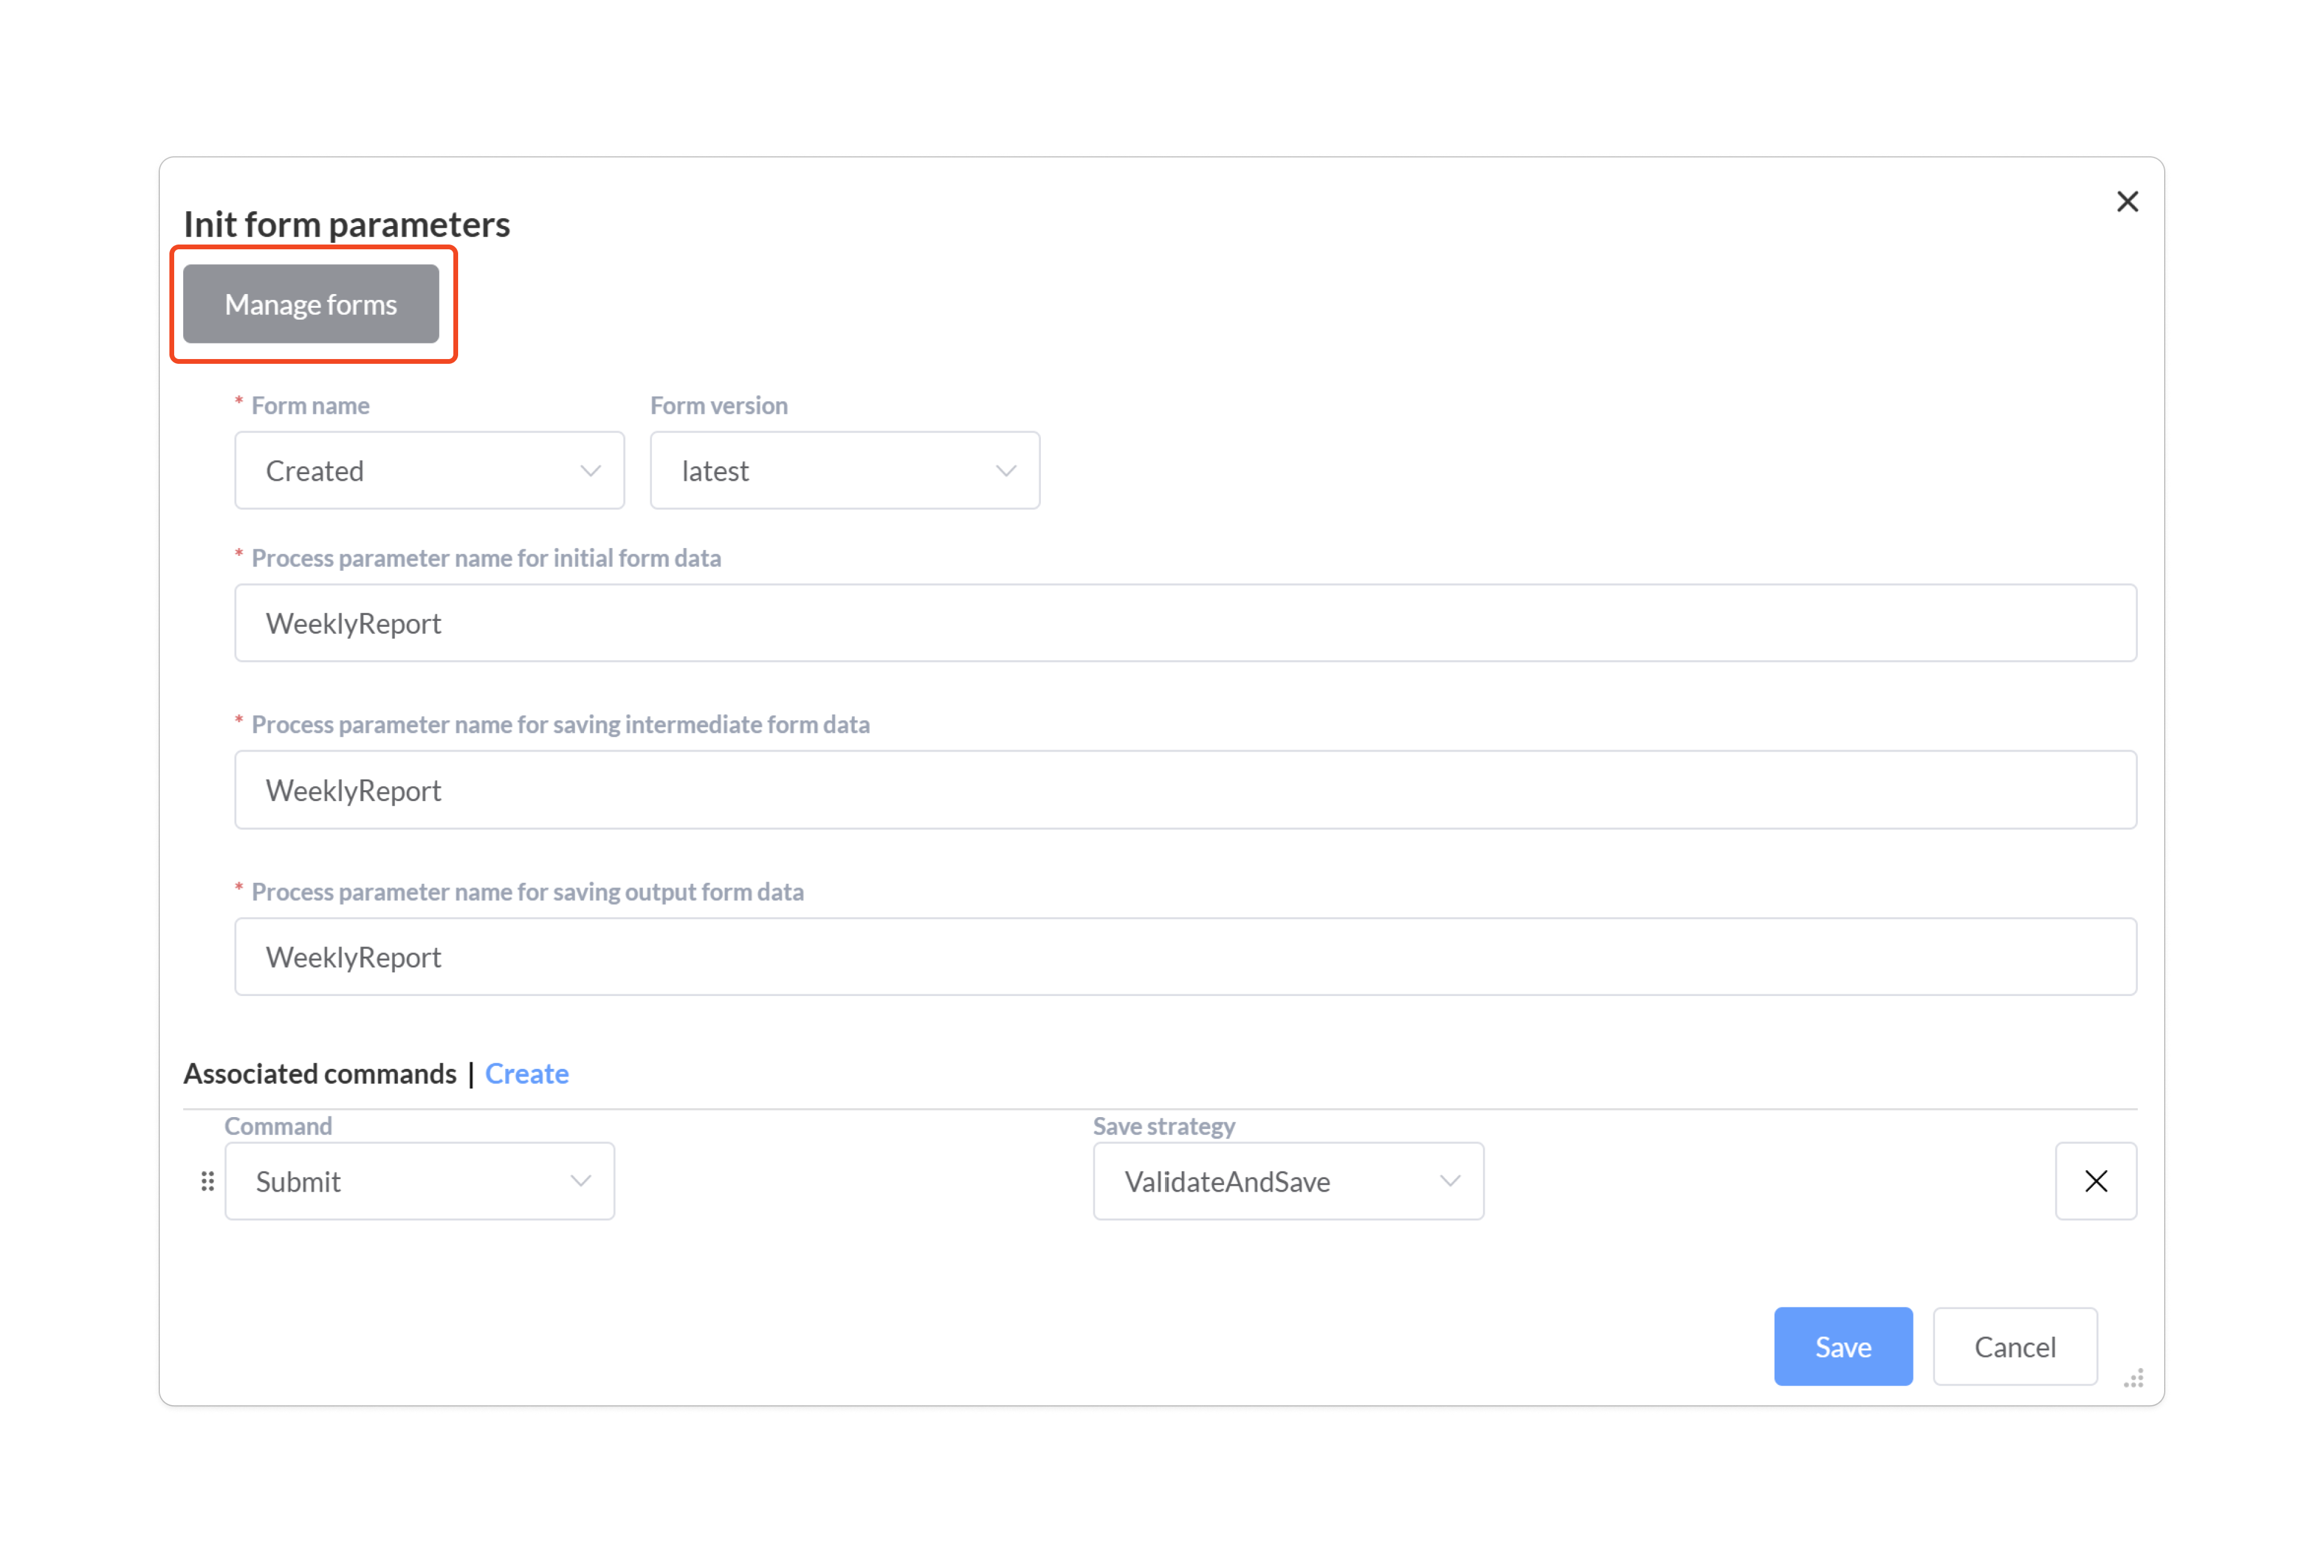
To display a form, you need to specify several settings. We’ll cover them in more detail below.
- Form name and version — specifies which form to show. The default version is always latest, but you can also set an explicit version.
- Process parameters in which the form data is stored.
- Commands executed together with the form. Access to a command is equivalent to access to a form; in other words, if a user has access to a command, all forms that mention this command in this list will be available to them.
- Command name.
- Form save strategy when executing a command. Two options are available: validate the form and, if it’s valid, execute the command and save; or execute the command without saving the form data.
Let’s dive into these settings and the mechanics of displaying and executing forms.
Form Name
For a specific user to see a form in the browser, the following conditions must be met:
- The process must be waiting for a command.
- In the activity where the process is waiting for a command, the FormsPlugin.ShowForm action must be invoked. You can invoke this action multiple times within the same activity; this lets you show multiple forms to one user, different forms to different users, or both.
- The command being awaited must be linked to the form being displayed (see below).
- The command must be available to the user.
If all these conditions are met, the form will be displayed.
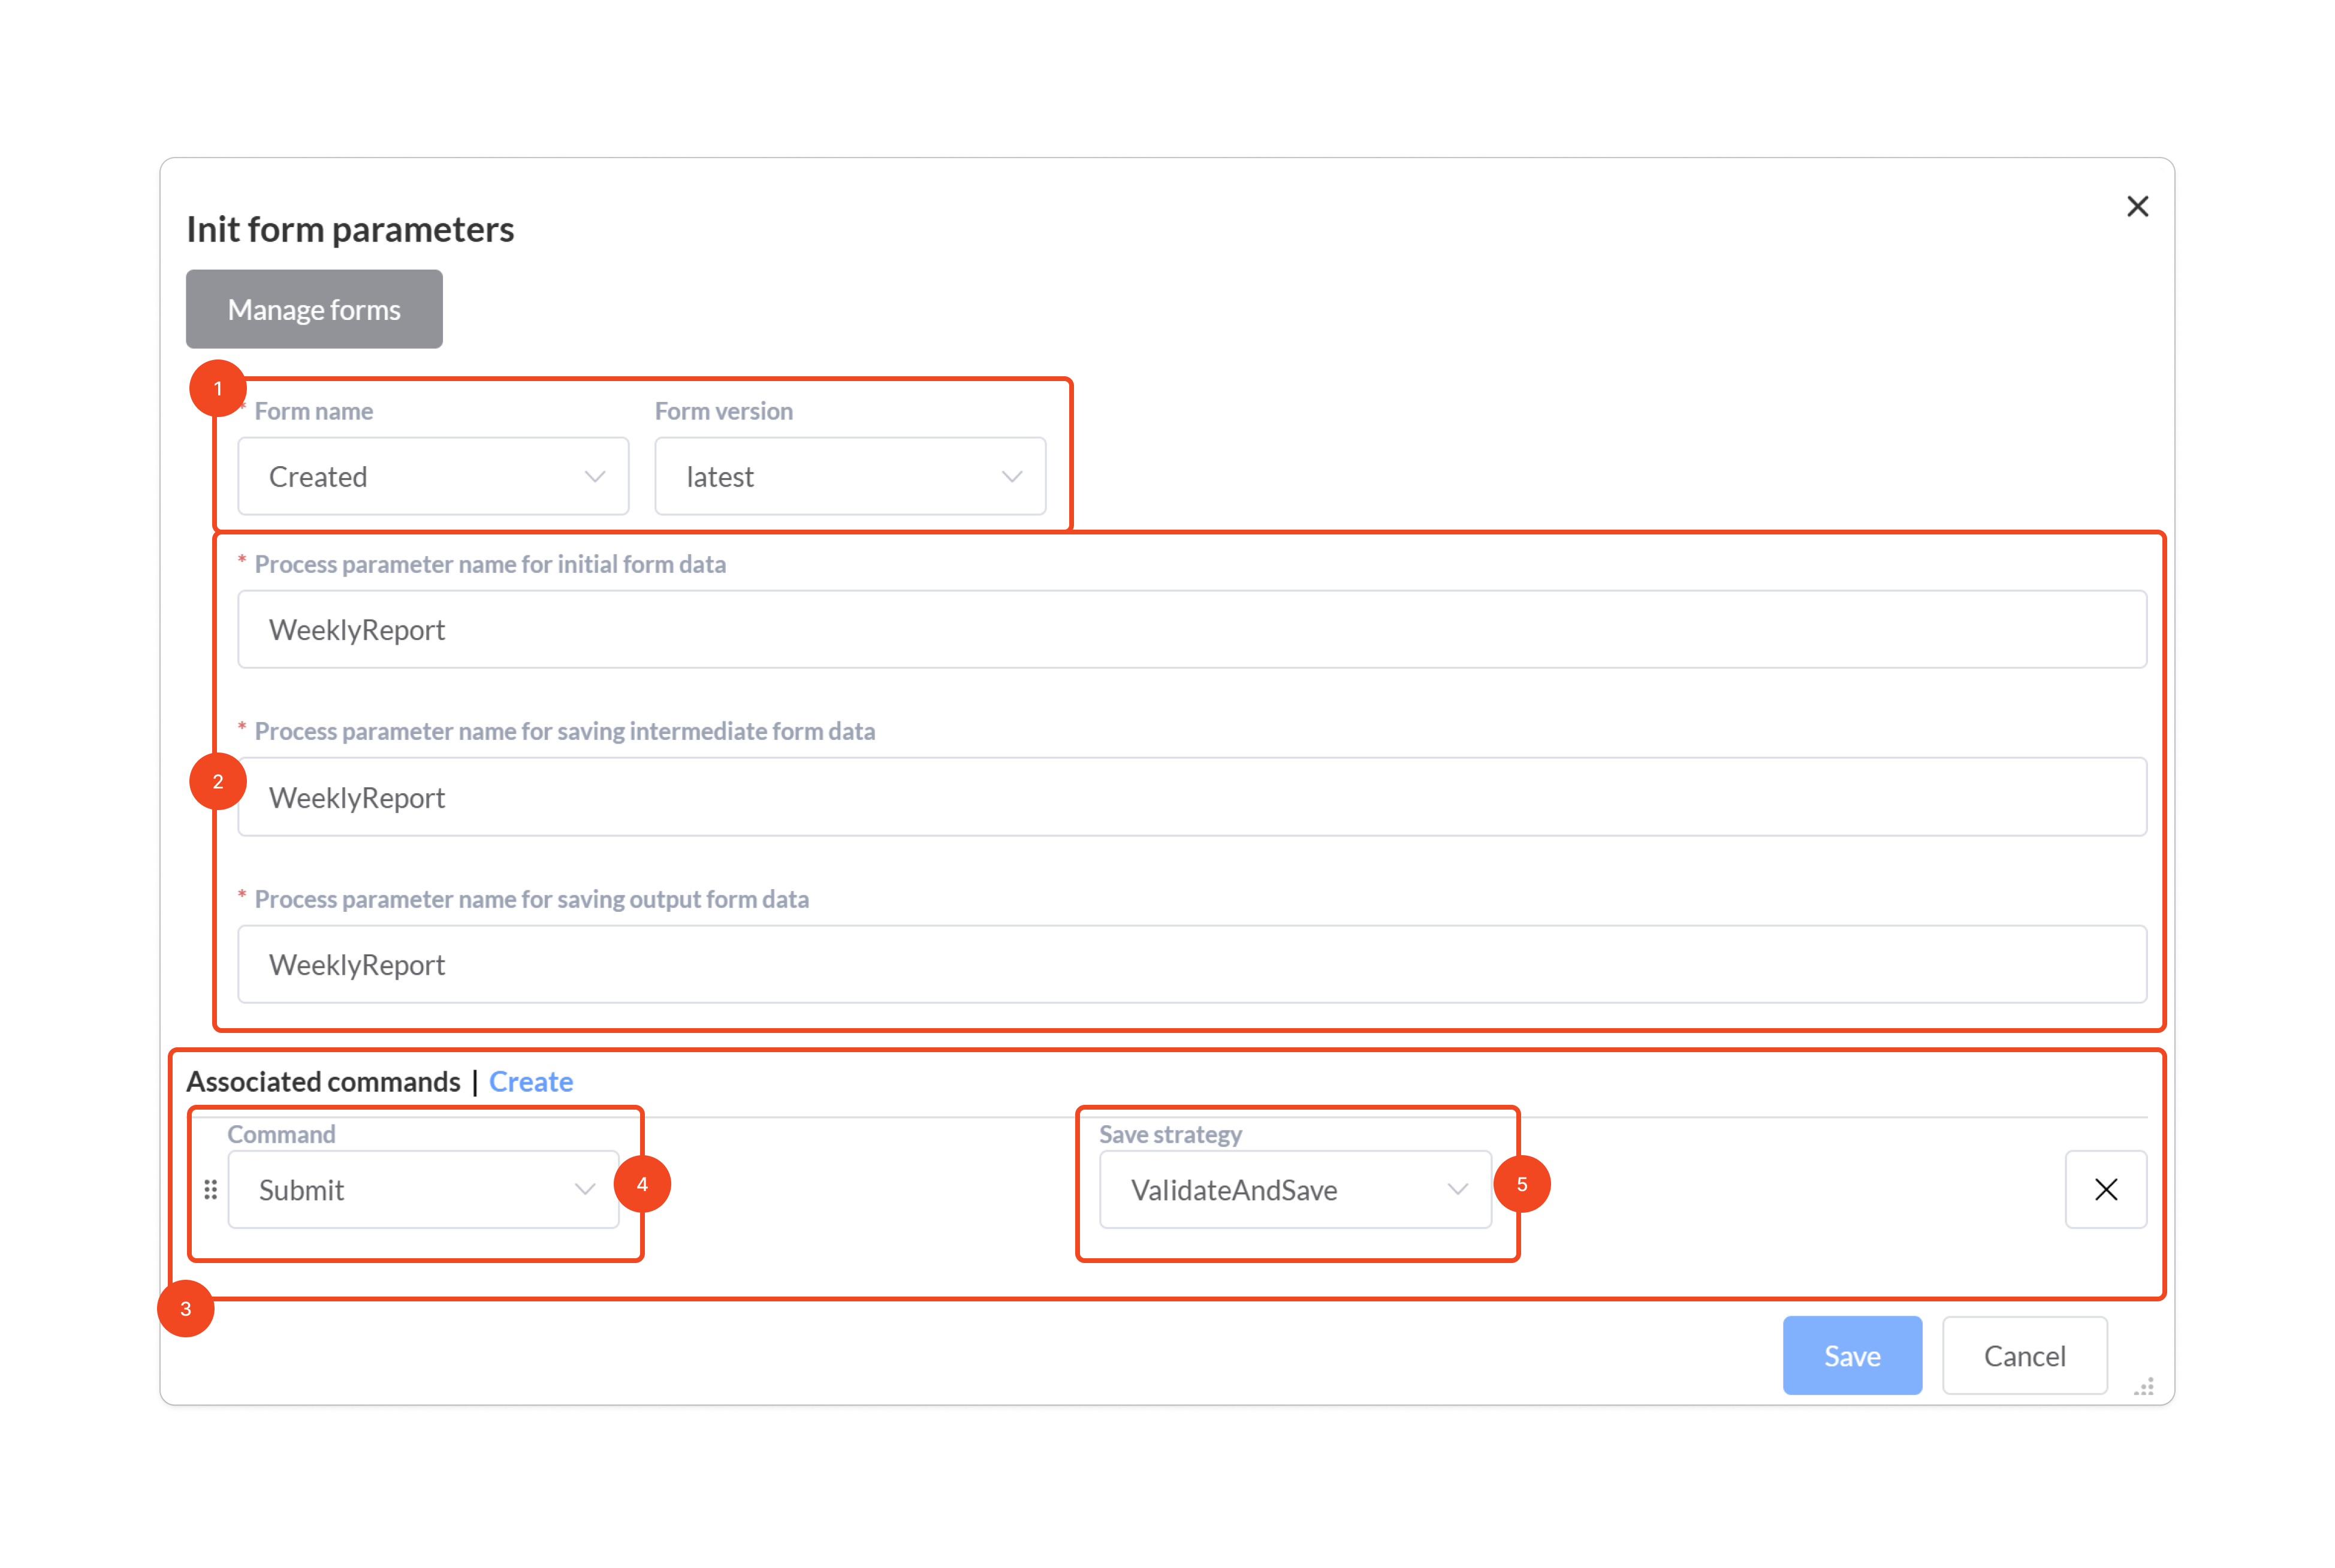
Form Parameters
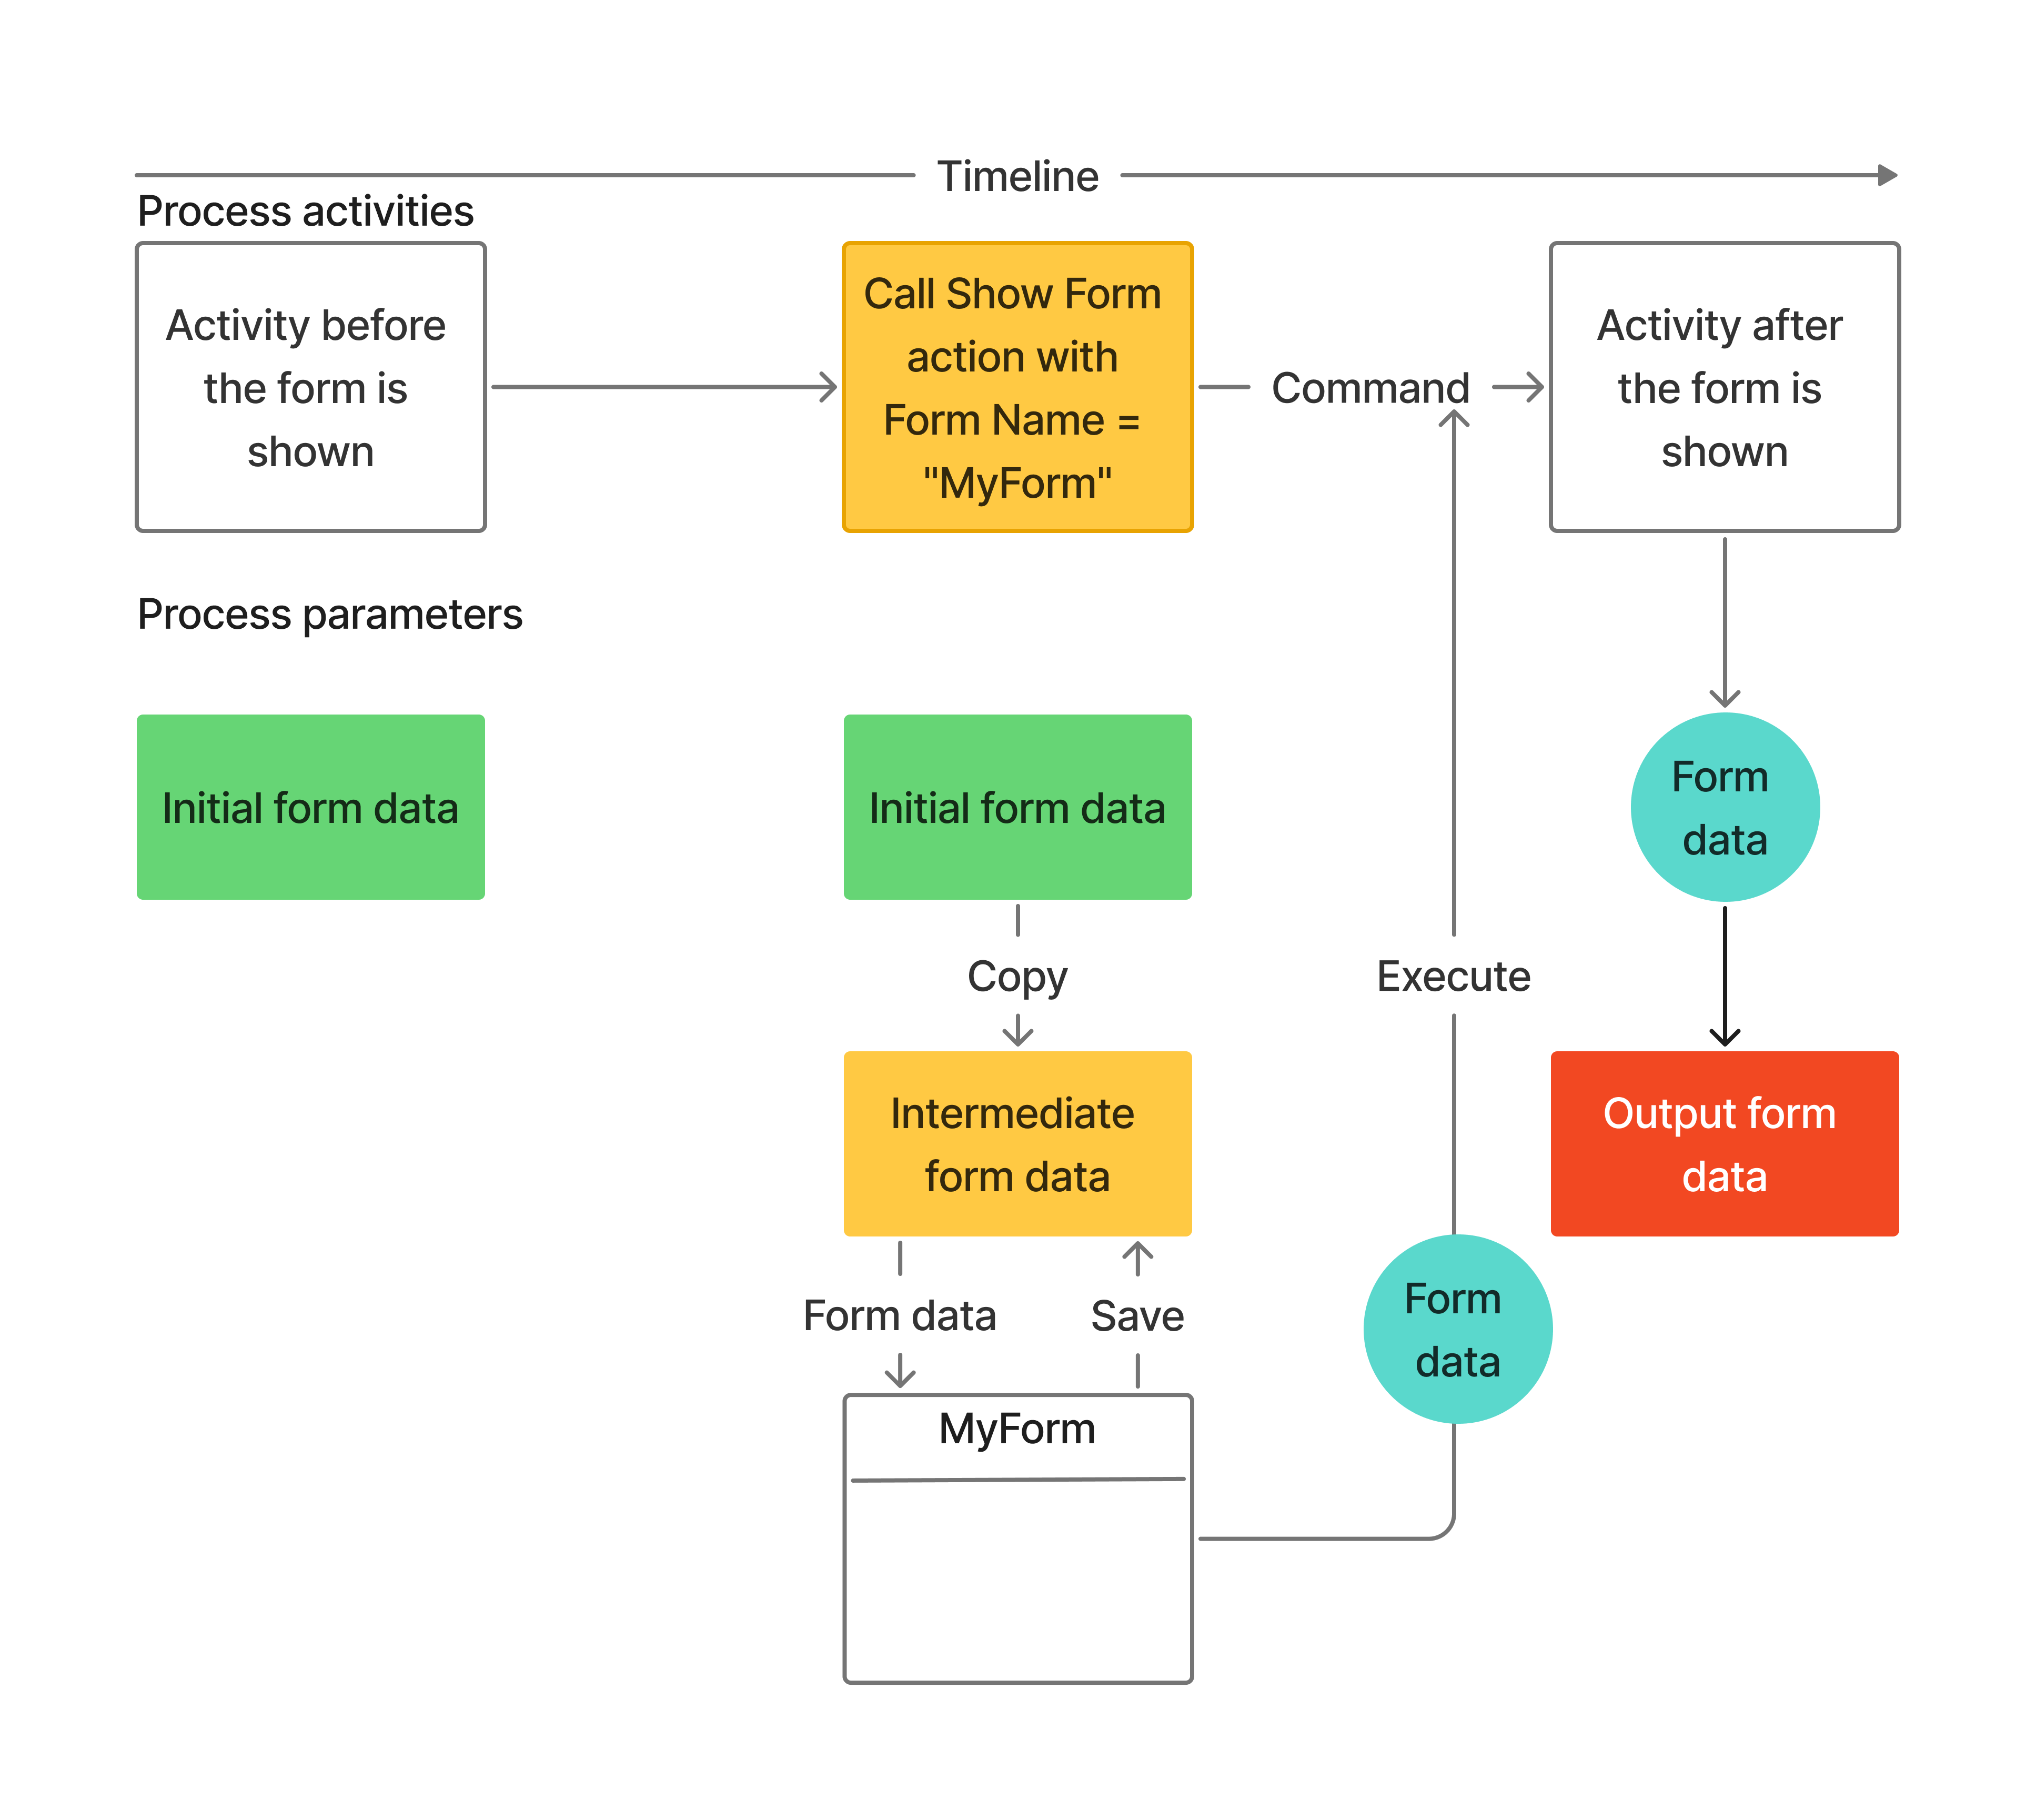
In the form-parameter settings, you need to specify the names of three parameters. They don’t have to be different; they can be the same. Moreover, when they’re the same, that’s the default option.
- Initial form data — the form’s initial data
- Intermediate form data — the form’s intermediate data, where it’s saved when you click Save
- Output form data — where the form data is saved after the command associated with the form has been executed
After the FormsPlugin.ShowForm action is invoked, the value of the Initial form data parameter is copied into Intermediate form data. The form displays exactly the data stored in Intermediate form data, and the Save button also writes to it. If we execute the command associated with the form, then the form data (provided the command succeeds) is saved to the Output form data parameter. Note again that by default all three parameters are the same, so everything can be handled with a single parameter.
Linking a Form to Commands
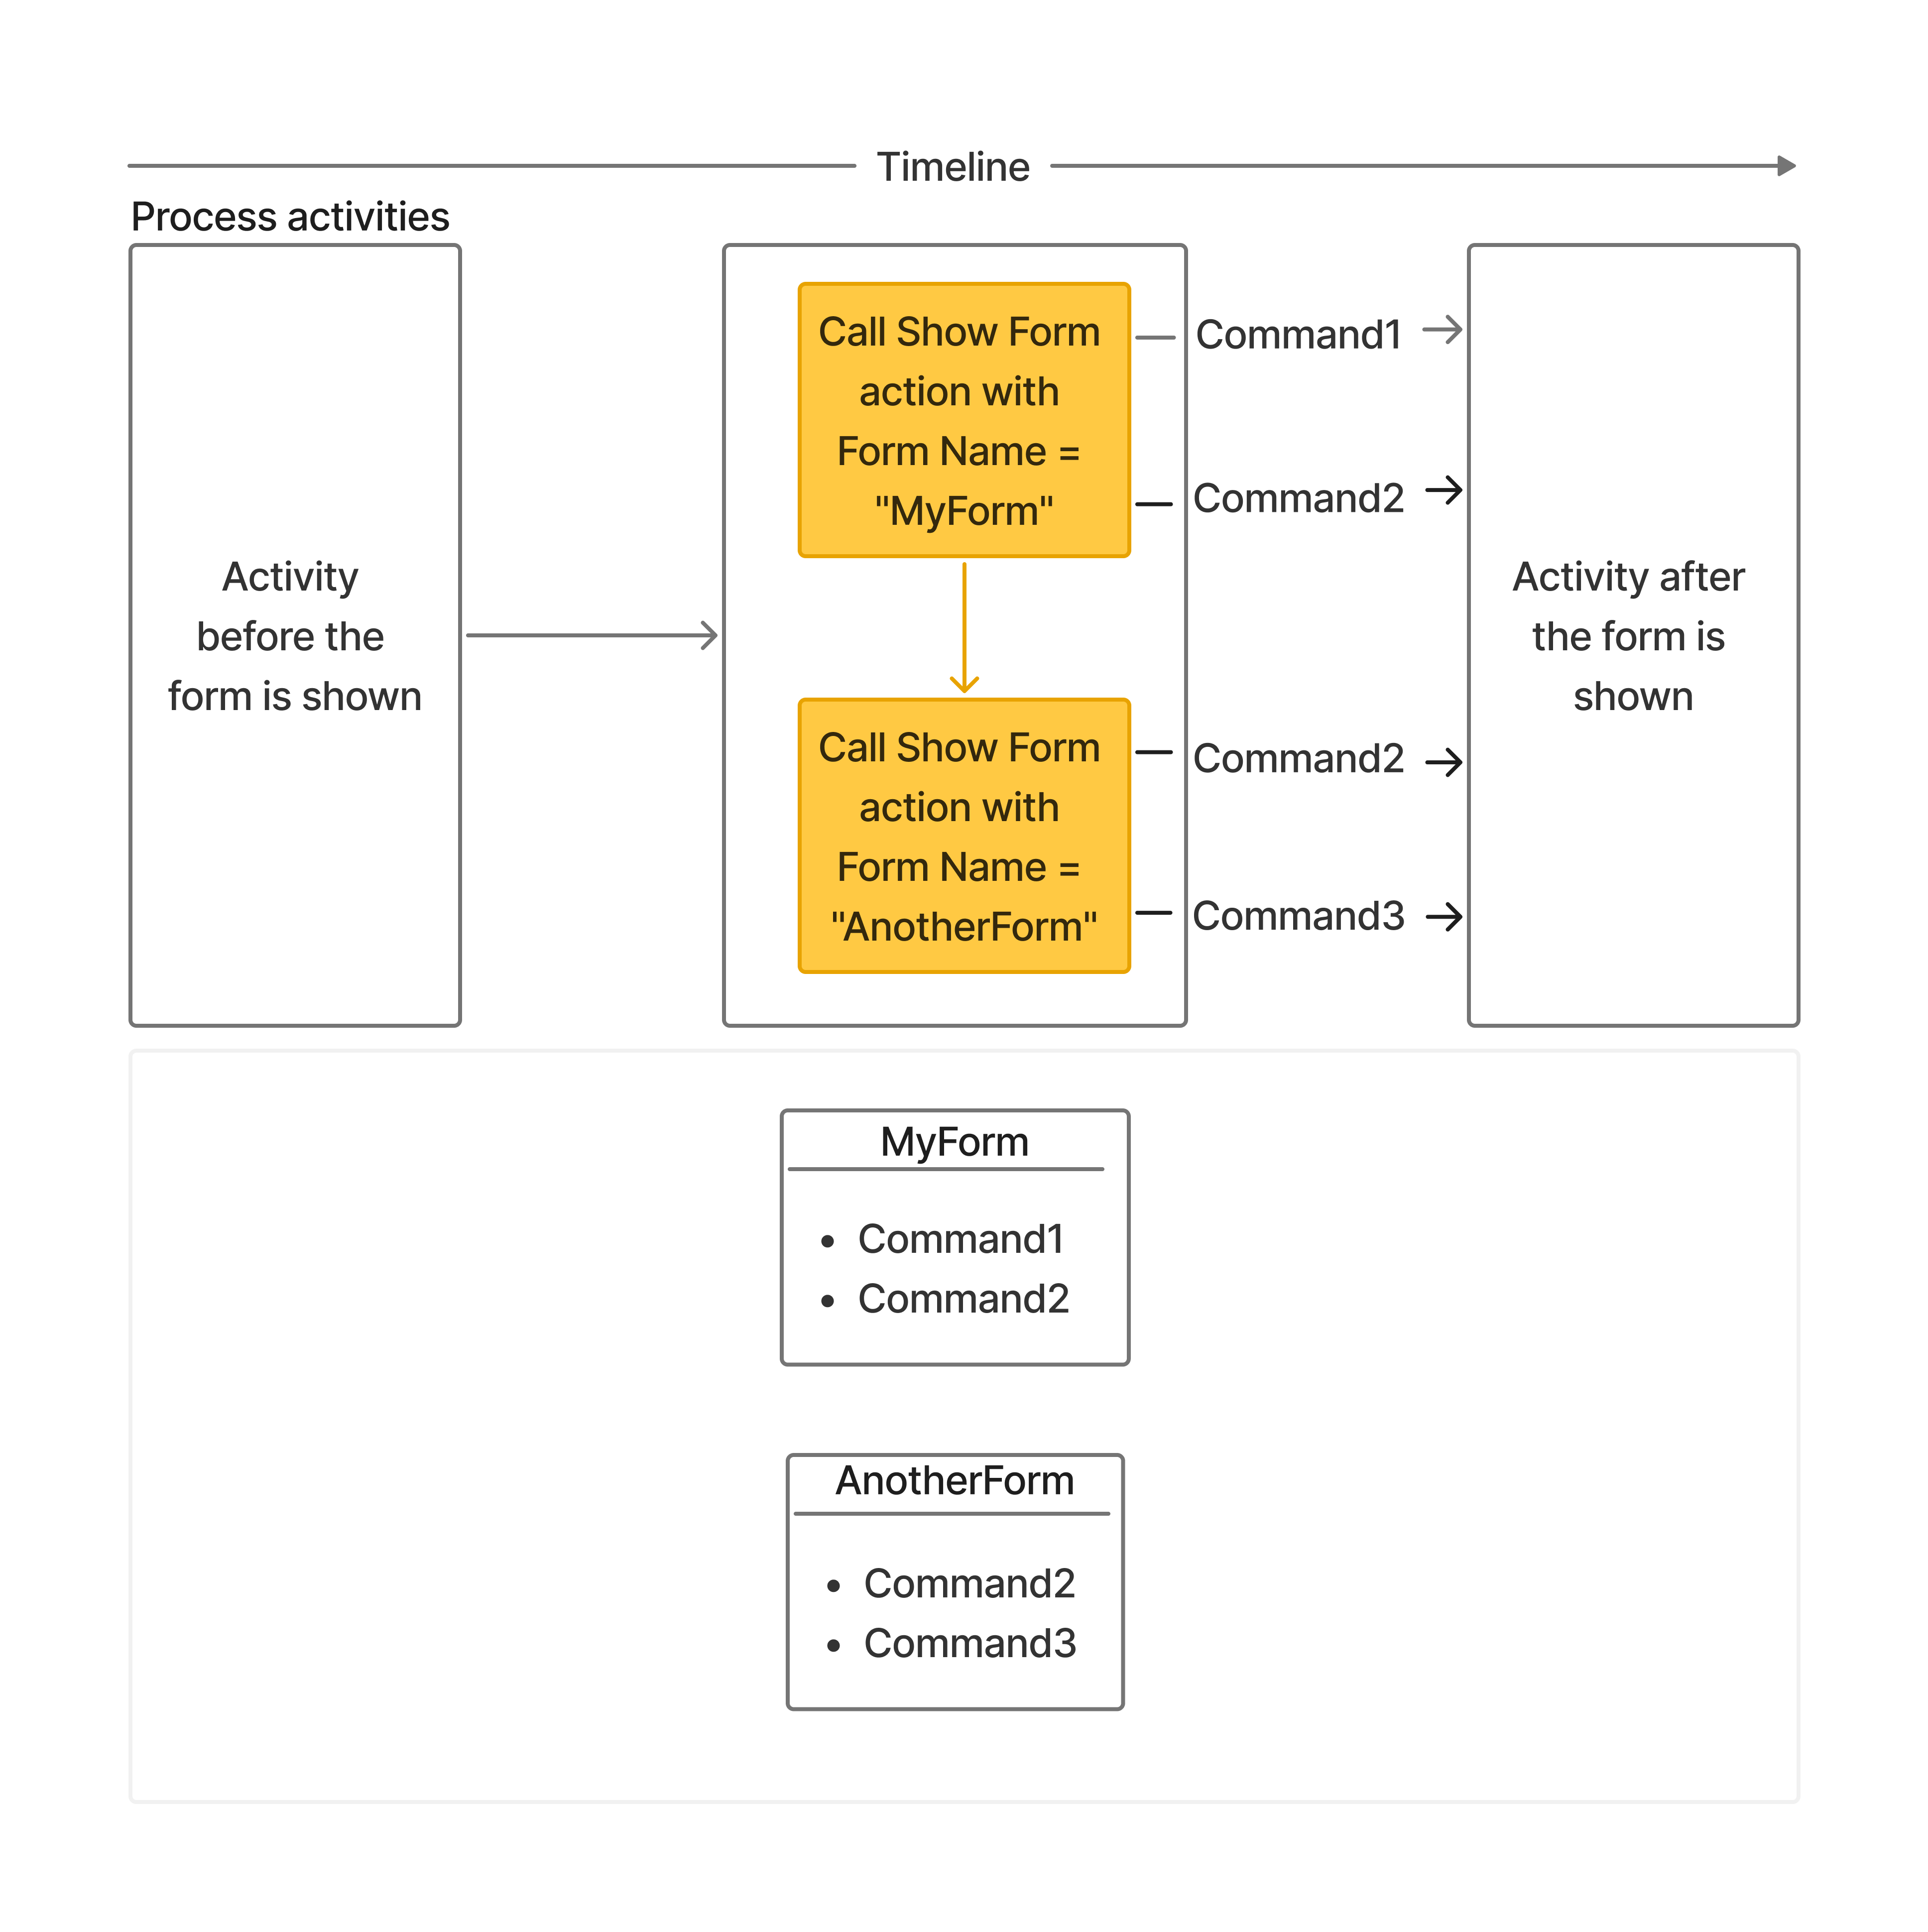
Access to forms is defined via commands, and any commands associated with a form will be available on that form. In the example below, by invoking FormsPlugin.ShowForm twice, you can show the user two forms with different commands.
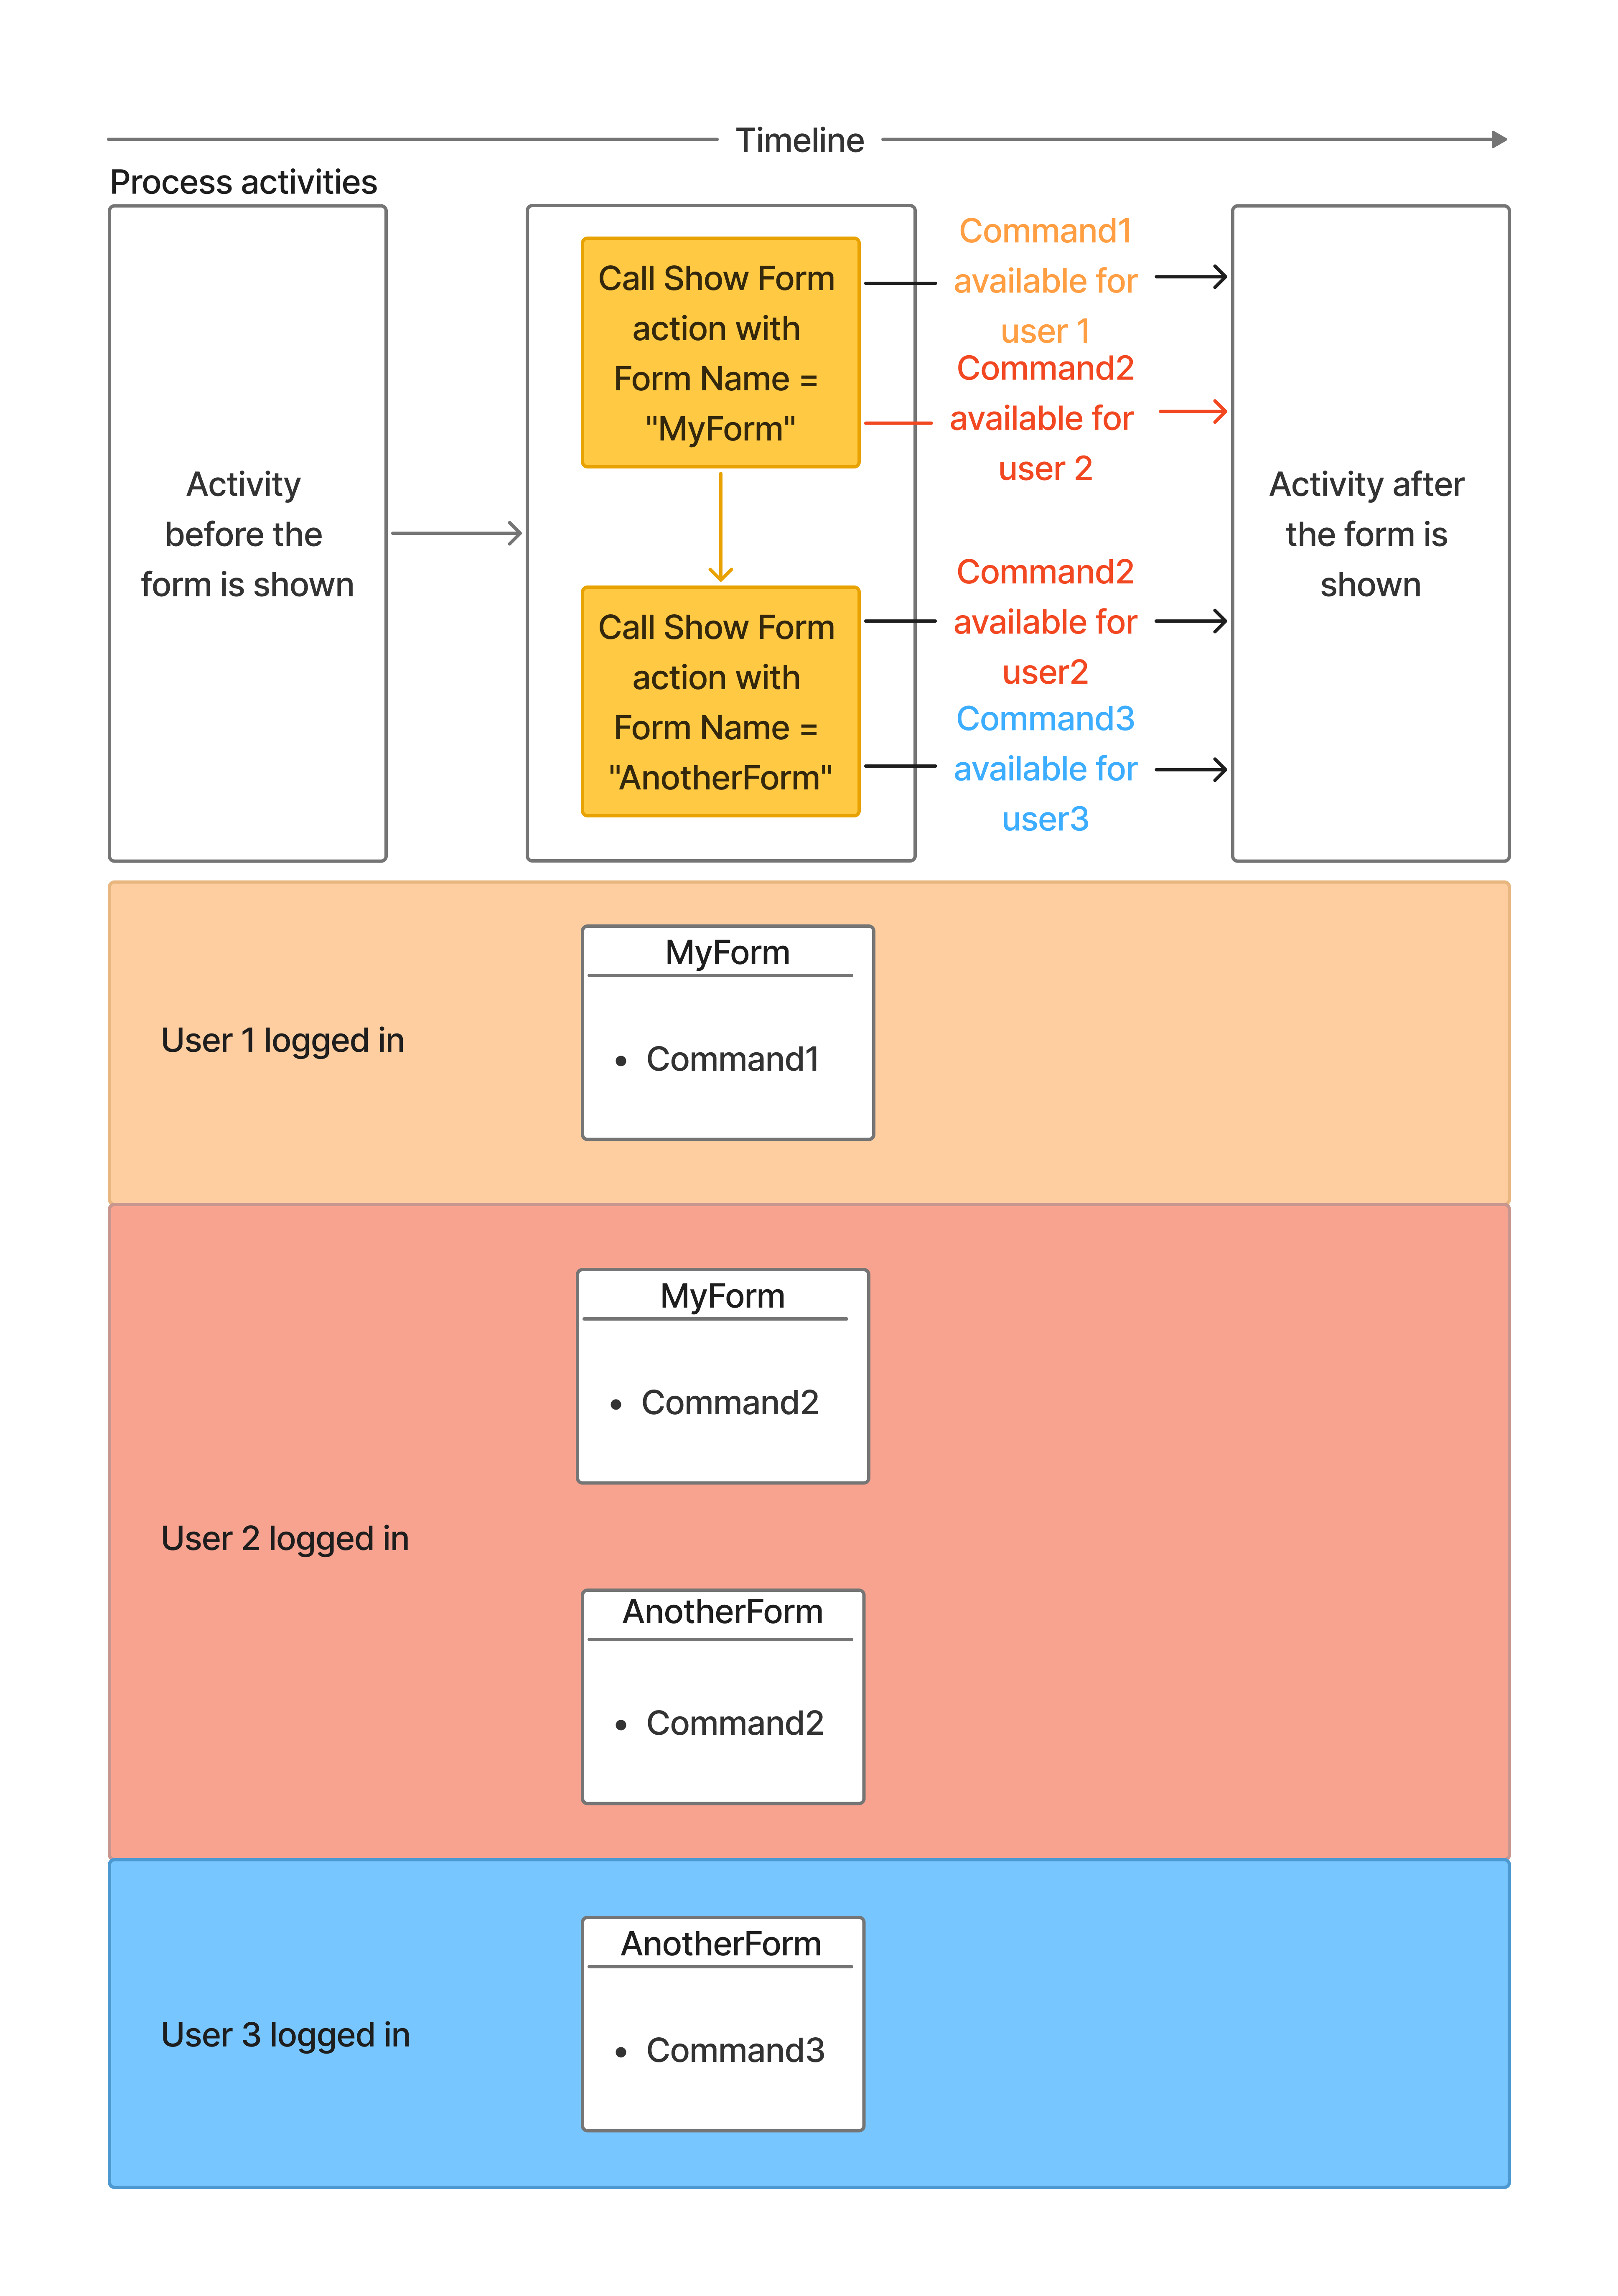
User access to forms is configured through restrictions associated with command transitions. The rule is simple: if a user has access to at least one command linked to a form, the form is available to them. If the user has access to none of the commands linked to the form, the entire form is unavailable. The example below shows which set of forms each of the three users will see.
Binding Form Data to Form Fields
The server returns form data as JSON. This JSON may contain both simple properties and nested objects. The binding rule is straightforward: a form field’s key must exactly match the corresponding property name in the returned data object, including a case (case-sensitive).
"formData": {
"id": "888adc2d-6670-4fd5-be48-940d5b267c40",
"submittedBy": "Paula",
...
},

Server-Side Form Validation
In the Forms Plugin settings, you can specify a server-side form validator.
var formsPluginSettings = new FormsPluginSettings
    {
        FormsManagerUrl = configuration.Workflow.FormsManagerUrl,
        FormValidator = new ServerSideFormValidator()
    };
Here’s what such a validator might look like.
public class ServerSideFormValidator : IFormValidator
{
    public async Task<FormValidationResult> ValidateSaveAsync(FormKey formKey, DynamicParameter formValue, CancellationToken token = default)
    {
        return await ValidateFormAsync(formKey, formValue, token);
    }

    public async Task<FormValidationResult> ValidateExecuteAsync(FormKey formKey, WorkflowCommand command, DynamicParameter formValue,
        CancellationToken token = default)
    {
        return await ValidateFormAsync(formKey, formValue, token);
    }

    private Task<FormValidationResult> ValidateFormAsync(FormKey formKey, DynamicParameter formValue, CancellationToken token = default)
    {
        FormData typedFormData = formValue.ConvertTo<FormData>();
        Dictionary<string, object?> errors = new();

        //Validation and error population

        if (errors.Any())
        {
            return Task.FromResult(new FormValidationResult { IsValid = false, Errors = errors.ToImmutableDictionary() });
        }

        return Task.FromResult(FormValidationResult.Valid);
    }
}
Using this validator, you can:
- Write different validation logic for different forms. Use formKey.FormName to get the form name.
- Write different validation logic for saving vs. executing a form. Put the logic in ValidateSaveAsync for save validation and in ValidateExecuteAsync for execution validation. If you need different logic per command, you can get the command name from command.CommandName.
It’s important to remember that the same rule used for data binding is used for error binding. The key of the form field must case-sensitively match the property name in the returned error object.
Forms and Subprocesses
Forms can be used together with subprocesses. For example, you can create a form within a subprocess that is available at any point in the main process’s lifetime. For a deeper dive, study the sample project, which is examined in detail in the next section.